1
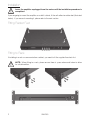
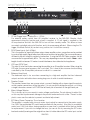
0>( owners manual
ENGLISH
Contents
Contents
1
Introduction
1
Installation
2
Fitting Rubber Feet
2
Fitting to Rack
2
Initial Set Up
3
Set Up
3
Amp Panel & Controls
4
Specifications
6
Trouble Shooting
7
Owner Information
7
Introduction
Thank you for your purchase of the IWA-250 subwoofer amplifier, which has been designed and
constructed using quality systems and materials to provide years of enjoyment, reliability and pride
of ownership.
Music is and should be a natural enhancement of life. It stimulates the imagination, changes your
mood, helps you relax, and provides endless hours of entertainment. At Monitor Audio we pride
ourselves in attempting to make the listening experience as close as possible to the original ‘music’
production.
Please read through this manual to familiarise yourself with any safety advice and how to set up
your subwoofer amplifier to achieve the very best listening experience.
Please retain this manual for future reference.
monitoraudio.com
1
Installation
Leave the amplifier unplugged from the mains until the installation procedure is
completed.
If you are going to mount the amplifier on a shelf/ cabinet, fit the self adhesive rubber feet (illustrated
below). If you are rack mounting it, please refer to the next section.
Fitting Rubber Feet
Fitting to Rack
If installing in a rack or communications cabinet, you need to fit the supplied brackets first.
NOTE: When fitting to a rack, please ensure there is space above and below to allow
for suitable airflow.
2
IWA-250
The optimal control settings will depend entirely on your system configuration, room environment
and personal tastes. However, for initial trials set the controls as follows:
Volume Control
Should be set to approximately 10 o’clock.
Frequency Control
Should be set to the approximate frequency depending on
main speakers when using the L & R Line Level Inputs.
EQ
Should be set to Movies when connecting to an AV receiver
or Music when connecting to a stereo amplifier.
Cabinet
Should be set depending on whether or not you are using the
Monitor Audio back box or not.
Phase Control
Should be set to zero degrees.
Mode Switch
Should be set to ‘on’.
12v Trigger (optional)
Do not connect at this stage.
Input
Connections from the amplifier can be made at this stage
before the power is connected to the subwoofer. Refer to
items 2, 3 & 4 on page 4.
Never connect or disconnect the RCA input/ output leads with the amplifier switched on.
Set Up
Once the input cables are connected and the controls are set in accordance with the initial set-up
procedure above, the amplifier can be connected to the mains power supply and switched on at
the mains power switch.
Do not play any music or movies at this stage as the auto set up of the AV amp (if using one) will
need to be run. If your amp has an auto set up procedure, run this now ensuring the IWA-250 is
turned on. If you do not have an auto set up or are using a stereo amp connected to the left and
right inputs, set the crossover in accordance with your main speakers.
When the auto set up is complete, check that the subwoofer settings on the AV amp are correct.
The crossover frequency should be roughly 80Hz (although this may vary depending on the other
speakers within the system) and the level should be no more/ less than +/- 3dB. If not we would
suggest adjusting accordingly.
Now play a variety of music/ film excerpts that you are familiar with and adjust the level of the
amplifier to a point where it integrates with the rest of the system and to where you are happy. The
volume of the amp can then be adjusted to an average listening level once you are sure everything
is working correctly to double check your sub woofer level settings.
Experiment with the EQ switch as well to get the perfect sound for your environment and tastes.
monitoraudio.com
3
ENGLISH
Initial Set Up
Amp Panel & Controls
1
2
3
4
5
6
SPEAKER OUTPUTS
L
110-120V~
7
AC110-120V~50-60Hz
AC220-240V~50-60Hz
200 W
220-240V~
TRIGGER
R
STEREO INPUT
12V DC
8
9
LFE IN
BALANCED LFE INPUT
+
-
-
11 13
10 12
+
FUSE: 110-120VAC
T4.0AL/250VAC
FUSE: 220-240VAC
T4.0AL/250VAC
DESIGNED IN THE UK, MADE IN CHINA.
14
7a
15
1.
12 Volt Trigger Input ~ Centre Pin = +12Vdc
For external power control from AV amplifier/ receiver to the IWA-250. Monitor Audio
recommend using this function and a lead is supplied. A 12 volt signal is supplied by the
AV amp/receiver and tells the IWA-250 to turn on from standby mode. This allows a more
accurately controlled auto on/off function, and is far more energy efficient. When using the 12v
trigger, the Mode Switch (8) can be in any position, for it to function correctly.
2.
RCA Stereo Inputs (Left & Right)
This is the method of signal input when using a stereo amplifier system, connection can be provided
by a pair of high-quality signal cables from the pre-out section of an amplifier. The crossover frequency
will need to be set if using this method of connection. If using the IWA-250 Series speakers set the
crossover dial to approximately 80Hz. This may vary depending on room and tastes. Note:- cable
lengths should not exceed 10 metres to avoid interference from other electrical appliances.
3.
LFE Input (RCA Type)
This input is to be used when connecting the amplifier to an AV amplifier/ receiver. When using the
LFE input, the crossover frequency dial is not used. This is due to the crossover function being
controlled by the AV amplifier/ processor to which it is connected.
4.
Balanced Level Input
The balanced input is for use when connecting to a high end amplifier that has balanced
outputs and also advisable when running long runs of cable to avoid interference.
5.
Speaker Output
The speaker connections are a mono output, so even if feeding with a stereo signal the outputs
on the speaker connections will be the same. It is not possible to bridge the outputs, so if using
a single subwoofer, connect to EITHER the left hand pair of terminals or the right hand pair.
6.
Mains Voltage Selector
This is factory set to your country’s mains voltage specification. Do not attempt to adjust this
as this may lead to permanent damage to the product and even the risk of fire. There is a clear
plastic cover over the selector to prevent accidental adjustment.
7.
IEC Mains Power Connector/ Fuse Location
The amplifier is supplied with a two-pin mains input socket for connection to the mains supply.
Use ONLY the appropriate IEC mains lead provided with the product. Also fitted is an external
mains fuse. If this fuse blows during operation a spare fuse is provided within the fuse holder
for replacement. If you wish to change the fuse, you can do this by removing the IEC mains
lead and carefully levering out the original fuse from its holder below the IEC mains input socket
4
IWA-250
8.
Mains Power Switch
The mains power switch should be switched to the ‘Off’ position when the IWA-250 will not be
used for extended periods. The switch must be in the ‘On’ position for the subwoofer to function.
9.
Power LED
The LED indicates whether the unit is in standby mode or operational. It will be illuminated red
when in standby, and green when operational.
10. EQ Switch
This switch tailors the bass response of the subwoofer to your tastes. There are three settings:
Music, Movies and Impact. Movie mode provides a relatively flat response down to 35Hz.
Music mode is -2dB down on Movie mode but goes lower, all the way down to 30Hz. Impact
mode is +3dB up on Movie mode and comfortably goes down to 40Hz.
11. Cabinet
Select the appropriate position for if a cabinet is being used or not.
12. Phase Control Switch
The Phase Control is used to synchronise any delay between the subwoofer and main/satellite
speakers. When the subwoofer is in phase with the main/satellite speakers the sound should
be full bodied. Sit in a normal listening position whilst adjusting the phase switch. Help from
another person may be required. When set correctly the location of the subwoofer should be
almost undetectable. Experimentation is advised in order to achieve optimum results. However
it should be noted that in most cases the phase control switch should be set to 0 degrees,
especially when using a digital AV processor or AV receiver amplifier.
13. Power Mode Switch
With the switch in the ‘On’ position, the amplifier is permanently switched on under all
conditions. In the ‘Auto’ position, the amplifier will automatically switch on when an input
signal is received. It will remain on for a period of 15 minutes without receiving a signal before
switching into standby mode until a signal is received once more. Place it in the ‘Trigger’
position when using the 12v trigger from the AV amp to the IWA-250
Additional Notes on the Auto On Function
When using the auto on feature, the amplifier will “lock” onto the input it was activated by. In
most cases, when using either stereo, LFE or balanced input connection this will not matter.
However, if using more than one connections, you will not be able to toggle between inputs
until the amplifier has gone into standby mode. This can be done manually by turning it off and
on again, or by letting it time out (15 mintues) before changing the inputs over.
14. Crossover Frequency Control
The crossover frequency control only operates when using the RCA stereo input (2) and is used
to set the upper frequency limit (low pass) of the amplifier. The crossover control should be set
in accordance with the size or bass output of the main/satellite speakers. .
15. Volume Control
This control allows the level or volume to be adjusted in order to achieve a balanced overall
sound. To use this facility you will need to play a selection of familiar music or film excerpts.
Start with the volume at approx 10 o’clock and increase the level control until a balanced
sound is established. If using an AV processor or AV receiver amplifier, the system can be
adjusted by the test tone function within the set-up features. (Refer to the set up section in the
AV processor or AV receiver amplifier user guide.) When the subwoofer is correctly set-up, you
should not be able to identify its location easily in the room.
monitoraudio.com
5
ENGLISH
(7a). If the fuse blows again it is advisable to seek help from an authorised service agent. DO
NOT attempt to re-fit a further fuse as this could result in serious damage to the amplifier unit.
Specifications
IWA-250
System Format
Active sub-woofer amplifier
Low Frequency Limit
25Hz
Upper Frequency Limit
Variable 40 – 120 Hz @ 24dB/Octave
Amplifier Power Output
250W @ < 1% THD+N
Drive Unit Parameters
4 - 8 Ohm Nominal Impedance
Amplifier Classification
Class D amplifier with Switch mode power supply
(SMPSU)
Cabinet Switch
EQ Switch
For use when using the dedicated back box
Music/ Movie/ Impact
Phase Control
0 & 180 degrees
Auto Sensing
Line Level > 3.5mV
Input Level Requirements
Standby after approximately 15 minutes if no signal
sensed
Input Impedance
Mains Input Voltage
Dimensions (H x W x D)
Connections
12v Trigger Input
Power Consumption
> 20K Ohms
AC 110 - 120 V ~ 50/60Hz
AC 220 - 240 V ~ 50/60Hz
(Factory Region Preset)
43.7 x 432 x 263mm
1 3/4 x 17 x 10 3/8 Inch
LFE in (Stereo RCA and Balanced), 12v Trigger in
(3.5mm mono mini-jack), left and right speaker output
5 - 12v via 3.5mm mono mini-jack socket
Standby: < 0.5W (ErP approved)
Typical Idle: < 10W
Max Rated: 200W
Weight (unpacked
4Kg (8lb 12oz)
Monitor Audio reserves the right to alter specifications without notice.
6
IWA-250
Should you experience any technical, or set-up problems with your amplifier please check the
Trouble Shooting guide below:
My amplifier will not turn on/ no power.
s
Is the LED illuminated on the front of the unit? If not, check your mains lead is properly
connected both at the amplifier and at the mains outlet. Also check the fuse of the amplifier
and mains plug (where fitted).
s
Is the LED red? If so, you have power going to the unit. It could be that there is no signal, or
the 12v trigger is connected and the source not turned on (see below).
s
Have you got the 12v trigger connected? If so, the amplifier will not power up until the source
is turned on.
s
Is the unit receiving a signal (12v trigger not being used)? Is the Power Mode Switch in Auto or
On position, and signal source turned on? Try adjusting the volume level of the source.
If it still does not turn on/ power up, please contact your local dealer/ distributor or Monitor Audio immediately.
No sound from amplifier.
s
Is the LED on the front red or green? If it is red, then the unit hasn’t actually turned on. See
above suggestions. If it is green, then your unit is powered up and turned on. Check further
suggestions below.
s
Are the signal leads connected correctly? Check these. If possible, check by replacing with
a second, working set.
s
Is the volume level just very low? Try adjusting the volume on the source and the IWA-250.
s
Have you tried switching input’s? If changing from LFE to Stereo (or vice versa), you need to
power down the sub woofer first. It will stay “locked” onto the input that activates it.
If it still does not output a signal, please contact your local dealer/ distributor or Monitor Audio
immediately.
Owner Information
Product Details
Model: IWA-250 ...............................................
Product Serial No: .............................................
Date of Purchase: ..............................................
Dealer Details
Dealer Name: ……………………………………………………………………………………….
Address: ……………………………………………………………………………………………
Town, Post code, Country: …………………………………………………………………………….
e-mail address: …………………………………………………………………………………………
monitoraudio.com
7
ENGLISH
Trouble Shooting
Monitor Audio Ltd.
24 Brook Road
Rayleigh, Essex
SS6 7XJ
England
Tel: +44 (0)1268 740580
Fax: +44 (0)1268 740589
Email: [email protected]
Web: www.monitoraudio.com
Designed in the United Kingdom
Version 2. 2013