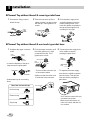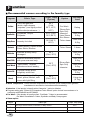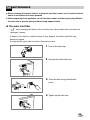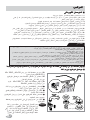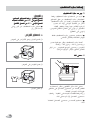
1
P roduct Feature Direct Drive System The advanced Brushless DC motor directly drives the drum without belt and pulley. Water Circulation Sprays detergent solution and water onto the load over and over. Clothes are soaked more quickly and thoroughly during wash cycle. The detergent suds can be removed more easily by the water shower during rinse cycle. The water circulation system uses both water and detergent more efficiently. Tilted Drum and Extra Large Door Opening Tilted drum and extra large opening make it possible to load and unload clothing more easily. Steam Washing and Refresh Steam Washing features upgraded washing performance with low energy consumption. Refresh cycle reduces wrinkles from dry clothes. Automatic Wash Load Detection Automatically detects the load and optimizes the washing time. Built-in Heater Internal heater helps to maintain water temperature at its optimum level for selected cycles. √fl∞°º±≈√ øπæ‡ C Child Lock The Child lock prevents children from pressing any button to change the settings during operation. ontents Warnings.......................................................................................................3 Specification .................................................................................................4 Installation.....................................................................................................6 Care before washing...................................................................................11 Adding detergent ........................................................................................12 Function .....................................................................................................14 How to use the washer ...............................................................................15 Maintenance ...............................................................................................23 Troubleshooting guide ................................................................................27 2 Terms of Warranty ......................................................................................30 W arnings READ ALL INSTRUCTIONS AND EXPLANATION OF THE INSTALLATION BEFORE USE ! WARNING! For your safety, the information in this manual must be followed to minimize the risk of fire or explosion, electric shock, or to prevent property damage, personal injury, or loss of life. IMPORTANT SAFETY INSTRUCTIONS WARNING : To reduce the risk of fire, electric shock, or injury to persons when using the washer, follow basic precautions, including the following: • Before installation, check exterior damages. If it has, do not install. • Do not install or store the washer where it will be exposed to the weather. • Do not tamper with controls. • Do not repair or replace any part of the washer or attempt any servicing unless specifically recommended in the user-maintenance instructions or published user-repair instructions that you understand and have the skills to carry out. • Keep the area underneath and around your appliances free of combustible materials such as lint, paper, rags, chemicals, etc. • Close supervision is necessary if this appliance is used by or near children or infirm persons. Do not allow them to play on, with, or inside this or any other appliance. • Keep washer away from fire. • Do not leave the washer door open. An open door could entice children to hang on the door or crawl inside the washer. • Never reach into washer while it is running. Wait until the drum has completely stopped. • The laundry process can reduce the flame retardant of fabrics. • To avoid such a result, carefully follow the garment manufacturer’s wash and care instructions. • Do not wash or dry articles that have been cleaned in, washed in, soaked in, or spotted with combustible or explosive substances (such as wax, oil, paint, gasoline, degreasers, dry-cleaning solvents, kerosene, etc.) which may ignite or explode. Oil may remain in the tub after a whole cycle resulting in fire during drying. So, do not load oiled clothes. • Do not slam the washer door closed or try to force the door open when locked. This could result in damage to the washer. • When the machine runs at high temperature, the front door may be very hot. Don’t touch it. • To minimize the possibility of electric shock, unplug this appliance from the power supply or disconnect the washer at the household distribution panel by removing the fuse or switching off the circuit breaker before attempting any maintenance or cleaning. • When unplugging power cord, do not pull out by grasping the cord. Otherwise, the power cord may be damaged. • Never attempt to operate this appliance if it is damaged, malfunctioning, partially disassembled, or has missing or broken parts, including a damaged cord or plug. • Before discarding an old machine unplug it. Render the plug useless. Cut off the cable directly behind the appliance to prevent misuse. • When a product was under water, Please call service center. The risk of electric shock and fire. ❊ Do not push down the door excessively, when washer door open. This could topple over the washer. SAVE THESE INSTRUCTIONS GROUNDING INSTRUCTIONS This appliance must be grounded. In the event of malfunction or breakdown, grounding will reduce the risk of electric shock by providing a path of least resistance for electric current. This appliance is equipped with a cord having an equipment-grounding conductor and grounding plug. The plug must be plugged into an appropriate outlet that is properly installed and grounded in accordance with all local codes and ordinance. • Do not use an adapter or otherwise defeat the grounding plug. • If you don’t have the proper outlet, consult an electrician. : WARNING Improper connection of the equipment-grounding conductor can result in risk of electric shock. Check with a qualified electrician or serviceman if you are in doubt as to whether the appliance is properly grounded. Do not modify the plug provided with the appliance - if it does not fit the outlet, have a proper outlet installed by a qualified electrician. 3 S pecification Drawer Name : Front loading washing machine Power supply : 220-240V~, 50Hz Size : 635mm(W)×720mm(D)×925mm(H) Weight : 81kg Wash capacity : 10.2kg Max. Watt : 2200W (Wash) / 1900W (Steam) Spin speed : No Spin/400/800/1000/1200 Water consumption : 63ℓ Permissible water pressure : 0.3-10 kgf/cm2 (30-1000 kPa) ❋ The appearance and specifications may be varied without notice to improve the units quality. Accessories Inlet hose(1EA) 4 Spanner I nstallation Install or store where it will not be exposed to temperatures below freezing or exposed to the weather. Properly ground washer to conform with all governing codes and ordinances. The base opening must not be obstructed by carpeting when the washing machine is installed on a carpeted floor. In countries where there are areas which may be subject to infestation by cockroaches or other vermin, pay particular attention to keeping the appliance and its surroundings in clean condition at all times. Any damage which may be cause by cockroaches or other vermin will not be covered by the appliance guarantee. Transit bolts The appliance is fitted with transit bolts to prevent internal damage during transport. • Packing and all transit bolts must be removed before using the washer. ☞ When unpacking the base, be sure to remove the additional packing support in the middle of the base packing. Washer Packing Support Base Packing Removing transit bolts 1. To prevent internal damage during transport, the special 4 bolts are locked. Before operating the washer, remove the bolts along with the rubber bungs. 3. Take out the 4 bolts along with the rubber bungs by slightly twisting the bung. Keep the 4 bolts and the spanner for future use. • If they are not removed, it may cause heavy vibration, noise and malfunction. • Whenever the appliance is transported, the transit bolts must be refitted. 2. Unscrew the 4 bolts with the spanner supplied. 4. Close the holes with the caps supplied. 5 I nstallation Installation place requirement Drain Hose Washer Laundry Tub approx. 2cm Level floor : Allowable slope under entire washer is 1˚ Power outlet : Must be within 1.5 meters of either side of location of washer. Do not overload the outlet with more than one appliance. Additional Clearance : For wall, door and floor modeling is required. (10cm : rear /2cm:right & left side) Do not place or store laundry products on top of washer at any times. They can damage the finish or controls. Positioning Install the washer on a flat hard floor. Make sure that air circulation around the washer is not impeded by carpets,rug etc. • Before placing the washer on tiles, apply a rubber mat under the feet. • Never try to correct any unevenness in the floor with pieces of wood, cardboard or similar materials under the washer. • If it is impossible to avoid positioning the washer next to a gas cooker or coal burning stove,an insulating covered with aluminum foil on the side facing the cooker or stove,must be inserted between the two appliance. • The washer must not be installed in rooms where the temperature can drop below 0°C. • Please ensure that when the washer is installed, it is easily accessible for the engineer in the event of a breakdown. • With the washer installed adjust all four feet using the transit bolt spanner provided ensuring the appliance is stable, and a clearance of approximately 20mm is left between the top of the washer and the underside of the work-top. 6 I nstallation Electrical connection 1. Do not use an extension cord or double adapter. 2. If the supply cord is damaged, it must be replaced by the manufacturer or its service agents or similarly qualified person in order to avoid a hazard. 3. Always unplug the machine and turn off the water supply after use. 4. Connect the machine to an earthed socket in accordance with current wiring regulations. 5. The appliance must be positioned so that the plug is easily accessible. • Repairs to the washing machine must only be carried out qualified personnel. Repairs carried out by inexperienced persons may cause injury or serious malfunctioning. Contact your local service center • Do not install your washing machine in rooms where temperatures below freezing may occur. Frozen hoses may burst under pressure. The reliability of the electronic control unit may be impaired at temperatures below freezing point. • If the appliance is delivered in the winter months and temperatures are below freezing : Store the washing machine at room temperature for a few hours before putting it into operation. CAUTION CAUTION concerning the Power Cord Most appliances recommend they be placed upon a dedicated circuit; that is, a single outlet circuit which powers only that appliance and has no additional outlets or branch circuits. Check the specification page of this owner's manual to be certain. Do not overload wall outlets. Overloaded wall outlets, loose or damaged wall outlets, extension cords, frayed power cords, or damaged or cracked wire insulation are dangerous. Any of these conditions could result in electric shock or fire. Periodically examine the cord of your appliance, and if its appearance indicates damage or deterioration, unplug it, discontinue use of the appliance, and have the cord replaced with an exact replacement part by an authorized servicer. Protect the power cord from physical or mechanical abuse, such as being twisted, kinked, pinched, closed in a door, or walked upon. Pay particular attention to plugs, wall outlets, and the point where the cord exits the appliance. Washing Machine is to be connected to the water mains using new hose-sets and that old hose-sets should not be used. Connecting water supply hose ▶Water supply pressure must be between 30kPa and 1000kPa (0.3~10kgf/cm2) ▶Don’t strip or crossthread when connecting Inlet hose to the valve. ▶If the water supply pressure is more than 1000kPa, a decompression device should be installed. • Two rubber seals are supplied with the water inlet hoses these are in order to prevent water leaks. • Check water tightness of washing machine connections by turning the tap completely on. • Periodically check the condition of the hose and replace the hose if necessary. • Make sure that there is no kink on the hose and that it is not crushed. NOTE After completing connection, if water leaks from the hose, the repeat the same steps. Use the most conventional type of faucet for water supply. In case the faucet is square or too big, remove the spacing ring before inserting the faucet into the adaptor. 7 I nstallation Normal Tap without thread & screw type inlet hose 1. Unscrew the fixing screw to attach the tap. 2. Push the connector up till the rubber packing is in tight contact with the tap. Then tighten the 4 screws. 3. Push the water supply hose vertically upwards so that the rubber packing within in the hose can adhere completely to the tap and then tighten it by screwing it to the right. Normal Tap without thread & one touch type inlet hose 1. Untighten the upper connector screw. Upper Connector Fixing screw Rubber packing Middle connector • In case the diameter of the tap is large remove the guide plate. Guide plate 2. Push the upper connector up till 3. Connect the water supply hose the rubber packing is in tight contact with the tap. Then tighten the 4 screws. Upper Connector Rubber packing • Usable water tap for connecting Hose. Used the horizontal tap Plate Upper Connector Water supply hose Middle connector • Turn the middle connector not to have water leaked. Connector to the middle connector, pushing the plate down. • Make sure that the rubber seal is inside the hose connector. • To separate the water supply hose from the middle connector shut off the tap. Then pull the inlet hose down, pushing the plate down. Hose connector Rubber seal Horizontal tap Extension tap Square tap 8 • Your machine comes with only cold water connection. • Make sure that there are no kinks in the hose and that it is not crushed. nstallation I This equipment is not designed for maritime use or for use mobile installations such as caravans, aircraft etc. Turn off the stopcock if the machine is to be left for any length of time (e.g. holiday), especially if there is no floor drain(gully) in the immediate vicinity. When disposing of the appliance, cut off the mains cable, and destroy the Plug. Disable the door lock to prevent young children being trapped inside. Packaging material (e.g. Films, Styrofoam) can be dangerous for children. There is a risk of suffocation ! Keep all packaging well away from children Installation of drain hose about 100 cm min. 60 cm max. 100 cm about 145 cm • When installing the drain hose to a sink, secure it tightly with a string. • Proper securing of the drain hose will protect the floor from damage due to water leakage. about 105 cm Laundry tub about 100 cm Hose Retainer max. 100 cm about 105 cm min. 60 cm about 145 cm • The drain hose should not be placed higher than 100 cm above the floor. Water in the washer does not drain or drains slowly. • Proper securing of the drain hose will protect the floor from damage due to water leakage. • When the drain hose is too long, do not force back into the washer. This will cause abnormal noise. max. 100cm min. 60cm Tie strap max. 100cm min. 60cm 9 I nstallation Level adjustment 1. Adjusting the washing machine level properly prevents excessive noise and vibration. Install the appliance on a solid and level floor surface, preferably in a corner of the room. NOTE Timber or suspended type flooring may contribute to excessive vibration and unbalance errors. 2. If the floor is uneven, adjust the adjustable feet as required. (do not insert pieces of wood etc. under the feet) Make sure that all four feet are stable and resting on the floor and then check that the appliance is perfectly level. (use a spirit level) ※ After the washer is level, tighten the lock nuts up towards of the base of the washer. All lock nuts must be tightened. NOTE In the case that the washing machine is installed on a raised platform, it must be securely fastened in order to eliminate the risk that it might fall off. ❊ Diagonal Check When pushing down the edges of the washing machine top plate diagonally, the machine should not move up and down at all. (Please, check both of two directions) If machine rocks when pushing the machine top plate diagonally, adjust the feet again. Concrete floors • The installation surface must be clean, dry and level. • Install washer on a flat hard floor. Tile floors (Slippery floors) • Position each foot on the Tread Mate and level the machine to suit. (Cut Tread Mate into 70x70 mm sections and stick the pieces on to the dry tile where machine is to be placed.) ※ Tread Mate is a self adhesive material used on ladders & steps that prevents slipping. Wooden floors (Suspended floors) Rubber Cup • Wooden floors are particularly susceptible to vibration. • To prevent vibration we recommend you place rubber cups under each foot, at least 15mm thick under the washer, secured to at least 2 floor beams with screws. • If possible install the washer in one of the corners of the room, where the floor is more stable. ※ Insert the rubber cups to reduce vibration. ※ You can obtain the rubber cups (p/no.4620ER4002B) from the LG svc dept. Important! • Proper placement and levelling of the washer ensure long, regular and reliable operation. • The washer must be absolutely horizontal and stand firmly in position. • It must not “Seesaw” across corners under load. • The installation surface must be clean, free from floor wax and other lubricant coatings. • Do not let the feet of the washer get wet. If feet of the washer get wet, slipping may occur. 10 C are before washing Before the first washing Select a cycle (COTTON 60°C, add a half load of detergent) allow the unit to wash without clothing. This will remove residues and water from the drum that may have been left during manufacturing. Caring before washing 1. Care Labels Look for a care label on your clothes. This will tell you about the fabric content of your garment and how it should be washed. 2. Sorting To get the best results, Sort clothes into loads that can be washed with the same wash cycle. Water temperature and spin speed and different fabrics need to be washed in different ways. Always sort dark colors from pale colors and whites. Wash separately as dye and lint transfer can occur causing discoloration of white etc. If possible, do not wash heavily soiled items with lightly soiled one. Soil (Heavy, Normal, Light) Separate clothes according to amount of soil. Color (White, Lights, Darks) Separate white fabrics from colored fabrics. Lint (Lint producers, Collectors) Wash lint producers and lint collectors separately. 3. Caring before loading Combine large and small items in a load. Load large items first. Large items should not be more than half the total wash load. Do not wash single items. This may cause an out-of-balance load. Add one or two similar items. • Check all pockets to make sure that they are empty. Items such as nails, hair clip, matches, pens, coins and keys can damage both your washer and your clothes. • Close zippers, hooks and strings to make sure that these items don’t snag on other clothes. • Pre treat dirt and stains by brushing a little detergent dissolved in water onto stains like collars and cuffs to help shift dirt. • Check the folds of the flexible gasket (gray) and remove any small articles,if any. • Check inside of the drum and remove any left items in it for next wash cycle. • Remove any clothing or items on the flexible gasket to prevent clothing and the gasket damages. 11 A dding detergent Adding detergent and fabric softener 1. The Dispenser Drawer • Main wash only ➔ • Pre Wash + Main Wash ➔ ( ( ) () 2. Adding Fabric Softener ( ) • Do not exceed the maximum fill line. Close the dispenser drawer slowly. Overfilling can cause early dispensing of the fabric softener which could stain clothes. • Do not leave the fabric softener in the detergent drawer for more than 2 days. (Fabric softener could harden) • Softener will automatically be added during the last rinse cycle. • Do not open the drawer when water is supplied. • Solvents(benzene, etc) are not allowable. NOTE 12 Do not pour fabric softener directly on the cloths ) A dding detergent 3. Detergent dosage • The detergent should be used according to the instruction of the detergent manufacture. • If too much detergent is used, too many suds can occur and this will decrease the washing result or cause heavy load to the motor. • Use powder detergent only for the front loading washer. ❇ If suds occur too much, pleas reduce the detergent amount. • Detergent usage may need to be adjusted for water temperature, water hardness, size and soil level of the load. For best results, avoid oversudsing. ❋ Tips Full load : according to manufacturer’s recommendation. Part load : 3/4 of the normal amount. Minimum load : 1/2 of full load. • Detergent is flushed from the dispenser at the beginning of the cycle. 5. Using the Tablets 1) Open the door and Tablets into the drum. 4. Water softener 2) Load the laundry into the drum. • A water softener, such as Anti limescale (Clagon) can be used to cut down on the use of detergent in extremely hard water areas. Dispense according to the amount specified on the packaging. First add detergent and then the water softener. 3) Close the door. • Use the quantity of detergent as for soft water. 13 F ■ unction Recommended courses according to the laundry type Program Fabric Type Proper Temp. (Option) Cotton Color fast gaments (shirts, night dresses, pajamas...)and lightly soiled white cotton(underwear...) 60˚C (Cold, 30˚C, 40˚C, 95˚C) Synthetic Polyamide, Acrylic, Polyester. 40˚C (Cold, 30˚C,60˚C) Baby Care Laundry for infant 95°C(40°C, 60°C) Refresh Cotton mixed, Polyeter mixed Dress Shirts, Blouses Delicate Delicate laundry easily damaged. Wool/Silk Hand Wash Quick 30 Duvet _ Maximum Load Option - Pre Wash - Rinse+Spin - Spin Only - Intensive - Less Steam - Eco Steam - Turbo steam - Turbo Steam 40˚C (Cold, 30˚C) Machine washable woolens with pure new wool only. “Hand Wash ” marked delicate and wool laundry. 30˚C (Cold, 40˚C) Rating Less than 5.0kg Less than 6.0kg 5 items Less than 4.0kg - Rinse+Spin - Spin Only - Intensive Colored Landry which is lightely soiled fast. Less than 3.0kg Less than 3.0kg Less than 5.0kg Cotton bedding with filling, duvet, pillow, blanket, sofa cover with light filling. 40˚C (Cold, 30˚C) 1 king size (9 Tog) ❋ Water Temperature : Select the water temperature to the wash cycles. Always follow garment manufacture’s care label or instructions when laundering. ❋ Intensive : If the laundry is heavily soiled “Intensive ” option is effective. ❋ Program setting with “Cotton 60°C+Intensive+Turbo Steam” option for test in accordance or in conformity with EN60456 and IEC60456. ❋ Pre Wash : If the laundry is heavily soiled, “Pre Wash ” Cotton is recommended. Pre Wash is available in Cotton, Synthetic and Baby Care program. ❋ Steam option Steam Fabric Type Turbo Steam For tough stained clothes, underwear, or Baby clothes. Proper. Temp. (Fixed) 60°C When you want to do a steam wash while reducing the electricity consumption, select the this opton. 40°C Small Steam When you want to do a steam wash for only a small amount of laundry, select the this opton. 30°C Eco Steam 14 H ow to use the washer 1. Cotton automatically selected upon power on. • Press the Power button to start. • Press the Start/Pause button. • Initial condition - Wash : Main wash - Rinse : 3 times - Spin : 1200 rpm - Water temperature : 60˚C - Program : Cotton 2. Manual Selecting • Press the Power button to start. • Select the conditions which you want to use, by pressing each button. For selecting the each conditions, please refer to the page16~page22 • Press the Start/Pause button. 15 H ow to use the washer (1) (2) (1) Button: Power (2) Dial: Program (3) Button: Start/Pause (4) Button: Option (3) (4) (5) Child lock (6) Button: Rinse (7) Button: Temperature (8) Button: Intensive Power (5) (6) (7) (8, 9, 10) (11) (12) (9) Button: Favorite (10) Button: Time Delay (11) Button: Beeper (12) Button: Turbo Steam (13) (13) Dial: Spin Program 1. Power • Press the Power button to turn power on and off. • To cancel the Time Delay function, the Power button should be pressed. • 9 programs are available according to the laundry type. 2. Initial Program • Lamp will light up to indicate selected program. • When the Power button is pressed, the washer is ready for Cotton program. And the other initial conditions as follows. • So, if you want to advance into the washing cycle without changing the program, just press Start/Pause button and then the washer will proceed. ■ Initial program - Cotton Program / Main Wash / Rinse: 3times / 1200 rpm /60°C 16 • When Start/Pause button is pressed, the Cotton program is automatically selected. - By turning the Program dial, the program is selected in order of “Cotton – Synthetic – Delicate – Wool/Silk – Hand Wash – Duvet – Quick 30 – Refresh – Baby Care ”. For information regarding laundary type for each program, please refer to page 14. H ow to use the washer Option Start/Pause • By pressing the option button, only one option functions may be selected. 1. Start • This Start/Pause button is used to start wash cycle or pause the wash cycle. 2. Pause • If temporary stop of wash cycle is needed, press “Start/Pause” button. • When in Pause, the power is turned off automatically after 4 minutes. • NB. The door will not open before 1 to 2 minutes when Pause is selected, or at the end of the wash cycle. Door Lock 1. Pre Wash • Use this option for loads that need pretreatment. This adds 17 minutes of pre washing before draining. - When using Pre Wash option, do not use a liquid detergent for the main wash. Use powder for the main wash. • Available in Cotton, Synthetic and Baby Care program. 2. Rinse+Spin • Use this option to rinse and then spin. 3. Spin Only • Lights whenever the door of the washer is locked. • The door can be unlocked by pressing the Start/Pause button to stop the washer. • The door can be opened after a short delay. Detecting • When you want Spin only, select the this opton. 4. Less Steam • When you want to do a steam wash for only a small amount of laundry, select the this opton. • Available in Cotton, Synthetic and Baby Care program. • Temperature fixed 30°C. 5. Eco Steam • While the "Detecting" is shown in the display the machine rotates slowly and detects how many laundries are loaded in the drum. It will take a few seconds. • Available in Cotton and Synthetic program. • When you want to do a steam wash while reducing the electricity consumption, select the this opton. • Available in Cotton, Synthetic and Baby Care program. • Temperature fixed 40°C. The required lamp will light up for identification. 17 H ow to use the washer Rinse Child lock • By pressing the Rinse button,the Rinse type can be selected. If you choose to lock the buttons on the control assembly to prevent tampering, this function may be selected. • Child lock can be set by pressing and holding the Option and Rinse button simultaneously. (About three seconds) 1. Normal • Cotton, Synthetic, Baby Care performs 3 Rinses • Wool/Silk, Hand Wash, Quick 30, Delicate, Duvet performs 2 Rinses • When child lock is set, all buttons are inoperable, except Power button. • To deactivate Child lock system, press and hold the Option and Rinse button simultaneously again. (About three seconds) 2. Rinse+ • Used to additional rinse, which may assist in removing traces of detergent residue. • By selecting Rinse+ function, the Rinse time and the Rinse water are increased. 3. Rinse Hold • To change to the desired program, whilst in child lock mode. 1. Press and hold both Option and Rinse button together once again. (About three seconds) 2. Press the Start/Pause button. 3. Select the desired program and press the Start/Pause button again. Change the desired program • The child lock can be set at any time and it is automatically canceled when operational errors occur. Also Child lock works when power is off. 18 • Is selected by pressing the Rinse button repeatedly this function leaves clothes in the washer; suspended in the water after a rinse without entering into spin. • To proceed through to a drain or spin, once the rinse hold function is completed using to program dial scroll to the required program. 4. Medic Rinse • For high effectiveness or more purity in rinse operation you can choose Medic Rinse option. • Available in Cotton, Synthetic and Baby Care program. The required lamp will light up for identification. H ow to use the washer Water Temp. • By pressing the Temp. button, the water temperature can be selected. - Cold - 30˚C / 40˚C / 60˚C / 95˚C • Water temperature can be selected as below according to the program. - Baby Care 95˚C – 60˚C – 40˚C - Cotton Cold – 30˚C – 40˚C – 60˚C – 95˚C - Synthetic Cold – 30˚C – 40˚C – 60˚C - Delicate, Wool/Silk, Quick 30, Hand Wash, Duvet Cold – 30˚C – 40˚C The required temperature lamp will light up for identification. For the more detailed information, please refer to the page14. Favorite • Favorite program allows you to store a customized wash cycle for future use. • To make a Favorite program: 1. Select a cycle. 2. Select The course, washing method, number of rinses, spin speed, water temperature, turbo steam etc. 3. Press and hold Favorite program button 3 seconds (2 beep sounds). The Favorite program is now stored for future use. To reuse the program, select Favorite program and press Start/Pause. Intensive • If the laundry is heavily soiled “Intensive ” option is effective. • By selecting the Intensive option, the wash time may be extended, depending on the program selected. • To use this option press the Intensive button once before the wash program is started. 19 H ow to use the washer Turbo Steam Time Delay • For tough stained clothes, underwear, or baby clothes. • Steam Wash is available with Refresh, Baby Care, Cotton, Synthetic. Preparing washing before starting “Time Delay” - Turn on the water tap. - Load laundry and close the door. - Place the detergent and fabric softener in the drawer. • How to set “Time Delay” - Press Power button. - Turn the Program dial to select the program you require. - Press Time Delay button and set the desired time. - Press the Start/Pause button. (“ ” lamp is on) • If Time Delay button is pressed, “3:00” is displayed. The maximum delayed time is 19:00 hours and the minimum time is 3:00 hours. • Each pressing of the button advances time delay by one hour. • To cancel the time delay, press the Power button. • Time Delay is ‘expected time’ from the present to the completion of washing cycle or selected process (Wash, Rinse, Spin). • According to the condition of water supply and temperature, the delayed time and the actual washing time may vary. 20 • This option features upgraded washing performance with low energy and water consumption. • Do not load delicates such as wool, silk, and easily discolored clothes. • Temperature fixed 60°C. NOTE: - Steam wash is a highly concentrated and efficient. It may seem there is no water inside the drum, but this is normal. - Steam spray may not be seen clearly through the door; however, the washer is spraying steam strongly inside. - During the steam operation, a spraying sound will be heard. This is not a malfunction. ! CAUTION Do not reach into the washer while operating. Steam can cause severe burns. H ow to use the washer Spin Refresh ■ Refresh cycle • For slightly wrinkled clothes which have been stored for an extended time. It just makes wrinkled clothes easy to iron (Do not load wet clothes). • Wrinkles will be reduced. • Fixed 60°C ■ How to use Refresh cycle 1. Turn on the washer and select the Refresh cycle. 2. Load 5 items or less and close the door. 3. Press the Turbo Steam button repeatedly until the desired and correct number of items is displayed. Initial display is 3 items 4. Press the Start/Pause button [Precautionary Notes] - The Refresh cycle is not like other washing or drying cycles. - Due to the characteristic of cotton fibers, this cycle is not recommended for 100% cotton clothing. - Remove stains from clothing before using the Refresh cycle to prevent permanently setting the stains by high heat. • By pressing the Spin button, the spin speed can be chosen. 1. Spin selection • Spin speed is available according to the program as follows. - Cotton & Quick 30 No Spin – 400 – 800 – 1000 – 1200 - Baby Care, Duvet, Synthetic, Wool/Silk, Hand Wash No Spin – 400 – 800 – 1000 - Delicate No Spin – 400 – 800 2. No spin • If “No Spin” is selected, the washer stops after draining water. 3. Spin only - Be sure the faucet is open. This cycle uses a little water to produce steam. 1. Press the Power buton. 2. Set the desired spin speed by pressing the Spin button. 3. Press the Start/Pause button. - Be careful not to touch the door. It can be very hot. The required temperature lamp will light up for identification. - Do not open the door while operating. Steam can cause severe burns. Beeper - After removing clothes from the Refresh cycle they may feel slightly damp wait at least 10 minutes before putting the clothes on. • Press the Beeper button repeatedly to adjust the volume of the Beeper. (High/Low/Off) - Best result are achieved when articles are of similar size and fabric type. Do not overload (Load less than 3 dress shirtes) The required temperature lamp will light up for identification. 21 H ow to use the washer Display 3. Completion of washing 1. Special function display • When Child lock is selected, the “ ” lamp is on. • When time delay is selected, it shows the remaining times to finish the selected program. ■ Est. Time Remaining • This display shows the estimated time remaining in the cycle when operating. • This washer automatically detects the wash load (weight) and optimizes the washing time. After detecting, the display will show the adjusted time remaining. ■ Status Indicator • It shows elapsed time of the cycle the washer is operating. 2. Self diagnose display • If the washer encounters a fault during operation, the associated fault will be displayed. “ ” : Water pressure sensing error “ ” : Problem of overfilling water “ ” : Door is not closed “ ” : Over load in motor “ ” : Over load in motor “ ” : Water inlet trouble “ ” : Drainage trouble “ ” : Unbalanced load “ ” : Water temperature trouble If these error letters are displayed, please refer to the troubleshooting page27 and follow the guide. 22 • When washing cycle is completed, “ ” is displayed on the “Multi display”. 4. Time left • During washing cycle, the remaining washing time is displayed. • Recommended program by manufacturer. - Cotton : around 2 hours 2 minutes - Synthetic : around 1 hour 28 minutes - Delicate : around 1 hour 16 minutes - Wool/Silk : around 1 hour 4 minutes - Hand Wash : around 1 hour 4 minutes - Duvet : around 1 hour 16 minutes - Quick 30 : around 30 minutes - Refresh : around 20 minutes - Baby Care : around 2 hours 48 minutes • The washing time may vary by the amount of laundry, water pressure, water temperature and other washing conditions. • If an unbalanced load is detected or if the suds removing program operates, the wash time may be extended. (Max. increasing time is 45 minutes.) M aintenance ❋ Before cleaning the washer interior, unplug the electrical power cord to avoid electrical shock to avoid electrical shock hazards. ❋ When disposing of the appliance, cut off the mains cable, and destroy the plug Disable the door lock to prevent young children being trapped inside. The water inlet filter -" " error message will blink on the control panel when water does not enter the detergent drawer. - If water is very hard or contains traces of lime deposit, the water inlet filter may become clogged. It is therefore a good idea to clean it from time to time. 1. Turn off the water tap. 2. Unscrew the water inlet hose. 3. Clean the filter using a hard bristle brush. 4. Tighten up the inlet hose. 23 M aintenance The drain pump filter ❋ The drain filter collects threads and small objects left in the laundry. Check regularly that the filter is clean to ensure smooth running of your machine. ! CAUTION First drain using the drain hose and then open the pump filter to remove whatever any threads or objects. Be careful when draining if the water is hot. ❋ Allow the water to cool down before cleaning the drain pump, carrying out emergency emptying or opening the door in an emergency. 1. Open the lower cover cap (①) by using a finger. Turn the drain plug (②) to pull out the hose. 2. Unplug the drain plug (②), allowing the water to flow out. At this time use a vessel to prevent water flowing on to the floor. When water does not flow any more, turn the pump filter (③) open to the left. 3 2 3. Remove out any foreign material from the pump filter (③). 4. After cleaning, turn the pump filter (③) clockwise and insert the drain plug (②)to the original place. close the lower cover cap. 3 2 24 M aintenance Dispenser drawer ❋ After a while detergents and fabric softeners leave a deposit in the drawer. MAX MAX • It should be cleaned from time to time with a jet of running water. • If necessary it can be removed completely from the machine by pressing the catch downward and by pulling it out. • To facilitate cleaning, the upper part of the fabric softener compartment can be removed. The drawer recess ❋ Detergent can also accumulate inside the recess which should be cleaned occasionally with an old toothbrush. • Once you have finished cleaning, replace the drawer and run a rinse cycle without laundry. The washing drum • If you live in a hard water area, limescale may continuously build up in places where it cannot be seen and thus not easily removed. Over time the build up of scale clogs appliances, and if it is not kept in check, expensive maintenance or repairs may result. • Although the washing drum is made of Stainless steel, specks of rust can be caused by small metal articles (paper clips, safety pins) which have been left in the drum. • The washing drum should be cleaned from time to time. • If you use descaling agents, dyes or bleaches, make sure they are suitable for washing machine use. ❋ Descaler may contain chemicals that may damage part of your washing machine. ❋ Remove any spots with a stainless steel cleaning agent. ❋ Never use steel wool. 25 M aintenance The water circulation nozzle & steam nozzle • Clean the water circulation nozzle, if clogged. Cleaning your washer 1. Exterior Proper care of your washer can extend its life. The outside of the machine can be cleaned with warm water and a neutral non abrasive household detergent. Immediately wipe off any spills. Wipe with damp cloth. Try not to hit surface with sharp objects. ❋ IMPORTANT: Do not use methylated spirits, diluents or similar products. 2. Interior Dry around the washer door opening, flexible gasket and door glass. Run washer through a complete cycle using hot water. Repeat process if necessary. NOTE Remove hard water deposits using only cleaners labeled as safe for washing machine. Winterizing instructions If the washer is stored in an area where freezing may occur or moved in freezing temperatures, follow these instructions to prevent damage to the washer: 1. Turn off water supply tap. 2. Disconnect hoses from water supply and drain water from hoses. 3. Plug electrical cord into a properly grounded electrical outlet. 4. Add 1gallon(3.8L) of nontoxic recreational vehicle(RV) antifreeze into an empty wash drum. Close the door. 5. Set spin cycle and let washer spin for 1minute to drain out all water. Not all of the RV antifreeze will be expelled. 6. Unplug electrical power cord, dry the drum interior, and close the door. 7. Remove dispenser drawer, drain and dry excessive water from the compartments. 8. Store washer in an upright position. 9. To remove antifreeze from washer after storage, run empty washer through a complete cycle using detergent. Do not add wash load. 26 T roubleshooting guide ❋ This washing machine is equipped with automatic safety functions which detect and diagnose faults at an early stage and react appropriately. When the machine does not function properly or does not function at all, check the following points before you contact your service provider. Symptom Possible Cause Solution Rattling and clanking noise • Foreign objects such as coins or safety pins maybe in drum or pump. Stop washer and check drum and drain filter. If noise continues after washer is restarted, call your authorized service centre. Thumping sound • Heavy wash loads may produce a thumping sound. This is usually normal. If sound continues, washer is probably out of balance. Stop and redistribute wash load. Vibrating noise • Have all the transit bolts and packing been removed? • Are all the feet resting firmly on the ground? If not removed during installation, refer to Installation guide for removing transit bolts. Wash load may be unevenly distributed in drum. Stop washer and rearrange wash load. Water leaks. • Fill hoses or drain hose are loose at tap or washer. Check and tighten hose connections. • House drain pipes are clogged. Unclog drain pipe. Contact plumber if necessary. Too much detergent or unsuitable detergent may cause excessive foaming which may result in water leaks, and vibration during spin. Oversudsing Water does not enter washer or it enters slowly Water in the washer does not drain or drains slowly. • Water supply is not adequate in area. Check another tap in the house. • Water supply tap is not completely open. Fully open tap. • Water inlet hose(s) are kinked. Straighten hose(s). • The filter of the inlet hose(s) are clogged. Check the filter of the inlet hose(s). • Drain hose is kinked or clogged. Clean and straighten the drain hose. • The drain filter is clogged. Clean the drain filter. 27 roubleshooting guide T Symptom Washer does not start Possible Cause • Electrical power cord may not be plugged in or connection may be loose. Make sure plug fits tightly in wall outlet. • House fuse blown, circuit breaker tripped,or a power outage has occurred. Reset circuit breaker or replace fuse. Do not increase fuse capacity. If problem is a circuit overload, have it corrected by a qualified electrician. Turn on water supply tap. • Water supply tap is not turned on. Washer won’t spin Solution ❋ Check that the door is firmly shut. Close the door and press the Start/Pause button. After pressing the Start/Pause button, it may take a few moments before the clothes washer begins to spin. The door must lock before spin can be achieved. Door does not open Once started, the door can not be opened for safety reasons. Wait one or two minutes before opening the door to give the electric locking mechanism time to release. Wash cycle time delayed The washing time may vary by the amount of laundry, water pressure, water temperature and other using conditions. If the imbalance is detected or if the suds removing program works, the wash time shall be increased. 28 T roubleshooting guide Symptom Possible Cause Solution • Water supply is not adequate in area • Water supply taps are not completely open. • Water inlet hose(s) are kinked. • The filter of the inlet hose(s) are clogged. Check another tap in the house. Fully open tap. • Drain hose is kinked or clogged. • The drain filter is clogged. Clean and straighten the drain hose. Clean the drain filter. • Load is too small. • Load is out of balance. • The appliance has an unbalance detection and correction system. If individual heavy articles are loaded (ex. bath mat, both robe, etc.), this system may stop spinning or even interrupt the spin cycle altogether. • If the laundry is still too wet at the end of the cycle, add smaller articles of laundry to balance the load and repeat the spin cycle. Add 1 or 2 similar items to help balance the load. Rearrange load to allow proper spinning • Is the door opend or not completely closed? Straighten hose(s). Check the filter of the inlet hose(s). Close the door completely. ❋ If “ ”is not released, call for service. Unplug the power plug and call for service. • Water overfills due to the faulty water valve. • Water level sensor has malfunctioned. Close the water tap. Unplug the power plug. Call for service. • Over load in motor. • Over load in motor. 29 T erms of Warranty What Is Not Covered: • Service trips to your home to teach you how to use the product. • If the product is connected to any voltage other than that shown on the rating plate. • If the fault is caused by accident, neglect, misuse or Act of God. • If the fault is caused by factors other than normal domestic use or use in accordance with the owner's manual. • Provide instruction on use of product or change the set-up of the product. • If the fault is caused by pests for example, rats or cockroaches etc.. • Noise or vibration that is considered normal for example water drain sound, spin sound, or warming beeps. • Correcting the installation for example, levelling the product, adjustment of drain. • Normal maintenance which recommended by the owner's manual. • Removal of foreign objects / substances from the machine, including the pump and inlet hose filter for example, grit, nails, bra wires, buttons etc. • Replace fuses in or correct house wiring or correct house plumbing. • Correction of unauthorized repairs. • Incidental or consequential damage to personal property caused by possible defects with this appliance. • If this product is used for commercial purpose, it is not warranted. (Example : Public places such as public bathroom, lodging house, training center, dormitory) If the product is installed outside the normal service area, any cost of transportation involved in the repair of the product, or the replacement of a defective part, shall be borne by the owner. 30 ﻣﺰاﻳﺎ اﳌﻨﺘﺞ ■ ﻧﻈﺎم اﻟﺪﻓﻊ اﳌﺒﺎﺷﺮ اﳌﺘﻘﺪم ﺑﻼ ﻓﺮاش ﻳﺪﻳﺮ اﳊﻠﺔ ﻣﺒﺎﺷﺮة ﺑﺪون ﺣﺰام وﺑﻜﺮة. ﻣﺤﺮك DC ّ ■ دورة اﳌﺎء رش ﺳﺎﺋﻞ اﻟﻐﺴﻴﻞ واﳌﺎء ﻋﻠﻰ اﳌﻼﺑﺲ واﺣﺪا ﻓﻮاﺣﺪ. ﻋﻨﺪﻫﺎ ﻳﺘﻢ ﻧﻘﻊ اﳌﻼﺑﺲ ﺑﺴﺮﻋﺔ أﻛﺜﺮ وﲤﺎﻣﺎ أﺛﻨﺎء دورة اﻟﻐﺴﻴﻞ. وﳝﻜﻨﻚ إزاﻟﺔ ﺻﻘﺎﻗﻴﻊ ﺳﺎﺋﻞ اﻟﻐﺴﻴﻞ ﺑﺴﻬﻮﻟﺔ أﻛﺜﺮ ﺑﺮش اﳌﺎء أﺛﻨﺎء دورة اﻟﺸﻄﻒ. وﻧﻈﺎم دوران اﳌﺎء ﻳﺴﺘﺨﺪم ﻛﻠﻲ اﳌﺎء وﺳﺎﺋﻞ اﻟﻐﺴﻴﻞ ﺑﻔﻌﺎﻟﻴﺔ أﻛﺜﺮ. ■ اﳊﻠﺔ اﳌﺎﺋﻠﺔ واﻟﺒﺎب ﺑﻔﺘﺤﻪ اﻟﻌﺮﻳﺾ ﺟﺪا ﺑﻔﻀﻞ اﳊﻠﺔ اﳌﺎﺋﻠﺔ واﻟﻔﺘﺢ اﻟﻌﺮﻳﺾ ﺟﺪا ،ﳝﻜﻦ ﺣﻤﻞ اﳌﻼﺑﺲ وإﺧﺮاﺟﻬﺎ ﺑﺴﻬﻮﻟﺔ أﻛﺜﺮ. ■ ﻧﻈﺎم اﻟﺘﺤﻜﻢ ﻓﻲ اﻟﺴﺮﻋﺔ ﺑﻀﺠﻴﺞ ﻣﻨﺨﻔﺾ ﺑﺎﻹﺷﻌﺎر ﺑﻜﻤﻴﺔ اﻟﻐﺴﻴﻞ وﺗﻮازﻧﻪ ،ﻳﺘﻢ ﺗﻮزﻳﻊ اﻟﻐﺴﻴﻞ ﻟﺘﺨﻔﻴﺾ ﻣﺴﺘﻮى ﺿﺠﻴﺞ ﻧﺎﺟﻢ ﻋﻦ اﻟﺘﺪوﻳﺮ ■ ﻛﺸﻒ ﺣﻤﻞ اﻟﻐﺴﻴﻞ اﻟﺘﻠﻘﺎﺋﻲ ﻳﻜﺸﻒ اﳉﻬﺎز اﳊﻤﻞ وأﻣﺜﻞ وﻗﺖ ﻟﻠﻐﺴﻴﻞ ﺗﻠﻘﺎﺋﻴﺎ. ■ ﺟﻬﺎز اﻟﺘﺴﺨﲔ اﻟﺪاﺧﻠﻲ ﺟﻬﺎز اﻟﺘﺴﺨﲔ اﻟﺪاﳋﻲ ﻳﺴﺨﻞ اﳌﺎء ﺗﻠﻘﺎﺋﻴﺎ ﻋﻠﻰ أﻓﻀﻞ درﺟﺔ ﺣﺮارة ﻓﻲ اﻟﺪورة اﺨﻤﻟﺘﺎرة. ¬È¥®¬ ¨¢§É ■ إﻏﻼق اﻟﻄﻔﻞ ﻧﻈﺎم إﻏﻼق اﻟﻄﻔﻞ ﻳﺴﺘﺨﺪم ﳌﻨﻊ اﻷﻃﻔﺎل ﻋﻦ اﻟﻀﻐﻂ ﻋﻠﻰ أي زر ﻟﺘﻐﻴﻴﺮ اﻟﺒﺮﻧﺎﻣﺞ أﺛﻨﺎء اﻟﺘﺸﻐﻴﻞ. اﶈﺘﻮﻳﺎت اﻟﺘﻨﺒﻴﻬﺎت 3 ............................................................. اﳌﻮاﺻﻔﺎت 4 .............................................................. اﻟﺘﺮﻛﻴﺐ 6 ................................................................ اﻟﻌﻨﺎﻳﺔ ﻗﺒﻞ اﻟﻐﺴﻴﻞ 11 .............................................. إﺿﺎﻓﺔ ﻣﺎدة اﻟﺘﻨﻈﻴﻒ 12 ............................................ اﻟﻮﻇﻴﻔﺔ 14 ............................................................... ﻛﻴﻔﻴﺔ اﺳﺘﺨﺪام اﻟﻐﺴﺎﻟﺔ 15 ......................................... اﻟﺼﻴﺎﻧﺔ 23 ............................................................... دﻟﻴﻞ ﲢﺮى اﳋﻠﻞ وإﺻﻼﺣﻪ 27 ....................................... ﺷﺮوط اﻟﻀﻤﺎﻧﺔ 30 .................................................... 2 اﻟﺘﻨﺒﻴﻬﺎت اﻗﺮأ ﺟﻤﻴﻊ اﻟﺘﻌﻠﻴﻤﺎت ﻗﺒﻞ اﻻﺳﺘﺨﺪام ﺗﻨﺒﻴﻪ ! ﻣﻦ أﺟﻞ اﻟﺴﻼﻣﺔ ،ﻻ ﺑﺪ ﻣﻦ إﺗﺒﺎع اﻟﺘﻌﻠﻴﻤﺎت اﳌﻮﺿﺤﺔ ﻓﻲ ﻫﺬا اﻟﺪﻟﻴﻞ ﻟﺘﺨﻔﻴﻒ ﺧﻄﺮ اﻻﺣﺘﺮاق أو اﻻﻧﻔﺠﺎر ،واﻟﺼﺪﻣﺎت اﻟﻜﻬﺮﺑﺎﺋﻴﺔ ،أو ﳌﻨﻊ اﳋﺴﺎﺋﺮ اﳌﺎدﻳﺔ ،ﺟﺮح اﻟﺸﺨﺺ ،أو ﺗﻘﺼﻴﺮ اﻟﻌﻤﺮ. اﻟﺘﻌﻠﻴﻤﺎت اﳌﻬﻤﺔ ﻣﻦ أﺟﻞ اﻟﺴﻼﻣﺔ ﺗﻨﺒﻴﻪ :ﳋﻔﺾ ﺧﻄﺮ اﻻﺣﺘﺮاق ،واﻟﺼﺪﻣﺎت اﻟﻜﻬﺮﺑﺎﺋﻴﺔ ،أو ﺟﺮح اﻟﺸﺨﺺ ﻋﻨﺪ اﺳﺘﺨﺪام ﺟﻬﺎز اﻟﻐﺴﺎﻟﺔ، اﺗﺒﻊ اﻟﺘﺤﺬﻳﺮات اﻷﺳﺎﺳﻴﺔ ﲟﺎ ﻓﻴﻬﺎ اﻷﻣﻮر اﻟﺘﺎﻟﻴﺔ: ﻛﺐ أو ﲢﻔﻆ ﺟﻬﺎز اﻟﻐﺴﺎﻟﺔ ﻓﻲ ﻣﻜﺎن ﻣﻌﺮض ● ﻻ ﺗﺮ ّ ﻟﻠﻤﻄﺮ واﻟﺮﻃﻮﺑﺔ. ﻛﺐ أو ﲢﻔﻆ ﺟﻬﺎز اﻟﻐﺴﺎﻟﺔ ﻓﻲ ﻣﻜﺎن ﻣﻌﺮض ● ﻻ ﺗﺮ ّ ﻟﻠﻤﻄﺮ واﻟﺮﻃﻮﺑﺔ. ● ﻻ ﺗﻌﺒﺚ ﺑﻠﻮﺣﺔ اﻟﺘﺤﻜﻢ. ● ﻻ ﺗﺼﻠﺢ أو ﺗﺒﺪل أي ﻗﻄﻌﺔ ﻣﻦ ﺟﻬﺎز اﻟﻐﺴﺎﻟﺔ أو ﻻ ﲢﺎول أي إﺻﻼح ﺑﺎﺳﺘﺜﻨﺎء اﳊﺎﻟﺔ اﳌﻮﺻﻰ ﺑﻬﺎ ﺧﺎﺻﺔ ﻓﻲ ﺗﻌﻠﻴﻤﺎت اﻟﺼﻴﺎﻧﺔ ﻟﻠﻤﺴﺘﺨﺪم أو ﺗﻌﻠﻴﻤﺎت إﺻﻼح اﳌﺴﺘﺨﺪم اﻟﺼﺎدرة اﻟﺘﻲ ﺗﻔﻬﻤﻬﺎ وﺗﻘﻮم ﺑﻬﺎ ﲟﻬﺎرة. ● اﺗﺮك ﲢﺖ اﳉﻬﺎز وﺣﻮل اﳉﻬﺎز ﺧﺎﻟﻴﺎ ﻣﻦ اﳌﻮاد اﻟﻘﺎﺑﻠﺔ ﻟﻼﺷﺘﻌﺎل ﻣﺜﻞ اﻟﻜﺘﺎن ،واﻟﻮرق ،واﻟﺴﺠﺎدة ،اﳌﻮاد اﻟﻜﻴﻤﺎﺋﻴﺔ ...اﻟﺦ. ● اﻹﺷﺮاف اﻟﺪﻗﻴﻖ ﻣﻄﻠﻮب ﻓﻲ ﺣﺎﻟﺔ أن ﻫﺬا اﳉﻬﺎز ﻳﻌﻤﻞ ﻣﻦ ﻗﺒﻞ أو ﻗﺮﻳﺒﺎ ﻣﻦ اﻷﻃﻔﺎل. ﻻ ﺗﺴﻤﺢ ﻟﻸﻃﻔﺎل ﺑﺎﻟﻠﻌﺐ ﻋﻠﻰ ،ﻣﻊ ،أو داﺧﻞ ﻫﺬا اﳉﻬﺎز أو أي ﺟﻬﺎز آﺧﺮ. ● ﻻ ﺗﺘﺮك ﺑﺎب ﺟﻬﺎز اﻟﻐﺴﺎﻟﺔ ﻣﻔﺘﻮﺣﺎ. اﻟﺒﺎب اﳌﻔﺘﻮح ﻳﻐﺮي اﻷﻃﻔﺎل ﻟﻠﺘﻌﻠﻖ ﺑﺎﻟﺒﺎب أو اﻟﺪﺧﻮل اﻟﻰ داﺧﻞ اﳉﻬﺎز. ● ﻻ ﺗﻼﻣﺲ ﺟﻬﺎز اﻟﻐﺴﺎﻟﺔ أﺛﻨﺎء اﻟﺘﺸﻐﻴﻞ .اﻧﺘﻈﺮ ﺣﺘﻰ ﺗﺘﻮﻗﻒ اﳊﻠﺔ ﻋﻦ اﻟﻌﻤﻞ ﲤﺎﻣﺎ. ● ﻋﻤﻠﻴﺎت اﻟﻐﺴﻴﻞ ﻗﺪ ﺗﺨﻔﺾ ﻣﻘﺎوﻣﺔ اﻻﻟﺘﻬﺎب ﻟﻸﻗﻤﺸﺔ ٪ .ﻻ ﺗﻐﺴﻞ أو ﲡﻔﻒ اﻷﺷﻴﺎء اﻟﺘﻲ ﻳﺘﻢ ﺗﻨﻈﻴﻔﻬﺎ ،ﻏﺴﻴﻠﻬﺎ ،ﻧﻘﻌﻬﺎ أو وﺿﻊ اﻟﻨﻘﺎط ﻋﻠﻴﻬﺎ ﺑﺎﳌﻮاد اﻟﻘﺎﺑﻠﺔ ﻟﻼﺷﺘﻌﺎل أو اﻻﻧﻔﺠﺎر )ﻣﺜﻞ اﻟﺸﻤﻊ ،واﻟﺰﻳﺖ ،واﻟﺪﻫﺎن ،واﻟﻐﺎزوﻟﲔ ،وﻣﺰﻳﻞ اﻟﺸﺤﻢ ،وﻣﺤﻠﻮل اﻟﺘﻨﻈﻴﻒ اﳉﺎف ، واﻟﻜﻴﺮوﺳﲔ ،و (....اﻷﻣﺮ ﻗﺪ ﻳﺆدي اﻟﻰ اﺷﺘﻌﺎل أو اﻧﻔﺠﺎر. ● ﻟﺘﺠﻨﺐ ﻫﺬه اﻟﻨﺘﻴﺠﺔ ،اﺗﺒﻊ ﺗﻌﻠﻴﻤﺎت اﻟﻐﺴﻴﻞ واﻟﺼﻴﺎﻧﺔ ﻣﻦ ﻗﺒﻞ ﺻﺎﻧﻊ اﳌﻼﺑﺲ ﺑﻌﻨﺎﻳﺔ. ● ﻻ ﺗﻀﺮب ﺑﺎب اﻟﻐﺴﺎﻟﺔ ﺑﻌﻨﻒ أو ﻻ ﲢﺎول ﻓﺘﺢ اﻟﺒﺎب ﺑﻘﻮة وﻫﻮ ﻣﻐﻠﻖ .ﻫﺬا ﻗﺪ ﻳﺆدي اﻟﻰ إﺣﺪاث ﺿﺮر ﻓﻲ اﻟﻐﺴﺎﻟﺔ. ● ﻟﺘﺨﻔﻴﻒ اﺣﺘﻤﺎل ﺻﺪﻣﺎت ﻛﻬﺮﺑﺎﺋﻴﺔ ،اﻓﺼﻞ ﻗﺎﺑﺲ اﳉﻬﺎز ﻋﻦ ﻣﺨﺮج اﻟﺘﻴﺎر أو اﻓﺼﻞ ﺟﻬﺎز اﻟﻐﺴﺎﻟﺔ ﻋﻦ ﻣﻮزع اﻟﻜﻬﺮﺑﺎء ﻓﻲ اﻟﺒﻴﺖ ﺑﻮاﺳﻄﺔ إزاﻟﺔ ﺻﻬﻴﺮة أو إﻳﻘﺎف ﻗﺎﻃﻊ اﻟﺪاﺋﺮة ﻗﺒﻞ ﻣﺤﺎوﻟﺔ أي ﺻﻴﺎﻧﺔ أو ﺗﻨﻈﻴﻒ. ● ﻻ ﲢﺎول ﺗﺸﻐﻴﻞ ﻫﺬا اﳉﻬﺎز ﻓﻲ ﺣﺎﻟﺔ ﺣﺪوث ﺿﺮر ،ﻋﻄﻞ ،ﻓﻚ ﺟﺰﺋﻲ ،أو ﻓﻘﺪ ﻗﻄﻌﺔ أو اﻧﻜﺴﺎر ﻗﻄﻊ ،ﲟﺎ ﻓﻴﻬﺎ ﺳﻠﻚ أو ﻗﺎﺑﺲ ﻣﺘﻀﺮر. اﺣﻔﻆ ﻫﺬه اﻟﺘﻌﻠﻴﻤﺎت ﺗﻌﻠﻴﻤﺎت اﻟﺘﻮﺻﻴﻞ اﻷرﺿﻲ ﻻ ﺑﺪ ﻣﻦ اﻟﺘﻮﺻﻴﻞ اﻷرﺿﻲ ﻟﻬﺬا اﳉﻬﺎز .ﻓﻲ ﺣﺎﻟﺔ ﺣﺪوث ﻋﻄﻞ أو ﺧﻠﻞ ،اﻟﺘﻮﺻﻴﻞ اﻷرﺿﻲ ﻳﺨﻔﺾ ﺧﻄﺮ اﻟﺼﺪﻣﺎت اﻟﻜﻬﺮﺑﺎﺋﻴﺔ ﺑﺘﻘﺪﱘ ﻣﺮور ﻣﻘﺎوﻣﺔ أﻗﻞ ﻟﻠﺘﻴﺎر اﻟﻜﻬﺮﺑﺎﺋﻲ .ﻫﺬا اﳉﻬﺎز ﻣﺰود ﺑﺴﻠﻚ ذي أداة اﻟﺘﻮﺻﻴﻞ اﻷرﺿﻲ ﻟﻠﺠﻬﺎز وﻗﺎﺑﺲ اﻟﺘﻮﺻﻴﻞ اﻷرﺿﻲ .ﻻ ﺑﺪ ﻣﻦ وﺻﻞ اﻟﻘﺎﺑﺲ اﻟﻰ ﻣﺨﺮج ﺗﻴﺎر ﻣﻨﺎﺳﺐ ﰎ ﺗﺮﻛﻴﺒﻪ وﺗﻮﺻﻴﻠﻪ اﻷرﺿﻲ ﺑﺸﻜﻞ ﺻﺤﻴﺢ وﻓﻘﺎ ﳉﻤﻴﻊ اﻟﺮﻣﻮز اﶈﻠﻴﺔ واﻷﺣﻜﺎم. ● ﻻ ﺗﺴﺘﺨﺪم ﻣﺤﻮﻻ أو إﻻ ،ﻻ ﻳﺼﻠﺢ ﻗﺎﺑﺲ اﻟﺘﻮﺻﻴﻞ اﻷرﺿﻲ. ● إذا ﻟﻢ ﻳﻜﻦ ﻟﺪﻳﻚ ﻣﺨﺮج اﻟﺘﻴﺎر اﳌﻨﺎﺳﺐ ،اﺗﺼﻞ ﺑﻔﻨﻲ ﻛﻬﺮﺑﺎﺋﻲ. ﺗﻨﺒﻴﻪ :اﻟﺘﻮﺻﻴﻞ ﻏﻴﺮ اﻟﺼﺤﻴﺢ ﻹداة اﻟﺘﻮﺻﻴﻞ اﻷرﺿﻲ ﻟﻠﺠﻬﺎز ﻗﺪ ﻳﺆدي اﻟﻰ إﺣﺪاث ﺧﻄﺮ اﻟﺼﺪﻣﺎت اﻟﻜﻬﺮﺑﺎﺋﻴﺔ .ﺗﺄﻛﺪ ﻣﻦ اﻟﺘﻮﺻﻴﻞ اﻟﺼﺤﻴﺢ ﻣﻦ ﻗﺒﻞ ﻓﻨﻲ ﻛﻬﺮﺑﺎﺋﻲ ﻣﺆﻫﻞ أو ﻓﻨﻲ ﻟﻠﺨﺪﻣﺎت ﻓﻲ ﺣﺎﻟﺔ أﻧﻚ ﺗﺸﻚ ﻓﻲ اﻟﺘﻮﺻﻴﻞ اﻷرﺿﻲ ﻟﻠﺠﻬﺎز .ﻻ ﺗﻌﺪل اﻟﻘﺎﺑﺲ اﳌﺰود ﺑﺎﳉﻬﺎز -إذا ﻛﺎن ﻣﺨﺮج اﻟﺘﻴﺎر ﻏﻴﺮ ﻛﺐ ﻣﺨﺮج اﻟﺘﻴﺎر اﳌﻨﺎﺳﺐ ﻣﻦ ﻗﺒﻞ ﻓﻨﻲ ﻛﻬﺮﺑﺎﺋﻲ ﻣﺆﻫﻞ. ﻣﻨﺎﺳﺐ ،ر ّ 3 اﳌﻮاﺻﻔﺎت ﻗﺎﺑﺲ اﻟﻄﺎﻗﺔ ﻣﺴﺎﻣﻴﺮ اﻟﺸﺤﻦ ● إذا ﺣﺪث ﺿﺮر ﻓﻲ ﺳﻠﻚ اﻟﺘﻴﺎر، ﻻ ﺑﺪ ﻣﻦ ﺗﺒﺪﻳﻠﻪ ﺑﺠﺪﻳﺪ ﻣﻦ ﻗﺒﻞ اﻟﺼﺎﻧﻊ أو وﻛﻴﻞ اﳋﺪﻣﺎت ﻟﻪ أو ﻓﻨﻲ ﻣﺆﻫﻞ ﺷﺒﻴﻪ ﻣﻦ أﺟﻞ ﲡﻨﺐ ﺧﻄﺮ. اﳌﻮزع ﻟﻮﺣﺔ اﻟﺘﺤﻜﻢ ﺧﺮﻃﻮم اﻟﺘﺼﺮﻳﻒ اﻟﺒﺎب ﺧﺮﻃﻮم اﻟﺘﺼﺮﻳﻒ رﺟﻞ ﻗﺎﺑﻞ ﻟﻠﺘﻌﺪﻳﻞ ﻏﻄﺎء ﻏﻼف أﺳﻔﻞ ﻗﺎﺑﺲ اﻟﺘﺼﺮﻳﻒ ﻣﺼﻔﺎة ﻣﻀﺨﺔ اﻟﺘﺼﺮﻳﻒ ■ اﻻﺳﻢ :ﺟﻬﺎز اﻟﻐﺴﺎﻟﺔ ﺑﺎﳊﻤﻞ اﻷﻣﺎﻣﻲ ■ اﻟﻄﺎﻗﺔ اﻟﻜﻬﺮﺑﺎﺋﻴﺔ 240 -220٠:ﻓﻮﻟﺖ 50 ، -ﻫﻴﺮﺗﺰ ■ اﻷﺑﻌﺎد 635 :ﻣﻠﻢ )ﻋﺮض( × 720ﻣﻠﻢ )ﻋﻤﻖ( × 925ﻣﻠﻢ)ارﺗﻔﺎع( ■ اﻟﻮزن 81 :ﻛﺠﻢ ■ ﺳﻌﺔ اﻟﻐﺴﻴﻞ 10,2 :ﻛﺠﻢ ■اﻟﻮاط اﻷﻗﺼﻰ 2200 :واط)اﻟﻐﺴﻴﻞ( 1900 ،واط)ﺑﺎﻟﺒﺨـﺎر( ■ ﺳﺮﻋﺔ اﻟﺘﺪوﻳﺮ :ﻻ ﲡﻔﻴﻒ1200/1000/800/400/ ■ اﺳﺘﻬﻼك اﳌﺎء 63 :ﻟﺘﺮ ■ ﺿﻐﻂ اﳌﺎء اﳌﺴﻤﻮح 10 - 0,3 :ﻛﺠﻢ.ﻗﻮة/ﺳﻢ (kPa 1000 -30 ) ٢ ٭ ﻗﺪ ﻳﺘﻐﻴﺮ اﳌﻨﻈﺮ واﳌﻮاﺻﻔﺎت ﺑﺪون إﺷﻌﺎر ﻟﺘﺤﺴﲔ ﺟﻮدة اﻷﺟﻬﺰة. ■ اﳌﻠﺤﻘﺎت ﺧﺮﻃﻮم دﺧﻮل اﳌﺎء ) (1EA٭ 4 ﻣﻔﺘﺎح اﻟﺼﻤﻮﻟﺔ اﻟﺘﺮﻛﻴﺐ رﻛّﺐ ﺟﻬﺎز اﻟﻐﺴﺎﻟﺔ أو اﺣﻔﻈﻬﺎ ﻓﻲ ﻣﻜﺎن ﻏﻴﺮ ﻣﻌﺮض ﻟﺪرﺟﺔ اﳊﺮارة أﻗﻞ ﻣﻦ درﺟﺔ اﻟﺘﺠﻤﻴﺪ أو ﻣﻌﺮض ﻟﻠﻄﻘﺲ.اﻋﻤﻞ اﻟﺘﻮﺻﻴﻞ اﻷرﺿﻲ اﳌﻨﺎﺳﺐ ﺑﺎﻟﺘﺄﻛﻴﺪ ﻣﻦ ﺟﻤﻴﻊ اﻟﺮﻣﻮز اﳊﻜﻮﻣﻴﺔ واﻷﺣﻜﺎم. ﻻ ﺑﺪ ﻣﻦ ﻋﺪم ﺳﺪ اﻟﻔﺘﺤﺎت ﲢﺖ اﳉﻬﺎز ﺑﺎﻟﺴﺠﺎدة ﻓﻲ ﺣﺎﻟﺔ ﺗﺮﻛﻴﺐ ﺟﻬﺎز اﻟﻐﺴﺎﻟﺔ ﻋﻠﻰ أرض ﻣﻐﻄﺎة ﺑﺎﻟﺴﺠﺎدة. ﻓﻲ اﻟﺒﻠﺪان اﻟﺘﻲ ﻫﻨﺎك ﻓﻴﻬﺎ ﻣﻨﺎﻃﻖ ﻗﺪ ﺗﻌﺮض ﻟﻜﺜﺮة اﻟﺼﻮﺻﻮر أو اﳊﺸﺮات اﻷﺧﺮى ،ﺧﺬ ﻋﻨﺎﻳﺔ ﺧﺎﺻﺔ ﻣﻦ أﺟﻞ اﻻﺣﺘﻔﺎظ ﺑﻨﻈﺎﻓﺔ اﳉﻬﺎز وﺣﻮﻟﻪ ﻓﻲ ﺟﻤﻴﻊ اﻷوﻗﺎت. ﻻ ﺗﻐﻄﻲ ﺿﻤﺎﻧﺔ ﻫﺬا اﳉﻬﺎز أي ﺿﺮر ﻗﺪ ﲢﺪﺛﻪ اﻟﺼﻮﺻﻮر أو اﳊﺸﺮات اﻷﺧﺮى. ■ ﻣﺴﺎﻣﻴﺮ اﻟﻨﻘﻞ ﰎ ﺗﺜﺒﻴﺖ اﳉﻬﺎز ﺑﻮاﺳﻄﺔ ﻣﺴﺎﻣﻴﺮ اﻟﻨﻘﻞ ﳌﻨﻊ اﳉﻬﺎز ﻋﻦ ﺣﺪوث اﻟﻀﺮر داﺧﻞ اﳉﻬﺎز أﺛﻨﺎء اﻟﻨﻘﻞ. ﻳﺠﺐ ﻧﺰع ﺻﻨﺪوق اﻟﺸﺤﻦ وﻣﺴﺎﻣﻴﺮ اﻟﺘﺮﺣﻴﻞ ﻛﻠﻬﺎ ﻗﺒﻞ اﺳﺘﻌﻤﺎل اﻟﻐﺴﺎﻟﺔ. ﻋﻨﺪ ﻓﺾ ﻗﺎﻋﺪة ﺻﻨﺪوق اﻟﺸﺤﻦ،ﺗﺄﻛﺪ ﻣﻦ ﻧﺰع ﻛﻞ دﻋﺎﻣﺎت ﺻﻨﺪوق اﻟﺸﺤﻦ ﻓﻲ وﺳﻂ ﻗﺎﻋﺪة ﺻﻨﺪوق اﻟﺸﺤﻦ. ﻏﺴﺎﻟﺔ دﻋﺎﻣﺔ ﺻﻨﺪوق اﻟﺸﺤﻦ. ﻗﺪ ﻻ ﻳﺴﺘﺨﺪم ﻣﺴﺎﻋﺪ( )اﳊﺸﻴﺔ ﺣﺴﺐ اﳌﻮدﻳﻞ. ﻗﺎﻋﺪة ﺻﻨﺪوق اﻟﺸﺤﻦ. ■ إزاﻟﺔ ﻣﺴﺎﻣﻴﺮ اﻟﻨﻘﻞ .1ﳌﻨﻊ ﺣﻮدث ﺿﺮر داﺧﻞ اﳉﻬﺎز أﺛﻨﺎء اﻟﻨﻘﻞ ،ﰎ ﺗﺜﺒﻴﺖ اﳉﻬﺎز ﺑـ ٤ﻣﺴﺎﻣﻴﺮ ﺧﺎﺻﺔ .ﻗﺒﻞ ﺗﺸﻐﻴﻞ اﳉﻬﺎز ،ازل اﳌﺴﺎﻣﻴﺮ ﻣﻊ اﻟﺴﺪادات اﳌﻄﺎﻃﻴﺔ ﻟﻠﺜﻘﻮب. .3اﺳﺤﺐ ٤ﻣﺴﺎﻣﻴﺮ ﻣﻊ اﻟﺴﺪادات اﳌﻄﺎﻃﻴﺔ ﻟﻠﺜﻮق ﺑﻠﻮﻳﺎﻟﺴﺪادة ﺑﻘﻠﻴﻞ .اﺣﻔﻆ ٤ﻣﺴﺎﻣﻴﺮ وﻣﻠﻮي اﻟﺼﻤﻮﻟﺔ ﻻﺳﺘﺨﺪاﻣﻬﺎ ﻓﻲ اﳌﺴﺘﻘﺒﻞ. ● إذا ﻟﻢ ﺗﺰﻟﻬﺎ ،ﻫﺬا ﻗﺪ ﻳﺆدي اﻟﻰ إﺣﺪاث اﻫﺘﺰاز ﺷﺪﻳﺪ ،وﺿﺠﻴﺞ وﻋﻄﻞ. ﻛﻠﻤﺎ ﻧﻘﻠﺖ اﳉﻬﺎز ،ﻻ ﺑﺪ ﻣﻦ ﺗﺜﺒﻴﺖ اﳉﻬﺎز ﺑﺎﳌﺴﺎﻣﻴﺮ ﻣﺮة ﺛﺎﻧﻴﺔ. .2ارخ ٤ﻣﺴﺎﻣﻴﺮ ﺑﻮاﺳﻄﺔ ﻣﻔﺘﺎح ﺻﻤﻮﻟﺔ ﻣﺰود ﺑﺎﳉﻬﺎز. .4اﻏﻠﻖ اﻟﻔﺘﺤﺎت ﺑﺎﻷﻏﻄﻴﺔ اﳌﺰودة. 5 اﻟﺘﺮﻛﻴﺐ ■ ﻣﺘﻄﻠﺒﺎت ﻓﻲ ﻣﻜﺎن اﻟﺘﺮﻛﻴﺐ اﻷرض اﳌﺴﺘﻮﻳﺔ : اﻻﻧﺤﺪار اﳌﺴﻤﻮح ﲢﺖ ﺟﻬﺎز اﻟﻐﺴﺎﻟﺔ ﻛﻠﻪ 1درﺟﺔ . ﻣﺨﺮج اﻟﺘﻴﺎر : ﻻ ﺑﺪ ﻣﻦ وﺟﻮده ﻓﻲ ﺿﻤﻦ 1.5ﻣﺘﺮ ﻣﻦ ﺟﺎﻧﺒﻲ اﻟﻐﺴﺎﻟﺔ .ﻻ ﺗﻮﺻﻞ إﻻ ﺟﻬﺎزا واﺣﺪا اﻟﻰ ﻣﺨﺮج اﻟﺘﻴﺎر. اﳌﺴﺎﻓﺔ اﻹﺿﺎﻓﻴﺔ : ﻣﻦ اﳉﺪار ،واﻟﺒﺎب ،واﻷرض اﳌﺴﺎﻓﺔ اﶈﺪدة ﻣﻄﻠﻮﺑﺔ. ) 10ﺳﻢ :ﺧﻠﻒ 2 /ﺳﻢ :ﺟﺎﻧﺒﲔ ﳝﲔ وﻳﺴﺎر( ﻻ ﺗﻀﻊ اﳌﻼﺑﺲ اﻟﺘﻲ ﺗﻐﺴﻠﻬﺎ أو ﲢﻔﻈﻬﺎ ﻋﻠﻰ أﻋﻠﻰ ﺟﻬﺎز اﻟﻐﺴﺎﻟﺔ ﻓﻲ أي وﻗﺖ. ﻫﻲ ﺗﺆﺛﺮ ﻋﻠﻰ اﻧﺘﻬﺎء اﻟﻐﺴﻴﻞ أو اﻟﺘﺤﻜﻢ ﻓﻴﻪ. ■ ﲢﺪﻳﺪ اﳌﻜﺎن ﺗﺄﻛﺪ ﻣﻦ أن دوران اﻟﻬﻮاء ﺣﻮل اﻟﻐﺴﺎﻟﺔ ﻻ ﻳﻌﻴﻘﻪ اﻟﺴﺠﺎد،ﺑﺴﺎط أو ﻏﻴﺮه. • ﻻ ﲢﺎول أﺑﺪا ﺗﺼﺤﻴﺢ أي ﻣﺴﺘﻮى ﻋﻠﻰ اﻟﺒﻼط ﻋﻦ ﻃﺮﻳﻖ ﻗﻄﻊ ﺧﺸﺒﻴﺔ،أﻟﻮاح ﺧﺸﺒﻴﺔ أو ﻣﻮاد ﺷﺒﻴﻪ ﺑﺬﻟﻚ أﺳﻔﻞ اﻟﻐﺴﺎﻟﺔ. • إذا اﺳﺘﺤﺎل ﲡﻨﺐ وﺿﻊ اﻟﻐﺴﺎﻟﺔ ﺑﺎﻟﻘﺮب ﻣﻦ ﻣﻮﻗﺪ ﻏﺎز)ﻓﺮن(أو ﻣﻮﻗﺪ ﻳﻌﻤﻞ ﺑﺎﻟﻔﺤﻢ،ﻳﺠﺐ وﺿﻊ ﻋﺎزل ﻣﻐﻄﻰ ﺑﻮرق أﳌﻮﻧﻴﻮم)ﻓﻮﻳﻞ( ﻋﻠﻰ اﳉﺎﻧﺐ اﳌﻮاﺟﻪ ﻟﻠﻔﺮن أو اﳌﻮﻗﺪ، ﻋﻠﻰ أن ﻳﺘﻢ إدﺧﺎﻟﻪ ﺑﲔ اﳉﻬﺎزﻳﻦ. • ﻳﺠﺐ ﻋﺪم ﺗﺮﻛﻴﺐ اﻟﻐﺴﺎﻟﺔ ﻓﻲ ﻏﺮف ﳝﻜﻦ أن ﺗﻨﺨﻔﺾ درﺟﺔ ﺣﺮارﺗﻬﺎ إﻟﻰ دون اﻟﺼﻔﺮ درﺟﺔ ﻣﺌﻮﻳﺔ. • اﻟﺮﺟﺎء اﻟﺘﺄﻛﺪ ﻋﻨﺪ ﺗﺮﻛﻴﺐ اﻟﻐﺴﺎﻟﺔ ﺳﻬﻮﻟﺔ وﺻﻮل ﻓﻨﻲ اﻟﺼﻴﺎﻧﺔ ﻓﻲ ﺣﺎﻟﺔ ﺗﻌﻄﻠﻬﺎ. • ﻣﻊ ﺗﺮﻛﻴﺐ اﻟﻐﺴﺎﻟﺔ ﻗﻢ ﺑﺘﻌﺪﻳﻞ اﻻﻗﺪام اﻷرﺑﻌﺔ ﺑﺎﺳﺘﻌﻤﺎل ﻣﻔﺘﺎح ﻣﺴﻤﺎر اﻟﺘﺮﺣﻴﻞ اﳌﺰود ﻟﻠﺘﺄﻛﺪ ﻣﻦ اﺳﺘﻘﺮار اﻟﻐﺴﺎﻟﺔ و وﺟﻮد ﺧﻠﻮص ﲟﻘﺪار ٢٠ﻣﻠﻢ ﺑﲔ ﻗﻤﺔ اﻟﻐﺴﺎﻟﺔ واﳉﺎﻧﺐ اﻷﺳﻔﻞ ﻟﻠﻤﺤﺮﻛﺎت اﻟﻌﻠﻴﺎ. 6 اﻟﺘﺮﻛﻴﺐ ■ اﻟﺘﻮﺻﻴﻞ اﻟﻜﻬﺮﺑﺎﺋﻲ .1ﻻ ﺗﺴﺘﺨﺪم ﺳﻠﻜﺎ إﺿﺎﻓﻴﺎ أو ﻣﺤﻮﻻ ﻣﺰدوﺟﺎ. .2إذا ﻛﺎن ﺳﻠﻚ اﻟﺘﻴﺎر ﻣﻀﺮرا ،ﻻ ﺑﺪ ﻣﻦ ﺗﺒﺪﻳﻠﻪ ﺑﺎﳉﺪﻳﺪ ﻣﻦ ﻗﺒﻞ اﻟﺼﺎﻧﻊ أو وﻛﻴﻞ اﳋﺪﻣﺎت ﻟﻪ أو ﻓﻨﻲ ﻣﺆﻫﻞ ﺷﺒﻴﻪ ﻣﻦ أﺟﻞ ﲡﻨﺐ ﺧﻄﺮ. .3اﻧﺰع ﻗﺎﺑﺲ اﳉﻬﺎز داﺋﻤﺎ واﻏﻠﻖ ﺣﻨﻔﻴﺔ اﳌﺎء ﺑﻌﺪ اﺳﺘﺨﺪام اﳉﻬﺎز. .4ﺻﻞ ﺟﻬﺎز اﻟﻐﺴﺎﻟﺔ اﻟﻰ ﻣﺨﺮج اﻟﺘﻴﺎر اﳌﻮﺻﻮل أرﺿﻴﺎ وﻓﻘﺎ ﻷﺣﻜﺎم ﺗﻮﺻﻴﻞ اﻷﺳﻼك. .5ﻻ ﺑﺪ ﻣﻦ وﺿﻊ اﳉﻬﺎز ﺑﺤﻴﺚ ﳝﻜﻦ ﺗﻮﺻﻴﻞ اﻟﻘﺎﺑﺲ اﻟﻰ ﻣﺨﺮج اﻟﺘﻴﺎر ﺑﺴﻬﻮﻟﺔ. ❖ إﺻﻼح ﺟﻬﺎز اﻟﻐﺴﺎﻟﺔ ﻻ ﺑﺪ ﻣﻦ اﻟﻘﻴﺎم ﺑﻪ ﻣﻦ ﻗﺒﻞ اﻟﻔﻨﻲ اﳌﺆﻫﻞ .اﻟﻘﻴﺎم ﺑﺎﻹﺻﻼح ﻣﻦ ﻗﺒﻞ اﻟﻔﻨﻲ ﻏﻴﺮ اﺨﻤﻟﺘﺺ ﻗﺪ ﻳﺆدي اﻟﻰ إﺻﺎﺑﺔ اﻟﺸﺨﺺ ﺑﺎﳉﺮح أو اﻟﻌﻄﻞ اﳋﻄﻴﺮ .اﺗﺼﻞ ﲟﺮﻛﺰ اﳋﺪﻣﺎت اﶈﻠﻲ ﻟﻚ. ﻛﺐ ﺟﻬﺎز اﻟﻐﺴﺎﻟﺔ ﻓﻲ اﻟﻐﺮف اﻟﺘﻲ ﺗﻜﻮن درﺟﺔ اﳊﺮارة ﻓﻴﻬﺎ أﻗﻞ ﻣﻦ درﺟﺔ اﻟﺘﺠﻤﻴﺪ .اﳋﺮﻃﻮم ❖ ﻻ ﺗﺮ ّ اﳌﺘﺠﻤﺪ ﻗﺪ ﻳﻨﻜﺴﺮ ﺑﺎﻟﻀﻐﻂ ﻋﻠﻴﻪ .وﻗﺪ ﺗﺘﻌﻄﻞ وﺣﺪة اﻟﺘﺤﻜﻢ اﻹﻟﻜﺘﺮوﻧﻲ ﻓﻲ درﺟﺔ اﳊﺮارة ﲢﺖ ﻧﻘﻄﺔ اﻟﺘﺠﻤﻴﺪ. ❖ إذا ﰎ ﻧﻘﻞ اﳉﻬﺎز ﻓﻲ اﻷﺷﻬﺮ اﻟﺸﺘﺎﺋﻴﺔ وﻛﺎﻧﺖ درﺟﺔ اﳊﺮارة ﻓﻴﻬﺎ أﻗﻞ ﻣﻦ ﻧﻘﻄﺔ اﻟﺘﺠﻤﻴﺪ :اﺣﻔﻆ ﺟﻬﺎز اﻟﻐﺴﺎﻟﺔ ﻓﻲ درﺟﺔ ﺣﺮارة اﻟﻐﺮﻓﺔ ﳌﺪة ﺑﻌﺾ ﺳﺎﻋﺎت ﻗﺒﻞ ﺗﺸﻐﻴﻠﻪ. ﲢﺬﻳﺮ .tﲢﺬﻳﺮ :ﺑﺎﻟﻨﺴﺒﺔ ﻟﺴﻠﻚ اﻟﺘﻴﺎر اﻟﻜﻬﺮﺑﻲ ،ﻳﻮﺻﻰ ﻓﻲ ﻣﻌﻈﻢ اﻷﺟﻬﺰة ﺑﻮﺿﻊ داﺋﺮة ﻣﺨﺼﺼﺔ ،ذات ﻣﻨﻔﺬ أﺣﺎدي واﻟﺬي ﻳﺰود اﻟﺘﻴﺎر اﻟﻜﻬﺮﺑﻲ ﻟﻠﺠﻬﺎز ﻓﻘﻂ وﻻ ﻳﻮﺟﺪ ﺑﻪ أﻳﺔ ﻣﻨﺎﻓﺬ إﺿﺎﻓﻴﺔ أو دواﺋﺮ ﻓﺮﻋﻴﺔ. اﻧﻈﺮ ﺻﻔﺤﺔ اﳌﻮاﺻﻔﺎت ﻓﻲ دﻟﻴﻞ اﳌﺎﻟﻚ ﻟﻠﺘﺄﻛﺪ. ﻻ ﺗﺰﻳﺪ ﺣﻤﻞ ﻣﻨﺎﻓﺬ اﳊﺎﺋﻂ. ﻓﻜﻞ ﻣﻦ ﻣﻨﺎﻓﺬ اﳊﺎﺋﻂ ذات اﻷﺣﻤﺎل اﻟﻌﺎﻟﻴﺔ ،أو اﻟﺘﺎﻟﻔﺔ أو اﳌﺮﺗﺨﻴﺔ أو أﺳﻼك اﻟﺘﻤﺪﻳﺪ أو اﻷﺳﻼك اﻟﻜﻬﺮﺑﻴﺔ اﻟﺒﺎﻟﻴﺔ أو ﻋﺰل اﻷﺳﻼك اﻟﺘﺎﻟﻔﺔ أو اﳌﺸﻘﻮق ﺧﻄﺮ. وﳝﻜﻦ ﻷي ﻣﻦ ﻫﺬه اﻟﻈﺮوف أن ﺗﺴﺒﺐ ﺻﻌﻖ ﻛﻬﺮﺑﻲ أو اﺷﺘﻌﺎل اﻟﻨﺎر. اﻓﺤﺺ ﺳﻠﻚ اﳉﻬﺎز ،وإذا ﻇﻬﺮ ﻋﻠﻴﻪ أي ﺗﻠﻒ أو إﻫﻼك ،ﻓﺎﻧﺰﻋﻪ ﻣﻦ اﻟﻘﺎﺑﺲ ،وأوﻗﻒ ﺗﺸﻐﻴﻞ اﳉﻬﺎز ،واﺳﺘﺒﺪل اﻟﺴﻠﻚ ﺑﺴﻠﻚ أﺧﺮ ﳑﺎﺛﻞ ﺑﻮاﺳﻄﺔ ﻓﻨﻲ ﺻﻴﺎﻧﺔ ﻣﻌﺘﻤﺪ. اﺣﻤﻲ ﺳﻠﻚ اﻟﺘﻴﺎر اﻟﻜﻬﺮﺑﻲ ﻣﻦ ﺳﻮء اﻻﺳﺘﺨﺪام اﳌﺎدي أو اﳌﻴﻜﺎﻧﻴﻜﻲ ﻛﺄن ﻳﺘﻢ اﻟﺘﻮاﺋﻪ أو ﺧﺮﻗﻪ أو إﻏﻼق اﻟﺒﺎب ﻋﻠﻴﻪ أو اﳌﺸﻲ ﻓﻮﻗﻪ. ﻳﺮﺟﻰ ﻣﺮاﻋﺎة اﻻﻧﺘﺒﺎه ﻋﻨﺪ اﻟﺘﻌﺎﻣﻞ ﻣﻊ اﻟﻘﻮاﺑﺲ وﻣﻨﺎﻓﺬ اﳉﺪران واﻟﻨﻘﻄﺔ اﻟﺘﻲ ﻳﺨﺮج اﻟﺴﻠﻚ ﻣﻨﻬﺎ ﻣﻦ اﳉﻬﺎز. ■ ﺟﻬﺎز اﻟﻐﺴﺎﻟﺔ ﻻ ﺑﺪ ﻣﻦ ﺗﻮﺻﻴﻠﻪ اﻟﻰ ﺣﻨﻔﻴﺔ اﳌﺎء ﺑﻮاﺳﻄﺔ ﻣﺠﻤﻮﻋﺔ ﺧﺮاﻃﻴﻢ ﺟﺪﻳﺪة وﻻ ﺗﺴﺘﺨﺪم ﻣﺠﻤﻮﻋﺔ ﺧﺮاﻃﻴﻢ ﻗﺪﳝﺔ. ■ ﺗﻮﺻﻴﻞ ﺧﺮﻃﻮم ﺗﺰوﻳﺪ اﳌﺎء ❖ ﻻ ﺑﺪ ﻣﻦ ﺿﻐﻂ اﳌﺎء ﻣﻦ ﺑﲔ kPa 30و kPa 1000 ) 10-0,3ﻛﺠﻢ.ﻗﻮة/ﺳﻢ(2 ❖ ﻻ ﺗﻘﺸﺮ أو ﺗﺼﻠّﺐ اﳋﻴﻂ ﻋﻨﺪ ﺗﻮﺻﻴﻞ ﺧﺮﻃﻮم ﺗﻮزﻳﺪ اﳌﺎء اﻟﻰ ﺻﻤﺎم اﻟﺪﺧﻮل. ❖ إذا ﻛﺎن ﺿﻐﻂ اﳌﺎء أﻛﺜﺮ ﻣﻦ ، kPa 1000ﻻ ﺑﺪ ﻣﻦ ﺗﺮﻛﻴﺐ إداة ﺧﻔﺾ اﻟﻀﻐﻂ. ●اﳋﺘﻤﺎن اﳌﻄﺎﻃﻴﺎن ﻣﺰودان ﺑﺨﺮﻃﻮم ﺗﺰوﻳﺪ اﳌﺎء وﻫﺬان ﻣﻦ أﺟﻞ ﻣﻨﻊ ﺗﺴﺮب اﳌﺎء. ● ﺗﺄﻛﺪ ﻣﻦ ﺗﻮﺻﻴﻼت ﺟﻬﺎز اﻟﻐﺴﺎﻟﺔ ﺑﺈﺣﻜﺎم ﺑﻔﺘﺢ ﺣﻨﻔﻴﺔ اﳌﺎء ﲤﺎﻣﺎ. ﺑﺪل اﳋﺮﻃﻮم ● اﻓﺤﺺ ﺣﺎﻟﺔ اﳋﺮﻃﻮم ﻋﻠﻰ ﻓﺘﺮات و ّ ﺑﺠﺪﻳﺪ ﻋﻨﺪ اﳊﺎﺟﺔ. ● ﺗﺄﻛﺪ ﻣﻦ ﻋﺪم وﺟﻮد ﻟﻲ ﻓﻲ اﳋﺮﻃﻮم وﻋﺪم ﺿﻐﻂ اﳋﺮﻃﻮم. ﺗﻮﺻﻴﻠﺔ ﺧﺮﻃﻮم ﺧﺘﻢ ﻣﻄﺎﻃﻲ ﻣﻼﺣﻈﺔ :ﺑﻌﺪ اﻛﺘﻤﺎل اﻟﺘﻮﺻﻴﻞ ،ﻓﻲ ﺣﺎﻟﺔ ﺗﺴﺮب اﳌﺎء ﻛﺮر ﻧﻔﺲ اﳋﻄﻮات .اﺳﺘﺨﺪم ﻣﻦ اﳋﺮﻃﻮمّ ، أﻛﺜﺮ ﻧﻮع ﻣﻦ اﳊﻨﻔﻴﺔ ﺳﻬﻮﻟﺔ ﻹﻣﺪاد اﳌﺎء .وﻓﻲ ﺣﺎﻟﺔ أن اﳊﻨﻔﻴﺔ ﻣﺮﺑﻌﺔ أو ﻛﺒﻴﺮة ﺟﺪا ،اﻧﺰع ﺣﻠﻘﺔ اﻹﺑﻌﺎد ﻗﺒﻞ إدﺧﺎل اﳊﻨﻔﻴﺔ اﻟﻰ اﶈﻮل. 7 اﻟﺘﺮﻛﻴﺐ ■ ﺣﻨﻔﻴﺔ ﻋﺎدﻳﺔ ﺑﺪون ﺧﻴﻂ وﺧﺮﻃﻮم ﺗﺰوﻳﺪ ﻣﺎء ﻣﻨﻨﻮع ﺑﺮﻏﻰ .1ارخ اﻟﺒﺮﻏﻰ ﻟﺘﺜﺒﻴﺖ اﳊﻨﻔﻴﺔ. ﺣﺸﻴﺔ ﻣﻄﺎﻃﻴﺔ .2ادﻓﻊ اﻟﺘﻮﺻﻴﻠﺔ اﻟﻰ اﻷﻋﻠﻰ ﺣﺘﻰ ﺗﺘﺼﻞ اﳊﺸﻴﺔ اﳌﻄﺎﻃﻴﺔ ﺑﺎﳊﻨﻔﻴﺔ ﺑﺈﺣﻜﺎم .ﺛﻢ ﺛﺒﺖ ٤ﺑﺮاﻏﻲ. ﺗﻮﺻﻴﻠﺔ أﻋﻠﻰ .3ادﻓﻊ ﺧﺮﻃﻮم ﺗﺰوﻳﺪ اﳌﺎء اﻟﻰ اﻷﻋﻠﻰ ﻋﻤﻮدﻳﺎ ﺑﺤﻴﺚ ﺗﺘﺼﻞ اﳊﺸﻴﺔ اﳌﻄﺎﻃﻴﺔ اﳌﻮﺟﻮدة داﺧﻞ اﳋﺮﻃﻮم ﺑﺎﳊﻨﻔﻴﺔ ﺑﺈﺣﻜﺎم ﺛﻢ ﺛﺒﺘﻪ ﺑﺘﺪوﻳﺮ اﻟﺒﺮﻏﻰ اﻟﻰ اﻟﻴﻤﲔ. ﺣﺸﻴﺔ ﻣﻄﺎﻃﻴﺔ ﺗﻮﺻﻴﻠﺔ أﻋﻠﻰ ﺑﺮﻏﻰ اﻟﺘﺜﺒﻴﺖ ﺗﻮﺻﻴﻠﺔ أﻋﻠﻰ ﺻﻔﻴﺤﺔ ﺧﺮﻃﻮم ﺗﺰوﻳﺪ اﳌﺎء ■ ﺣﻨﻔﻴﺔ ﻋﺎدﻳﺔ ﺑﺪون ﺧﻴﻂ وﺧﺮﻃﻮم ﺗﺰوﻳﺪ ﻣﺎء ﻣﻦ ﻧﻮع ﳌﺴﺔ واﺣﺪة .1ارخ ﺑﺮﻏﻰ اﻟﺘﻮﺻﻴﻠﺔ اﻷﻋﻠﻰ ﺣﺸﻴﺔ ﻣﻄﺎﻃﻴﺔ ﺗﻮﺻﻴﻠﺔ أﻋﻠﻰ ﺑﺮﻏﻰ اﻟﺘﺜﺒﻴﺖ ﺗﻮﺻﻴﻠﺔ وﺳﻄﻰ .2ادﻓﻊ اﻟﺘﻮﺻﻴﻠﺔ اﻷﻋﻠﻰ اﻟﻰ اﻷﻋﻠﻰ ﺣﺘﻰ ﺗﺘﺼﻞ اﳊﺸﻴﺔ اﳌﻄﺎﻃﻴﺔ ﺑﺎﳊﻨﻔﻴﺔ ﺑﺈﺣﻜﺎم. ﺛﻢ ﺛﺒﺖ ٤ﺑﺮاﻏﻲ. ﺣﺸﻴﺔ ﻣﻄﺎﻃﻴﺔ .3ﺻﻞ ﺧﺮﻃﻮم ﺗﺰوﻳﺪ اﳌﺎء اﻟﻰ اﻟﺘﻮﺻﻴﻠﺔ اﻟﻮﺳﻄﻰ ،ﺑﺪﻓﻊ اﻟﺼﻔﻴﺤﺔ اﻟﻰ اﻷﺳﻔﻞ. ﺗﻮﺻﻴﻠﺔ أﻋﻠﻰ ﺗﻮﺻﻴﻠﺔ أﻋﻠﻰ ﺻﻔﻴﺤﺔ ﺗﻮﺻﻴﻠﺔ وﺳﻄﻰ ﺧﺮﻃﻮم ﺗﺰوﻳﺪ اﳌﺎء ● ﻓﻲ ﺣﺎﻟﺔ أن ﻗﻄﺮ اﳊﻨﻔﻴﺔ أﻛﺒﺮ ﻣﻦ ﺻﻔﻴﺤﺔ اﻟﺪﻟﻴﻞ. دور اﻟﺘﻮﺻﻴﻠﺔ اﻟﻮﺳﻄﻰ ﻟﻜﻲ ● ّ ﻻ ﻳﺘﺴﺮب اﳌﺎء. ● ﺗﺄﻛﺪ ﻣﻦ أن اﳋﺘﻢ اﳌﻄﺎﻃﻲ ﻣﻮﺟﻮد داﺧﻞ ﺗﻮﺻﻴﻠﺔ اﳋﺮﻃﻮم. ﺻﻔﻴﺤﺔ دﻟﻴﻞ ● ﻟﻔﺼﻞ ﺧﺮﻃﻮم ﺗﺰوﻳﺪ اﳌﺎء ﻋﻦ اﻟﺘﻮﺻﻴﻠﺔ اﻟﻮﺳﻄﻰ اﻏﻠﻖ ﺣﻨﻔﻴﺔ اﳌﺎء .ﺛﻢ اﺳﺤﺐ ﺧﺮﻃﻮم ﺗﺰوﻳﺪ اﳌﺎء اﻟﻰ اﻷﺳﻔﻞ ،ﺑﺪﻓﻊ اﻟﺼﻔﻴﺤﺔ اﻟﻰ اﻷﺳﻔﻞ. ﺗﻮﺻﻴﻠﺔ ﺧﺮﻃﻮم ﺗﻮﺻﻴﻠﺔ ﺧﺘﻢ ﻣﻄﺎﻃﻲ اﳊﻨﻔﻴﺔ اﻷﻓﻘﻴﺔ ﻣﺴﺘﺨﺪﻣﺔ ﺣﻨﻔﻴﺔ أﻓﻘﻴﺔ ﺣﻨﻔﻴﺔ إﺿﺎﻓﻴﺔ ﺣﻨﻔﻴﺔ ﻣﺮﺑﻌﺔ 8 ● ﻳﺘﻢ ﺗﻮزﻳﻊ ﺟﻬﺎز اﻟﻐﺴﺎﻟﺔ ﺑﺘﻮﺻﻴﻞ اﳌﺎء اﻟﺒﺎرد ﻓﻘﻂ. ● ﺗﺄﻛﺪ ﻣﻦ أن ﻋﺪم وﺟﻮد ﻟﻲ ﻓﻲ اﳋﺮﻃﻮم وأن اﳋﺮﻃﻮم ﻏﻴﺮ ﻣﻀﻐﻮط. اﻟﺘﺮﻛﻴﺐ ﻫﺬا اﳉﻬﺎز ﻏﻴﺮ ﻣﺼﻤﻢ ﻟﻼﺳﺘﺨﺪام ﻋﻠﻰ ﻣﱳ اﻟﺒﺤﺮ أو ﻟﻼﺳﺘﺨﺪام ﻓﻲ اﻟﻌﺮﺑﺎت اﳌﺘﺤﺮﻛﺔ ﻣﺜﻞ اﻟﻘﺎﻓﻠﺔ واﻟﻄﺎﺋﺮة ...اﻟﺦ. اوﻗﻒ اﳊﻨﻔﻴﺔ ﻓﻲ ﺣﺎﻟﺔ ﻋﺪم اﺳﺘﺨﺪام اﳉﻬﺎز ﳌﺪة ﻃﻮﻳﻠﺔ )ﻣﺜﻞ اﻹﺟﺎزة( ،ﺧﺎﺻﺔ ﻟﻴﺲ ﻫﻨﺎك اﻟﻔﺘﺤﺔ ﻟﻠﺘﺼﺮﻳﻒ ) اﻷﺧﺪود( ﺑﺎﻟﻘﺮب. دﻣﺮ اﻟﻘﺎﺑﻞ واﻛﺴﺮ ﻗﻔﻞ اﻟﺒﺎب ﳌﻨﻊ اﻟﺼﻐﺮ ﻣﻦ ﻋﻨﺪ ﻃﺮد اﳉﻬﺎز ،اﻗﻄﻊ اﻟﻜﺎﺑﻞ اﻟﺮﺋﻴﺴﻲ و ّ ﺳﻘﻮﻃﻬﻢ ﻓﻲ داﺧﻞ اﳉﻬﺎز. ﻣﺎدة اﳊﺸﻴﺔ )ﻣﺜﻞ اﻷﻓﻼم واﻟﺴﺘﻴﺮوﻓﻮم( ﻗﺪ ﺗﻜﻮن ﺧﻄﻴﺮة ﻟﻸﻃﻔﺎل .ﻫﻨﺎك ﺧﻄﺮ اﻻﺧﺘﻨﺎق ! اﺗﺮك ﺟﻤﻴﻊ اﻟﺘﻐﻠﻴﻔﺎت ﺟﻴﺪا ﻋﻠﻰ اﻟﺒﻌﺪ ﻋﻦ اﻷﻃﻔﺎل. ■ ﺗﺮﻛﻴﺐ ﺧﺮﻃﻮم اﻟﺘﺼﺮﻳﻒ 100ﺳﻢ 60ﺳﻢ ﻋﻠﻰ اﻷﻗﻞ 100ﺳﻢ ﻋﻠﻰ اﻷﻗﺼﻰ 100ﺳﻢ ﻋﻠﻰ اﻷﻗﺼﻰ 105ﺳﻢ ﺧﺮﻃﻮم 100ﺳﻢ ﻋﻠﻰ اﻷﻗﺼﻰ 145ﺳﻢ ﺣﻮض اﻟﻐﺴﻴﻞ 60ﺳﻢ ﻋﻠﻰ اﻷﻗﻞ 100ﺳﻢ 105ﺳﻢ ﻣﺤﺘﺰﺟﺔ 60ﺳﻢ ﻋﻠﻰ اﻷﻗﻞ ● ﻋﻨﺪ ﺗﺮﻛﻴﺐ ﺧﺮﻃﻮم اﻟﺘﺼﺮﻳﻒ ﻓﻲ اﻟﺒﺎﻟﻮﻋﺔ، ﺛﺒﺘﻪ ﺑﺈﺣﻜﺎم ﺑﻮاﺳﻄﺔ ﺣﺒﻞ. ● ﺗﺜﺒﻴﺖ ﺧﺮﻃﻮم اﻟﺘﺼﺮﻳﻒ اﳌﻨﺎﺳﺐ ﻳﺤﻤﻲ اﻷرض ﻣﻦ اﻟﻀﺮر ﺑﺴﺒﺐ ﺗﺴﺮب اﳌﺎء. 100ﺳﻢ ﻋﻠﻰ اﻷﻗﺼﻰ 60ﺳﻢ ﻋﻠﻰ اﻷﻗﻞ 145ﺳﻢ ﺣﺰام رﺑﻂ ● ﻻ ﺑﺪ ﻣﻦ وﺿﻊ ﺧﺮﻃﻮم اﻟﺘﺼﺮﻳﻒ ﺑﺎرﺗﻔﺎع أﻋﻠﻰ ﻣﻦ 100ﺳﻢ ﻣﻦ اﻷرض. ● ﺗﺜﺒﻴﺖ ﺧﺮﻃﻮم اﻟﺘﺼﺮﻳﻒ اﳌﻨﺎﺳﺐ ﻳﺤﻤﻲ اﻷرض ﻣﻦ اﻟﻀﺮر ﺑﺴﺒﺐ ﺗﺴﺮب اﳌﺎء. ● ﻓﻲ ﺣﺎﻟﺔ أن ﺧﺮﻃﻮم اﻟﺘﺼﺮﻳﻒ ﻃﻮﻳﻞ ﺟﺪا، ﻳﺮﺟﻰ ﻋﺪم ﻣﻞء اﻟﻐﺴﺎﻟﺔ .ﻫﺬا ﻗﺪ ﻳﺆدي اﻟﻰ إﺣﺪاث ﺿﺠﻴﺞ ﻏﻴﺮ ﻋﺎدي. 9 اﻟﺘﺮﻛﻴﺐ ■ ﺿﺒﻂ اﻻﺳﺘﻮاء .1اﺳﺘﻮاء ﺟﻬﺎز اﻟﻐﺴﺎﻟﺔ اﻟﺼﺤﻴﺢ ﳝﻨﻊ اﻟﻀﺠﻴﺞ واﻻﻫﺘﺰاز ﻛﺐ ﺟﻬﺎز اﻟﻐﺴﺎﻟﺔ ﻋﻠﻰ أرض ﻣﺴﺘﻮﻳﺔ وﺛﺎﺑﺘﺔ ، اﻟﺸﺪﻳﺪ .ر ّ واﻷﻓﻀﻞ ﻓﻲ زاوﻳﺔ اﻟﻐﺮﻓﺔ. ٭ ﻣﻼﺣﻈﺔ:اﻷرض ﻣﻦ اﳋﺸﺐ أو ﻣﻦ ﻧﻮع اﻹﺳﻨﺎد ﻗﺪ ﻳﺆدي اﻟﻰ إﺣﺪاث اﻻﻫﺘﺰاز اﻟﺰاﺋﺪ أو اﳋﻄﺄ ﻓﻲ ﺗﻮازن اﳊﻤﻞ. .2إذا ﻛﺎﻧﺖ اﻷرض ﻏﻴﺮ ﻣﺴﺘﻮﻳﺔ ،اﺿﺒﻂ اﻟﺮﺟﻞ اﻟﻘﺎﺑﻞ ﻟﻠﺘﻌﺪﻳﻞ ﻛﻤﺎ ﺗﺮﻳﺪ ) .ﻻ ﺗﺪﺧﻞ ﻗﻄﻌﺔ ﻣﻦ اﳋﺸﺐ ..اﻟﺦ ﲢﺖ اﻟﺮﺟﻞ( ﺗﺄﻛﺪ ﻣﻦ ﺛﺒﺎت ﺟﻤﻴﻊ أرﺑﻌﺔ أرﺟﻞ ووﺿﻌﻬﺎ ﻋﻠﻰ اﻷرض ﺛﻢ ﺗﺄﻛﺪ ﻣﻦ أن اﳉﻬﺎز ﻣﺴﺘﻮي ﲤﺎﻣﺎ) .اﺳﺘﺨﺪم ﻣﻴﺰان اﻟﺘﺴﻮﻳﺔ( ﺻﻤﻮﻟﺔ رﺑﻂ رﺟﻞ ﻗﺎﺑﻞ ﻟﻠﺘﻌﺪﻳﻞ أﺳﻔﻞ رﺟﻞ ﻗﺎﺑﻞ ﻟﻠﺘﻌﺪﻳﻞ أﻋﻠﻰ رﺟﻞ ﻗﺎﺑﻞ ﻟﻠﺘﻌﺪﻳﻞ ٭ ﺑﻌﺪ ﺗﻌﺪﻳﻞ اﻟﻘﺪم،أﺣﻜﻢ رﺑﻂ ﺻﻤﻮﻟﺔ اﻟﺮﺑﻂ ﻋﻦ ﻃﺮﻳﻖ ﺗﺪوﻳﺮﻫﺎ ﻋﻜﺲ اﲡﺎه دوران اﻟﺴﺎﻋﺔ. ٭ ﻓﻲ ﺣﺎﻟﺔ ﺗﺮﻛﻴﺐ ﺟﻬﺎز اﻟﻐﺴﺎﻟﺔ ﻋﻠﻰ ﻣﻨﺼﺔ ﻣﺮﺗﻔﻌﺔ ،ﻻ ﺑﺪ ﻣﻦ ﺗﺜﺒﻴﺘﻪ ﺑﺈﺣﻜﺎم ﻣﻦ أﺟﻞ ﲡﻨﺐ اﳋﻄﺮ ﻟﻴﺴﻘﻂ ﻋﻠﻰ اﻷرض. ٭ اﻟﻔﺤﺺ اﻟﻘﻄﺮي ﻋﻨﺪ اﻟﻀﻐﻂ ﻋﻠﻰ ﺣﺎﻓﺔ أﻋﻠﻰ ﺟﻬﺎز اﻟﻐﺴﺎﻟﺔ ﻗﻄﺮﻳﺎ ،ﻻ ﺑﺪ ﻣﻦ ﻋﺪم ﲢﺮك ﺟﻬﺎز اﻟﻐﺴﺎﻟﺔ اﻟﻰ اﻷﻋﻠﻰ واﻷﺳﻔﻞ أﺑﺪا. )ﻳﺮﺟﻰ ﻓﺤﺺ ﻛﻼ اﻻﲡﺎﻫﲔ( إذا ﲢﺮك ﺟﻬﺎز اﻟﻐﺴﺎﻟﺔ ﻋﻨﺪ اﻟﻀﻐﻂ ﻋﻠﻰ أﻋﻠﻰ ﺟﻬﺎز اﻟﻐﺴﺎﻟﺔ ﻗﻄﺮﻳﺎ ،اﺿﺒﻂ اﻷرﺟﻞ ﻣﻦ ﺟﺪﻳﺪ. ﺑﻼط ﻣﺴﻠﺢ • ﻳﺠﺐ أن ﻳﻜﻮن ﺳﻄﺢ اﻟﺘﺮﻛﻴﺐ ﻧﻈﻴﻔﺎ،ﺟﺎﻓﺎ وﻣﺴﺘﻮﻳﺎ. • رﻛﺐ اﻟﻐﺴﺎﻟﺔ ﻋﻠﻰ ﺑﻼط ﺻﻠﺪ ﻣﺴﻄﺢ. اﻷرض ﻣﻦ اﻟﻘﺮاﻣﻴﺪ )اﻷرض اﻟﺰاﻟﻘﺔ( ﻋﺪل اﺳﺘﻮاء اﳉﻬﺎز ﻣﻨﺎﺳﺒﺎ )اﻗﻄﻊ ﻣﺴﻨﺪ ﻗﺪم ﺑـ 70 × 70ﻣﻠﻢ( واﻟﺼﻖ اﻟﻘﻄﻊ ﻋﻠﻰ • ﺿﻊ ﻛﻞ ﻗﺪم ﻣﻦ اﳉﻬﺎز ﻋﻠﻰ ﻛﻞ ﻣﺴﻨﺪ ﻟﻬﺎ و ّ اﻟﻘﺮﻣﺪة اﳉﺎﻓﺔ ﺑﺤﻴﺚ اﳉﻬﺎز ﻣﻮﺟﻮد(. ٭ ﻣﺴﻨﺪ اﻟﻘﺪم ﺻﻨﻊ ﻣﻦ اﳌﺎدة اﻟﻼﺻﻘﺔ اﻟﺬاﺗﻴﺪ اﻟﺘﻲ ﺗﺴﺘﺨﺪم ﻋﻠﻰ اﻟﺴﻼﻟﻴﻢ واﳋﻄﻮات اﳌﻀﺎدة ﻟﻠﺰﻟﻖ . أرﺿﻴﺔ ﺧﺸﺒﻴﺔ ﻛﻮب ﻣﻄﺎﻃﻲ • اﻷرﺿﻴﺔ اﳋﺸﺒﻴﺔ ﳝﻜﻦ أن ﺗﺆدي إﻟﻰ اﻻﻫﺘﺰاز. • ﳌﻨﻊ اﻻﻫﺘﺰاز ﻧﻮﺻﻴﻚ ﺑﻮﺿﻊ أﻛﻮاب ﻣﻄﺎﻃﻴﺔ أﺳﻔﻞ ﻛﻞ ﻗﺪم،ﺑﺴﻤﻚ ١٥ﻣﻠﻢ ﻋﻠﻰ اﻷﻗﻞ أﺳﻔﻞ اﻟﻐﺴﺎﻟﺔ،ﻋﻠﻰ أن ﻳﺘﻢ اﻟﺘﺜﺒﻴﺖ ﺑﺎﺛﻨﲔ ﻣﻦ ﺑﻼط ﻣﺴﻠﺢ ﻣﻊ ﻣﺴﺎﻣﻴﺮ. • إذا ﻛﺎن ﳑﻜﻨﺎ،رﻛﺐ اﻟﻐﺴﺎﻟﺔ ﻋﻠﻰ إﺣﺪى زواﻳﺎ اﻟﻐﺮﻓﺔ،ﺣﻴﺚ ﻳﻜﻮن اﻟﺒﻼط أﻛﺜﺮ ﺛﺒﺎﺗﺎ. ٭أدﺧﻞ اﻷﻛﻮاب اﳌﻄﺎﻃﻴﺔ ﳋﻔﺾ اﻹﻫﺘﺰاز. ٭ ﳝﻜﻨﻚ اﳊﺼﻮل ﻋﻠﻰ اﻷﻛﻮاب اﳌﻄﺎﻃﻴﺔ) .ﺑﻲ/رﻗﻢ (4620ER4002Bﻣﻦ ﻗﺴﻢ ﻗﻄﻊ ﻏﻴﺎر ال ﺟﻲ ﻫﺎم! • ﲢﺪﻳﺪ ﻣﻜﺎن اﻟﻐﺴﺎﻟﺔ وﺗﺴﻮﻳﺘﻬﺎ ﻳﺆﻛﺪ ﺗﺸﻐﻴﻞ أﻃﻮل وﻣﻌﺘﻤﺪ وﻣﻨﺘﻈﻢ. • ﻳﺠﺐ أن ﺗﻜﻮن اﻟﻐﺴﺎﻟﺔ ﻓﻲ وﺿﻊ أﻓﻘﻲ ﺑﺎﻟﻜﺎﻣﻞ وأن ﺗﻜﻮن ﻓﻲ وﺿﻊ ﻣﻌﺘﺪل ﺑﺎﻟﻜﺎﻣﻞ. • ﻳﺠﺐ ﻋﺪم « أرﺟﺤﺔ « ﻛﻞ اﻟﺰواﻳﺎ ﲢﺖ اﻟﺘﺤﻤﻴﻞ. • ﻳﺠﺐ أن ﻳﻜﻮن ﺳﻄﺢ اﻟﺘﺮﻛﻴﺐ ﻧﻈﻴﻔﺎ ،ﺧﺎﻟﻴﺎ ﻣﻦ ﺷﻤﻊ اﻟﺒﻼط وأي ﻃﻼء ﻟﺰج. • ﻻ ﺗﺘﺮك ﻗﺪم اﻟﻐﺴﺎﻟﺔ ﺗﺘﺒﻠﻞ .إذا أﺻﺒﺤﺖ ﻗﺪم اﻟﻐﺴﺎﻟﺔ ﻣﺘﺒﻠﻠﺔ ،ﻗﺪ ﻳﺤﺪث زﻟﻘﻬﺎ. 10 اﻟﻌﻨﺎﻳﺔ ﻗﺒﻞ اﻟﻐﺴﻴﻞ ■ ﻗﺒﻞ اﻟﻐﺴﻴﻞ اﻷول اﺧﺘﺮ دورة )ﻗﻄﻦ ْ 60م و اﺿﻒ ﻧﺼﻒ ﺣﻤﻞ ﻣﻦ ﻣﺴﺤﻮق اﻟﻐﺴﻴﻞ( ﺗﺴﻤﺢ ﻟﻠﻮﺣﺪة ﺑﺎﻟﻐﺴﻴﻞ ﺑﺪون وﺿﻊ ﻣﻼﺑﺲ .ﻫﺬا ﻳﺰﻳﻞ اﻟﺮواﺳﺐ ﻣﻦ اﻟﻄﺒﻞ اﻟﺘﻲ ﻗﺪ ﺗﺒﻘﻰ أﺛﻨﺎء إﻧﺘﺎج اﳉﻬﺎز. ■ اﻟﻌﻨﺎﻳﺔ ﻗﺒﻞ اﻟﻐﺴﻴﻞ .1رﻗﻌﺔ اﻟﻌﻨﺎﻳﺔ اﺑﺤﺚ ﻋﻦ رﻗﻌﺔ اﻟﻌﻨﺎﻳﺔ اﳌﻮﺟﻮدة ﻓﻲ ﻣﻼﺑﺴﻚ .ﻫﺬه اﻟﺮﻗﻌﺔ ﺗﻌﺮﻓﻚ ﻣﺤﺘﻮﻳﺎت اﻷﻗﻤﺸﺔ ﳌﻼﺑﺴﻚ وﻛﻴﻔﻴﺔ ﻏﺴﻴﻠﻬﺎ. .2اﻟﻔﺮز ﻟﻠﺤﺼﻮل ﻋﻠﻰ أﻓﻀﻞ ﻧﺘﺎﺋﺞ ،اﻓﺮز اﳌﻼﺑﺲ اﻟﻰ ﻧﻮع ﳝﻜﻦ ﻏﺴﻴﻠﻬﺎ ﺑﺪوران ﻧﻔﺲ اﻟﻐﺴﻴﻞ. درﺟﺔ ﺣﺮارة اﳌﺎء وﺳﺮﻋﺔ اﻟﺘﺪوﻳﺮ واﻷﻗﻤﺸﺔ اﺨﻤﻟﺘﻠﻔﺔ ﻣﻄﻠﻮﺑﺔ ﻟﻐﺴﻴﻠﻬﺎ ﺑﻄﺮق ﻣﺨﺘﻠﻔﺔ. اﻓﺮز داﺋﻤﺎ اﳌﻼﺑﺲ ﺑﺎﻟﻠﻮن اﻟﻐﺎﻣﻖ ﻣﻦ اﳌﻼﺑﺲ ﺑﺎﻟﻠﻮن اﳋﻔﻴﻒ واﳌﻼﺑﺲ اﻟﺒﻴﻀﺎء .اﻏﺴﻞ اﳌﻼﺑﺲ ﻣﻨﻔﺼﻠﺔ ﺑﲔ اﳌﻼﺑﺲ اﳌﺼﺒﻮﻏﺔ واﳌﻼﺑﺲ اﻟﻜﺘﺎﻧﻴﺔ وﻗﺪ ﻳﺤﺪث ﲢﻮﻳﻞ اﻟﻠﻮن ﻟﻠﻤﻼﺑﺲ اﻟﺒﻴﻀﺎء ...اﻟﺦ .إذا أﻣﻜﻦ ،ﻻ ﺗﻐﺴﻞ اﳌﻼﺑﺲ اﻟﺸﺪﻳﺪة اﻟﻮﺳﺦ ﻣﻊ اﳌﻼﺑﺲ اﳋﻔﻴﻔﺔ اﻟﻮﺳﺦ. ﻓﺮز اﳌﻼﺑﺲ وﻓﻘﺎ ﳌﺴﺘﻮي اﻟﻮﺳﺦ. وﺳﺦ )ﺷﺪﻳﺪ ،ﻋﺎدي ،ﺧﻔﻴﻒ( ّ اﻓﺼﻞ اﳌﻼﺑﺲ اﻟﺒﻴﻀﺎء ﻋﻦ اﻷﻗﻤﺸﺔ اﳌﻠﻮﻧﺔ ﻟﻮن )أﺑﻴﺾ ،ﺧﻔﻴﻒ ،ﻏﺎﻣﻖ( ﻛﺘﺎن )ﻣﻨﺘﺠﺎت ﻛﺘﺎﻧﻴﺔ ،ﺟﺎﻣﻊ ﻛﺘﺎن( اﻏﺴﻞ ﻣﻨﺘﺠﺎت ﻛﺘﺎﻧﻴﺔ وﻣﻼﺑﺲ ﻳﺠﻤﻊ اﻟﻜﺘﺎب اﻧﻔﺼﺎﻻ. .3اﻟﻌﻨﺎﻳﺔ ﻗﺒﻞ اﳊﻤﻞ ■ ﺿﻊ اﳌﻼﺑﺲ اﻟﻜﺒﻴﺮة واﻟﺼﻐﻴﺮة ﻣﻌﺎ .ﻓﻲ ﻫﺬه اﳊﺎﻟﺔ ،ﺿﻊ اﳌﻼﺑﺲ اﻟﻜﺒﻴﺮة أوﻻ .ﻻ ﺑﺪ ﻣﻦ ﻋﺪم وﺿﻊ اﳌﻼﺑﺲ اﻟﻜﺒﻴﺮة أﻛﺜﺮ ﻣﻦ ﻧﺼﻒ ﻛﻞ اﳊﻤﻞ. ﻻ ﺗﻐﺴﻞ اﳌﻼﺑﺲ اﻟﻔﺮدﻳﺔ .ﻫﺬا ﻗﺪ ﻳﺆدي اﻟﻰ ﻋﺪم اﻟﺘﻮازن ﻓﻲ اﳊﻤﻞ .اﺿﻒ ﻗﻄﻌﺔ أو ﻗﻄﻌﺘﲔ ﻣﺘﺸﺎﺑﻬﺘﲔ. ● اﻓﺤﺺ ﺟﻤﻴﻊ اﳉﻴﻮب ﻟﻠﺘﺄﻛﺪ ﻣﻦ أﻧﻬﺎ ﻓﺎرﻏﺔ. اﻷﺷﻴﺎء ﻣﺜﻞ اﳌﺴﺎﻣﻴﺮ ،وﻣﺸﺒﻚ اﻟﺸﻌﺮ ،وﻋﻮد اﻟﺜﻘﺎب ، اﻷﻗﻼم ،واﻟﻘﻄﻊ اﳌﻌﺪﻧﻴﺔ واﳌﻔﺎﺗﻴﺢ ﻗﺪ ﺗﺆدي اﻟﻰ إﺣﺪاث ﺿﺮر ﻓﻲ ﻛﻠﻲ ﺟﻬﺎز اﻟﻐﺴﺎﻟﺔ واﳌﻼﺑﺲ. ● اﻏﻠﻖ اﻟﺴﺤﺎب ،اﳋﻄﺎف ،واﳊﺒﻞ ﻟﻠﺘﺄﻛﺪ ﻣﻦ أن ﻫﺬه اﳌﻮاد ﻻ ﺗﻌﻠﻖ ﺑﺎﳌﻼﺑﺲ اﻷﺧﺮى. ● اﻣﺴﺢ اﻟﻮﺳﺦ واﻟﺒﻘﻊ ﺑﻮاﺳﻄﺔ ﻓﺮﺷﺎة ﻣﻊ ﺳﺎﺋﻞ اﻟﻐﺴﻴﻞ اﻟﻘﻠﻴﻞ ﺑﺎﳌﺎء ﻋﻠﻰ اﻟﻮﺳﺦ ﻣﺜﻞ اﻟﻴﺎﻗﺔ واﻟﻜﻢ ﻟﻠﻤﺴﺎﻋﺪة ﻓﻲ إزاﻟﺔ اﻟﻮﺳﺦ. ● اﻓﺤﺺ اﻟﻄﻴﺎت ﻟﻠﺤﺸﻴﺔ اﳌﺮﻧﺔ)رﻣﺎدﻳﺔ( واﻧﺰع أي أﺷﻴﺎء ﺻﻐﻴﺮة إذا ﻛﺎﻧﺖ ﻣﻮﺟﻮدة. ● اﻓﺤﺺ داﺧﻞ اﳊﻮض واﻧﺰع أي أﺷﻴﺎء ﻣﻮﺟﻮدة داﺧﻠﻪ ﻣﻦ أﺟﻞ دورة اﻟﻐﺴﻴﻞ اﻟﻘﺎدﻣﺔ. ● اﺧﺮج أي ﻣﻼﺑﺲ أو أﺷﻴﺎء ﻓﻲ اﳊﺸﻴﺔ اﳌﺮﻧﺔ ﳌﻨﻊ اﳌﻼﺑﺲ واﳊﺸﻴﺔ ﻣﻦ اﻷﺿﺮار. 11 إﺿﺎﻓﺔ ﻣﺎدة اﻟﺘﻨﻈﻴﻒ ■ إﺿﺎﻓﺔ ﻣﺎدة اﻟﺘﻨﻈﻴﻒ وﻣﻠﲔ اﻟﻘﻤﺎش .1دوﻻب اﻟﺘﻮزﻳﻊ ● اﻟﻐﺴﻴﻞ اﻟﺮﺋﻴﺴﻲ ﻓﻘﻂ ● اﻟﻐﺴﻴﻞ اﻷوﻟﻲ +اﻟﻐﺴﻴﻞ اﻟﺮﺋﻴﺴﻲ ﻣﺎدة اﻟﺘﻨﻈﻴﻒ ﻟﻠﻐﺴﻴﻞ اﻷوﻟﻲ ﻣﻠﲔ اﻟﻘﻤﺎش ﻣﺎدة اﻟﺘﻨﻈﻴﻒ ﻟﻠﻐﺴﻴﻞ اﻟﺮﺋﻴﺴﻲ .2إﺿﺎﻓﺔ ﻣﻠﲔ اﻟﻘﻤﺎش ● ﻻ ﲤﻸ ﻣﻠﲔ اﻟﻘﻤﺎش أﻛﺜﺮ ﻣﻦ اﳋﻂ اﻷﻗﺼﻰ ﻟﻠﻤﻞء. اﻹﻓﺮاط ﻓﻲ اﳌﻞء ﻗﺪ ﻳﺆدي اﻟﻰ ﺗﻮزﻳﻊ ﻣﻠﲔ اﻟﻘﻤﺎش اﻟﺬي ﻳﻮﺳﺦ اﳌﻼﺑﺲ. ● ﻻ ﺗﺘﺮك ﻣﻠﲔ اﻟﻘﻤﺎش ﻓﻲ دوﻻب ﻣﺎدة اﻟﺘﻨﻈﻴﻒ ﳌﺪة أﻛﺜﺮ ﻣﻦ ﻳﻮﻣﲔ. )ﻣﻠﲔ اﻟﻘﻤﺎش ﻗﺪ ﻳﺘﺼﻠّﺐ( ● ﺗﺘﻢ إﺿﺎﻓﺔ ﻣﻠﲔ اﻟﻘﻤﺎش أﺛﻨﺎء آﺧﺮ دوران ﻣﻦ اﻟﺸﻄﻒ أوﺗﻮﻣﺎﺗﻴﻜﻴﺎ. ● ﻻ ﺗﻔﺘﺢ اﻟﺪوﻻب أﺛﻨﺎء ﺗﻮزﻳﺪ اﳌﺎء. ● اﶈﻠﻮﻻت )ﺑﻨﺰﻳﻦ ...اﻟﺦ( ﻏﻴﺮ ﻣﺴﻤﻮﺣﺔ. ﻣﻼﺣﻈﺔ :ﻻ ﺗﺼﺐ ﻣﻠﲔ اﻟﻘﻤﺎش ﻋﻠﻰ اﳌﻼﺑﺲ ﻣﺒﺎﺷﺮة. 12 إﺿﺎﻓﺔ ﻣﺎدة اﻟﺘﻨﻈﻴﻒ .3ﺟﺮﻋﺔ ﻣﺎدة اﻟﺘﻨﻈﻴﻒ ● ﻻ ﺑﺪ ﻣﻦ اﺳﺘﺨﺪام ﻣﺎدة اﻟﺘﻨﻈﻴﻒ وﻓﻘﺎ ﻟﺘﻌﻠﻴﻤﺎت ﻣﺎدة اﻟﺘﻨﻈﻴﻒ ﻣﻦ ﻗﺒﻞ اﻟﺼﺎﻧﻊ. ● إذا اﺳﺘﺨﺪﻣﺖ ﻛﻤﻴﺔ ﻣﻦ ﻣﺎدة اﻟﺘﻨﻈﻴﻒ أﻛﺜﺮ ﻣﻦ اﻟﻜﻤﻴﺔ اﳌﻮﺻﻰ ﺑﻬﺎ ،ﻗﺪ ﲢﺪث اﻟﺮﻏﻮة اﻟﻜﺜﻴﺮة ﺟﺪا وﻫﺬا ﻳﺨﻔﺾ ﻛﻔﺎءة اﻟﻐﺴﻴﻞ أو ﻳﺆدي اﻟﻰ اﳊﻤﻞ اﻟﺜﻘﻴﻞ ﻟﻠﻤﻮﺗﻮر. )ﻳﺆدي اﻟﻰ اﻟﻌﻄﻞ( ● اﺳﺘﺨﺪم ﻣﺴﺤﻮق ﻣﺎدة اﻟﺘﻨﻈﻴﻒ ﻓﻘﻂ ﳉﻬﺎز اﻟﻐﺴﺎﻟﺔ ﺑﺎﳊﻤﻞ اﻷﻣﺎﻣﻲ. ٭ اﻟﻠﻤﺤﺎت اﳊﻤﻞ اﻟﻜﺎﻣﻞ :وﻓﻘﺎ ﻟﻨﺼﺎﺋﺢ اﻟﺼﺎﻧﻊ. اﳊﻤﻞ اﳉﺰﺋﻲ 4/3 :ﻣﻦ اﻟﻜﻤﻴﺔ اﻟﻌﺎدﻳﺔ اﳊﻤﻞ اﻷدﻧﻰ 2/1 :ﻣﻦ اﳊﻤﻞ اﻟﻜﺎﻣﻞ ● ﺗﺘﺪﻓﻖ ﻣﺎدة اﻟﺘﻨﻈﻴﻒ ﻣﻦ اﳌﻮزع ﻓﻲ ﺑﺪاﻳﺔ اﻟﺪوران. .5اﺳﺘﺨﺪام اﻷﻗﺮاص. (١اﻓﺘﺢ اﻟﺒﺎب وﺿﻊ اﻷﻗﺮاص ﻓﻲ اﳊﻮض. ﻛﻤﻴﺔ ﻣﺎدة اﻟﺘﻨﻈﻴﻒ ﳝﻜﻦ ﺗﻌﺪﻳﻠﻬﺎ ﺣﺴﺐ درﺟﺔ ﺣﺮارة اﳌﺎء ،وﻧﻮع اﳌﺎء ،وﻛﻤﻴﺔ اﳌﻼﺑﺲ ،وﻣﺴﺘﻮى اﻟﻮﺳﺦ ﻟﻠﻤﻼﺑﺲ .ﻣﻦ أﺟﻞ أﻓﻀﻞ ﻧﺘﺎﺋﺞ ،ﲡﻨﺐ اﻟﺮﻏﻮة اﻟﺰاﺋﺪة. .4ﻣﻨﻘﻲ اﳌﺎء (٢ﺿﻊ اﳌﻼﺑﺲ ﻓﻲ اﳊﻮض. ﻣﻨﻘﻲ اﳌﺎء ﻣﺜﻞ اﻟﻜﺎﳉﻮن ﳝﻜﻦ اﺳﺘﺨﺪاﻣﻪ ﳋﻔﺾ ﻛﻤﻴﺔ ﻣﻦ ﻣﺴﺤﻮق اﻟﻐﺴﻴﻞ ﻓﻲ ﻣﻨﺎﻃﻖ ﻓﻴﻬﺎ اﳌﺎء اﻟﻌﺴﻴﺮ ﻟﻠﻐﺎﻳﺔ. وزﻋﻪ وﻓﻘﺎ ﻟﻠﻜﻤﻴﺔ اﳌﺒﻴﻨﺔ ﻓﻲ اﻟﻌﻠﺒﺔ .واﺿﻒ ّ ﻣﺴﺤﻮق اﻟﻐﺴﻴﻞ أوﻻ ﺛﻢ ﻣﻨﻘﻲ اﳌﺎء. (٣اﻏﻠﻖ اﻟﺒﺎب. ● اﺳﺘﺨﺪم ﻛﻤﻴﺔ ﻣﻦ ﻣﺴﺤﻮق اﻟﻐﺴﻴﻞ ﻟﺘﻨﻘﻴﺔ اﳌﺎء. 13 اﻟﻮﻇﻴﻔﺔ ■ اﻟﺪوران اﳌﻮﺻﻰ ﺑﻪ وﻓﻘﺎ ﻟﻨﻮع اﻟﻐﺴﻴﻞ اﻟﺒﺮﻧﺎﻣﺞ درﺟﺔ ﺣﺮارة ﻣﻨﺎﺳﺒﺔ ﻧﻮع اﻟﻘﻤﺎش اﻟﻘﻄﻦ اﻓﺤﺺ إذا ﻛﺎن اﻟﻐﺴﻴﻞ ﺑﺎﳉﻬﺎز ﳑﻜﻨﺎ أم ﻻ) .ﻗﻄﻦ أﺑﻴﺾ ،ﻣﻨﺸﻔﺔ ﻛﺘﺎﻧﻴﺔ ، أﻏﻄﻴﺔ( اﻻﺻﻄﻨﺎﻋﻲ ﺑﻮﻟﻴﻤﺎﻳﺪ ،اﻛﻠﻴﻠﻴﻚ ، ﺑﻮﻟﻴﺴﺘﻴﺮ ْ 40م )ﺑﺎرد ْ 30 ،م ْ 60،م( ْ 95م ) ْ 60م ْ 40،م( رﻋﺎﻳﺔ اﻷﻃﻔﺎل ﻏﺴﻞ ﻣﻼﺑﺲ اﻷﻃﻔﺎل إﻋﺎدة اﻹﻧﻌﺎش اﻟﻘﻤﺼﺎن واﻟﺒﻠﻮزات ﻣﻦ ﻗﻄﻦ ﻣﺰﻳﺞ ،ﺑﻮﻟﻴﺴﺘﻴﺮ ﻣﺰﻳﺞ اﻟﺮﻗﻴﻖ ﻣﻼﺑﺲ رﻗﻴﻘﺔ وﺳﻬﻠﺔ اﻟﻀﺮر اﻟﺼﻮف/ اﳊﺮﻳﺮ اﻟﺼﻮف اﻟﻘﺎﺑﻞ ﻟﻠﻐﺴﻴﻞ ﻓﻲ ﺟﻬﺎ ز اﻟﻐﺴﺎﻟﺔ ﻣﻊ اﻟﺼﻮف/اﳊﺮﻳﺮ اﳋﺎﻟﺺ اﳉﺪﻳﺪ ﻓﻘﻂ اﻟﻐﺴﻴﻞ اﻟﻴﺪوي ﻋﻼﻣﺔ « اﻟﻐﺴﻴﻞ اﻟﻴﺪوي « ﻣﻮﺿﻮﻋﺔ ﻟﻠﻤﻼﺑﺲ اﻟﺼﻮﻓﻴﺔ اﻟﺮﻗﻴﻘﺔ. اﻟﺴﺮﻳﻊ ٣٠ اﳌﻼﺑﺲ اﳌﻠﻮﻧﺔ اﳋﻔﻴﻔﺔ اﻟﻮﺳﺦ اﻟﺪﻓﺘﲔ ْ 60م )ﺑﺎرد ْ 30 ،م، ْ 40م ْ 95 ،م( _ اﺧﺘﻴﺎري -اﻟﻐﺴﻴﻞ اﻷوﻟﻲ ﻣﻘﺪر اﻟﺸﻄﻒ +اﻟﺘﺠﻔﻴﻒ اﻟﺪورة ﻓﻘﻂ أﻗﻞ ﺑﺨﺎرأﻗﻞ ﻣﻦ٠ اﻗﺘﺼﺎد اﻟﺒﺨﺎر 5ﻛﺠﻢ اﻟﻜﺜﻴﻒأﻗﻞ ﻣﻦ٠ ﺗﻮرﺑﻮ اﻟﺒﺨﺎر 6ﻛﺠﻢ -ﺗﻮرﺑﻮ اﻟﺒﺨﺎر ٥ﻣﻮاد أﻗﻞ ﻣﻦ٠ 4ﻛﺠﻢ ْ 40م )ﺑﺎرد ْ 30 ،م( ْ 30م )ﺑﺎرد ْ 40 ،م( ﺣﻤﻞ أﻗﺼﻰ اﻟﺸﻄﻒ +اﻟﺘﺠﻔﻴﻒ اﻟﺪورة ﻓﻘﻂ -اﻟﻜﺜﻴﻒ أﻗﻞ ﻣﻦ٠ 3ﻛﺠﻢ أﻗﻞ ﻣﻦ٠ 3ﻛﺠﻢ أﻗﻞ ﻣﻦ٠ 5ﻛﺠﻢ ﻏﻄﺎء اﻟﺴﺮﻳﺮ اﳌﻤﺘﻠﺊ ﺑﺎﻟﻘﻄﻦ ، اﻟﺪﻓﺘﲔ ،اﻟﻮﺳﺎدة ،اﻟﺒﻄﺎﻧﺔ ، ﻏﻄﺎء اﻷرﻳﻜﺔ اﳌﻤﺘﻠﺊ اﻣﺘﻼءا ﺧﻔﻴﻔﺎ. ْ 40م )ﺑﺎرد ْ 30 ،م( ﺣﺠﻢ ﻛﺒﻴﺮ ) ٩ﻗﻄﻊ ﻣﻦ اﳌﻼﺑﺲ( ٭ درﺟﺔ ﺣﺮارة اﳌﺎء :اﺧﺘﺮ درﺟﺔ ﺣﺮارة اﳌﺎء ﻟﺪورة اﻟﻐﺴﻴﻞ .اﺗﺒﻊ داﺋﻤﺎ ﺗﻮﺻﻴﺎت ﺻﺎﻧﻊ اﻷﻗﻤﺸﺔ أو اﻟﺘﻌﻠﻴﻤﺎت ﻋﻨﺪ اﻟﻐﺴﻴﻞ. ٭ اﻟﻐﺴﻴﻞ اﻷوﻟﻲ :ﻟﻠﻤﻼﺑﺲ ﺛﻘﻴﻠﺔ اﻟﻮﺳﺦ ،دوران «اﻟﻐﺴﻴﻞ اﻷوﻟﻲ« ﻣﻔﻴﺪ. ٭ اﻟﻜﺜﻴﻒ :إذا ﻛﺎﻧﺖ اﳌﻼﺑﺲ ﻣﺘﺴﺨﺔ ﺑﺎﻟﻮﺳﺦ اﻟﺜﻘﻴﻞ ،ﻣﻦ اﻷﻓﻀﻞ اﺳﺘﺨﺪام «اﻟﻜﺜﻴﻒ» اﻻﺧﺘﻴﺎري. ٭ ﺿﺒﻂ اﻟﺒﺮﻧﺎﻣﺞ ﻋﻠﻰ " اﻟﻘﻄﻦ ْ ٦٠م +اﻟﻐﺴﻴﻞ ﺑﺎﻟﺒﺨﺎر +اﻟﻜﺜﻴﻒ " اﻻﺧﺘﻴﺎري ﻟﻼﺧﺘﺒﺎر وﻓﻘﺎ أو ﲟﺮاﻋﺎة EN60456و .IEC60456 ﺧﻴﺎرات اﻟﻨﻈﺎم اﻟﺒﺨﺎري اﻟﺒﺨﺎر ﺗﺮﺑﻮاﻟﺒﺨﺎر اﻗﺘﺼﺎد اﻟﺒﺨﺎر أﻗﻞ ﺑﺨﺎر 14 اﻟﺒﺨﺎر اﻟﺪرﺟﺔ اﳌﺌﻮﻳﺔ اﻟﺒﻘﻊ اﳌﺴﺘﻌﺼﻴﺔ ﻓﻲ اﳌﻼﺑﺲ اﻟﺪاﺧﻠﻴﺔ أو ﻣﻼﺑﺲ اﻷﻃﻔﺎل ْ 60م ﻋﻨﺪﻣﺎ ﺗﺮﻳﺪ ااﺳﺘﻌﻤﺎل اﻟﻐﺴﻞ اﻟﺒﺨﺎري ﻣﻊ اﻗﺘﺼﺎد ﻓﻲ اﻟﻄﺎﻗﺔ اﻟﻜﻬﺮﺑﺎﺋﻴﺔ ،اﺳﺘﻌﻤﻞ ﻫﺬه اﳋﺎﺻﻴﺔ. ْ 40م ﻋﻨﺪﻣﺎ ﺗﺮﻳﺪ ااﺳﺘﻌﻤﺎل اﻟﻐﺴﻞ اﻟﺒﺨﺎري ﻣﻊ اﻗﺘﺼﺎد ﻓﻲ اﻟﻄﺎﻗﺔ اﻟﻜﻬﺮﺑﺎﺋﻴﺔ ،اﺳﺘﻌﻤﻞ ﻫﺬه اﳋﺎﺻﻴﺔ. ْ 30م ﻛﻴﻔﻴﺔ اﺳﺘﺨﺪام اﻟﻐﺴﺎﻟﺔ .1ﻳﺘﻢ اﺧﺘﻴﺎر دورة اﻟﻘﻄﻦ ﻋﻨﺪ اﻟﺒﺪء ﺑﺎﻟﺘﺸﻐﻴﻞ. ● اﺿﻐﻂ ﻋﻠﻰ زر اﻟﻄﺎﻗﺔ ﻟﺘﺸﻐﻴﻞ اﳉﻬﺎز. ● اﺿﻐﻂ ﻋﻠﻰ زر اﻟﺘﺸﻐﻴﻞ/اﻟﺘﻮﻗﻒ اﳌﺆﻗﺖ. ● اﳊﺎﻟﺔ اﻷﺳﺎﺳﻴﺔ اﻟﻐﺴﻴﻞ :اﻟﻐﺴﻴﻞ اﻟﺮﺋﻴﺴﻲ اﻟﺸﻄﻒ 3 :ﻣﺮات اﻟﺪورة : 1200دورة ﻓﻲ اﻟﺪﻗﻴﻘﺔ -درﺟﺔ ﺣﺮارة اﳌﺎء ْ 60 :م .2اﻻﺧﺘﻴﺎر اﻟﻴﺪوي ● اﺿﻐﻂ ﻋﻠﻰ زر اﻟﻄﺎﻗﺔ ﻟﺘﺸﻐﻴﻞ اﳉﻬﺎز. ● اﺧﺘﺮ اﻷﺣﻮال اﻟﺘﻲ ﺗﺮﻳﺪ اﺳﺘﺨﺪاﻣﻬﺎ ،ﺑﺘﺪوﻳﺮ ﺣﻠﻘﺔ اﻟﺒﺮﻧﺎﻣﺞ واﻟﻀﻐﻂ ﻋﻠﻰ ﻛﻞ زر. ﻻﺧﺘﻴﺎر ﻛﻞ ﺣﺎﻻت اﻟﻐﺴﻴﻞ ،ﻳﺮﺟﻰ ﻣﺮاﺟﻌﺔ ﺻﻔﺤﺎت ﻣﻦ 16وﺣﺘﻰ .22 ● اﺿﻐﻂ ﻋﻠﻰ زر اﻟﺘﺸﻐﻴﻞ/اﻟﺘﻮﻗﻒ اﳌﺆﻗﺖ. -اﻟﺒﺮﻧﺎﻣﺞ :اﻟﻘﻄﻦ 15 ﻛﻴﻔﻴﺔ اﺳﺘﺨﺪام اﻟﻐﺴﺎﻟﺔ )(13 )(11) (12 )(8, 9, 10 ) (1اﻟﺰر :اﻟﻄﺎﻗﺔ ) (2ﺑﺮﻧﺎﻣﺞ ) (3اﻟﺰر :اﻟﺘﺸﻐﻴﻞ/اﻟﺘﻮﻗﻒ اﳌﺆﻗﺖ ) (4اﻟﺰر :اﻻﺧﺘﻴﺎري )(6) (7 )(5 )(3 )(4 ) (5اﻟﺰر :إﻏﻼق اﻟﻄﻔﻞ ) (6اﻟﺰر :اﻟﺸﻄﻒ ) (7اﻟﺰر :درﺟﺔ ﺣﺮارة اﳌﺎء ) (8اﻟﺰر :اﻟﻜﺜﻴﻒ اﻟﻄﺎﻗﺔ )(2 ) (9اﻟﺰر :اﳌﻤﻴﺰات ) (10اﻟﺰر :ﺗﺄﺟﻴﻞ اﻟﻮﻗﺖ ) (11اﻟﺰر :اﻟﺼﻔﺎرة ) (12اﻟﺰر :ﺗﻮرﺑﻮ اﻟﺒﺨﺎر )(1 ) (13اﻟﺪورة اﻟﺒﺮﻧﺎﻣﺞ .1اﻟﻄﺎﻗﺔ ● اﺿﻐﻂ ﻋﻠﻰ زر اﻟﻄﺎﻗﺔ ﻟﺘﺸﻐﻴﻞ/إﻳﻘﺎف اﳉﻬﺎز. ● ﻹﻟﻐﺎء وﻇﻴﻔﺔ ﺗﺄﺟﻴﻞ اﻟﻮﻗﺖ ،ﳝﻜﻨﻚ اﺳﺘﺨﺪام ﻫﺬا اﻟﺰر. .2اﻟﺒﺮﻧﺎﻣﺞ اﻷﺳﺎﺳﻲ ● ﻋﻨﺪ اﻟﻀﻐﻂ ﻋﻠﻰ زر اﻟﻄﺎﻗﺔ ،ﺟﻬﺎز اﻟﻐﺴﺎﻟﺔ ﻣﺴﺘﻌﺪ ﻟﺪوران اﳌﻼﺑﺲ اﳌﻠﻮﻧﺔ .واﳊﺎﻻت اﻷﺳﺎﺳﻴﺔ اﻷﺧﺮى ﻛﻤﺎ ﻳﻠﻲ. ● إذا أردت اﻻﺳﺘﻤﺮار ﻓﻲ دوران اﻟﻐﺴﻴﻞ ﺑﺪون اﺧﺘﻴﺎر ﺑﺮﻧﺎﻣﺞ ،اﺿﻐﻂ ﻋﻠﻰ زر اﻟﺘﺸﻐﻴﻞ/اﻟﺘﻮﻗﻒ اﳌﺆﻗﺖ ﻓﻘﻂ ﺛﻢ ﻳﺒﺪأ ﺟﻬﺎز اﻟﻐﺴﺎﻟﺔ ﺑﺎﻟﻌﻤﻞ. ■اﻟﺒﺮﻧﺎﻣﺞ اﻷﺳﺎﺳﻲ ﺑﺮﻧﺎﻣﺞ اﻟﻘﻄﻦ /اﻟﻐﺴﻴﻞ اﻟﺮﺋﻴﺴﻲ /اﻟﺸﻄﻒ اﻟﻌﺎدي 1200 /دورة ﻓﻲ اﻟﺪﻗﻴﻘﺔ / ْ 60م 16 ﺗﺴﺘﺨﺪم 9ﺑﺮاﻣﺞ وﻓﻘﺎ ﻟﻨﻮع اﳌﻼﺑﺲ. ﺳﻴﻀﺎء اﳌﺆﺷﺮ ﻟﻺﺷﺎرة اﻟﻰ اﻟﺒﺮﻧﺎﻣﺞ اﺨﻤﻟﺘﺎر. ● ﻋﻨﺪ اﻟﻀﻐﻂ ﻋﻠﻰ زر اﻟﺘﺸﻐﻴﻞ/اﻟﺘﻮﻗﻒ اﳌﺆﻗﺖ ،ﻳﺘﻢ اﺧﺘﻴﺎر ﺑﺮﻧﺎﻣﺞ اﻟﻘﻄﻦ أوﺗﻮﻣﺎﺗﻴﻜﻴﺎ. ● ﺑﺎﻟﻀﻐﻂ ﻋﻠﻰ زر اﻟﺒﺮﻧﺎﻣﺞ ،ﻳﺘﻢ اﺧﺘﻴﺎر اﻟﺒﺮﻧﺎﻣﺞ ﺑﺎﻟﺘﺮﺗﻴﺐ « اﻟﻘﻄﻦ _ اﻻﺻﻄﻨﺎﻋﻲ _ اﻟﺮﻗﻴﻖ _ اﻟﺼﻮف/اﳊﺮي _ اﻟﻐﺴﻴﻞ اﻟﻴﺪوي _. اﻟﺪﻓﺘﲔ _ اﻟﺴﺮﻳﻊ _ ٣٠إﻋﺎدة اﻹﻧﻌﺎش _ رﻋﺎﻳﺔ اﻷﻃﻔﺎل ﳌﻌﺮﻓﺔ ﻧﻮع اﳌﻼﺑﺲ ﻟﻜﻞ ﺑﺮﻧﺎﻣﺞ ،ﻳﺮﺟﻰ ﻣﺮاﺟﻌﺔ ﺻﻔﺤﺔ .14 ﻛﻴﻔﻴﺔ اﺳﺘﺨﺪام اﻟﻐﺴﺎﻟﺔ اﻟﺘﺸﻐﻴﻞ/اﻟﺘﻮﻗﻒ اﳌﺆﻗﺖ اﻻﺧﺘﻴﺎري ● ﺑﺎﻟﻀﻐﻂ ﻋﻠﻰ اﻟﺰر اﻻﺧﺘﻴﺎري ،ﻗﺪ ﻳﺘﻢ اﺧﺘﻴﺎر اﺣﺪى اﻟﻮﻇﺎﺋﻒ اﻻﺧﺘﻴﺎرﻳﺔ ﻓﻘﻂ. .1اﻟﺘﺸﻐﻴﻞ ● زر اﻟﺘﺸﻐﻴﻞ/اﻟﺘﻮﻗﻒ اﳌﺆﻗﺖ ﻫﺬا ﻳﺴﺘﺨﺪم ﻟﺘﺸﻐﻴﻞ دوران اﻟﻐﺴﻴﻞ أو اﻟﺘﻮﻗﻒ اﳌﺆﻗﺖ ﻣﻦ ﻫﺬا اﻟﺪوران. .2اﻟﺘﻮﻗﻒ اﳌﺆﻗﺖ ● إذا أردت ﺗﻮﻗﻒ اﳉﻬﺎز ﻣﺆﻗﺘﺎ ﻋﻦ دوران اﻟﻐﺴﻴﻞ ،اﺿﻐﻂ ﻋﻠﻰ زر اﻟﺘﺸﻐﻴﻞ/اﻟﺘﻮﻗﻒ اﳌﺆﻗﺖ. ● ﺑﻌﺪ اﻟﻀﻐﻂ ﻋﻠﻰ زر اﻟﺘﻮﻗﻒ اﳌﺆﻗﺖ ﺑﺪون ﺿﻐﻂ ﻋﻠﻰ أي زر ،ﻳﺘﻮﻗﻒ اﳉﻬﺎز ﻋﻦ اﻟﻌﻤﻞ أوﺗﻮﻣﺎﺗﻴﻜﻴﺎ ﺑﻌﺪ ٤دﻗﺎﺋﻖ. اﻟﻜﺸﻒ .1اﻟﻐﺴﻴﻞ اﻷوﻟﻲ ● اﺳﺘﺨﺪم ﻫﺬه اﻟﻮﺿﻌﻴﺔ اﻻﺧﺘﻴﺎرﻳﺔ ﻟﻠﻤﻼﺑﺲ اﳌﻄﻠﻮﺑﺔ ﻟﻠﻐﺴﻴﻞ اﻷوﻟﻲ .اﺿﺒﻂ ١٧دﻗﻴﻘﺔ إﺿﺎﻓﻴﺔ ﻟﻠﻐﺴﻴﻞ اﻷوﻟﻲ واﻟﺘﺼﺮﻳﻒ. ﻋﻨﺪ اﺳﺘﺨﺪام اﻟﻐﺴﻴﻞ اﻷوﻟﻲ اﻻﺧﺘﻴﺎري ،ﻻ ﺗﺴﺘﺨﺪم ﺳﺎﺋﻞاﻟﻐﺴﻴﻞ ﻓﻲ ﺣﻮض اﻟﻐﺴﻴﻞ اﻟﺮﺋﻴﺴﻲ. ● ﻗﺎﺑﻞ ﻟﻼﺳﺘﺨﺪام ﻓﻲ وﺿﻌﻴﺎت اﻟﻘﻄﻦ ،رﻋﺎﻳﺔ اﻷﻃﻔﺎل ، واﻻﺻﻄﻨﺎﻋﻲ. .2اﻟﺸﻄﻒ +اﻟﺘﺠﻔﻴﻒ ● اﺳﺘﺨﺪم ﻫﺬه اﻟﻮﺿﻌﻴﺔ اﻻﺧﺘﻴﺎرﻳﺔ ﻟﻠﺸﻄﻒ ﺛﻢ اﻟﺘﺠﻔﻴﻒ. .3اﻟﺪورة ﻓﻘﻂ ● أﺛﻨﺎء ﻇﻬﻮر " اﻟﻜﺸﻒ " ﻋﻠﻰ ﺷﺎﺷﺔ اﻟﻌﺮض ،ﻳﺪور اﳉﻬﺎز ﺑﺒﻂء وﻳﻜﺸﻒ ﻛﻢ ﻋﺪدا ﻣﻦ اﳌﻼﺑﺲ اﳌﻮﺿﻮﻋﺔ ﻓﻲ اﳊﻮض .وﻳﺴﺘﻐﺮق اﻟﻮﻗﺖ ﺑﻌﺾ ﺛﻮان. ● ﻳﺴﺘﺨﺪم ﻓﻲ اﻟﻘﻄﻦ ،اﻻﺻﻄﻨﺎﻋﻲ ،اﻟﻌﻨﺎﻳﺔ ﻋﻠﻰ اﳊﺴﺎﺳﻴﺔ وﺑﺮﻧﺎﻣﺞ. ﻗﻔﻞ اﻟﺒﺎب ● ﻋﻨﺪﻣﺎ ﺗﺮﻳﺪ اﻟﺪورة ﻓﻘﻂ ،اﺧﺘﺮ ﻫﺬه اﻟﻮﺿﻌﻴﺔ اﻻﺧﺘﻴﺎرﻳﺔ ﻓﻘﻂ. .4أﻗﻞ ﺑﺨﺎر ● ﻋﻨﺪﻣﺎ ﺗﺮﻳﺪ ﻏﺴﻞ ﻛﻤﻴﺔ ﺻﻐﻴﺮة ﻣﻦ اﳌﻼﺑﺲ ﺑﻮاﺳﻄﺔ اﻟﺒﺨﺎر ،اﺳﺘﻌﻤﻞ ﻫﺬه اﳋﺎﺻﻴﺔ. .5اﻗﺘﺼﺎد اﻟﺒﺨﺎر ● ﻳﻀﺎء ﻛﻠﻤﺎ ﻳﺘﻢ ﻗﻔﻞ اﻟﺒﺎب ﻟﻠﻐﺴﺎﻟﺔ. ● ﳝﻜﻨﻚ إﻟﻐﺎء ﻗﻔﻞ اﻟﺒﺎب ﺑﺎﻟﻀﻐﻂ ﻋﻠﻰ زر اﻟﺘﺸﻐﻴﻞ/اﻟﺘﻮﻗﻒ اﳌﺆﻗﺖ ﻹﻳﻘﺎف اﻟﻐﺴﺎﻟﺔ ﻋﻦ اﻟﻌﻤﻞ. ● ﳝﻜﻨﻚ ﻓﺘﺢ اﻟﺒﺎب ﺑﻌﺪ ﺗﺄﺟﻴﻞ ﳌﺪة ﻗﺼﻴﺮة. ● ﻋﻨﺪﻣﺎ ﺗﺮﻳﺪ اﺳﺘﻌﻤﺎل اﻟﻐﺴﻞ اﻟﺒﺨﺎري ﻣﻊ اﻻﻗﺘﺼﺎد ﻓﻲ اﻟﻄﺎﻗﺔ اﻟﻜﻬﺮﺑﺎﺋﻴﺔ، اﺳﺘﻌﻤﻞ ﻫﺬه اﳋﺎﺻﻴﺔ. 17 ﻛﻴﻔﻴﺔ اﺳﺘﺨﺪام اﻟﻐﺴﺎﻟﺔ اﻟﺸﻄﻒ إﻏﻼق اﻟﻄﻔﻞ ● ﺑﺎﻟﻀﻐﻂ ﻋﻠﻰ زر اﻟﺸﻄﻒ ،ﳝﻜﻨﻚ اﺧﺘﻴﺎر ﻧﻮع اﻟﺸﻄﻒ. إذا أردت إﻏﻼق ﺟﻤﻴﻊ اﻷزرار ﳌﻨﻊ ﻃﻔﻞ أو ﻣﻌﻮﻗﲔ ﻋﻦ ﺗﺸﻐﻴﻞ ،ﳝﻜﻨﻚ اﺳﺘﺨﺪام ﻫﺬه اﻟﻮﻇﻴﻔﺔ. ● ﳝﻜﻨﻚ ﺿﺒﻂ إﻏﻼق اﻟﻄﻔﻞ ﺑﺎﻟﻀﻐﻂ ﻋﻠﻰ زر درﺟﺔ Optionوزر Rinseﻓﻲ ﻧﻔﺲ اﻟﻮﻗﺖ . )ﺣﻮاﻟﻲ ﺛﻼث ﺛﻮان( ● ﻋﻨﺪ ﺿﺒﻂ وﻇﻴﻔﺔ إﻏﻼق اﻟﻄﻔﻞ ،ﻻ ﺗﻌﻤﻞ ﺟﻤﻴﻊ اﻷزرار ﺑﺎﺳﺘﺜﻨﺎء زر اﻟﻄﺎﻗﺔ . ● ﻹﻟﻐﺎء ﻧﻈﺎم إﻏﻼق اﻟﻄﻔﻞ ،اﺑﻖ ﺿﺎﻏﻄﺎ ﻋﻠﻰ زر درﺟﺔ Optionوزر Rinseﻓﻲ ﻧﻔﺲ اﻟﻮﻗﺖ ﻣﺮة ﺛﺎﻧﻴﺔ) .ﺣﻮاﻟﻲ ﺛﻼث ﺛﻮان( ● إذا أردت ﺗﻐﻴﻴﺮ اﻟﺒﺮﻧﺎﻣﺞ ﻓﻲ ﺣﺎﻟﺔ ﻋﻤﻞ وﻇﻴﻔﺔ إﻏﻼق اﻟﻄﻔﻞ. .1اﺑﻖ ﺿﺎﻏﻄﺎ ﻋﻠﻰ زردرﺟﺔ Optionوزر Rinseﻣﻌﺎ) .ﺣﻮاﻟﻲ ﺛﻼث ﺛﻮان( .2اﺿﻐﻂ ﻋﻠﻰ زر اﻟﺘﺸﻐﻴﻞ/اﻟﺘﻮﻗﻒ اﳌﺆﻗﺖ . .3ﻏﻴﺮ اﻟﺒﺮﻧﺎﻣﺞ اﳌﻄﻠﻮب واﺿﻐﻂ ﻋﻠﻰ زر اﻟﺘﺸﻐﻴﻞ/اﻟﺘﻮﻗﻒ اﳌﺆﻗﺖ . Change the desired program .1ﻋﺎدي ●ﻳﺠﺮي اﻟﺸﻄﻒ ﺛﻼث ﻣﺮات ﻟﺒﺮاﻣﺞ رﻋﺎﻳﺔ اﻷﻃﻔﺎل /اﻟﻘﻄﻦ /اﻻﺻﻄﻨﺎﻋﻲ ● ﻳﺠﺮي اﻟﺸﻄﻒ ﻣﺮﺗﲔ ﻟﺒﺮاﻣﺞ اﻟﺼﻮف/اﳊﺮﻳﺮ /اﻟﻐﺴﻴﻞ اﻟﻴﺪوي /اﻟﺴﺮﻳﻊ ٣٠ /اﻟﺮﻗﻴﻖ /اﻟﺪﻓﺘﲔ .2ﺷﻄﻒ + ● اﺳﺘﺨﺪام اﻟﺸﻄ اﻹﺿﺎﻓﻲ ﻗﺪ ﻳﺴﺎﻋﺪ ﻋﻠﻰ إزاﻟﺔ رواﺳﺐ ﻣﺴﺤﻮق اﻟﻐﺴﻴﻞ. ● ﺑﺎﺧﺘﻴﺎر وﻇﻴﻔﺔ ﺷﻄﻒ ، +ﻳﺰﻳﺪ وﻗﺖ اﻟﺸﻄﻒ وﻣﺎء اﻟﺸﻄﻒ. .3اﻧﺘﻈﺎر اﻟﺸﻄﻒ ● إذا أردت أن ﺗﺘﺮك اﳌﻼﺑﺲ ﻓﻲ ﺟﻬﺎز اﻟﻐﺴﺎﻟﺔ ﺑﺪون ﲡﻔﻴﻒ ﺑﻌﺪ اﻟﺸﻄﻒ ﳌﻨﻌﻬﺎ ﻣﻦ اﻟﺘﺠﺎﻋﻌﻴﺪ ،ﳝﻜﻨﻚ اﺧﺘﻴﺎر وﻇﻴﻔﺔ اﻧﺘﻈﺎر اﻟﺸﻄﻒ ﺑﺎﻟﻀﻐﻂ ﻋﻠﻰ زر اﻟﺘﺠﻔﻴﻒ. ● ﻣﻦ أﺟﻞ ﻋﻤﻠﻴﺎت اﻟﺘﺼﺮﻳﻒ أو اﻟﺘﺠﻔﻴﻒ ، ﻋﻨﺪ اﻛﺘﻤﺎل وﻇﻴﻔﺔ اﻧﺘﻈﺎر اﻟﺸﻄﻒ ﺑﺎﺳﺘﺨﺪام ﺣﻠﻘﺔ اﻟﺒﺮﻧﺎﻣﺞ ﻳﺠﺮي اﻟﺒﺮﻧﺎﻣﺞ اﳌﻄﻠﻮب. .4ﺷﻄﻒ اﳌﻼﺑﺲ اﻟﻄﺒﻲ ● ﳝﻜﻨﻚ ﺿﺒﻂ وﻇﻴﻔﺔ إﻏﻼق اﻟﻄﻔﻞ ﻓﻲ أي وﻗﺖ وﻳﺘﻢ إﻟﻐﺎء إﻏﻼق اﻟﻄﻔﻞ أوﺗﻮﻣﺎﺗﻴﻜﻴﺎ ﻓﻲ ﺣﺎﻟﺔ ﺣﺪوث اﳋﻄﺄ ﻓﻲ اﻟﺘﺸﻐﻴﻞ .ﻛﻤﺎ ﺗﻌﻤﻞ وﻇﻴﻔﺔ إﻏﻼق اﻟﻄﻔﻞ ﻓﻲ ﺣﺎﻟﺔ اﻧﻄﻔﺎء اﻟﻄﺎﻗﺔ. 18 ● ﻟﻠﺤﺼﻮل ﻋﻠﻰ ﻓﻌﺎﻟﻴﺔ ﻋﺎﻟﻴﺔ أو ﻧﻘﺎء أﻓﻀﻞ ﻋﻨﺪ ﺗﺸﻐﻴﻞ اﻟﺸﻄﻒ ،ﳝﻜﻦ اﺧﺘﻴﺎر اﳋﻴﺎر ﺷﻄﻒ اﳌﻼب ﻟﻄﺒﻴﺔ. ﻛﻴﻔﻴﺔ اﺳﺘﺨﺪام اﻟﻐﺴﺎﻟﺔ درﺟﺔ ﺣﺮارة اﳌﺎء اﻟﻜﺜﻴﻒ ● ﺑﺎﻟﻀﻐﻂ ﻋﻠﻰ زر درﺟﺔ اﳊﺮارة ،ﳝﻜﻨﻚ اﺧﺘﻴﺎر درﺟﺔ ﺣﺮارة اﳌﺎء. ﺑﺎرد 60م ْ 95 /م ْ 30 -م ْ 40 /م ْ / ● ﳝﻜﻨﻚ اﺧﺘﻴﺎر درﺟﺔ ﺣﺮارة اﳌﺎء وﻓﻘﺎ ﻟﻠﺒﺮﻧﺎﻣﺞ ﻛﻤﺎ ﻳﻠﻲ. رﻋﺎﻳﺔ اﻷﻃﻔﺎل ْ 40م ْ 60 -م ْ 95 -م اﻟﻘﻄﻦﺑﺎرد ْ 30 -م ْ 40 -م ْ 60 -م ْ 95 -م اﻻﺻﻄﻨﺎﻋﻲﺑﺎرد ْ 30 -م ْ 40 -م ْ 60 -م اﻟﺮﻗﻴﻖ ,اﻟﻐﺴﻴﻞ اﻟﻴﺪوي ,اﻟﺼﻮف/اﳊﺮﻳﺮ ,اﻟﺴﺮﻳﻊ , ٣٠اﻟﺪﻓﺘﲔ ﺑﺎرد ْ 30 -م ْ 40 -م ﻳﻀﺎء ﻣﺆﺷﺮ درﺟﺔ ﺣﺮارة اﳌﺎء اﺨﻤﻟﺘﺎرة. ﳌﺰﻳﺪ ﻣﻦ اﳌﻌﻠﻮﻣﺎت ﺑﺘﻔﺎﺻﻴﻞ ،ﻳﺮﺟﻰ ﻣﺮاﺟﻌﺔ ﺻﻔﺤﺔ .14 ● إذا ﻛﺎﻧﺖ اﳌﻼﺑﺲ ﻣﺘﺴﺨﺔ ﺑﺎﻟﻮﺳﺦ اﻟﺜﻘﻴﻞ ، ﻣﻦ اﻷﻓﻀﻞ اﺳﺘﺨﺪام «اﻟﻜﺜﻴﻒ» اﻻﺧﺘﻴﺎري. ● ﺑﺎﺧﺘﻴﺎر اﻟﻜﺜﻴﻒ اﻻﺧﺘﻴﺎري ،ﻗﺪ ﻳﺰﻳﺪ وﻗﺖ اﻟﻐﺴﻴﻞ ﺣﺴﺐ اﻟﺒﺮﻧﺎﻣﺞ اﺨﻤﻟﺘﺎر. اﳌﻤﻴﺰات ● اﻟﺒﺮﻣﺠﺔ ﲤﻜﻨﻚ ﻣﻦ أن ﺗﺨﺰن دورة ﺧﺎﺻﺔ ﺑﻚ ﻟﻠﻐﺴﻴﻞ ﻟﻼﺳﺘﻌﻤﺎل اﳌﺴﺘﻘﺒﻠﻲ. ●ﻻﺧﺘﻴﺎر ﺑﺮﻧﺎﻣﺞ ﺗﺸﻐﻴﻞ: .1اﺧﺘﺮ اﻟﺪورة .2اﺧﺘﺮ اﻟﻄﺮﻳﻘﺔ :ﻃﺮﻳﻘﺔ اﻟﻐﺴﻴﻞ ،ﻋﺪد ﻣﺮات اﻟﺸﻔﻂ ،ﺳﺮﻋﺔ اﻟﺸﻔﻂ ،درﺟﺔ ﺣﺮارة اﳌﻴﺎة ،اﻟﺘﺠﻔﻴﻒ وﺗﺮﺑﻮاﻟﺒﺨﺎر... .3اﺿﻐﻂ واﺳﺘﻤﺮ ﻓﻲ اﻟﻀﻐﻂ ﻋﻠﻰ زر اﻟﺒﺮﻣﺠﺔ ﳌﺪة 3ﺛﻮان )ﺳﺘﺴﻤﻊ ﺻﻮت إﻧﺬار ﻣﺮﺗﲔ( اﻟﺒﺮﻣﺠﺔ أﺻﺒﺤﺖ اﻵن ﻣﺨﺰﻧﺔ ﻟﻼﺳﺘﻌﻤﺎل اﳌﺴﺘﻘﺒﻠﻲ .ﻹﻋﺎدة اﺳﺘﻌﻤﺎل اﻟﺒﺮﻧﺎﻣﺞ، اﺧﺘﺮ اﻟﺒﺮﻣﺠﺔ واﺿﻐﻂ ﻋﻠﻰ زر اﻟﺘﺸﻐﻴﻞ. 19 ﻛﻴﻔﻴﺔ اﺳﺘﺨﺪام اﻟﻐﺴﺎﻟﺔ ﺗﺄﺟﻴﻞ اﻟﻮﻗﺖ ﺗﻮرﺑﻮ اﻟﺒﺨﺎر اﻹﺟﺮاءات اﻻﺳﺘﻌﺪادﻳﺔ ﻟﻠﻐﺴﻴﻞ ﻗﺒﻞ ﺗﺸﻐﻴﻞ « ﺗﺄﺟﻴﻞ اﻟﻮﻗﺖ« اﻓﺘﺢ ﺣﻨﻔﻴﺔ اﳌﺎء. ﺿﻊ اﳌﻼﺑﺲ واﻏﻠﻖ اﻟﺒﺎب. ﺿﻊ ﻣﺎدة اﻟﺘﻨﻈﻴﻒ وﻣﻠﲔ اﻟﻘﻤﺎش ﻓﻲاﻟﺪوﻻب. ● ﻟﻠﺒﻘﻊ اﳌﺴﺘﻌﺼﻴﺔ ﻓﻲ اﳌﻼﺑﺲ ،ﺛﻴﺎب داﺧﻠﻴﺔ أو ﺛﻴﺎب ﻟﻸﻃﻔﺎل. ● اﻟﻐﺴﻞ اﻟﺒﺨﺎري ،ﳑﻜﻦ ﻣﻊ اﻟﻘﻄﻦ، اﻟﺴﺮﻳﻊ ،اﻟﺼﺤﻲ واﻟﻬﺎدئ ● ﻫﺬه اﳋﺎﺻﻴﺔ ﲢﺴﻦ ﻣﻦ ﺟﻮدة اﻟﻐﺴﻴﻞ ﻣﻊ اﻻﻗﺘﺼﺎد ﻓﻲ اﻟﻄﺎﻗﺔ واﳌﺎء. ● ﻻ ﲢﻤﻞ ﻣﻼﺑﺲ ﺣﺴﺎﺳﺔ ﻛﺎﻟﺼﻮف واﳊﺮﻳﺮ واﳌﻼﺑﺲ اﳌﻠﻮﻧﺔ. ● اﳊﺮارة ﻣﺤﺪدة ﺑـ 60درﺟﺔ ﻣﺌﻮﻳﺔ. ● ﻛﻴﻔﻴﺔ ﺿﺒﻂ « ﺗﺄﺟﻴﻞ اﻟﻮﻗﺖ« اﺿﻐﻂ ﻋﻠﻰ زر اﻟﻄﺎﻗﺔ. اﺿﻐﻂ ﻋﻠﻰ زر اﻟﺒﺮﻧﺎﻣﺞ ﻻﺧﺘﻴﺎر اﻟﺒﺮﻧﺎﻣﺞاﳌﻄﻠﻮب. اﺿﻐﻂ ﻋﻠﻰ زر ﺗﺄﺟﻴﻞ اﻟﻮﻗﺖ واﺿﺒﻂ اﻟﻮﻗﺖاﳌﺮﻏﻮب ﻓﻴﻪ. -اﺿﻐﻂ ﻋﻠﻰ زر اﻟﺘﺸﻐﻴﻞ/اﻟﺘﻮﻗﻒ اﳌﺆﻗﺖ. ● إذا ﺿﻐﻄﺖ ﻋﻠﻰ زر ﺗﺄﺟﻴﻞ اﻟﻮﻗﺖ ،ﺗﻌﺮض « « 00:3ﻋﻠﻰ زﺟﺎج اﻟﻌﺮض .وأﻗﺼﻰ وﻗﺖ ﻟﻠﺘﺄﺟﻴﻞ ١٩ﺳﺎﻋﺔ وأدﻧﻰ وﻗﺖ ﻣﻦ اﻟﺘﺄﺟﻴﻞ ٣ ﺳﺎﻋﺎت. ● ﻛﻠﻤﺎ ﺿﻐﻄﺖ ﻋﻠﻰ اﻟﺰر ﻳﺰﻳﺪ وﻗﺖ اﻟﺘﺄﺟﻴﻞ ﺑﻮاﻗﻊ ﺳﺎﻋﺔ. ● ﻹﻟﻐﺎء ﺗﺄﺟﻴﻞ اﻟﻮﻗﺖ ،اﺿﻐﻂ ﻋﻠﻰ زر اﻟﻄﺎﻗﺔ. ● وﻗﺖ اﻟﺘﺄﺟﻴﻞ ﻫﻮ « وﻗﺖ ﻣﻘﺪر « ﻣﻦ اﻧﺘﻬﺎء دوران اﻟﻐﺴﻴﻞ أو اﻟﻌﻤﻠﻴﺎت اﺨﻤﻟﺘﺎرة. وﻓﻘﺎ ﳊﺎﻟﺔ ﺗﻮزﻳﺪ اﳌﺎء ودرﺟﺔ اﳊﺮارة ،ﺗﺄﺟﻴﻞ اﻟﻮﻗﺖ ووﻗﺖ اﻟﻐﺴﻴﻞ اﳊﻘﻴﻘﻲ ﻗﺪ ﻳﺨﺘﻠﻒ. 20 ﻣﻼﺣﻈﺔ: ● اﻟﻐﺴﻴﻞ اﻟﺒﺨﺎري ﻋﺎﻟﻲ اﻟﻔﺎﻋﻠﻴﺔ واﳌﻔﻌﻮل .ﳝﻜﻦ أن ﻻ ﻳﻜﻮن ﻫﻨﺎك ﻣﺎء داﺧﻞ ﺣﻠﺔ اﻟﻐﺴﻴﻞ وﻟﻜﻦ ذﻟﻚ ﻋﺎدي. ● ﻻ ﳝﻜﻨﻚ رؤﻳﺔ ﻧﻈﺎم اﻟﺮش ﻣﻦ ﺧﻼل اﻟﺒﺎب وﻟﻜﻦ ﻫﺬا اﻟﻨﻈﺎم ﻳﻌﻤﻞ ﺑﻘﻮة ﻣﻦ اﻟﺪاﺧﻞ. ● ﻓﻲ ﻫﺬه اﻟﻌﻤﻠﻴﺔ اﻟﺒﺨﺎرﻳﺔ ،ﻳﺴﻤﻊ ﺻﻮت ﻗﻮي ﻟﻬﺬا اﻟﻨﻈﺎم وﻻ ﻳﻌﺘﺒﺮ ﻫﺬا ﻋﻄﺐ. ﺗﻨﺒﻴﻪ : ﻻ ﺗﻼﻣﺲ اﻟﻐﺴﺎﻟﺔ أﺛﻨﺎء اﻟﺘﺸﻐﻴﻞ .ﻓﺎﻟﺒﺨﺎر ﻗﺪﻳﺆدي اﻟﻰ إﺻﺎﺑﺘﻚ ﺑﺎﺣﺘﺮاق. ﻛﻴﻔﻴﺔ اﺳﺘﺨﺪام اﻟﻐﺴﺎﻟﺔ اﻟﺪورة ● ﺑﺎﻟﻀﻐﻂ ﻋﻠﻰ زر اﻟﺘﺠﻔﻴﻒ ،ﳝﻜﻨﻚ اﺧﺘﻴﺎر ﺳﺮﻋﺔ اﻟﺘﺠﻔﻴﻒ. .1اﺧﺘﻴﺎر اﻟﺪورة ● ﺳﺮﻋﺔ اﻟﺘﺠﻔﻴﻒ ﺗﺨﺘﻠﻒ وﻓﻘﺎ ﻟﻠﺒﺮﻧﺎﻣﺞ ﻛﻤﺎ ﻳﻠﻲ . اﻟﻘﻄﻦ ,اﻟﺴﺮﻳﻊ ,٣٠ﻻ ﲡﻔﻴﻒ 1200 - 1000 - 800 - 400 - اﻻﺻﻄﻨﺎﻋﻲ ,اﻟﻐﺴﻴﻞ اﻟﻴﺪوي ,اﻟﺼﻮف/اﳊﺮﻳﺮ ,اﻟﺪﻓﺘﲔ ,رﻋﺎﻳﺔ اﻷﻃﻔﺎل ﻻ ﲡﻔﻴﻒ 1000 - 800 - 400 - اﻟﺮﻗﻴﻖﻻ ﲡﻔﻴﻒ 800 - 400 - .2ﻻ ﲡﻔﻴﻒ ● إذا ﰎ اﺧﺘﻴﺎر « ﻻ ﲡﻔﻴﻒ« ،ﻳﺘﻮﻗﻒ ﺟﻬﺎز اﻟﻐﺴﺎﻟﺔ ﻋﻦ اﻟﻌﻤﻞ ﺑﻌﺪ ﺗﺼﺮﻳﻒ اﳌﺎء. .3اﻟﺘﺠﻔﻴﻒ ﻓﻘﻂ .١اﺿﻐﻂ ﻋﻠﻰ زر اﻟﻄﺎﻗﺔ. .٢اﺿﺒﻂ ﺳﺮﻋﺔ اﻟﺘﺪوﻳﺮ ﻟﻠﺘﺠﻔﻴﻒ ﺑﺘﺪوﻳﺮ ﺣﻠﻘﺔ اﻟﺘﺠﻔﻴﻒ . .٣اﺿﻐﻂ ﻋﻠﻰ زر اﻟﺘﺸﻐﻴﻞ/اﻟﺘﻮﻗﻒ اﳌﺆﻗﺖ. إذا أﺿﻴﺊ اﳌﺆﺷﺮ ،ﻳﺘﻢ اﺧﺘﻴﺎر اﻟﻮﻇﻴﻔﺔ. اﻟﺼﻔﺎرة إﻋﺎدة اﻹﻧﻌﺎش ■ دورة إﻋﺎدة اﻹﻧﻌﺎش ٭ ﻣﻦ أﺟﻞ ﺧﻔﺾ اﻟﺘﺠﺎﻋﻴﺪ ﻟﻠﻤﻼﺑﺲ اﻟﺘﻲ ﰎ ﺣﻔﻈﻬﺎ ﳌﺪة ﻃﻮﻳﻠﺔ. ﻫـﺎ ﻳﺠﻌﻞ اﳌﻼﺑﺲ اﳌﺘﺠﻌﺪة ﺳﻬﻠﺔ ﻟﻠﻜﻮه )ﻻ ﻳﺠﻌﻞ اﳌﻼﺑﺲ ﻣﺒﻠﻠﺔ(. ٭ ﺳﺘﻨﺨﻔﺾ اﻟﺘﺠﺎﻋﻴﺪ. ■ ﻛﻴﻔﻴﺔ اﺳﺘﺨﺪام دورة إﻋﺎدة اﻹﻧﻌﺎش .١ﺷﻐّﻞ اﻟﻐﺴﺎﻟﺔ واﺧﺘﺮ ﺑﺮﻧﺎﻣﺞ إﻋﺎدة اﻹﻧﻌﺎش. .٢ﺿﻊ ٥ﻗﻄﻊ ﻣﻦ اﳌﻼﺑﺲ أو أﻗﻞ واﻏﻠﻖ اﻟﺒﺎب. .٣اﺿﻐﻂ ﻋﻠﻰ زر اﻟﻐﺴﻴﻞ ﺑﺎﻟﺒﺨﺎر ﺗﻜﺮارا ﺣﺘﻰ ﻳﻌﺮض اﻟﺮﻗﻢ اﳌﺮاد ﺿﺒﻄﻪ واﻟﺼﺤﻴﺢ ﻣﻦ ﻗﻄﻊ اﳌﻼﺑﺲ. وﺗﻌﺮض ﻗﻄﻌﺘﺎن ﻓﻲ اﻟﺒﺪاﻳﺔ. .٤اﺿﻐﻂ ﻋﻠﻰ زر اﻟﺘﺸﻐﻴﻞ/اﻟﺘﻮﻗﻒ اﳌﺆﻗﺖ. ] ﻣﻼﺣﻈﺎت ﻟﻠﺘﻨﺒﻴﻬﺎت اﻷوﻟﻴﺔ [ دورة إﻋﺎدة اﻹﻧﻌﺎش ﺗﺨﺘﻠﻒ ﻋﻦ دورة اﻟﻐﺴﻴﻞ أودورة اﻟﺘﺠﻔﻴﻒ. ﺑﺴﺒﺐ اﳋﺼﺎﺋﺺ ﻟﻸﻟﻴﺎف اﻟﻘﻄﻨﻴﺔ ،ﻫﺬه اﻟﺪورةﻏﻴﺮ ﻣﻮﺻﻰ ﺑﻬﺎ ﻟﻠﻤﻼﺑﺲ ﻣﻦ ٪١٠٠ﻣﻦ اﻟﻘﻄﻦ. اﻧﺰع اﻷوﺳﺎع ﻣﻦ اﳌﻼﺑﺲ ﻗﺒﻞ اﺳﺘﺨﺪام دورةإﻋﺎدة اﻹﻧﻌﺎش ﳌﻨﻊ ﺗﺜﺒﻴﺖ اﻷوﺳﺎخ ﺑﺸﻜﻞ داﺋﻢ ﺑﺎﳊﺮارة اﻟﻌﺎﻟﻴﺔ. ﺗﺄﻛﺪ ﻣﻦ ﻓﺘﺢ اﳊﻨﻔﻴﺔ .وﻫﺬة اﻟﺪورة ﺗﺴﺘﺨﺪمﻛﻤﻴﺔ ﻗﻠﻴﻠﺔ ﻣﻦ اﳌﺎء ﻟﻠﺘﺒﺨﻴﺮ. ﺧﺬ ﻋﻨﺎﻳﺔ ﻟﻜﻲ ﻻ ﺗﻼﻣﺲ اﻟﺒﺎب .ﻗﺪ ﻳﻜﻮن ﺳﺎﺧﻨﺎ. ﻻ ﺗﻔﺘﺢ اﻟﺒﺎب أﺛﻨﺎء اﻟﺘﺸﻐﻴﻞ .واﻟﺒﺨﺎر ﻗﺪ ﻳﺆدياﻟﻰ إﺻﺎﺑﺘﻚ ﺑﺎﺣﺘﺮاق. ﺑﻌﺪ إﺧﺮاج اﳌﻼﺑﺲ ﻣﻦ دورة إﻋﺎدة اﻹﻧﻌﺎش ،ﻳﺒﺪوأﻧﻬﺎ ﻗﺪ ﺗﻜﻮن ﻣﺒﻠﻠﺔ ﺧﻼل ١٠دﻗﺎﺋﻖ ﻋﻠﻰ اﻷﻗﻞ ﻗﺒﻞ ارﺗﺪاﺋﻬﺎ. ﳝﻜﻦ أن ﲢﺼﻞ ﻋﻠﻰ أﻓﻀﻞ ﻧﺘﺎﺋﺞ ﻋﻨﺪ ﺗﻔﺮﻳﺰاﳌﻼﺑﺲ ﺣﺴﺐ ﺣﺠﻢ ﺷﺒﻴﻪ وﻧﻮع اﻟﻘﻤﺎش .وﻻ ﺗﻀﻊ اﳌﻼﺑﺲ اﻷﻛﺜﺮ).ﺿﻊ اﳌﻼﺑﺲ أﻗﻞ ﻣﻦ ٣ﻗﻤﺼﺎن( اﺿﻐﻂ ﻋﻠﻰ ﻫﺬا اﻟﺰر ﻣﺮة أو أﻛﺜﺮ ﻟﻀﺒﻂ ﻣﺴﺘﻮى ﺻﻮت اﻟﺼﻔﺎرة. )ﻋﺎﻟﻴﺔ/ﻣﻨﺨﻔﻀﺔ/إﻳﻘﺎف( 21 ﻛﻴﻔﻴﺔ اﺳﺘﺨﺪام اﻟﻐﺴﺎﻟﺔ اﻟﻌﺮض .3اﻧﺘﻬﺎء اﻟﻐﺴﻴﻞ .1ﻋﺮض اﻟﻮﻇﻴﻔﺔ اﳋﺎﺻﺔ ●ﻋﻨﺪ اﺧﺘﻴﺎر إﻏﻼق اﻟﻄﻔﻞ ،ﻳﻈﻬﺮ ﻣﺆﺷﺮ « ﻋﻠﻰ زﺟﺎج اﻟﻌﺮض. « ● ﻋﻨﺪ اﺧﺘﻴﺎر ﺗﺄﺟﻴﻞ اﻟﻮﻗﺖ ،ﻫﺬا ﻳﺸﻴﺮ اﻟﻰ اﻟﻮﻗﺖ اﳌﺘﺒﻘﻲ ﻻﻧﺘﻬﺎء اﻟﺒﺮﻧﺎﻣﺞ اﺨﻤﻟﺘﺎر. ■اﻟﻮﻗﺖ اﳌﺘﺒﻘﻲ اﳌﻘﺪر ● ﻳﺸﻴﺮ ﻫﺬا اﻟﻌﺮض اﻟﻰ اﻟﻮﻗﺖ اﳌﺘﺒﻘﻲ اﳌﻘﺪر ﻓﻲ اﻟﺪورة ﻋﻨﺪ اﻟﺘﺸﻐﻴﻞ. ● ﻳﻜﺸﻒ ﺟﻬﺎز اﻟﻐﺴﺎﻟﺔ ﺗﻠﻘﺎﺋﻴﺎ ﺣﻤﻞ اﳌﻼﺑﺲ )وزن اﳌﻼﺑﺲ( وﻳﺤﺴﺐ أﻣﺜﻞ وﻗﺖ ﻟﻠﻐﺴﻴﻞ .ﺑﻌﺪ اﻟﻜﺸﻒ ،ﻳﺸﻴﺮ اﻟﻌﺮض اﻟﻰ اﻟﻮﻗﺖ اﳌﺘﺒﻘﻲ اﶈﺪد. ■ﻣﺆﺷﺮ اﳊﺎﻟﺔ ● ﻫﺬا ﻳﺸﻴﺮ اﻟﻰ اﻟﻮﻗﺖ اﻟﺬي ﻣﻀﻰ ﻣﻦ ﺗﺸﻐﻴﻞ دورة اﻟﻐﺴﺎﻟﺔ. .2ﻋﺮض اﻟﺘﺸﺨﻴﺺ اﻟﺬاﺗﻲ ● إذا ﺣﺪﺛﺖ ﻣﺸﻜﻠﺔ ﻓﻲ اﻟﻐﺴﺎﻟﺔ ،ﻳﻌﺮض ﻧﻮع اﳌﺸﻜﻠﺔ. :ﺧﻄﺄ ﻓﻲ اﻹﺷﻌﺎر ﺑﻀﻐﻂ اﳌﺎء :ﻣﺸﻜﻠﺔ ﻓﻴﻀﺎن اﳌﺎء :اﻟﺒﺎب ﻏﻴﺮ ﻣﻐﻠﻖ :اﳊﻤﻞ اﻟﺰاﺋﺪ ﻋﻠﻰ اﳌﻮﺗﻮر :اﳊﻤﻞ اﻟﺰاﺋﺪ ﻋﻠﻰ اﳌﻮﺗﻮر :اﳌﺸﻜﻠﺔ ﻓﻲ ﻣﺪﺧﻞ اﳌﺎء :اﳌﺸﻜﻠﺔ ﻓﻲ اﻟﺘﺼﺮﻳﻒ :ﻣﺸﻜﻠﺔ ﻋﺪم اﻟﺘﻮازن :ﻣﺸﻜﻠﺔ درﺟﺔ ﺣﺮارة اﳌﺎء إذا ﻋﺮﺿﺖ ﺣﺮوف اﻷﺧﻄﺎء ﻫﺬه ،ﻳﺮﺟﻰ ﻣﺮاﺟﻌﺔ دﻟﻴﻞ ﲢﺮى اﳋﻠﻞ وإﺻﻼﺣﻪ اﳌﻮﺟﻮد ﻓﻲ ﺻﻔﺤﺔ 27واﺗﺒﻊ اﻟﺪﻟﻴﻞ. 22 ● ﻋﻨﺪ اﻧﺘﻬﺎء دوران اﻟﻐﺴﻴﻞ ،ﻳﻌﺮض ” ﻋﻠﻰ اﻟﻌﺮض اﳌﺘﻌﺪد . ” .4اﻟﻮﻗﺖ اﳌﺘﺒﻘﻲ ● أﺛﻨﺎء دورة اﻟﻐﺴﻴﻞ ،ﻳﻈﻬﺮ اﻟﻮﻗﺖ اﳌﺘﺒﻘﻲ ﻟﻌﻤﻠﻴﺔ اﻟﻐﺴﻴﻞ ﻋﻠﻰ اﻟﻌﺮض. ● اﻟﺒﺮﻧﺎﻣﺞ اﳌﻮﺻﻰ ﺑﻪ ﻣﻦ اﻟﺼﺎﻧﻊ. اﻟﻘﻄﻦ :ﺣﻮاﻟﻲ ﺳﺎﻋﺘﲔ و ٢دﻗﻴﻘﺔ اﻻﺻﻄﻨﺎﻋﻲ :ﺣﻮاﻟﻲ ﺳﺎﻋﺔ و ٢٨دﻗﻴﻘﺔ اﻟﺮﻗﻴﻖ :ﺣﻮاﻟﻲ ﺳﺎﻋﺔ و ١٦دﻗﻴﻘﺔ اﻟﺼﻮف/اﳊﺮﻳﺮ :ﺣﻮاﻟﻲ ﺳﺎﻋﺔ و ٤دﻗﻴﻘﺔ اﻟﻐﺴﻴﻞ اﻟﻴﺪوي :ﺣﻮاﻟﻲ ﺳﺎﻋﺔ و ٤دﻗﻴﻘـﺔ اﻟﺪﻓﺘﲔ :ﺣﻮاﻟﻲ ﺳﺎﻋﺔ و ١٦دﻗﻴﻘﺔ اﻟﺴﺮﻳﻊ : ٣٠ﺣﻮاﻟﻲ ٣٠دﻗﻴﻘﺔ إﻋﺎدة اﻹﻧﻌﺎش :ﺣﻮاﻟﻲ ٢٠دﻗﻴﻘﺔرﻋﺎﻳﺔ اﻷﻃﻔﺎل:ﺣﻮاﻟﻲ ﺳﺎﻋﺘﲔ و ٤٨دﻗﻴﻘﺔ● ﻗﺪ ﻳﺨﺘﻠﻒ وﻗﺖ اﻟﻐﺴﻴﻞ ﺗﺒﻌﺎ ﳊﺠﻢ ﺣﻤﻞ اﻟﻐﺴﻴﻞ وﺿﻐﻂ اﳌﺎء ،ودرﺟﺔ ﺣﺮارة اﳌﺎء وﻇﺮوف اﻟﻐﺴﻴﻞ اﻷﺧﺮى. ● إذا ﻇﻬﺮ اﺧﺘﻼل ﻓﻲ اﻟﺘﻮازن أو إذا ﻋﻤﻞ ﺑﺮﻧﺎﻣﺞ إزاﻟﺔ اﻟﺮﻏﻮة ،ﻳﺰﻳﺪ ﻃﻮل ﻓﺘﺮة اﻟﻐﺴﻴﻞ) .وﻗﺖ اﻟﺰﻳﺎدة ﻋﻠﻰ اﻷﻗﺼﻰ ٤٥دﻗﻴﻘﺔ( اﻟﺼﻴﺎﻧﺔ ٭ ﻗﺒﻞ ﺗﻨﻈﻴﻒ اﻷﺳﻄﺢ اﻟﺪاﺧﻠﻴﺔ ﳉﻬﺎز اﻟﻐﺴﺎﻟﺔ ،اﻓﺼﻞ ﻗﺎﺑﺲ اﳉﻬﺎز ﻣﻦ ﻣﺨﺮج اﻟﺘﻴﺎر اﻟﻜﻬﺮﺑﺎﺋﻲ ﻟﺘﺠﻨﺐ ﺻﺪﻣﺎت ﻛﻬﺮﺑﺎﺋﻴﺔ وﺧﻄﺮ ﺻﺪﻣﺎت ﻛﻬﺮﺑﺎﺋﻴﺔ. دﻣﺮ اﻟﻘﺎﺑﻞ واﻛﺴﺮ ﻗﻔﻞ اﻟﺒﺎب ﳌﻨﻊ اﻟﺼﻐﺮ ﻣﻦ ﺳﻘﻮﻃﻬﻢ ﻓﻲ داﺧﻞ اﳉﻬﺎز. و ﺋﻴﺴﻲ اﻟﺮ ٭ ﻋﻨﺪ ﻃﺮد اﳉﻬﺎز ،اﻗﻄﻊ اﻟﻜﺎﺑﻞ ّ ■ ﻣﺼﻔﺎة ﻣﺪﺧﻞ اﳌﺎء ” ﻋﻠﻰ ﻟﻮﺣﺔ اﻟﺘﺤﻜﻢ ﻓﻲ ﺣﺎﻟﺔ أن اﳌﺎء ﻻ ﻳﺪﺧﻞ اﻟﻰ دوﻻب ﻣﺎدة اﻟﺘﻨﻈﻴﻒ. ﺗﻮﻣﺾ رﺳﺎﻟﺔ ﺧﻄﺄ ” إذا ﻛﺎن اﳌﺎء ﻋﺴﺮا ﺟﺪا أو اﺣﺘﻮى ﻋﻠﻰ اﻟﺜﻔﻞ ،ﻗﺪ ﺗﺘﺴﺪد ﻣﺼﻔﺎة ﻣﺪﺧﻞ اﳌﺎء.ﻟﺬﻟﻚ ﻓﻜﺮة ﺟﻤﻴﻠﺔ أن ﺗﻨﻈﻒ اﳌﺼﻔﺎة ﻣﻦ ﺣﲔ اﻟﻰ آﺧﺮ. .1اﻏﻠﻖ ﺣﻨﻔﻴﺔ اﳌﺎء. .2ارخ ﺑﺮﻏﻰ ﺧﺮﻃﻮم ﻣﺪﺧﻞ اﳌﺎء .3ﻧﻈّﻒ اﳌﺼﻔﺎة ﺑﻮاﺳﻄﺔ اﻟﻔﺮﺷﺎة اﳋﺸﻨﺔ واﻟﺼﻠﺒﺔ. .4ﺛﺒﺖ ﺧﺮﻃﻮم ﻣﺪﺧﻞ اﳌﺎء ﺑﺈﺣﻜﺎم. 23 اﻟﺼﻴﺎﻧﺔ ■ ﻣﺼﻔﺎة ﻣﻀﺨﺔ اﻟﺘﺼﺮﻳﻒ ٭ ﻣﺼﻔﺎة اﻟﺘﺼﺮﻳﻒ ﲡﻤﻊ اﳋﻴﻮط واﻷﺷﻴﺎء اﻟﺼﻐﻴﺮة اﳌﺘﺒﻘﻴﺔ ﻓﻲ اﳌﻼﺑﺲ. اﻓﺤﺺ ﺑﺎﻧﺘﻈﺎم أن اﳌﺼﻔﺎة ﻧﻈﻴﻔﺔ ﻟﺘﻀﻤﻦ اﻟﺘﺸﻐﻴﻞ اﻟﻨﺎﻋﻢ ﳉﻬﺎز اﻟﻐﺴﺎﻟﺔ. ﲢﺬﻳﺮ ﺻﺮف اﳌﺎء ﺑﻮاﺳﻄﺔ ﺧﺮﻃﻮم اﻟﺘﺼﺮﻳﻒ ﺛﻢ اﻓﺘﺢ ﻣﺼﻔﺎة ﻣﻀﺨﺔ اﻟﺘﺼﺮﻳﻒ ﻹزاﻟﺔ أي ﺷﻲء ﻣﺴﺪود. أوﻻ ّ ﺧﺬ ﻋﻨﺎﻳﺔ ﻋﻨﺪ ﺗﺼﺮﻳﻒ اﳌﺎء إذا ﻛﺎن اﳌﺎء ﺣﺎرا. * اﺗﺮك اﳌﺎء ﻟﻴﺼﺒﺢ ﺑﺎردا ﻗﺒﻞ ﺗﻨﻈﻴﻒ ﻣﻀﺨﺔ اﻟﺘﺼﺮﻳﻒ ،ﻣﻊ ﺗﻔﺮﻳﻎ ﻃﺎرئ أو ﻓﺘﺢ اﻟﺒﺎب ﻓﻲ ﺣﺎﻟﺔ ﻃﺎرﺋﺔ. .1اﻓﺘﺢ ﻋﻠﺒﺔ اﻟﻐﻄﺎء اﻟﺴﻔﻠﻲ ) (1ﺑﺎﺳﺘﺨﺪام اﻷﺻﺒﻊ .أدر ﻣﻔﺘﺎح اﻟﺘﺼﺮﻳﻒ ) (2ﻟﺴﺤﺐ اﳋﺮﻃﻮم. .2اﻓﺼﻞ ﻗﺎﺑﺲ اﻟﺘﺼﺮﻳﻒ) ، (2ﻟﻴﺴﻴﻞ اﳌﺎء اﻟﻰ اﳋﺎرج .ﻓﻲ ﻫﺬه اﳊﺎﻟﺔ ،اﺳﺘﺨﺪم وﻋﺎء ﳌﻨﻊ ﺳﻴﻞ اﳌﺎء ﻋﻠﻰ اﻷرض. 3 2 دور ﻣﺼﻔﺎة اﳌﻀﺨﺔ )(3 .3إذا ﻟﻢ ﻳﺴﻞ اﳌﺎء ّ ، اﻟﻰ اﻟﻴﺴﺎر ﻟﻠﻔﺘﺢ. 3 2 24 .4ازل أي ﺷﻲء ﻏﺮﻳﺐ ﻣﻦ ﻣﺼﻔﺎة اﳌﻀﺨﺔ ).(3 ﺑﻌﺪ اﻟﺘﻨﻈﻴﻒ ،دور ﻣﺼﻔﺎة اﳌﻀﺨﺔ ) (3ﺑﺎﲡﺎه ﻋﻘﺮب اﻟﺴﺎﻋﺔ وادﺧﻞ ﻗﺎﺑﺲ اﻟﺘﺼﺮﻳﻒ) (2اﻟﻰ ﻣﻜﺎﻧﻪ اﻷﺻﻠﻲ .اﻏﻠﻖ ﻏﻄﺎء اﻟﻐﻼف اﻷﺳﻔﻞ. اﻟﺼﻴﺎﻧﺔ ■ دوﻻب اﳌﻮزع ٭ ﺑﻌﺪ وﺿﻊ ﻣﺎدة اﻟﺘﻨﻈﻴﻒ وﻣﻠﲔ اﻟﻘﻤﺎش ﻓﻲ اﻟﺪوﻻب. ● ﻻ ﺑﺪ ﻣﻦ ﺗﻨﻈﻴﻒ اﻟﺪوﻻب ﻣﻦ ﺣﲔ اﻟﻰ آﺧﺮ ﺑﺎﳌﺎء اﳉﺎري. ● ﻋﻨﺪ اﳊﺎﺟﺔ ﳝﻜﻨﻚ ﺳﺤﺐ اﻟﺪوﻻب ﲤﺎﻣﺎ ﻣﻦ ﺟﻬﺎز اﻟﻐﺴﺎﻟﺔ ﺑﺎﻟﻀﻐﻂ ﻋﻠﻰ اﻟﺪوﻻب اﻟﻰ اﻷﺳﻔﻞ وﺳﺤﺒﻪ اﻟﻰ اﳋﺎرج. ● ﻣﻦ أﺟﻞ اﻟﺘﻨﻈﻴﻒ اﻟﺴﻬﻞ ،ﳝﻜﻨﻚ إزاﻟﺔ اﳉﺰء اﻷﻋﻠﻰ ﻣﻦ ﺣﺠﻴﺮة ﻣﻠﲔ اﻟﻘﻤﺎش. MAX MAX MAX !ف ﻣﻜﺎن داﺧﻠﻲ ﻟﻠﺪوﻻب ٭ ﻗﺪ ﺗﺘﺮاﻛﻢ ﻣﺎدة اﻟﺘﻨﻈﻴﻒ داﺧﻞ اﳌﻜﺎن اﻟﺪاﺧﻠﻲ ﻓﻼ ﺑﺪ ﻣﻦ ﺗﻨﻈﻴﻔﻪ أﺣﻴﺎﻧﺎ ﺑﻔﺮﺷﺎة اﻷﺳﻨﺎن. ● ﻋﻨﺪ اﻧﺘﻬﺎء اﻟﺘﻨﻈﻴﻒ ،اﻋﺪ اﻟﺪوﻻب اﻟﻰ ﻣﻜﺎﻧﻪ واﺟﺮ دوران اﻟﺸﻄﻒ ﺑﺪون ﻣﻼﺑﺲ. ■ ﺣﻠﺔ اﻟﻐﺴﻴﻞ ● إذا ﻋﺸﺖ ﻓﻲ ﻣﻨﻄﻘﺔ اﳌﻴﺎه اﻟﻌﺴﺮة ،ﺗﺘﻜﻮن ﺻﻔﻴﺤﺔ اﻟﻜﻠﺲ ﺑﺎﺳﺘﻤﺮار ﻓﻲ اﻷﻣﺎﻛﻦ اﻟﺘﻲ ﻻ ﳝﻜﻦ أن ﺗﺮاﻫﺎوﻻ ﺗﺰﻳﻠﻬﺎ ﺑﺴﻬﻮﻟﺔ. ﺗﻜﻮن ﺻﻔﻴﺤﺔ اﻟﻜﻠﺲ ﻳﺴﺪ اﻷﺟﻬﺰة وإذا ﻟﻢ ﺗﻔﺤﺼﻪ وﻻ ﺑﺪ ﻣﻦ ﺗﺒﺪﻳﻠﻪ أﺧﻴﺮا. ● ﺑﺎﻟﺮﻏﻢ ﻣﻦ أن ﺣﻠﺔ اﻟﻐﺴﻴﻞ ﻣﺼﻨﻮﻋﺔ ﻣﻦ اﻟﻔﻮﻻذ اﻟﺬي ﻻ ﻳﺼﺪأ ،ﻗﺪ ﻳﺤﺪث اﻟﺼﺪأ ﺑﺴﺒﺐ اﻷﺷﻴﺎء اﳌﻌﺪﻧﻴﺔ اﻟﺼﻐﻴﺮة ) ﻣﺸﺒﻚ اﻟﻮرق ،ودﺑﺎﺑﺲ اﻷﻣﺎن( اﻟﺘﻲ ﻛﺎﻧﺖ ﺗﺒﻘﻰ ﻓﻲ اﳊﻠﺔ. ● ﻻ ﺑﺪ ﻣﻦ ﺗﻨﻈﻴﻒ ﺣﻠﺔ اﻟﻐﺴﻴﻞ ﻣﻦ ﺣﲔ اﻟﻰ آﺧﺮ. ● إذا اﺳﺘﺨﺪﻣﺖ ﻣﺎدة اﻟﺘﻨﻈﻴﻒ و ﻣﺎدة اﻟﺼﺒﻎ أو ﻣﺎدة اﻟﺘﺒﻴﻴﺾ ﻏﻴﺮ اﻟﻘﻴﺎﺳﻴﺔ ، ﺗﺄﻛﺪ ﻣﻦ أﻧﻬﺎ ﻣﻨﺎﺳﺒﺔ ﻟﻼﺳﺘﺨﺪام ﻓﻲ ﺟﻬﺎز اﻟﻐﺴﺎﻟﺔ. ٭ اﳌﻮاد ﻏﻴﺮ اﻟﻘﻴﺎﺳﻴﺔ ﲢﺘﻮى ﻋﻠﻰ اﳌﻜﻮﻧﺎت اﻟﺘﻲ ﻗﺪ ﺗﺆدي اﻟﻰ ﺿﺮر ﻓﻲ ﺟﻬﺎز اﻟﻐﺴﺎﻟﺔ. ٭ ازل اﻟﺒﻘﻊ ﺑﺴﺎﺋﻞ اﻟﺘﻨﻈﻴﻒ اﳋﺎص ﺑﺎﻟﻔﻮﻻذ اﻟﺬي ﻻ ﻳﺼﺪأ. ٭ ﻻ ﺗﺴﺘﺨﺪم ﺻﻮف اﻟﻔﻮﻻذ أﺑﺪا. 25 اﻟﺼﻴﺎﻧﺔ ■ ﻓﻮﻫﺔ دوران اﳌﺎء ﻧﻈﻒ ﻓﻮﻫﺔ دوران اﳌﺎء ،إذا ﻛﺎﻧﺖ ﻣﺴﺪودة. ّ ■ ﺗﻨﻈﻴﻒ اﻟﻐﺴﺎﻟﺔ .1اﻷﺳﻄﺢ اﳋﺎرﺟﻴﺔ اﻟﺼﻴﺎﻧﺔ اﳌﻨﺎﺳﺒﺔ ﳉﻬﺎز اﻟﻐﺴﺎﻟﺔ ﺗﺴﺘﻄﻴﻊ ﲤﺪﻳﺪ ﻋﻤﺮ اﳉﻬﺎز. ﳝﻜﻨﻚ ﺗﻨﻈﻴﻒ اﻷﺳﻄﺢ اﳋﺎرﺟﻴﺔ ﳉﻬﺎز اﻟﻐﺴﺎﻟﺔ ﺑﺎﳌﺎء اﻟﺪاﻓﺊ وﻣﺎدة اﻟﺘﻨﻈﻴﻒ اﶈﺎﻳﺪة ﻏﻴﺮ اﻟﻜﺎﺷﻄﺔ ﻟﻠﻤﻨﺰل. اﻣﺴﺢ أي ﺳﺎﺋﻞ ﻣﺼﺒﻮب ﻓﻮرا .واﻣﺴﺤﻬﺎ ﺑﺎﻟﻘﻤﺎش اﻟﺮﻃﺐ. ﻻ ﲢﺎول ﺿﺮب اﻷﺳﻄﺢ ﻟﻠﺠﻬﺎز ﺑﺎﻷﺷﻴﺎء اﳊﺎدة. ٭ ﻫﺎم :ﻻ ﺗﺴﺘﺨﺪم اﳌﻴﺸﻴﻼت ،واﳌﺸﻌﺸﻴﻌﺔ أو اﳌﻨﺘﺠﺎت اﻟﺸﺒﻴﻬﺔ . .2اﻷﺳﻄﺢ اﻟﺪاﺧﻠﻴﺔ ﺟﻔﻒ ﺣﻮل ﺑﺎب اﻟﻐﺴﺎﻟﺔ اﳌﻔﺘﻮح واﳊﺸﻴﺔ اﻟﻘﺎﺑﻠﺔ ﻟﻠﺜﻨﻰ واﻟﺒﺎب اﻟﺰﺟﺎﺟﻲ .ﻫﺬه ّ اﳌﻨﺎﻃﻖ ﻻ ﺑﺪ ﻣﻦ ﺗﻨﻈﻴﻔﻬﺎ ﻟﻀﻤﺎن ﻛﺘﻢ اﳌﺎء ﺑﺈﺣﻜﺎم. اﻋﻤﻞ ﺟﻬﺎز اﻟﻐﺴﺎﻟﺔ ﺑﺪوران ﻛﺎﻣﻞ ﺑﺎﺳﺘﺨﺪام اﳌﺎء اﳊﺎر. ﻛﺮر اﻹﺟﺮاءات ﻋﻨﺪ اﳊﺎﺟﺔ. ﻣﻼﺣﻈﺔ :ازل ﺛﻔﻞ اﳌﺎء اﻟﻴﺴﺮ ﺑﺎﺳﺘﺨﺪام ﻣﺎدة ﺗﻨﻈﻴﻒ ﻓﻘﻂ ﺑﺮﻗﻌﺔ اﻻﺳﺘﺨﺪام اﻷﻣﻨﻴﺔ ﳉﻬﺎز اﻟﻐﺴﺎﻟﺔ. ■ ﺗﻌﻠﻴﻤﺎت ﻋﻨﺪ ﺣﻠﻮل ﻓﺼﻞ اﻟﺸﺘﺎء إذا ﺣﻔﻈﺖ ﺟﻬﺎز اﻟﻐﺴﺎﻟﺔ ﻓﻲ ﻣﻨﻄﻘﺔ ﻗﺪ ﻳﺘﺠﻤﺪ اﳌﺎء ﻓﻴﻬﺎ أو ﻳﺘﻐﻴﺮ اﻟﻄﻘﺲ ﻓﻴﻬﺎ اﻟﻰ درﺟﺔ اﳊﺮارة اﳌﻨﺨﻔﻀﺔ ﺣﺘﻰ ﻳﺘﺠﻤﺪ اﳌﺎء ،اﺗﺒﻊ ﻫﺬه اﻟﺘﻌﻠﻴﻤﺎت ﻋﻨﺪ ﺣﻠﻮل ﻓﺼﻞ اﻟﺘﺸﺎء ﻣﻦ أﺟﻞ ﻣﻨﻊ ﺿﺮر ﻓﻲ ﺟﻬﺎز اﻟﻐﺴﺎﻟﺔ. .1اﻏﻠﻖ ﺣﻨﻔﻴﺔ اﳌﺎء. وﺻﺮف اﳌﺎء ﻣﻦ اﳋﺮﻃﻮم. اﳌﺎء ﺣﻨﻔﻴﺔ ﻣﻦ .2اﻓﺼﻞ اﳋﺮﻃﻮم ّ .3ﺻﻞ ﻗﺎﺑﺲ اﻟﺘﻴﺎر اﻟﻜﻬﺮﺑﺎﺋﻲ اﻟﻰ ﻣﺨﺮج اﻟﺘﻴﺎر اﻟﺬي ﰎ ﺗﻮﺻﻴﻠﻪ اﻷرﺿﻲ اﳌﻨﺎﺳﺐ. .4اﺿﻒ ١ﺟﺎﻟﻮن ) 3,8ﻟﺘﺮ( ﻣﻦ ﺳﺎﺋﻞ ﻣﻘﺎوﻣﺔ اﻟﺘﺠﻤﻴﺪ اﳋﺎص ﻟﻠﺴﻴﺎرة ﻏﻴﺮ اﳌﺘﺴﻤﻢ ) (RVﻟﺘﻔﺮﻳﻎ ﺣﻠﺔ اﻟﻐﺴﻴﻞ .اﻏﻠﻖ اﻟﺒﺎب. .5اﺿﺒﻂ دوران اﻟﺘﺠﻔﻴﻒ واﺗﺮك ﺟﻬﺎز اﻟﻐﺴﺎﻟﺔ ﻳﺪور ﳌﺪة دﻗﻴﻘﺔ واﺣﺪة ﻟﺘﺼﺮﻳﻒ ﺟﻤﻴﻊ اﳌﺎء ﻣﻦ اﻟﻐﺴﺎﻟﺔ. ﻳﺨﺮج ﺟﻤﻴﻊ اﻟﺴﻮاﺋﻞ ﻣﻘﺎوﻣﺔ اﻟﺘﺠﻤﻴﺪ RVﲤﺎﻣﺎ. .6اﻧﺰع ﻗﺎﺑﺲ اﻟﺘﻴﺎر اﻟﻜﻬﺮﺑﺎﺋﻲ وﲡﻔﻒ اﻷﺳﻄﺢ اﻟﺪاﺧﻠﻴﺔ ﻟﻠﺤﻠﺔ واﻏﻠﻖ اﻟﺒﺎب. ﺻﺮف أي ﻣﺎء ﻣﻦ ﺣﺠﻴﺮات وﺟﻔﻒ ﺣﺠﻴﺮات واﻋﺪ اﻟﺪوﻻب اﻟﻰ .7ازل دوﻻب اﳌﻮزع. ّ ﻣﻜﺎﻧﻪ. .8اﺣﻔﻆ ﺟﻬﺎز اﻟﻐﺴﺎﻟﺔ ﻓﻲ ﻣﻮﺿﻊ ﻋﻤﻮدي. .9ﻹزاﻟﺔ ﺳﺎﺋﻞ ﻣﻘﺎوﻣﺔ اﻟﺘﺠﻤﻴﺪ ﻣﻦ ﺟﻬﺎز اﻟﻐﺴﺎﻟﺔ ﺑﻌﺪ ﺣﻔﻈﻪ ،اﻋﻤﻞ ﺟﻬﺎز اﻟﻐﺴﺎﻟﺔ ﻓﺮاﻏﺎ ﻣﻦ ﺧﻼل دوران ﻛﺎﻣﻞ ﺑﺎﺳﺘﺨﺪام ﻣﺎدة اﻟﺘﻨﻈﻴﻒ .ﻻ ﺗﻀﻒ اﳌﻼﺑﺲ. 26 دﻟﻴﻞ ﲢﺮى اﳋﻠﻞ وإﺻﻼﺣﻪ ٭ ﺟﻬﺎز اﻟﻐﺴﺎﻟﺔ ﻫﺬا ﻣﺰود ﺑﻮﻇﺎﺋﻒ اﻟﺴﻼﻣﺔ اﻷوﺗﻮﻣﺎﺗﻴﻜﻴﺔ اﻟﺘﻲ ﺗﻜﺸﻒ وﺗﺸﺨﺺ اﻷﺧﻄﺎء ﻓﻲ ﻣﺮﺣﻠﺔ دوران وردود ﻓﻌﻞ ﻣﻨﺎﺳﺒﺔ. ﻋﻨﺪﻣﺎ ﻻ ﻳﻌﻤﻞ ﺟﻬﺎز اﻟﻐﺴﺎﻟﺔ ﺑﻮﻇﻴﻔﺔ ﻣﻨﺎﺳﺒﺔ ﻻ ﻳﻌﻤﻞ أﺑﺪا ،اﻓﺤﺺ اﻷﻣﻮر اﻟﺘﺎﻟﻴﺔ ﻗﺒﻞ اﻻﺗﺼﺎل ﲟﺮﻛﺰ اﳋﺪﻣﺎت. اﳌﺸﻜﻠﺔ اﻟﺴﺒﺐ اﶈﺘﻤﻞ اﳊﻠﻮل وﺿﺠﻴﺞ اﻟﺼﻠﺼﻞ ● اﻷﺷﻴﺎء اﻟﻐﺮﻳﺒﺔ ﻣﺜﻞ اﻟﻘﻄﻊ اﳌﻌﺪﻧﻴﺔ أو دﺑﺎﺑﻴﺲ اﻟﺴﻼﻣﺔ ﻗﺪ ﺗﻮﺟﺪ ﻓﻲ اﳊﻠﺔ أو اﳌﻀﺨﺔ . اوﻗﻒ ﺟﻬﺎز اﻟﻐﺴﺎﻟﺔ ﻣﻦ اﻟﻌﻤﻞ واﻓﺤﺺ اﳊﻠﺔ وﻣﺼﻔﺎة اﻟﺘﺼﺮﻳﻒ. ﺻﻮت اﳋﺸﺨﺶ ﺻﻮت ﺿﺨﻢ ﺿﺠﻴﺞ اﻻﻫﺘﺰاز ﺗﺴﺮب اﳌﺎء إذا اﺳﺘﻤﺮ اﻟﻀﺠﻴﺞ ﺑﻌﺪ إﻋﺎدة ﺗﺸﻐﻴﻞ اﳉﻬﺎز، اﺗﺼﻞ ﲟﺮﻛﺰ اﳋﺪﻣﺎت. ● اﳌﻼﺑﺲ اﻟﺜﻘﻴﻠﺔ واﻟﻜﺒﻴﺮة ﻗﺪ ﺗﺼﺪر ﺻﻮﺗﺎ ﻛﺒﻴﺮا. إذا اﺳﺘﻤﺮ اﻟﺼﻮت ،ﺟﻬﺎز اﻟﻐﺴﺎﻟﺔ ﺧﺎرج اﻟﺘﻮازن .اوﻗﻒ ﻫﺬا أﻣﺮ ﻋﺎدي. وزع اﳌﻼﺑﺲ ﻣﻦ ﺟﺪﻳﺪ. ّ ● ﻫﻞ أزﻟﺖ ﻣﺴﺎﻣﻴﺮ اﻟﻨﻘﻞ واﻟﺘﻐﻠﻴﻒ ؟ إذا ﻟﻢ ﺗﺰل اﳌﺴﺎﻣﻴﺮ أﺛﻨﺎء اﻟﺘﺮﻛﻴﺐ، راﺟﻊ ﺗﻌﻠﻴﻤﺎت ● ﻫﻞ ﺟﻤﻴﻊ اﻷرﺟﻞ ﻣﻮﺿﻮﻋﺔ ﻋﻠﻰ اﻷرض ﺑﺜﺒﺎت ؟ اﻟﺘﺮﻛﻴﺐ ﻣﻦ أﺟﻞ إزاﻟﺔ ﻣﺴﺎﻣﻴﺮ اﻟﻨﻘﻞ. وﺿﻊ اﳌﻼﺑﺲ ﻏﻴﺮ ﻣﺘﻮازن ﻓﻲ اﳊﻠﺔ. اوﻗﻒ ﺟﻬﺎز اﻟﻐﺴﺎﻟﺔ ﻣﻦ اﻟﻌﻤﻞ واﻋﺪ ﺗﺮﺗﻴﺐ اﳌﻼﺑﺲ. ● ﺧﺮﻃﻮم ﺗﻐﺬﻳﺔ اﳌﺎء وﺧﺮﻃﻮم اﻟﺘﺼﺮﻳﻒ ﻣﺮﺗﺨﲔ ﻓﻲ ﺣﻨﻔﻴﺔ ﻣﺎء أو ﺟﻬﺎز ﻏﺴﺎﻟﺔ. اﻓﺤﺺ ﺗﻮﺻﻴﻼت اﳋﺮﻃﻮم وﺛﺒﺘﻬﺎ . ● أﻧﺎﺑﻴﺐ اﻟﺘﺼﺮﻳﻒ اﻟﺪاﺧﻠﻴﺔ ﻣﺴﺪودة. ازل ﺷﻴﺌﺎ ﻣﺴﺪودا ﻓﻲ أﻧﺒﻮب اﻟﺘﺼﺮﻳﻒ .واﺗﺼﻞ ﺑﺎﻟﻔﻨﻲ ﻋﻨﺪ اﳊﺎﺟﺔ. اﻟﺮﻏﻮة اﻟﺰاﺋﺪة ﻣﺎدة اﻟﺘﻨﻈﻴﻒ اﻟﻜﺜﻴﺮة ﺟﺪا أو ﻣﺎدة اﻟﺘﻨﻈﻴﻒ ﻏﻴﺮ ﻻ ﻳﺪﺧﻞ اﳌﺎء اﻟﻰ اﻟﻐﺴﺎﻟﺔ أو ● ﺗﺰوﻳﺪ اﳌﺎء ﻓﻲ اﳌﻨﻄﻘﺔ ﻏﻴﺮ ﻛﺎﻓﻲ. اﳌﻨﺎﺳﺒﺔ ؟ وﺣﺪوث اﻟﺮﻏﻮة ﻳﺆدي اﻟﻰ ﺗﺴﺮب ﻣﺎء. اﻓﺤﺺ اﳊﻨﻔﻴﺔ اﻷﺧﺮى ﻓﻲ اﳌﻨﺰل. ● ﻻ ﺗﻔﺘﺢ ﺣﻨﻔﻴﺔ اﳌﺎء ﻛﺎﻣﻼ . اﻓﺘﺢ اﳊﻨﻔﻴﺔ ﻛﺎﻣﻼ. ﻳﺪﺧﻠﻪ ﺑﺒﻂء ● ﺧﺮﻃﻮم ﺗﺰوﻳﺪ اﳌﺎء ﻣﻠﺘﻮي. ﻻ ﺗﺼﺮف اﳌﺎء ﻣﻦ ● ﻣﺼﻔﺎة ﺧﺮﻃﻮم دﺧﻮل اﳌﺎء ﻣﺴﺪودة. ● ﺧﺮﻃﻮم اﻟﺘﺼﺮﻳﻒ ﻣﺘﻠﻮي أو ﻣﺴﺪود. ● ﻣﺼﻔﺎة اﻟﺘﺼﺮﻳﻒ ﻣﺴﺪودة. ﺟﻬﺎز اﻟﻐﺴﺎﻟﺔ أو اﺳﺘﻘﻢ اﳋﺮﻃﻮم. اﻓﺤﺺ اﳌﺼﻔﺎة ﻓﻲ ﺧﺮﻃﻮم دﺧﻮل اﳌﺎء. ﻧﻈﻒ واﺳﺘﻘﻢ ﺧﺮﻃﻮم اﻟﺘﺼﺮﻳﻒ. ّ ﻧﻈﻒ ﻣﺼﻔﺎة اﻟﺘﺼﺮﻳﻒ. ّ ﻳﺘﻢ اﻟﺘﺼﺮﻳﻒ ﺑﺒﻂء 27 دﻟﻴﻞ ﲢﺮى اﳋﻠﻞ وإﺻﻼﺣﻪ اﳌﺸﻜﻠﺔ ﻻ ﻳﻌﻤﻞ ﺟﻬﺎز اﻟﻐﺴﺎﻟﺔ اﻟﺴﺒﺐ اﶈﺘﻤﻞ ● ﻻ ﻳﺼﻞ ﻗﺎﺑﺲ اﳉﻬﺎز اﻟﻰ ﻣﺨﺮج اﻟﺘﻴﺎر أو اﻟﺘﻮﺻﻴﻞ ﻣﺮﺗﺦ. ● ﺻﻬﻴﺮة اﻟﺒﻴﺖ ﻣﻨﻘﻄﻌﺔ ،وﻳﻄﻔﺮ ﻗﺎﻃﻊ اﻟﺪاذرة ،أو ﺣﺪث اﻧﻘﻄﺎع ﻃﺎﻗﺔ. اﳊﻠﻮل ﺗﺄﻛﺪ ﻣﻦ ﺗﻮﺻﻴﻞ اﻟﻘﺎﺑﺲ اﻟﻰ ﻣﺨﺮج اﻟﺘﻴﺎر ﺑﺈﺣﻜﺎم. ﺑﺪل اﻋﺪ ﺿﺒﻂ ﻗﺎﻃﻊ اﻟﺪاﺋﺮة أو ّ اﻟﺼﻬﻴﺮة .وﻻ ﺗﺰد ﺳﻌﺔ اﻟﺼﻴﻬﺮة. إذا ﻛﺎﻧﺖ ﻣﺸﻜﻠﺔ ﻧﺎﺟﻤﺔ ﻋﻦ ﺣﻤﻞ اﻟﺪاﺋﺮة اﻟﺰاﻳﺪ ،ﻛﻦ ﻻ ﲡﻔﻴﻒ ﻓﻲ اﻟﻐﺴﺎﻟﺔ ● ﻻ ﺗﻔﺘﺢ ﺣﻨﻔﻴﺔ اﳌﺎء. ﺻﺤﻴﺤﺎ ﻣﻦ ﻗﺒﻞ ﻓﻨﻲ ﻛﻬﺮﺑﺎﺋﻲ ﻣﺆﻫﻞ. ٭ ﺗﺄﻛﺪ ﻣﻦ أن اﻟﺒﺎب ﻣﻐﻠﻖ ﺑﺈﺣﻜﺎم. اﻓﺘﺢ ﺣﻨﻔﻴﺔ اﳌﺎء. اﻏﻠﻖ اﻟﺒﺎب واﺿﻐﻂ ﻋﻠﻰ زر اﻟﺘﺸﻐﻴﻞ/اﻟﺘﻮﻗﻒ اﳌﺆﻗﺖ. ﺑﻌﺪ اﻟﻀﻐﻂ ﻋﻠﻰ زر اﻟﺘﺸﻐﻴﻞ/اﻟﺘﻮﻗﻒ اﳌﺆﻗﺖ ،ﻳﺴﺘﻐﺮق وﻗﺖ ﻗﻠﻴﻞ ﻟﻠﺒﺪء ﺑﺎﻟﺘﺠﻔﻴﻒ .ﻻ ﺑﺪ ﻣﻦ إﻏﻼق اﻟﺒﺎب ﻗﺒﻞ اﻟﺒﺪء ﺑﺎﻟﺘﺠﻔﻴﻒ. ﻻ ﳝﻜﻦ ﻓﺘﺢ اﻟﺒﺎب ﻋﻨﺪ اﻟﺘﺸﻐﻴﻞ ،ﻻ ﳝﻜﻨﻚ ﻓﺘﺢ اﻟﺒﺎب ﺳﺒﺒﺎ ﻟﻠﺴﻼﻣﺔ. اﻧﺘﻈﺮ دﻗﻴﻘﺔ أو دﻗﻴﻘﺘﲔ ﻗﺒﻞ ﻓﺘﺢ اﻟﺒﺎب ﻹﻋﻄﺎء وﻗﺖ ﻟﻔﺘﺢ إﻏﻼق اﻵﻟﻴﺔ اﻟﻜﻬﺮﺑﺎﺋﻴﺔ. ﻳﺘﺄﺟﻞ وﻗﺖ دوران اﻟﻐﺴﻴﻞ وﻗﺖ اﻟﻐﺴﻴﻞ ﻗﺪ ﻳﺨﺘﻠﻒ ﺣﺴﺐ ﻛﻤﻴﺔ اﳌﻼﺑﺲ ،وﺿﻐﻂ اﳌﺎء ،ودرﺟﺔ ﺣﺮارة اﳌﺎء واﳊﺎﻻت اﻷﺧﺮى ﻟﻠﻐﺴﻴﻞ. إذا ﻛﺎﻧﺖ اﳌﻼﺑﺲ ﻏﻴﺮ ﻣﺘﻮازﻧﺔ أو إذا ﻋﻤﻞ ﺑﺮﻧﺎﻣﺞ إزاﻟﺔ اﻟﺮﻏﻮة ،ﻳﺰﻳﺪ وﻗﺖ اﻟﻐﺴﻴﻞ . 28 دﻟﻴﻞ ﲢﺮى اﳋﻠﻞ وإﺻﻼﺣﻪ اﳌﺸﻜﻠﺔ اﻟﺴﺒﺐ اﶈﺘﻤﻞ اﳊﻠﻮل ● ﺗﺰوﻳﺪ اﳌﺎء ﻓﻲ اﳌﻨﻄﻘﺔ ﺿﻌﻴﻒ. اﻓﺤﺺ ﺣﻨﻔﻴﺔ ﻣﺎء أﺧﺮى ﻓﻲ اﳌﻨﺰل. اﻓﺘﺢ ﺣﻨﻔﻴﺔ اﳌﺎء ﻛﺎﻣﻼ. اﺳﺘﻘﻢ اﳋﺮﻃﻮم. ● ﻻ ﺗﻔﺘﺢ ﺣﻨﻔﻴﺔ اﳌﺎء ﻛﺎﻣﻼ. ● ﺧﺮﻃﻮم دﺧﻮل اﳌﺎء ﻣﻠﺘﻮي . ● ﻣﺼﻔﺎة ﺧﺮﻃﻮم دﺧﻮل اﳌﺎء ﻣﺴﺪود. اﻓﺤﺺ ﻣﺼﻔﺎة ﺧﺮﻃﻮم دﺧﻮل اﳌﺎء. ● ﺧﺮﻃﻮم اﻟﺘﺼﺮﻳﻒ ﻣﻠﺘﻮي أو ﻣﺴﺪود. ﻧﻈﻒ واﺳﺘﻘﻢ ﺧﺮﻃﻮم اﻟﺘﺼﺮﻳﻒ. ّ ● ﻣﺼﻔﺎة اﻟﺘﺼﺮﻳﻒ ﻣﺴﺪودة. ﻧﻈﻒ ﻣﺼﻔﺎة اﻟﺘﺼﺮﻳﻒ. ّ ● اﳊﻤﻞ ﻏﻴﺮ ﻣﺘﻮازن. اﺿﻒ ﻗﻄﻌﺔ أو ﻗﻄﻌﺘﲔ ﻟﻠﻤﺴﺎﻋﺪة ﻓﻲ ﺗﻮازن اﳊﻤﻞ. ● اﳊﻤﻞ ﻗﻠﻴﻞ ﺟﺪا. ● اﳉﻬﺎز ﻣﺰود ﺑﻨﻈﺎم ﻛﺸﻒ ﻋﺪم اﻟﺘﻮازن وﺗﺼﺤﻴﺤﻪ. إذا وﺿﻌﺖ اﻷﺷﻴﺎء اﻟﺜﻘﻴﻠﺔ ﻣﺜﻞ ﺑﻄﺎﻧﻴﺔ اﳊﻤﺎم ،رداء اﳊﻤﺎم ...اﻟﺦ .ﻫﺬا اﻟﻨﻈﺎم ﻗﺪ ﻳﺘﻮﻗﻒ ﻋﻦ اﻟﺘﺪوﻳﺮ أو إﻋﺎﻗﺔ اﻟﺘﺪوﻳﺮ ،ﻓﻲ ﺣﺎﻟﺔ أن اﳊﻤﻞ ﻏﻴﺮ ﻣﺘﻮازن ﺟﺪا ﺣﺘﻰ ﺑﻌﺪ اﻟﺒﺪء ﺑﺎﻟﺘﺪوﻳﺮ ﻋﺪة ﻣﺮات. ● إذا ﻣﺎ زاﻟﺖ اﳌﻼﺑﺲ ﻣﺘﺒﻠﻠﺔ ﻓﻲ ﻧﻬﺎﻳﺔ اﻟﺪوران ،اﺿﻒ اﻟﻘﻄﻊ اﻷﺻﻔﺮ ﻣﻦ اﳌﻼﺑﺲ ﻟﺘﻮازن اﳊﻤﻞ وﻛﺮر دوران اﻟﺘﺠﻔﻴﻒ. ﺗﻮازن اﳊﻤﻞ. اﻋﺪ ﺗﺮﺗﻴﺐ اﳊﻤﻞ ﻟﻠﺘﺪوﻳﺮ اﳌﻨﺎﺳﺐ. اﻏﻠﻖ اﻟﺒﺎب. ● ﻫﻞ اﻟﺒﺎب ﻣﻔﺘﻮح ؟ ٭ إذا ﻟﻢ ﻳﺘﻼش اﳋﺪﻣﺎت. ،اﺗﺼﻞ ﲟﺮﻛﺰ اﻓﺼﻞ ﻗﺎﺑﺲ اﻟﺘﻴﺎر ﻣﻦ ﻣﺨﺮج اﻟﺘﻴﺎر واﺗﺼﻞ ﲟﺮﻛﺰ اﳋﺪﻣﺎت. ●إذا ﻓﺎض اﳌﺎء ﺑﺴﺒﺐ ﺧﻠﻞ ﺻﻤﺎم اﳌﺎء ، اﻏﻠﻖ ﺣﻨﻔﻴﺔ اﳌﺎء . ﻳﻌﺮض ﻣﺆﺷﺮ س س ﻋﻠﻰ زﺟﺎج اﻟﻌﺮض .اﻓﺼﻞ ﻗﺎﺑﺲ اﻟﺘﻴﺎر. اﺗﺼﻞ ﲟﺮﻛﺰ اﳋﺪﻣﺎت. ﻓﻲ ﺣﺎﻟﺔ ﺣﺪوث ● ﻳﻌﺮض ﻣﺆﺷﺮ ﻋﻄﻞ ﻓﻲ اﳌﺆﺷﺮ ﲟﺴﺘﻮى اﳌﺎء. ● اﳊﻤﻞ اﻟﺰاﺋﺪ ﻓﻲ اﳌﻮﺗﻮر. ● اﳊﻤﻞ اﻟﺰاﺋﺪ ﻓﻲ اﳌﻮﺗﻮر. 29 ﺷﺮوط اﻟﻀﻤﺎﻧﺔ ﻣﺎ ﻻ ﺗﻐﻄﻴﻪ اﻟﻀﻤﺎﻧﺔ ● رﺣﻼت اﳋﺪﻣﺔ اﻟﻰ ﺑﻴﺘﻚ ﻟﺘﻌﻠﻴﻤﻚ ﻛﻴﻔﻴﺔ اﺳﺘﺨﺪام اﳌﻨﺘﺞ . ● اذا ﰎ ﺗﻮﺻﻴﻞ اﳌﻨﺘﺞ ﻣﻊ أي ﻓﻮﻟﻄﻴﺔ ﻏﻴﺮ اﻟﺘﻲ اﺷﻴﺮ اﻟﻴﻬﺎ ﻋﻠﻰ ﻟﻮﺣﺔ اﻟﻨﺴﺐ . ● .اذا ﻛﺎن ﺳﺒﺐ اﳋﻄﺄ ﻋﻦ ﻃﺮﻳﻖ ﺣﺎدث ،إﻫﻤﺎل ،أو ﻛﻮارث ﻃﺒﻴﻌﻴﺔ . ● اذا ﻛﺎن ﺳﺒﺐ اﳋﻄﺄ ﻋﻦ ﻃﺮﻳﻖ ﻋﻮاﻣﻞ ﻏﻴﺮ اﻻﺳﺘﺨﺪام اﶈﻠﻲ اﻟﻌﺎدي أو اﺳﺘﺨﺪام ﺣﺴﺐ دﻟﻴﻞ اﳌﺎﻟﻚ . ● ﺗﻘﺪﱘ ﺗﻌﻠﻴﻤﺎت ﺣﻮل اﺳﺘﺨﺪام اﳌﻨﺘﺞ أو ﺗﻐﻴﻴﺮ ﺿﺒﻂ اﳌﻨﺘﺞ . ● اذا ﺗﺴﺒﺐ ﻓﻲ اﳋﻄﺄ آﻓﺔ ﻣﺎ ﻋﻠﻰ ﺳﺒﻴﻞ اﳌﺜﺎل،ﻓﺌﺮان أو ﺣﺸﺮات ﻣﻨﺰﻟﻴﺔ وﻏﻴﺮﻫﺎ . ● اﻟﻀﺠﻴﺞ واﻻﻫﺘﺰاز اﻟﺬي ﻳﻌﺘﺒﺮ ﻋﺎدي ،ﻣﺜﺎل ﺻﻮت ﺗﺼﺮﻳﻒ اﳌﺎء ،ﺻﻮت دوران أو ﺻﻮت اﻟﺘﺪﻓﺌﺔ )ﺑﻴﺐ ( . ● ﺗﺼﺤﻴﺢ اﻟﺘﺮﻛﻴﺐ ﻣﺜﻼً ،رﻓﻊ اﳌﻨﺘﺞ ،ﺗﻌﺪﻳﻞ اﻟﺘﺼﺮﻳﻒ . ● اﻟﺼﻴﺎﻧﺔ اﻟﻌﺎدﻳﺔ اﻟﺘﻲ أوﺻﻰ ﺑﻬﺎ دﻟﻴﻞ اﳌﺎﻟﻚ . ● اﻟﺘﺨﻠﺺ ﻣﻦ اﻻﺷﻴﺎء اﻟﻐﺮﻳﺒﺔ /ﻣﻮاد ﻣﻦ اﳌﺎﻛﻴﻨﺎت ،ﻳﺸﻤﻞ ذﻟﻚ اﳌﻀﺨﺔ وﻣﺼﻔﺎة اﳋﺮﻃﻮم اﻟﺪاﺧﻞ ﻋﻠﻰ ﺳﺒﻴﻞ اﳌﺜﺎل ، ﺣﺼﻰ ،ﻣﺴﺎﻣﻴﺮ ،ﻗﻄﻊ أﺳﻼك ،أزرار وﻏﻴﺮه . ● وﺿﻊ اﻟﻔﻴﻮز ﻓﻲ أو ﺗﺼﺤﻴﺢ اﺳﻼك اﻟﺒﻴﺖ أو ﺗﺼﺤﻴﺢ ﺳﺒﺎﻛﺔ اﻟﺒﻴﺖ . ● ﺗﺼﺤﻴﺢ ﺗﻌﻠﻴﻤﺎت ﻏﻴﺮ ﻣﺼﺮح ﺑﻬﺎ . ● ﺿﺮر ﺑﺴﺒﺐ ﺣﺎدث أو ﻧﺘﺞ ﻋﻨﻪ ﺗﻠﻒ ﻓﻲ اﳌﻤﺘﻠﻜﺎت اﳋﺎﺻﺔ ﺑﺴﺒﺐ ﺧﻠﻞ ﻓﻲ ﻫﺬا اﳉﻬﺎز . ● إذا أﺳﺘﺨﺪم ﻫﺬا اﳌﻨﺘﺞ ﻻﻏﺮاض ﲡﺎرﻳﺔ ،ﻻ ﺗﻐﻄﻴﻪ اﻟﻀﻤﺎﻧﺔ . )ﻣﺜﺎل /أﻣﺎﻛﻦ ﺗﺴﺘﺨﺪم ﻣﻦ ﻗﺒﻞ اﻟﻌﺎﻣﺔ ﻣﺜﻞ اﳊﻤﺎﻣﺎت ،ﻓﻨﺎدق، ﻣﺮﻛﺰ ﺗﺪرﻳﺐ ،ﺑﻴﺖ ﺑﻪ ﻏﺮف ﻟﻼﻳﺠﺎر ( 30 WD-12470BD WD-12475BD WD-12476BD WD-12477BD WD-12478BD WD-12479BD P/No.: MFL38868744 32 ﺟﻬﺎز اﻟﻐﺴﺎﻟﺔ دﻟﻴﻞ اﳌﺎﻟﻚ WD-12470BD WD-12475BD WD-12476BD WD-12477BD WD-12478BD WD-12479BD ﺷﻜﺮا ﻟﺸﺮاء ﺟﻬﺎز اﻟﻐﺴﺎﻟﺔ اﻷوﺗﻮﻣﺎﺗﻴﻜﻲ اﻟﻜﺎﻣﻞ ﻣﻦ إل ﺟﻲ. ﻳﻘﺪم اﻟﺘﻌﻠﻴﻤﺎت ﻋﻦ ﻳﺮﺟﻰ ﻗﺮاءة دﻟﻴﻞ اﳌﺎﻟﻚ ﺑﻌﻨﺎﻳﺔ ،وﻫﺬا ّ اﻟﺘﺮﻛﻴﺐ ﺑﺴﻼﻣﺔ واﻟﺘﺸﻐﻴﻞ واﻟﺼﻴﺎﻧﺔ. اﺣﺘﻔﻆ ﺑﻪ ﻛﻤﺮﺟﻊ ﻓﻲ اﳌﺴﺘﻘﺒﻞ. ﺳﺠﻞ رﻗﻢ اﳌﻮدﻳﻞ واﻟﺮﻗﻢ اﳌﺴﻠﺴﻞ ﳉﻬﺎز اﻟﻐﺴﺎﻟﺔ. ّ 33