1
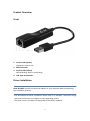
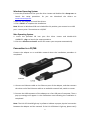
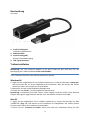
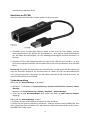
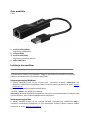
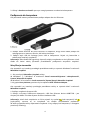
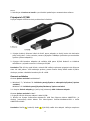
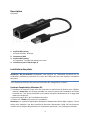
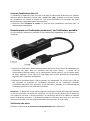
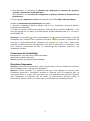
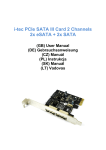
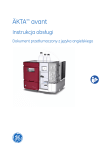
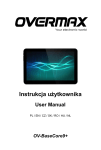
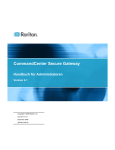
i-tec USB 2.0 Fast Ethernet Adapter
Uživatelská příručka
Úvod
I-tec USB 2.0 Fast Ethernet Adapter poskytuje uživatelskému počítači přístup do
10/100Mbps sítě prostřednictvím USB portu. Nemusíte nakupovat jinou LAN kartu ať
již do PCI/PCIe slotu nebo Express/CardBus slotu. Specifikace USB 2.0 zajistí
spolehlivé využití 10/100Mbps rychlosti. USB port zajistí plnou činnost adaptéru,
přičemž není třeba nijaký další externí napájecí zdroj.
Charakteristika
■ USB 2.0 na 10/100 Mbps Fast Ethernet
■ Podpora jak full-duplex, tak half-duplex přenosů
■ Podpora funkce Wake-on-LAN a režimu spánku
■ Podpora napájení z USB portu
■ Plug & Play funkce
Specifikace
■Porty: USB 2.0 typ A Male a RJ-45 pro připojení Ethernet kabelu
■LED indikace: zelená, žlutá
■Chipset Asix AX88772B s SRAM pro přenosy s vyrovnávací pamětí (buffer)
■Napájení: z USB portu (USB Bus Power 5 V), spotřeba asi 220 mW
■Obal z PVC
■Podporované OS: Windows® XP, Windows® 7, Windows® 8, Mac® OS 10.6-10.8
■Provozní teplota: 0-70°C
■Skladovací teplota: -10-80°C
■Rozměry (D x Š x V): 66 x 22 x 15 mm
■Hmotnost: 24 g
■Shoda: CE, FCC
Specifikace se mohou měnit bez předchozího oznámení
Systémové požadavky
■ Windows® XP / 7 / 8
■ Mac®OS
■ Volný USB port (USB 3.0/USB 2.0/USB 1.1)
2
Popis
Shora
1. Act/Link LED (Zelená)
Svítí: Připojeno.
2. RJ45 konektor
3. Act/Link LED (Žlutá)
Bliká: Přenos dat
4. USB Typ-A konektor
Instalace ovladačů
Poznámka: Nepřipojujte Fast Ethernet adaptér k PC/NB (do USB portu) před
dokončením instalace ovladačů.
*Verze ovladačů se může v budoucnosti měnit.
Windows OS
1. Vložte dodané CD do CD/DVD mechaniky, vyhledejte <Setup.exe> a dvojklikem
spusťte instalaci. Nebo si ovladače stáhněte z webu www.i-tec.cz.
2. Počkejte na dokončení instalace ovladačů.
3. Klikněte na <Finish> k dokončení instalace.
Poznámka: Windows 8 má ovladače již integrovány, můžete USB 2.0 Fast Ethernet
připojit přimo, viz kapitola Připojení k PC/NB.
3
Mac OS
1. Vložte dodané CD do CD/DVD mechaniky, vyhledejte v adresáři Mac soubor
<AX88772B….pkg> a dvojklikem spusťte instalaci. Nebo si ovladače stáhněte z
webu www.i-tec.cz.
2. Pokračujte <Continue to install> a po instalaci pokračujte v automatickém restartu.
Připojení k PC/NB
Připojte adaptér k Ethernet síti po dokončení instalace.
1. Připojte Ethernet kabel do RJ-45 portu adaptéru a druhý konec do aktivního prvku
vaší sítě – hubu, switche, routeru (nejlépe s 100Mbps rychlostí pro maximální
využití rychlosti adaptéru).
2. Připojte USB konektor adaptéru do volného USB portu PC/NB. Dokončí se instalace
ovladačů a v případě nutnosti si restartujte PC/NB.
Poznámka: Žlutá LED by měla blikat a zelená LED indikuje správnost připojení do
Ethernet sítě. Jestliže však jedna z LED neukazuje správně, pak ověřte všechny kabely
mezi PC/NB a aktivním prvkem a dotlačte konektory RJ-45 a USB.
Ověření oladačů
Otevřete Správce zařízení ve Windows®.
1. Windows® 7 / Windows® 8: Ovládací panely/Systém a zabezpečení/Systém/
Správce zařízení
Windows® XP: Ovládací panely/Systém/Hardware/ Správce zařízení
2. Ve skupině Síťové adaptéry je (měl by být) zobrazen ASIX…Ethernet Adapter
4
Otevřete Správce zařízení v Mac®
1. Připojte USB 2.0 Ethernet adaptér k Mac PC/NB.
2. Klikněte na System Preferences->Network-> USB Fast Ethernet device AX88772B je aktivní (connected) nebo About This Mac>System Profiler>Hardware>USB a
vidíte AX88772B ovladač.
Poznámka: Značky
(otazník) nebo
(vykřičník) vedle Asix adapter indikuje
nespávnou instalaci. Prosíme o odstranění (odinstalaci) adaptéru ze systému, odpojte
jej a opakujte instalaci znovu. Doporučujeme i restart PC/NB.
Obsah balení
■ i-tec USB 2.0 Fast Ethernet Adapter
■ CD (Ovladače a manuály)
■ Uživatelská příručka
Často kladené otázky
Otázka: Vše mi funguje, ale ukazuje se jen rychlost 10 Mbps, kde je problém?
Odpověď: Ověřte veškerou kabeláž mezi PC/NB a aktivním prvkem a dotlačte
konektory RJ-45. Pomáhá i výměna Ethernet kabelu mezi adaptérem a aktivním
síťovým prvkem (hub, switch, router) za certifikovaný.
5
i-tec USB 2.0 Fast Ethernet Adapter
User's Manual
Introduction
The USB 2.0 Fast Ethernet Adapter allows user's computer instantly connect to a
10/100 Mbps network through an existing USB port. No need to purchase an extra
network card and share a PCI or Cardbus slot. With compliance with USB 2.0
specification, this adapter ensures true 10/100 Mbps network speed without any
compromise. Besides, compact and bus-powered design means external power is not
required.
Features
■ USB 2.0 to 10/100 Mbps Fast Ethernet
■ Support both full-duplex and half-duplex operations
■ Support Wake-on-LAN function and suspend mode
■ Powered by USB port only
■ Plug & Play installation
Specification
■ Ports: USB 2.0 type A Male and RJ-45 for Fast Ethernet cable
■LED indicators: Green, Yellow
■Chipset Asix AX88772B with SRAM for RX/TX packet buffering
■Power: USB Bus Power 5V
■Housing from PVC
■Supported OS : Windows® XP, Windows® 7, Windows® 8, Mac® OS 10.6-10.8
■ Operation Temperature: 0-70°C
■ Storage Temperature: -10-80°C
■ Size (L x W x H): 66 x 22 x 15 mm
■Weight: 24 g
■Compliance: CE, FCC
Specification is subject to change without further notice
System Requirements
■ Windows® XP / 7 / 8
■ Mac®OS
■ Free USB port (USB 3.0 / USB 2.0 / USB 1.1)
2
Product Overview
Front
1. Act/Link LED (Green)
Light green: Data is link.
2. RJ45 connector
3. Act/Link LED (Yellow)
Yellow flashing: Data is transmitting.
4. USB Type-A connector
Driver Installation
Note: DO NOT connect the Ethernet adapter to your computer before completing
the installation of driver.
*The descriptions of driver installation shown here is an example. The actual strings
and screen shots may vary slightly on each operating system.
*The driver version is subject to change due to the driver updated.
3
Windows Operating System
1. Insert the provided CD into your disc drive. Locate and double-click <Setup.exe> to
launch the setup procedure. Or you can download the drivers on
www.i-tec-europe.eu.
2. Wait for the program to install the drivers.
3. Click <Finish> to complete the installation.
Note: Drivers in Windows 8 OS are included for this product, you connect its to USB
port – see on point “Connection to a PC/NB”
Mac Operating System
1. Insert the provided CD into your disc drive. Locate and double-click
<AX88179….pkg> to launch the setup procedure.
2. Click the <Continue to install> and it will restart your computer automatically.
Connection to a PC/NB
Connect the adapter to an available network when the installation procedure is
completed.
1. Connect an Ethernet cable to the Ethernet port of the adapter, and then connect
the other end of the Ethernet cable to an available network hub, switch or router.
2. Connect the USB connector of the adapter to a free USB port of computer. Then a
pop-up message will appear in the notification area indicating the installation is
completed.
Note: The Link LED should light up in yellow to indicate a proper physical connection
between the adapter and the network. If the Link LED doesn’t light up, please verify
4
the cable connection between all the network devices.
Verifying the Driver
To verify the driver of the adapter, follow the steps below to open the Device
Manager on Windows®.
1. Following the path as below to open the device manager
Windows® 7 / Windows® 8: Control Panel\System and Security\System\Device
Manager
Windows® XP: Control Panel\System\Hardware\Device Manager
2. In the Network adapters group, an item named ASIX…Ethernet Adapter should be
listed.
To verify the driver of the adapter, follow the steps below to open the Device
Manager on Mac®
1. Please connect the USB to LAN device to Mac.
2. Click the System Preferences->Network-> USB Fast Ethernet device AX88772B
active on line or About This Mac>System Profiler>Hardware>USB and you see
driver AX88772B.
Note: If there is a
(question) or
(exclamation) mark next to that item, then
the driver is not properly installed. Please delete the item, unplug the adapter and
repeat the installation steps.
Package Content
■ i-tec USB 2.0 Fast Ethernet Adapter
■ CD (Driver and User's manual)
■ Quick Installation Guide
FAQ
Question: All is OK, only Ethernet speed on adapter is displayed 10 Mbps, where is
problem?
Answer: Please verify all cabling between PC/NB and active Ethernet device (hub,
switch, router) and formly plug in all RJ-45 connectors. Maybe help you exchange
Ethernet cable between PC/NB and active device for certificated one.
5
i-tec USB 2.0 Fast Ethernet Adapter
Benutzerhandbuch
Einleitung
I-tec USB 2.0 Fast Ethernet Adapter bietet dem Benutzercomputer den Zugang ins 10/100
Mbps Netz mit Hilfe von USB Port. Sie müssen keine andere LAN Karte weder in den PCI/PCIe
Slotter noch den Express/CardBus Slotter kaufen. Dank der USB 2.0 Spezifikation ist die
10/100 Mbps Geschwindigkeit maximal und zuverlässig auszunutzen. Der USB Port
ermöglicht die volle Tätigkeit des Adapters, indem kein anderes externes Netzteil nötig ist.
Charakteristik
■ USB 2.0 auf 10/100 Mbps Fast Ethernet
■Unterstützung von Full-Duplex- sowie Half-Duplex-Übertragungen
■Unterstützung der Funktion Wake-on-LAN und Stand-by-Modus
■Unterstützung der Versorgung vom USB Port
■Plug & Play Funktion
Spezifikation
■Ports: USB 2.0 Typ A Male und RJ-45 zum Anschluss von Ethernet Kabel
■LED Anzeige: grün, gelb
■Chipsatz Asix AX88772B mit SRAM zu Übertragungen mit Zwischenspeicher (buffer)
■Versorgung: vom USB Port (USB Bus Power 5 V), Verbrauch etwa 220 mW
■Kunststoff-Gehäuse
■Unterstützte BS: Windows® XP, Windows® 7, Windows® 8, Mac® OS 10.6-10.8
■Betriebstemperatur: 0-70°C
■Lagerungstemperatur: -10-80°C
■Maße (L x B x H): 66 x 22 x 15 mm
■Gewicht: 24 g
■Übereinstimmung mit: CE, FCC
Die Spezifikationen können ohne vorherige Ankündigung geändert werden
Systemanforderungen
■ Windows® XP / 7 / 8
■ Mac®OS
■Ein freier USB Port (USB 3.0/USB 2.0/USB 1.1)
2
Beschreibung
Von oben
1. Act/Link LED (grün)
Leuchtet: Angeschlossen
2. RJ45 Anschluss
3. Act/Link LED (gelb)
Blinzelt: Datenübertragung
4. USB Typ-A Anschluss
Treiberinstallation
Bemerkung: Der Fast Ethernet Adapter ist an den PC/NB (an den USB Port) vor der
Beendigung der Treiberinstallation nicht anzuschließen.
*Die Treiberversion kann in der Zukunft aktualisiert werden.
Windows BS
1. Legen Sie die mitgelieferte CD ins CD/DVD Laufwerk ein, suchen Sie die Datei <Setup.exe>
aus und starten Sie mit einem Doppelklick die Installation. Oder Sie können die Treiber
auch unter www.i-tec-europet.eu herunterladen.
2. Warten Sie, bis die Treiberinstallation beendet wird.
3. Klicken Sie auf <Finish>, um die Installation beendet wird.
Bemerkung: In Windows 8 sind die Treiber schon integriert und der USB 2.0 Fast Ethernet
Adapter kann gleich angeschlossen werden, sieh. das Kapitel Anschluss an PC/NB.
Mac OS
1. Legen Sie die mitgelieferte CD ins CD/DVD Laufwerk ein, suchen Sie die Datei für Mac
<AX88772B….pkg> aus und starten Sie die Installation mit Doppelklick. Die Treiber können
Sie auch unter www.i-tec-europe.eu herunterladen.
2. Führen Sie mit <Continue to install> weiter und nach der Installation führen Sie den
3
automatischen Neustart durch.
Anschluss an PC/NB
Nach der Installation schließen Sie den Adapter an Ethernet Netz.
1. Schließen Sie ein hochwertiges Ethernet Kabel an den RJ-45 Port des Adapter und das
andere Kabelende an den aktiven Teil Ihres Netzes an – Hub, Switch, Router (idealerweise
mit 100 Mbps Geschwindigkeit, um die Adaptergeschwindigkeit maximal ausnutzen zu
können).
2. Schließen Sie den USB Adapteranschluss an einen freien USB Port von PC/NB an. Es wird
die Treiberinstallation beendet und bei Bedarf führen Sie noch den Neustart Ihres PCs/NBs
durch.
Bemerkung: Die gelbe LED-Kontrollleuchte sollte blinzeln und die grüne LED-Kontrollleuchte
zeigt den korrekten Anschluss ans Ethernet Netz an. Wenn eine der LED-Kontrollleuchten
nicht richtig funktioniert, überprüfen Sie alle Kabel zwischen PC/NB und dem aktiven Teil
sowie die Anschlüsse RJ-45 und USB.
Treiberüberprüfung
Öffnen Sie den Geräte-Manager in Windows®.
1. Windows® 7 / Windows® 8: Systemsteuerung / System und Sicherheit / System / GeräteManager
Windows® XP: Systemsteuerung / System / Hardware / Geräte-Manager
2. Unter der Gruppe Netzwerkadapter wird (sollte) das Gerät als ASIX…Ethernet Adapter
angezeigt
Öffnen Sie den Geräte-Manager in Mac®.
1. Schließen Sie den USB 2.0 Ethernet Adapter an Mac PC/NB an.
2. Klicken Sie auf System Preferences->Network-> USB Fast Ethernet Device AX88772B- wird
aktiv (connected) oder auf About This Mac>System Profiler>Hardware>USB und Sie können
die AX88772B Treiber sehen.
4
Bemerkung: Symbole wie
(Fragezeichen) oder
(Ausrufezeichen) neben Asix Adapter
zeigen eine unkorrekte Installation an. Entfernen (Deinstallieren) Sie bitte den Adapter vom
System, schalten Sie ihn ab und dann wiederholen Sie die Installation nochmals. Wir
empfehlen den Neustart von PC/NB durchzuführen.
Lieferumfang
■ i-tec USB 2.0 Fast Ethernet Adapter
■ CD (Treiber und Benutzerhandbücher)
■ Benutzerhandbuch
Oft gestellte Fragen
Frage: Alles funktioniert, aber es wird nur die 10 Mbps Geschwindigkeit angezeigt. Wo liegt
das Problem?
Antwort: Überprüfen Sie die Verkabelung zwischen PC/NB und dem aktiven Teil sowie die
Anschlüsse RJ-45 und USB. Es hilft auch, wenn Sie das Ethernet Kabel zwischen Adapter und
dem aktiven Teil (Hub, Switch, Router) für ein zertifiziertes austauschen.
5
i-tec USB 2.0 Fast Ethernet Adapter
Instrukcja
Wprowadzenie
I-tec USB 2.0 Fast Ethernet Adapter umożliwia użytkownikowi natychmiastowy dostęp do
sieci Ethernet 10/100 Mbps poprzez port USB, bez konieczności kupowania dodatkowej karty
sieciowej podłączanej do złącza PCI/PCIe czy też ExpressCard/CardBus.
Zgodność Adaptera ze specyfikacją USB 2.0 gwarantuje transmisję danych na poziomie
10/100 Mbps, zasilanie z portu USB zapewnia pracę urządzenia bez dodatkowego zasilacza.
Charakterystyka
■ Adapter – karta sieciowa USB 2.0 do 10/100 Mbps Gigabit Ethernet
■ Obsługa transmisji full-duplex oraz half-duplex
■ Obsługa funkcji Wake-on-LAN oraz trybu uśpienia
■ Zasilanie z portu USB
■ Funkcja Plug & Play
Specyfikacja
■ Porty: USB 2.0 typ A Męski oraz RJ-45 do podłączenia kabla Ethernet
■ Diody Led: zielona, żółta
■ Chipset Asix AX88772B z buforem transmisji RX/TX
■ Zasilanie: z portu USB (USB Bus Power 5 V), 220 mW
■ Opakowanie z PVC
■ Obsługiwane systemy operacyjne: Windows® XP, Windows® 7, Windows® 8, Mac® OS 10.610.8
■ Temperatura pracy: 0-70°C
■ Temperatura przechowywania: -10-80°C
■ Wymiary (D x S x W): 66 x 22 x 15 mm
■ Waga: 24 g
■ Zgodność: CE, FCC
Specyfikacja może się zmienić bez wcześniejszego powiadomienia
Wymagania sprzętowe
■ Windows® XP / 7 / 8
■ Mac®OS
■ Wolny port USB (USB 3.0/USB 2.0/USB 1.1)
2
Opis produktu
Front
1. Act/Link LED (zielona)
Sygnalizuje podłączenie.
2. Gniazdo RH45
3. Act/Link LED (żółta)
Sygnalizuje transmisję danych.
4. Wtyk USB Typ-A
Instalacja sterowników
UWAGA: Nie podłączać urządzenia do póki nie zostaną zainstalowane sterowniki.
*Poniższe opisy instalacji są przykładem i mogą się nieco różnić w zależności od systemu.
*Wersja sterownika może się zmienić w przyszłości.
System operacyjny Windows
1. Włożyć dołączony dysk CD do czytnika płyt. Uruchomić program <Setup.exe> aby
rozpocząć instalowanie sterowników. Można również pobrać sterowniki ze strony www.itec-europe.eu.
2. Zaczekać aż sterowniki zostaną zainstalowane.
3. Kliknąć <Finish> aby zakończyć instalację.
Informacja: Windows 8 posiada zintegrowany sterownik, można bezpośrednio podłączyć USB
2.0 Fast Ethernet, patrz rozdział podłączenie do komputera.
System operacyjny Mac
1. Włożyć dołączoną płytę CD do czytnika CD/DVD, wyszukać plik <AX88772B….pkg> i
uruchomić dwukrotnym kliknięciem w celu rozpoczęcia instalacji. Można również pobrać
sterowniki ze strony www.i-tec-europe.eu.
3
2. Kliknąć <Continue to install> po czym nastąpi ponowne uruchomienie komputera.
Podłączenie do komputera
Gdy sterowniki zostaną zainstalowane podłącz adapter do sieci Ethernet.
1. Podłącz kabel Ethernet do portu Ethernet w adapterze, drugi koniec kabla podłącz do
wolnego portu w routerze, switchu, lub hubie sieciowym.
2. Podłącz wtyk USB do wolnego portu USB w komputerze. Pojawi się komunikat o
zakończeniu instalacji urządzenia.
Informacja: Żółta dioda LED sygnalizuje łączność między urządzeniem a siecią Ethernet. Jeżeli
dioda nie świeci należy sprawdzić prawidłowość podłączenia wszystkich urządzeń.
Weryfikacja sterownika
Aby sprawdzić czy instalacja przebiegła prawidłowo należy w systemie Windows® uruchomić
Menedżer Urządzeń.
1. Aby uruchomić Menedżer Urządzeń należy:
W Windows® 7 / Windows® 8 uruchomić: Panel sterowania\System i zabezpieczenia\
System\ Menedżer Urządzeń
W Windows® XP uruchomić: Panel sterowania \System\Sprzęt\ Menedżer Urządzeń
2. W grupie Karty sieciowe, powinno być urządzenie ASIX…Ethernet Adapter.
Aby sprawdzić czy instalacja przebiegła prawidłowo należy w systemie Mac® uruchomić
Menedżer Urządzeń
1. Podłącz urządzenie do portu USB.
2. Kliknąć na System Preferences->Network-> USB Fast Ethernet device AX88772B – jest
aktywny lub About This Mac>System Profiler>Hardware>USB.
Informacja: Jeżeli obok urządzenia na liście pojawił się symbol
(znak zapytania) lub
(wykrzyknik), oznacza to, że urządzenie nie zostało zainstalowane poprawnie.
W takim przypadku należy wykasować urządzenie z listy, odłączyć od komputera, a następnie
powtórzyć instalację.
4
Zawartość opakowania
■ i-tec USB 2.0 Fast Ethernet Adapter
■ CD (Sterownik i instrukcja)
■ Skrócona instrukcja
FAQ
Pytanie: Wszystko działa, tylko wyświetlana prędkość transmisji wynosi 10 Mbps, w czym
tkwi problem?
Odpowiedź: Należy sprawdzić wszystkie połączenia kablowe między komputerem a
aktywnym urządzeniem sieciowym (hub, switch, router), sprawdzić czy wtyki RJ45 są
podłączone prawidłowo, pomóc też może wymiana przewodów Ethernet na certyfikowane.
5
i-tec USB 2.0 Fast Ethernet Adaptér
Užívateľská príručka
Úvod
i-tec USB 2.0 Ethernet Adaptér poskytuje užívateľskému počítaču prístup do 10/100 Mbps
siete prostredníctvom USB portu. Nemusíte nakupovať inú LAN kartu či už do PCI/PCIe slotu
alebo Express/CardBus slotu. Špecifikácie USB 2.0 zaistia maximálne a spoľahlivé využitie
10/100 Mbps rýchlosti. USB port zaistí plnú činnosť adaptéra, pričom nie je treba nijaký ďalší
externý napájací zdroj.
Charakteristika
■ USB 2.0 na 10/100 Mbps Fast Ethernet
■ Podpora ako full-duplex, tak half-duplex prenosov
■ Podpora funkcie Wake-on-LAN a režimu spánku
■ Podpora napájania z USB portu
■ Plug & Play funkcia
Špecifikácie
■Porty: USB 2.0 typ A Male a RJ-45 pre pripojenie Ethernet kábla
■LED indikácia: zelená, žltá
■Chipset Asix AX88772B s SRAM pre prenosy s vyrovnávacou pamäťou (buffer)
■Napájanie: z USB portu (USB Bus Power 5 V), spotreba asi 220 mW
■Obal z PVC
■Podporované OS : Windows® XP, Windows® 7, Windows® 8, Mac® OS 10.6-10.8
■Prevádzková teplota: 0-70°C
■Skladovacia teplota: -10-80°C
■Rozmery (D x Š x V): 66 x 22 x 15 mm
■Hmotnosť: 24 g
■Zhoda: CE, FCC
Špecifikácie sa môžu meniť bez predchádzajúceho oznámenia
Systémové požiadavky
■ Windows® XP / 7 / 8
■ Mac®OS
■ Voľný USB port (USB 3.0 /USB 2.0 /USB 1.1)
2
Popis
Zhora
1. Act/Link LED (Zelená)
Svieti: Pripojené.
2. RJ45 konektor
3. Act/Link LED (Žltá)
Bliká: Prenos dát.
4. USB Typ-A konektor
Inštalácia ovládačov
Poznámka: Nepripájajte Fast Ethernet adaptér k PC/NB (do USB portu) pred dokončením
inštalácie ovládačov.
*Verzia ovládačov sa môže v budúcnosti meniť.
Windows OS
1. Vložte dodané CD do CD/DVD mechaniky, vyhľadajte <Setup.exe> a dvojklikom spusťte
inštaláciu. Alebo si ovládače stiahnite z webu www.i-tec.cz.
2. Počkajte na dokončenie inštalácie ovládačov.
3. Kliknite na <Finish> pre dokončenie inštalácie.
Poznámka: Windows 8 má ovládače už integrované, môžete USB 2.0 Fast Ethernet pripojiť
priamo, vid kapitola Pripojenie k PC/NB.
Mac OS
1. Vložte dodané CD do CD/DVD mechaniky, vyhľadajte v adresári Mac súbor
<AX88772B….pkg> a dvojklikom spusťte inštaláciu. Alebo si ovládače stiahnite z webu www.i3
tec.cz.
2. Pokračujte <Continue to install> a po inštalácii pokračujte v automatickom reštarte.
Pripojenie k PC/NB
Pripojte adaptér k Ethernet sieti po dokončení inštalácie.
1. Pripojte kvalitný Ethernet kábel do RJ-45 portu adaptéra a druhý koniec do aktívneho
prvku vašej siete – hubu, switcha, routeru (najlepšie s 100Mbps rýchlosťou pre maximálne
využitie rýchlosti adaptéra).
2. Pripojte USB konektor adaptéra do voľného USB portu PC/NB. Dokončí sa inštalácia
ovládačov a v prípade nutnosti si reštartujte PC/NB.
Poznámka: Žltá LED by mala blikať a zelená LED indikuje správnosť pripojenia do Ethernet
siete. Ak však jedna z LED neukazuje správne, potom overte všetky káble medzi PC/NB a
aktívnym prvkom a dotlačte konektory RJ-45 a USB.
Overenie ovládačov
Otvorte Správca zariadení vo Windows®.
1. Windows® 7 / Windows® 8: Ovládacie panely/Systém a zabezpečenie/Systém/ Správca
zariadení
Windows® XP: Ovládacie panely/Systém/Hardware/ Správca zariadení
2. V skupine Sieťové adaptéry je (mal by byť) zobrazený ASIX…Ethernet Adaptér
Otvorte Správca zariadení v Mac®
1. Pripojte USB 2.0 Ethernet adaptér k Mac PC/NB.
2. Kliknite na System Preferences->Network-> USB Fast Ethernet device AX88772B - je
aktívne (connected) alebo About This Mac>System Profiler>Hardware>USB a vidíte
AX88772B ovládač.
Poznámka: Značky
(otáznik) alebo
(výkričník) vedľa Asix adaptér indikuje nesprávnu
4
inštaláciu. Prosíme o odstránenie (odinštaláciu) adaptéra zo systému, odpojte ho a opakujte
inštaláciu znova. Doporučujeme i reštart PC/NB.
Obsah balenia
■ i-tec USB 2.0 Fast Ethernet Adaptér
■ CD (Ovládače a manuály)
■ Užívateľská príručka
Často kladené otázky
Otázka: Všetko mi funguje, ale ukazuje sa len rýchlosť 10 Mbps, kde je problém?
Odpoveď: Overte všetku kabeláž medzi PC/NB a aktívnym prvkom a dotlačte konektory RJ45. Pomáha i výmena Ethernet kábla medzi adaptérom a aktívnym sieťovým prvkom (hub,
switch, router) za certifikovaný.
5
i-tec USB 2.0 Fast Ethernet Adapter
Vartotojo vadovėlis
Įvadas
i-tec USB 2.0 Fast Ethernet Adapter suteikia vartotojo kompiuteriui įėjimą į 10/100 Mbps
tinklą per USB portą. Nereikia turėti kitos LAN kortelės, nei į PCI/PCIe lizdą ar
Express/CardBus lizdą. Specifikacija USB 2.0 užtikrina maksimalų ir patikimą naudojimą
greičiu 10/100 Mbps. USB portas užtikriną pilną adapterio veiklą, nereikalaujantis jokio kito
išorinio maitinimo šaltinio.
Charakteristika
■ USB 2.0 ant 10/100 Mbps Fast Ethernet
■ Full-duplex ir half-duplex perdavimų parama
■ Funkcijos Wake-on-LAN ir ramybės režimo parama
■ Maitinimo iš USB porto parama
■ Plug & Play funkcija
Specifikacija
■Portai: USB 2.0 tipas A Male ir RJ-45 prijungimui prie Ethernet kabelio
■LED indikacija: žalia, geltona
■Chipset Asix AX88772B su SRAM perdavimams su atmintimi (buffer)
■Maitinimas: iš USB porto (USB Bus Power 5 V), sąnaudos apie 220 mW
■Pakuotė iš PVC
■Remiamos OS : Windows® XP, Windows® 7, Windows® 8, Mac® OS 10.6-10.8
■Darbo temperatūra: 0-70°C
■Sandėliavimo temperatūra: -10-80°C
■Matmenys (D x Š x V): 66 x 22 x 15 mm
■Svoris: 24 g
■Derinimas: CE, FCC
Specifikacijos gali keistis be išankstinio pranešimo
Sistemos reikalavimai
■ Windows® XP / 7 / 8
■ Mac®OS
■ Laisvas USB portas (USB 3.0/USB 2.0/USB 1.1)
2
Aprašymas
Iš viršaus
1. Act/Link LED (Žalia)
Šviečia: Prijungta.
2. RJ45 konektorius
3. Act/Link LED (Geltona)
Mirksi: Duomenų perdavimas
4. USB Tipas-A konektorius
Valdymo pultų instaliacija
Pastaba: Neprijunkite Fast Ethernet adapterio prie PC/NB (į USB portą) prieš baigiant
valdymo pultų instaliacij ą.
*Valdymo pultų versijos ateityje gali keistis.
Windows OS
1.Įdėkite duotas CD į CD/DVD mechaniką, suraskite <Setup.exe> ir dukart paspaudus
paleiskite instaliaciją . Arba valdymą atsisiųskite iš interneto www.i-tec-europe.eu.
2. Palaukite kol pasibaigs valdymo pultų instaliacija.
3. Spustelkit ant <Finish> instaliacijos užbaigimui.
Pastaba: Windows 8 turi integruotus valdiklius, galite tiesiai prijungti USB 2.0 Fast Ethernet,
žr. skyrių Prijungimas prie PC/NB.
Mac OS
1. Įdėkite pridėtą CD į CD/DVD lizdą, adresyne Mac suraskite bylą <AX88772B….pkg> ir du
kartus spustelėję paleiskite instaliaciją. Arba valdymą atsisiųskite iš internet www.i-teceurope.eu.
2. Tęskite <Continue to install> ir po instaliacijos toliau pratęskite automatiškai restart.
3
Prijungimas prie PC/NB
Prijunkite adapterį prie Ethernet tinklo baigus instaliaciją.
1. Prijunkite kokybišką Ethernet kabelį prie RJ-45 adapterio porto, o kitą galą į aktyvų Jūsų
tinklo elementą – hubu, switche, routeru (geriausia su 100 Mbps t greičiu maksimaliam
greičio adapterio panaudojimui).
2. Prijunkite USB konektorių prie adapteriaus į laisvą USB portą PC/NB. Pasibaigus valdymo
pultų instaliacijai,jei yra būtina paleiskite iš naujo PC/NB.
Pastaba: Geltona LED turėtų mirksėti, o žalia LED rodo teisingą prijungimą į Ethernet tinklą.
Jeigu viena iš LED nerodo teisingai, tai patikrinkite visus kabelius tarp PC/NB ir aktyvaus
elemento, bei paspauskite konektorius RJ-45 a USB.
Valdymo pultų patvirtinimas
Atidarykite Įrenginio valdiklį Windows®.
1. Windows® 7 / Windows® 8: Valdymo paneliai/Sistema ir apsauga/Sistema/ Įrenginio
valdiklis
Windows® XP: Valdymo paneliai/Sistema/Hardware/ Įrenginio valdiklis
2. Grupėje Tinklo adapteriai yra (turėtų būti) parodyti ASIX…Ethernet Adapter
Atidarykite Įrenginio valdiklį v Mac®
1. Prijunkite Gigabit USB 3.0 Ethernet adapterį prie Mac PC/NB.
2. Paspauskite ties Systema Preferences->Network-> USB Fast Ethernet device AX88772B –
yra aktyvi (connected) arba About This Mac>System Profiler>Hardware>USB ir matysite
AX88772B valdiklį.
Pastaba: Ženklai
(klaustukas) arba
(šauktukas) šalia Asix adapteris rodo neteisingą
instalaciją. Prašome pašalinti (išinstaliuoti) adapterį iš sistemos, atjunkite jį ir pakartokite
instaliaciją iš naujo. Patariame iš naujo paleisti PC/NB.
4
Pakuotė turi
■ i-tec USB 2.0 Ethernet Adapter
■ CD (Valdymo pultai ir manualai)
■ Vartotojaus vadovas
Dažnai apteikiami klausimai
Klausimas: Viskas man veikia, bet rodo tik greitį 10 Mbps, kur yra problema?
Atsakymas: Patikrinkite visus kabelius tarp PC/NB ir aktyvaus elemento ir paspauskite
konektorius RJ-45. Padeda ir pakeitimas kabelio Ethernet į sertifikuotą tarp adapteriaus ir
aktyvaus tinklo elemento (hub, switch, router).
5
L’Adaptateur i-tec Fast Ethernet USB 2.0
Mode d’emploi et guide pour les utilisateurs
L’entrée en matière
L’Adaptateur Ethernet i-tec Fast USB 2.0 rend possible l’établissement de l’accès de
l’ordinateur d’utilisateur au réseau à vitesse de 10/100 Mbps, par l’intermédiaire du port de
l’USB. Il ne faut pas acheter une autre carte LAN, soit pour le slot PCI/PCIe, soit pour le slot
Express/CardBus. L’USB 2.0 dispose des spécifications qui permettent une maximale
exploitation de la vitesse de 10/100 Mbps en la rendant, de façon totale, parfaitement fiable.
Le port de l’USB assure le fonctionnement à plein régime de l’adaptateur, ne pas exigeant
qu’il y ait d’autres sources d’alimentation externes.
Caractéristiques
■ L’Ethernet i-tec Fast USB 2.0 pour la vitesse 10/100 Mbps
■ Support des transferts Full-Duplex aussi bien que des transferts Half-Duplex
■ Support de la fonction Wake-on-LAN ainsi que du mode de sommeil
■ Support de l’alimentation du port de l’USB
■ Fonction Plug & Play
Spécifications
■ Les ports : pour l’USB 2.0, du type A Mâle, et RJ-45, pour le branchement du câble
Ethernet
■ L’indication par témoins lumineux sous forme de diodes électroluminescentes (DEL) :
verte, jaune
■ Chipset Asix AX88772B, doté de SRAM pour les transferts, avec la mémoire tampon
(buffer)
■ L’alimentation: du port de l’USB (USB Bus Power 5 V), étant la consommation
approximative de 220 mW
■ L’emballage confectionné en PVC
■ Les systèmes d’exploitation supportés: Windows® XP, Windows® 7, Windows® 8, Mac® OS
10.6-10.8
■ La température convenable pour le fonctionnement est de 0-70°C
■ La température convenable pour le stockage est de -10-80°C
■ Dimensions du produit: 66 (longueur) x 22 (largeur) x 15 (hauteur) mm
■ Poids du produit: 24 g
■ Conformité: CE, FCC
Les spécifications indiquées ci-dessus peuvent être changées sans avis préalable.
Exigences en matière du système
■ Windows® XP / 7 / 8
■ Système d’exploitation Mac®OS
■ Le port de l’USB inoccupé (USB 3.0/USB 2.0/USB 1.1)
2
Description
D’en haut
1. Act/Link DEL (Verte)
En étant allumée : Branché
2. Connecteur RJ45
3. Act/Link DEL (Jaune)
En clignotant : Transfert de données en cours
4. Connecteur pour l’USB du type A
Installation des pilots
Remarque : Ne pas brancher l’adaptateur Fast Ethernet sur l’ordinateur personnel ou sur
l’ordinateur portable (ça veut dire sur le port de l’USB) avant que soit achevée l’installation
des pilots.
*Les respectives versions des pilots peuvent subir des changements à l’avenir.
Système d’exploitation Windows OS
1. Introduire le respectif CD qui vous fut livré dans le mécanisme de lecture pour CD/DVD,
chercher <Setup.exe> et, ensuite, procéder à la mise en marche de l’installation en faisant
le double clic. Une autre possibilité est d’installer des pilots directement de la page web
www.i-tec-europe.eu.
2. Attendre jusqu’à la fin de l’installation des pilots.
3. Cliquer sur <Finish> pour terminer l’installation.
Remarque: Le système d’exploitation Windows 8 dispose des pilotes déjà intégrés. C’est la
raison pour laquelle il est bien possible de brancher directement l’USB 2.0 Fast Ethernet,
veuillez voir le chapitre Branchement sur l’ordinateur personnel / sur l’ordinateur portable.
3
Système d’exploitation Mac OS
1. Introduire le respectif CD qui vous fut livré dans le mécanisme de lecture pour CD/DVD,
chercher dans le répertoire le fichier Mac <AX88772B….pkg>, procéder à la mise en marche
de l’installation en faisant le double clic. Une autre possibilité est d’installer des pilots
directement de la page web www.i-tec-europe.eu.
2. Continuer avec <Continue to install>, et, une fois finie l’installation, continuer avec le
redémarrage automatique.
Branchement sur l’ordinateur personnel / sur l’ordinateur portable
Une fois achevé l’installation, procéder au branchement de l’adaptateur sur le réseau de
l’Ethernet.
1. Brancher un câble pour l’Ethernet d’une bonne qualité sur le port RJ-45 de l’adaptateur, en
branchant son autre bout sur l’élément actif de votre réseau – à savoir, sur le
concentrateur Ethernet (HUB), sur le commutateur réseau (switch), sur le routeur (doté,
de façon optimale, d’une vitesse de 100 Mbps pour rendre possible une exploitation
maximale de la vitesse de l’adaptateur).
2. Brancher le connecteur pour l’USB se trouvant sur l’adaptateur, sur le port pour l’USB qui
soit inoccupé, se trouvant sur l’ordinateur personnel ou sur l’ordinateur portable.
L’installation des pilots sera terminée. En cas de besoin, procéder à un redémarrage de
l’ordinateur personnel / de l’ordinateur portable.
Remarque : La diode DEL jaune devrait clignoter tandis que la diode DEL verte doit indiquer
la correcte connexion au réseau de l’Ethernet. Au cas où une des diodes DEL ne ferait pas
une indication correcte, il faudra procéder à la vérification de tous les câbles se trouvant
parmi l’ordinateur personnel / l’ordinateur portable et l’élément actif ainsi qu’il sera aussi
nécessaire procéder à un bon enfoncement des connecteurs RJ-45 et de l’USB.
Vérification des pilots
Procéder à l’ouverture du Gestionnaire de périphériques dans Windows®.
4
1. Pour Windows® 7 / Windows® 8: Panneaux de configuration / Protection du système /
Système / Gestionnaire de périphériques.
Pour Windows® XP: Panneaux de configuration / Système /Hardware/ Gestionnaire de
périphériques.
2. Dans le groupe Adaptateurs réseau sera (devrait être) affiché ASIX…Ethernet Adapter
Accéder au Gestionnaire de périphériques dans Mac®
1. Brancher l’adaptateur Ethernet Gigabit USB 2.0 sur l’ordinateur personnel Mac/sur
l’ordinateur portable Mac.
2. Cliquer sur System Preferences->Network-> USB Fast Ethernet device AX88772B – il est
actif (connected) ou sur About This Mac>System Profiler>Hardware>USB et il se verra le
pilote AX88772B.
Remarque : Les marques
(point d’interrogation) ou
(point d’exclamation) à côté de
l’adaptateur Asix indiquent une installation incorrecte. Veuillez procéder à l’élimination (ça
veut dire, à la désinstallation) de l’adaptateur du système et, à part cela, il faudra aussi
procéder au débranchement de l’adaptateur ainsi qu’à la reprise de son installation. Il est
aussi vivement recommandé de faire un redémarrage de l’ordinateur personnel / de
l’ordinateur portable.
Contenance de l’emballage
■ L’adaptateur i-tec Fast USB 2.0 Ethernet Adapter
■ CD (Pilots et Modes d’emploi)
■ Mode d’emploi et guide pour des utilisateurs
Questions fréquentes
Question: Tout chez moi marche bien, sauf la vitesse dont la valeur se montre de ne pas être
que de 10 Mbps, alors, c’est quoi mon problème ?
Réponse: Veuillez procéder à la vérification de tout votre câblage se trouvant parmi
l’ordinateur personnel / l’ordinateur portable et l’élément actif, en enfonçant bien les
connecteurs RJ-45. Il se peut que vous aide aussi un remplacement du câble de l’Ethernet
liant l’adaptateur et l’élément actif de réseau (le concentrateur Ethernet /HUB/, le
commutateur réseau /switch/, le routeur) par un autre câble qui soit dûment certifié.
5