1
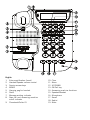
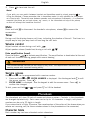
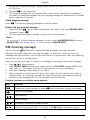
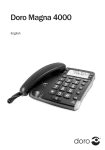
Doro Comfort 3005
English
English
1. Extra amplification (boost)
2. Handset/Speaker volume control
3. Service access keys
4. MEMO
5. Hanging peg for handset
6. Store
7. Message waiting indicator
8. New call and answering machine
on/off indicator
9. Phonebook/Caller ID
10.
11.
12.
13.
14.
15.
16.
17.
18.
19.
Clear
Menu
UP/DOWN
OK/Call key
Answering machine functions
Speaker/Headset
Microphone
Recall
Redial
Mute
English
Contents
Installation ........................................................................................................ 1
Connection .................................................................................................. 1
Setup ......................................................................................................... 1
Wall mounting.............................................................................................. 2
Operation .......................................................................................................... 2
The display ................................................................................................. 2
Making a call ............................................................................................... 2
Mute .......................................................................................................... 3
Timer ......................................................................................................... 3
Volume control ............................................................................................. 3
Service access ............................................................................................. 3
Phonebook ........................................................................................................ 3
Character table............................................................................................. 3
Storing contacts ........................................................................................... 4
Phonebook dialling ....................................................................................... 4
Edit contacts ............................................................................................... 4
Deleting contacts.......................................................................................... 5
Deleting all contacts ..................................................................................... 5
Call list............................................................................................................. 5
Retrieving and dialling ................................................................................... 5
Messages .................................................................................................... 5
Deleting numbers ......................................................................................... 6
Transfer numbers to the phonebook .................................................................. 6
Answering machine ............................................................................................. 6
Settings ...................................................................................................... 6
OGM (outgoing message)................................................................................ 7
ICM (incoming message) ................................................................................ 8
Call monitoring ............................................................................................ 9
MEMO (personal message).............................................................................. 9
Two-way recording......................................................................................... 9
Remote control............................................................................................. 9
Out of memory ............................................................................................. 10
Other ............................................................................................................... 11
PBX Message Waiting Indicator ....................................................................... 11
Ring signal .................................................................................................. 11
Connecting a Headset.................................................................................... 11
Hearing Aid Compatible ................................................................................. 11
Troubleshooting ............................................................................................ 12
Care and Maintenance ................................................................................... 12
Declaration of Conformity ............................................................................... 13
Warranty ..................................................................................................... 13
English
Installation
This device is intended for the analogue telephone network lines in AT, BE, BG, CH, CY,
CZ, DE, DK, EE, ES, FI, FR, GB, GR, HU, IE, IS, IT, LV, LT, LU, MT, NL, NO, PL, PT, RO,
SI, SK, SE.
Connection
1.
2.
3.
4.
5.
Connect the curly cord to the handset and then to the socket marked q on the unit.
Connect the mains adapter (if included) to an electrical wall socket and then to the
socket marked DC 9V on the unit.
Connect the telephone line cord to a network wall socket and then to the socket marked
K on the unit.
Lift the handset and listen for the dial tone.
Position the cables in the grooves underneath the unit.
Note!
Use supplied telephone line cord, an existing cord from a previous phone may not be compatible.
Setup
1.
2.
3.
4.
5.
6.
7.
8.
9.
10.
11.
12.
13.
14.
15.
16.
17.
18.
19.
20.
21.
22.
23.
Press w.
CONTRAST is displayed. Press 0 to change, press V to continue without changes.
Select desired contrast setting (2=normal) using v/V. Press 0.
TIME/DATE is displayed. Press 0 to change, press V to continue.
To set hour (00-23) use v/V. Press 0.
Select desired minute using v/V. Press 0.
Select desired month using v/V. Press 0.
Select desired date using v/V. Press 0.
Select desired weekday using v/V. Press 0.
ENGLISH is displayed. Press 0 to change, press V to continue.
Select desired language using v/V. Press 0.
VOICE is displayed. Press 0 to change, press V to continue.
Select ON or OFF using v/V. Press 0.
RECALL is displayed. Press 0 to change, press V to continue.
Select the desired setting using v/V. 100 for AU/UK/EU, 270 for FR and 600 for
NZ. Press 0.
ANSWER DELAY is displayed. Press to change, press V to continue.
Select 2, 4 or TS using v/V. Press 0.
ANSWER MODE is displayed. Press 0 to change, press V to continue.
Select ANSWER/RECORD or ANSWER ONLY using v/V. Press 0.
PIN CODE is displayed. Press 0 to change, press V to continue.
Use the numeric keypad to enter the code (default=0000). Press 0. Enter the new
code (4 digits). Press 0. If the code is not accepted/correct you will hear a short beep,
repeat step 19 and 20.
PRIVACY MODE is displayed. Press 0 to change, press V to continue.
Select ON or OFF using v/V. Press 0.
To change settings for time, language or contrast etc. later on, repeat steps as above.
1
English
Wall mounting
The phone can be wall mounted.
WARNING
Make sure that no cables, water pipes or gas pipes are located inside the wall before drilling
into it.
1.
2.
3.
4.
5.
6.
Drill two holes in the wall, vertically 102 mm mm apart.
Insert the screws, allowing them to project ~5 mm out from the wall.
Unplug and remove the handset.
Position the phone so that the screws on the wall fit into the slots in the bracket, then
slide the phone downwards until it is hanging on the screws.
Activate the hanging peg (located by the hook switch) by rotating it 180 degrees.
Replace the handset, on the hanging peg, in the hook switch.
Operation
The display
In standby mode the date and time is indicated on the display, the total number of calls that
have been stored in the Call list memory, and the number of new calls.
Note!
There are separate logs for answering machine and Caller ID and separate red LED’s. In order to
stop the flashing LED the corresponding log must be reviewed.
Tip:
You can always press
to return to standby.
Making a call
Regular dialling
1.
2.
Lift the handset.
Enter desired phone number.
Pre-dialling
Allows you to enter and change a phone number before it is dialled.
1.
2.
Enter desired phone number. Mistakes can be deleted using c.
Lift the handset.
Redialling
Last dialled phone numbers can easily be dialled again.
1.
2.
Repeatedly press r to scroll through the dialled numbers.
Lift the handset to dial the number,
or lift the handset and then press r to dial the most recently dialled number.
Handsfree dialling
1.
2.
Press , handsfree function is activated.
Enter desired phone number.
2
English
3.
Press
to terminate the call.
Note!
If you wish, you can switch between handset and handsfree mode by simply pressing
or
lifting the handset. Please remember that in handsfree mode it is only possible for one person
at a time to talk. The switch-over between speaker and microphone is automatic. It is therefore
essential that there are no loud noises, e.g. music, in the immediate vicinity of the phone,
as this will disrupt the handsfree function.
Mute
Press and hold z to disconnect the handset's microphone, release z to resume the
conversation.
Timer
During a call the display shows a call timer, indicating the duration of the call. The timer is a
simple way to help you keep track of how long the call lasts.
Volume control
Adjust handset volume during a call with
.
Adjust speaker volume (hands free) during a call with v/V.
Extra amplification (boost)
Press the button
to activate amplification. The amplification is deactivated at the end
of each call to avoid harming people with normal hearing.
WARNING
The handset/headset volume can be turned up very loud. The amplification should only be
used by people with impaired hearing ability.
Service access
Key 1 and 2 can be programmed with a service number.
1.
2.
Press and hold 1 or 2. ENTER NUMBER is displayed. Use the keypad and c to edit
the access number. Press p.
ENTER NAME is displayed. Use the keypad to edit the access name. Press p to
confirm the changes.
To dial, press and hold 1 or 2 and press 0 or lift the handset.
Phonebook
The phonebook will store 99 sets of names and phone numbers. Contacts in the phonebook
are arranged alphabetically. Each name can be up to 14 characters in length, and phone
numbers can be up to 22 digits in length.
If you subscribe to a Caller ID service, the name/number of the caller will be shown when you
receive an incoming call (for those numbers stored in the phonebook or the memories).
Character table
Each number key has been allocated certain characters.
3
English
Key
Letters/symbols
[Space character] + & - / X 1
1
ABCÅÄÆæåäß2
2
DEFë3
3
GHIï4
4
JKL5
5
MNOÑñÖö6
6
PQRS7
7
TUVÜü8
8
WXYZ9
9
`@()*<>
*
,. : ? =0
0
$_%! ; #
#
Storing contacts
1.
2.
3.
4.
5.
6.
Press b /
to select phonebook mode. Ensure b is displayed.
Press p. NEW CONTACT? is displayed.
Press p again.
Enter phone number. Press p.
Enter name. Press the corresponding number key one or more times for the first letter
(see the table above).
Press p.
7.
Press p if you want to add more contacts, or press
to return to standby.
Note!
Press r to insert a pause in the phone number. If you wish to change a number, store the new
number in the same location as the old one.
Phonebook dialling
1.
2.
3.
Press b/
to select phonebook mode. Ensure b is displayed.
Select required memory location using v/V. To quick-search in the phonebook press
the corresponding number key one or more times for the first letter (see Character table,
p. 3 ).
Lift the handset to dial displayed number. If you do nothing the phone will return to
standby mode.
Edit contacts
1.
Press b /
to select phonebook mode. Ensure b is displayed.
4
English
2.
3.
4.
5.
6.
Select required memory location using v/V.
Press and hold p until EDIT CONTACT? is displayed. Press p.
Change displayed phone number with c and v/V. Press p.
Changes to displayed name can be made using c and v/V.
Press p to confirm the changes.
Deleting contacts
1.
2.
3.
4.
Press b /
to select phonebook mode. Ensure b is displayed.
Select required memory location using v/V.
Press c. DELETE? is displayed.
Press and hold c until displayed phone number disappears.
Deleting all contacts
1.
2.
3.
4.
Press b /
to select phonebook mode. Ensure b is displayed.
Select required memory location using v/V.
Press and hold c until DELETE ALL? is displayed.
Press and hold c until EMPTY is displayed.
Call list
Caller ID (caller identification) allows you to see who is calling before you answer a call
and to see who has called in your absence. If the number is stored in the phonebook, the
caller’s name is displayed. Received calls are stored chronologically, the sequential number is
displayed.
When the Caller list memory is full, the oldest number will be deleted automatically as the
new call is logged. New calls are indicated with the New call indicator
/1 flashing.
Note!
In order for numbers to be displayed, the Caller ID service must be provided by your network
operator and a current subscription in place. Contact you operator for more information.There
are separate logs for the answering machine and the Caller ID and separate red LED’s. In order
to stop the flashing LED the corresponding log must be reviewed.
Retrieving and dialling
1.
2.
3.
Press b/
to select CALL LIST mode. Ensure
is displayed.
Press v or V to review the numbers stored in the Caller list memory.
Lift the handset to dial the displayed number.
Note!
During a conversation, you can switch from the handset to hands free mode at any time by
pressing
. Press
again to terminate the call.
Messages
Various text messages and symbols can be displayed:
5
English
OUT OF AREA
No information received, e.g. an international call
PRIVATE
The call comes from a withheld number or a PBX
Q
Number not previously seen
T
A call is received while using the Call Waiting function
5
Message Waiting indication.
Deleting numbers
1.
2.
3.
Press b/
to select CALL LIST mode. Ensure
is displayed.
Select the number you wish to erase using v/V.
Press c. DELETE? is displayed, alternatively press and hold c until DELETE ALL? is
displayed.
4.
5.
Press and hold c until EMPTY is displayed. Press
to return to standby.
If you do nothing the phone will return to standby mode.
Note!
This deletes the Call list memory, not the Phonebook memory.
Transfer numbers to the phonebook
1.
2.
3.
4.
5.
6.
7.
Press b/
to select CALL LIST mode. Ensure
is displayed
Select the number you wish to copy using v/V.
Press p.
COPY TO PBOOK? is displayed. Press p.
Change displayed phone number with c and v/V. Press p.
Enter name using c and v/V.
Press p to confirm the changes.
Answering machine
Settings
Switching the answering machine on and off
The answering machine can be switched ON or OFF using the
-key.
In ON position, incoming calls will be answered by the answering machine and the red
indicator
/1 will be on.
In OFF position, no calls will be answered and the red indicator
/1 will be off.
Note!
Although the answering machine is turned off it will answer a call after 10 rings, to enable the
remote control commands.
Number of Rings (Answer delay)
The number of rings before the answering machine answers can be selected between 2, 4 or
TS. With TS (Toll Saver/Time saver) selected, calls will be answered after four rings until a new
incoming message has been recorded, any subsequent calls will be answered after two rings.
6
English
Once these incoming messages have been erased or read this cycle will be repeated. This is
useful when remotely accessing your unit. If there is no answer after three rings, no incoming
messages have been recorded and you can terminate the call before you are charged.
Pin code
The PIN CODE (default=0000) is needed in order to gain access to the remote control
functions of the answering machine. The same code is used for PRIVACY MODE. You can
alter the code, see Setup, p. 1 .
Note!
Using a PIN code prevents other people from accessing your machine without permission. For
security reasons, it is recommended that you change the PIN code from the default setting
of 0000.
Voice
With VOICE set to ON you will be announced the time for when the incoming message was
recorded. With VOICE set to OFF the time and date will not be announced but you can still
see when the incoming message was recorded in the display.
Answer only
ANSWER ONLY is your announcement message to a caller in which contact information can
be supplied but no incoming message will be recorded. When ANSWER ONLY is selected
A2 is displayed.
Note!
You need to record your own greeting message, there is no pre-recorded message. See Record
outgoing message for instructions on how to record an outgoing message.
"Hello, we are unable to take your call right now. Please do not leave a message as this is
not recorded. Thanks for calling."
Privacy mode
Use privacy mode if you want to prevent unauthorized people from accessing your incoming
messages. With PRIVACY MODE set to ON you will be asked to enter the PIN CODE before
listening to your incoming messages.
Note!
PRIVACY MODE and remote access uses the same PIN code.
OGM (outgoing message)
The outgoing message is your message to an incoming caller and may be up to 60 seconds in
length. You may want the message to tell the caller that they may start speaking once the
beep is heard after your outgoing message.
"Hello, we are unable to take your call right now, please leave a message after the beep.
Thanks for calling."
Record outgoing message
1.
Press and hold
. You will hear a short beep, the LED will flash and RECORD OGM is
displayed, do not release
until you are done recording.
7
English
2.
3.
4.
Record your outgoing message. Speak clearly towards the machine from a distance
of 15-20 cm.
Release
to stop recording.
The outgoing message will be repeated after a few seconds. Repeat this procedure if
you want to change the message, any old outgoing message will automatically be erased
when a new one is recorded.
Check outgoing message
Press
. The current outgoing message will now be played.
Restore the pre-recorded message
1.
2.
Press and hold
. You will hear a short beep, the LED will flash and RECORD OGM is
displayed, release
.
The pre-recorded outgoing message is played after a few seconds.
Note!
You can record 2 different outgoing messages, one for (normal) ANSWER/RECORD and one for
ANSWER ONLY. See Answer only, p. 7 on how to select ANSWER MODE.
ICM (incoming message)
The red indicator
/1 flashes to indicate that new messages have been received.
Playback will always begin with any new messages, for example if there are three old
messages and two new ones, only the two new ones will be played back, then the answering
machine will return to standby mode.
Press the play key once again to listen to all messages, starting with the oldest messages.
1.
2.
3.
Press
to start playback.
With PRIVACY MODE activated you need to enter the PIN CODE (default=0000) and
then press 0. The answer machine will then play the incoming message(s).
After each message a short beep will be heard.
When playback is finished you will hear a short beep, and the machine will return to
standby mode. All incoming messages are saved (unless you have erased any during
playback), new messages will then be recorded after the old ones.
Following functions are available during playback
Key
Function
Repeat the current message, or press
twice to step back through the message
Skip to next message
Stop playback
c
Erase messages
v/V
Increase or decrease the speaker volume
Pause during playback (max. 7 seconds). Press
8
again to resume playback
English
Delete incoming message
If you want to delete a single incoming message press c while the message is playing.
To erase all messages after playback, press and hold c until unit beeps.
Note!
New messages cannot be deleted until they have been played.
With PRIVACY MODE activated you need to enter the PIN CODE (default=0000) and then
press 0.
Call monitoring
Incoming messages can be heard through the loudspeaker as they are received. If there is
no sound, adjust the volume using v/V.
Note!
With PRIVACY MODE activated Call Monitoring will be disabled.
MEMO (personal message)
A personal message – MEMO – is a message recorded directly onto the answering machine
(120 seconds maximum) without dialling. This means that the answering machine may be
used as an electronic notebook, where messages, reminders or other notes to family members
or colleagues can be recorded.
1.
2.
3.
4.
Press and hold the a-key. You will hear a beep.
Start speaking clearly towards the machine to record your message. This function only
works when the handset is on the base (on-hook).
Release a to stop recording.
Memos are played back in the same way as regular incoming messages.
Note!
With PRIVACY MODE activated you need to enter the PIN CODE (default=0000) and then press
0. The answering machine will then play the recorded MEMO(s).
Two-way recording
You can record phone conversations as they occur. There is approximately 40 minutes
available recording time in memory, with the answering machine handling two-way recordings
as a regular incoming call.
1.
2.
A call is connected.
Press a. 2WAY RECORDING is displayed and a, indicating that two-way
recording is in progress.
3.
Press
to terminate recording.
Remote control
The answering machine can be remotely accessed using an ordinary tone dialling phone.
1.
2.
3.
Call the answering machine (the number that your answering machine is connected
to, usually your home number).
Enter the PIN code (default code is 0000) when the outgoing message is played.
Select remote access command(s):
9
English
Remote control commands
Command
1#
2#
Function
Play new messages
Play all messages
During playback:
3#
4#
5#
6#
Erase single message during playback
Skip to previous message
Stop playback
Skip to next message
After playback:
7#
Switching the answering machine on and off
8#
Record a new outgoing message, to stop recording press 5#
9#
Record a MEMO, to stop recording press 5#
0#
Room monitoring (active for 2 minutes and 30 seconds, press
0# to continue)
Note!
If the machine doesn’t respond correctly to the remote control commands, try pressing the
phone keys for a longer or shorter time. If you do not enter any remote control command, the
answering machine will disconnect after a few seconds. If you listen to any incoming messages
for more than 2 minutes and 40 seconds, you will hear two beeps. Press any key to continue.
Remote activation
The answering machine can be activated using the remote control functions.
1.
2.
3.
Call up the answering machine. After approximately 10 rings, the machine will answer
and emit a long tone.
Enter the PIN CODE during your outgoing message. If the code is accepted, you will
hear two short beeps.
Press 7#. One beep confirms that the answering machine is now on. Replace the
handset.
Room monitoring
This remote access feature enables you to call your home and turn ON the answering
machine’s microphone function, allowing you to monitor sounds in the room where the
answering machine is situated.
Out of memory
The total capacity of the answering machine’s memory is approximately 40 minutes. The
memory space is shared between the outgoing message, personal memos, and regular
incoming messages.
10
English
When the memory is full MEMORY FULL is displayed, the answering machine will answer
after 10 rings to allow remote playback and deletion of messages, no new messages will be
accepted until the existing messages have been played and erased.
Other
PBX Message Waiting Indicator
Some PBX systems use a function called Message Waiting. The phone will indicate when
a call was received by the Message Waiting light (5) next to the display. The switch is
located under the battery cover.
The MW function operates differently depending on the PBX in question. Please contact
the system controller for more information. The following alternatives are available: ringer
), high DC voltage (HV), + and –. When the phone is used in systems without a
indicator (
PBX, ringer indicator (
) should be selected.
Ring signal
The ringer volume, melody and tone can be set using the switches located under the battery
cover.
Ring melody
Ringer tone
Connecting a Headset
You can connect a headset to the socket =. When a headset is connected the speaker key
is used to connect/disconnect a call (equivalent to lifting and putting down the handset).
The volume in the headset can be adjusted during a call using v/V.
A neck loop/extra handset can be connected to this socket instead of a headset. DORO
original headsets are tested and adapted for this model. Other types and makes of headsets
may be used, though the function and sound quality cannot be guaranteed. In the worst
case, these could damage the headset and phone. This type of damage is not covered by the
phone’s guarantee.
Selecting headset or hands free mode
Select headset-/handsfree mode by setting the switch = /
on the back of the phone.
Note!
On delivery, the phone is set to handsfree mode. The handsfree function will not work when the
headset function is activated and vice versa.
Hearing Aid Compatible
This phone is hearing aid compatible. Select the T-mode on your hearing aid to enable
this feature.
11
English
Troubleshooting
Check that the telephone cord is undamaged and properly plugged in. Disconnect any
additional equipment, extension cords and other phones. If the problem is resolved, the fault
is with some other equipment.
Test the equipment on a known working line (e.g. at a neighbour’s house). If the equipment
works there the fault is probably with your telephone line. Please inform your network operator.
The answering machine does not respond to remote access
•
•
Check that you are using a tone dial telephone.
Try holding the keys down longer, approximately 1 second per digit.
The answering machine is not answering
•
•
•
Memory may be full. Delete old messages.
Check that the adapter/phone cord is connected correctly.
Check that the answering machine function is turned on.
If the telephone still does not work, please contact the place of purchase for service. Don’t
forget the receipt or a copy of the invoice.
Care and Maintenance
CAUTION
Only use batteries, mains adapter and accessories that have been approved for use with this
particular model. Connecting other accessories may be dangerous and may invalidate the
phone's type approval and guarantee. The mains adapter is the disconnect device between
the product and mains power. The mains socket outlet must be close to the equipment and
easily accessible.
Your unit is a technically advanced product and should be treated with the greatest care.
Negligence may void the warranty.
•
•
•
•
•
•
•
Protect the unit from moisture. Rain/snowfall, moisture and all types of liquid can
contain substances that corrode the electronic circuits. If the unit gets wet, you should
remove the battery and allow the unit to dry completely before you replace it.
Do not use or keep the unit in dusty, dirty environments. The unit’s moving parts and
electronic components can be damaged.
Do not keep the unit in warm places. High temperatures can reduce the lifespan for
electronic equipment, damage batteries and distort or melt certain plastics.
Do not keep the unit in cold places. When the unit warms up to normal temperature,
condensation can form on the inside which can damage the electronic circuits.
Do not try to open the unit in any other way than that which is indicated here.
Do not drop the unit. Do not knock or shake it either. If it is treated roughly the circuits
and precision mechanics can be broken.
Do not use strong chemicals to clean the unit.
The advice above applies to the unit, battery and other accessories. If the unit is not working
as it should, please contact the place of purchase for service. Don’t forget the receipt or a
copy of the invoice.
12
English
Declaration of Conformity
Doro hereby declares that Doro Comfort 3005 conforms to the essential requirements and
other relevant regulations contained in the Directives 1999/5/EC (R&TTE) and 2002/95/EC
(RoHS). A copy of the Declaration of Conformity is available at www.doro.com/dofc
Warranty
This product is guaranteed for a period of 12 months from the date of purchase. In the
unlikely event of a fault occurring during this period, please contact the place of purchase.
Proof of purchase is required for any service or support needed during the guarantee period.
This guarantee will not apply to a fault caused by an accident or a similar incident or damage,
liquid ingress, negligence, abnormal usage, non-maintenance or any other circumstances
on the user’s part. Furthermore, this guarantee will not apply to any fault caused by a
thunderstorm or any other voltage fluctuations. As a matter of precaution, we recommend
disconnecting the charger during a thunderstorm.
13
English
14
LAST PAGE
English
Version 1.0
© Doro AB. All rights reserved.
www.doro.com
REV 3672 — STR 111025