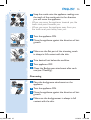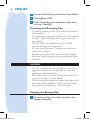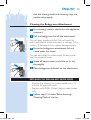
1
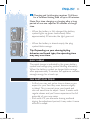
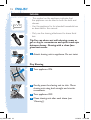
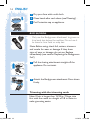
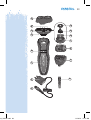
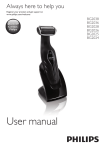
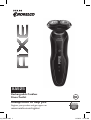
XA525
Rechargeable Cordless
Shave Toolkit
Always here to help you
Register your product and get support at
www.norelco.com/register
12_XA525.indd 1
Question?
Contact
Philips
Norelco
11/12/12 11:35 AM
12_XA525.indd 2
11/12/12 11:35 AM
12_XA525.indd 3
ENGLISH 4
ESPAÑOL 24
Congratulations on your purchase and
welcome to Philips Norelco!
To fully benefit from the support that Philips
Norelco offers, register your product at
www.norelco.com/register
XA525
¡Bienvenido a Philips Norelco y felicitaciones
por su compra!
Para utilizar los servicios de asistencia técnica
de Philips Norelco, registre su producto en
www.norelco.com/register
11/12/12 11:35 AM
4
English
IMPORTANT SAFETY
INSTRUCTIONS
When using an electric appliance, basic precautions should always
be followed, including the following:
Read all instructions before using this appliance.
DANGER
To reduce the risk of electric shock:
1. Do not reach for a corded appliance that has fallen into water.
Unplug immediately.
2. Power plug is not for immersion or for use in shower.
3. Do not use an extension cord with this appliance.
4.Always unplug this appliance from the electrical outlet
immediately after use, except when appliance is (re)charging.
5. Unplug and remove power supply cord from appliance before
cleaning.
WARNING
To reduce the risk of burns, fire, electric shock, or injury
to persons:
1. Close supervision is necessary when this appliance is used by,
on, or near children or invalids.
2. U
se this appliance for its intended household use as described
in this manual. Do not use attachments not recommended by
Philips Electronics North America Corporation.
3. Never operate this appliance if it has a damaged cord or
charging plug, if it is not working properly, if it has been
dropped or damaged, or dropped into water while plugged in.
For assistance call 1-800-243-3050.
4. Keep the appliance, cord, charging plug and any attachments
away from heated surfaces.
12_XA525.indd 4
11/12/12 11:35 AM
English
5
5. Never drop or insert any object into any opening.
6.Do not charge or plug in appliance outdoors or operate where
aerosol (spray) products are being used or where oxygen is
being administered.
7.Do not use this appliance with a damaged or broken comb, as
facial injury may occur. Always check foil, cutters and trimmer
before using. Do not use appliance if foil, cutters or trimmers
are damaged as injury may occur.
8. Always attach plug to appliance first, then plug into outlet. Be
certain plug is inserted firmly into appliance up to mark
indicated on plug. To disconnect, remove charging plug from
outlet.
9. Never put the appliance in direct sunlight or store at a
temperature above 140°F (60ºC).
10.Keep the cord dry at all times. Do not handle with wet hands.
11.Only use the cord provided. To prevent possible damage to the
cord, do not wrap cord around the appliance.
12.Only use the power plug and other accessories supplied with
the appliance.
SAVE THESE
INSTRUCTIONS
IMPORTANT: The power plug contains a transformer. Do not
cut off the power plug to replace it with another plug, as this will
cause a hazardous condition.
12_XA525.indd 5
11/12/12 11:35 AM
6
12_XA525.indd 6
English
45 - DAY MONEY-BACK GUARANTEE
To enjoy the closest and most comfortable shave from your new Philips Norelco
appliance, the appliance should be used exclusively for 3 weeks. This allows your
hair and skin enough time to adapt to the Philips Norelco Shaving System. If, after
that period of time, you are not fully satisfied with your Philips Norelco appliance, send the product back along with dated sales receipt and we’ll refund you
the full purchase price. The appliance must be shipped prepaid by insured
mail, insurance prepaid, have the original sales receipt, indicating
purchase price, the date of purchase, and the money-back guarantee
return authorization form enclosed. We cannot be responsible for lost
mail. The appliance must be postmarked no later than 45 days from the date of
purchase. Philips Norelco reserves the right to verify the purchase price of the
appliance and limit refunds not to exceed suggested retail price.
To obtain money-back guarantee return authorization form,
call 1-800-243-3050 for assistance. Delivery of refund check will
occur 6–8 weeks AFTER receipt of refund product.
11/12/12 11:35 AM
12_XA525.indd 7
English
7
Table of Contents
Features......................................................... 8-9
Our Story.......................................................10
Before First Use............................................10
Charging/(Re)Charging..........................10-11
Quick Charge................................................11
Skin Adaptation Period................................11
Shaving.......................................................12-14
Body Grooming.......................................14-16
Cleaning.....................................................16-19
Replacing the Shaving
Unit Razor Heads...................................19-20
Replacing the Bodygroom Foil..................20
Storage.......................................................20-21
Assistance.......................................................21
Battery Removal.....................................21-22
Accessories....................................................22
Warranty.........................................................23
Spanish.............................................................24
11/12/12 11:35 AM
8
English
features
A Protective cap
B Shaving unit
C Shaving unit release buttons
D Shaving attachment
E On/off button
FDisplay
GAdapter
H Small plug
I Cleaning brush
J Bodygroom attachment
K Bodygroom trimmer comb
L Shaving head holder
MComb
NCutter
O Retaining ring
12_XA525.indd 8
11/12/12 11:36 AM
12_XA525.indd 9
English
9
A
B
O
C
N
D
M
L
K
E
J
F
G
I
H
11/12/12 11:36 AM
10
12_XA525.indd 10
English
our story
This tool does it all, now so can you. The heads click
on and off, so you can switch from facial to body
grooming without breaking your shaving stride. Once
you’re done, go share your all-over smoothness with
someone. Extend your style by adding additional
accessories.
Before First Use
Important
-- Before putting on or taking off any parts or
performing any cleaning, maintenance or storage,
be sure to turn appliance off, unplug from outlet
and remove power cord from appliance.
charging/(re)charging
-- Charging or (re)charging at temperatures below
40°F or higher than 95°F adversely affects lifetime
of batteries.
-- Do not charge razor in a pouch.
1Connect the small plug directly to the
appliance and connect the charging plug into
any 100V to 240V AC outlet. Use only the
power cord provided.
-- An adapter plug may be necessary for charging
plug usage in some foreign countries. Use
an attachment plug adapter of the proper
configuration for the power outlet. The charging
plug will automatically convert to work on 100V
to 240V AC systems.
-- During charging the battery symbol blinks green.
11/12/12 11:36 AM
12_XA525.indd 11
English
11
2Charging and (re)charging requires 1 full hour
for a cordless shaving time of up to 40 minutes.
Note: First time charging or charging after a long
period of non-use requires 90 minutes of charge
time.
- When the battery is fully charged, the battery
- When the battery is almost empty, the plug
symbol lights up green continuously. After
approximately 30 minutes, the light goes out.
symbol blinks orange.
Tip: Depending on your shaving/styling
behavior and beard type, the operating time
may vary over time.
Quick Charge
The quick charge is indicated by the green battery
symbol and orange plug symbol blinking alternately.
When the battery symbol no longer blinks orange
after approximately 5 minutes, the appliance contains
enough energy for a touch up.
Skin Adaptation Period
-- At first you may not get as close a shave as you
expect, or your face may even become slightly
irritated. This is normal since your beard and
skin will need time to adjust. Invest 3 weeks with
regular shaves and you’ll soon experience the full
potential of your new razor.
-- Stick with it! If you alternate shaving methods
during the adjustment period, it may make it more
difficult to adapt.
11/12/12 11:36 AM
12
12_XA525.indd 12
English
Shaving
-- This symbol on the appliance indicates that
the appliance can be used in both the bath and
shower.
-- Use this appliance for its intended household use
as described in this manual.
-- Only use the shaving attachment to shave facial
hair.
Tip: You can shave wet with shaving cream or
gel or dry for convenience and quick touch-ups
between shaves. Shaving with a clean face
gives best results.
1Attach shaving unit to appliance. Do not twist.
Dry Shaving
1Turn appliance ON.
2Gently press the shaving unit to skin. Move
shaving unit using both straight and circular
movements.
3Turn appliance OFF.
4Clean shaving unit after each shave (see
‘Cleaning’).
11/12/12 11:36 AM
12_XA525.indd 13
English
13
5Put Protective cap on appliance.
Wet Shaving
1Splash warm water on your face.
2Apply shaving cream or gel to your skin.
3Rinse shaving unit under water.
4Turn appliance ON.
5Gently press razor to skin. Move the razor in
both straight and circular movements.
Tip: Rinsing the shaving unit with water before
and during shaving ensures the razor heads
glide smoothly over your skin, while removing
residual shaving foam/gel. Gently press razor to
skin for optimal results. Stretching your skin
can help prevent skin irritation.
6Turn appliance OFF.
11/12/12 11:36 AM
14
English
7Dry your face with a soft cloth.
8Clean heads after each shave (see’Cleaning’) .
9Put Protective cap on appliance.
Body Grooming
-- Only use the Bodygroom attachment to groom or
trim body hair below the neckline. Do not use it
to shave or trim facial or scalp hair.
Note: Before using, check foil, cutters, trimmers
and combs for wear or damage. If they show
signs of wear or damage, do not use. Replace
immediately (see section ‘Replacing the Bodygroom
Foil’)
1Pull the shaving attachment straight off the
appliance. Do not twist.
2Attach the Bodygroom attachment. Press down
firmly.
Trimming with the trimming comb
12_XA525.indd 14
Note: If hair is longer than 13/32 in./ 10mm, trim
first with the comb to a length of 1/8 in./3mm to make grooming easier.
11/12/12 11:36 AM
12_XA525.indd 15
English
15
1Snap the comb onto the appliance making sure
the teeth of the comb point in the direction
you will move the appliance.
-- When you move the appliance towards you, the
teeth must point towards you.
-- When you move the appliance away from you,
the teeth must point away from you.
2Turn the appliance ON.
3Move the appliance against the direction of hair
growth.
4Make sure the flat part of the trimming comb
is always in full contact with the skin.
5Trim desired hair below the neckline.
6Turn appliance OFF.
7Clean the Bodygroom attachment after each
use (see ‘Cleaning’).
Grooming
1Place the bodygroom attachment on the
appliance.
2Turn the appliance ON.
3Move the appliance against the direction of hair
growth.
4Make sure the bodygroomer is always in full
contact with the skin.
11/12/12 11:36 AM
16
12_XA525.indd 16
English
5Groom desired body parts below the neckline.
6Turn appliance OFF.
7Clean the bodygroom attachment after each
use (see ‘Cleaning’).
Trimming and Grooming Tips
-- For best trimming results, skin and hair should be
clean and dry.
-- For best body grooming results, use in the shower
or bath. Apply shaving cream or gel to skin for
easy gliding.
-- Do not move the appliance too fast. Make
smooth and gentle movements.
-- Do not press too hard. Pressing too hard may
cause skin irritation.
-- Stretching your skin with your free hand makes
the hairs stand upright and can help prevent skin
irritation.
Cleaning
-- Do not use abrasive cleaning agents, scourers or
aggressive liquids such as gasoline to clean the
appliance and attachments.
-- Be careful with hot water. Always test water first
so as not to burn or scald hands.
-- While rinsing the appliance, water may drip out of
the base of the appliance. This is normal. Simply
hold appliance upright for 10-15 seconds.
Cleaning the Shaving Unit
1Rinse the shaving unit under hot water for a
couple of minutes.
11/12/12 11:36 AM
English
17
2Press the shaving unit release buttons (1) and
pull shaving unit off the shaving attachment (2).
3Rinse the shaving unit for 30 seconds under
hot water.
4Carefully shake off excess water and let the
shaving unit air dry thoroughly.
Never dry the shaving unit with a towel or tissue
as damage may occur to the shaving heads.
12_XA525.indd 17
5Reattach the shaving unit to the shaving
attachment.
Note:You can also clean the shaving attachment and shaving unit with the supplied brush.
Extra-thorough Cleaning Method
1Press the shaving unit release buttons (1) and
pull shaving unit off the shaving attachment (2).
2Unlock the orange retaining ring by turning it
in the direction of the arrows on the retaining
ring.
11/12/12 11:36 AM
18
English
3Lift the retaining ring out of the shaving head
holder.
4Remove the cutter and comb and separate the
cutter from the comb.
Tip: Do not clean more than one cutter and
comb at a time as they are matching sets. If
you accidentally put a cutter in the wrong
comb, it may take several weeks before
optimal shaving performance is restored.
5Clean the inside and outside of both the cutter
and comb with the supplied brush.
6Place the comb in the shaving head holder
making sure the two wings fit exactly in the
recesses of the shaving head holder.
7Place the cutter into the shaving head holder
with the cutter legs pointing down.
8Reattach the retaining ring (1) by turning it
the opposite direction of the arrows on the
retaining ring (2).
Make sure the four wings of the retaining ring
are located exactly under the recesses of the
shaving head holder.
12_XA525.indd 18
9Reattach the shaving unit to the shaving
attachment. If it does not close smoothly, check
11/12/12 11:36 AM
English
19
that the shaving heads and retaining rings are
positioned properly.
Cleaning the Bodygroom Attachment
1If a trimming comb is attached to the appliance,
remove it.
2Pull the bodygroom foil off the attachment.
Do not apply pressure to foil. Do not touch foil
with hard objects as this may dent or damage foil or
cutters. If damage occurs, replace damaged parts.
3Rinse the bodygroom attachment, foil and
comb under hot water.
You can also clean the attachment, foil and comb
with the supplied brush.
4Shake off excess water and allow to air dry
thoroughly.
5Place bodygroom foil back on the attachment.
12_XA525.indd 19
Replacing the Shaving Unit Razor Heads
-- Replace the Shaving Unit razor heads every 12
months for optimal results.
-- Replace with RQ32 Philips Norelco razor heads
only
1Follow steps 1-4 under ‘Extra-thorough
Cleaning Method’ section.
11/12/12 11:36 AM
20
English
2Remove the shaving heads and place new ones
in the shaving head holder making sure the two
wings of the shaving heads fit exactly into the
recesses.
3Reattach the retaining ring (1) by turning it
the opposite direction of the arrows on the
retaining ring (2).
Make sure the four wings of the retaining ring
are located exactly under the recesses of the
shaving head holder.
4Reattach the shaving unit to the shaving
attachment. If it does not close smoothly, check
that the shaving heads and retaining rings are
positioned properly.
Replacing the bodygroom foil
-- Replace the Bodygroom foil every 12 months for
optimal results.
-- Replace with BG2000 Philips Norelco Bodygroom
Replacement foil.
1Pull the bodygroom foil off the attachment.
2Place the new foil on the attachment and snap
into place.
The foil is a precision part. Handle with care.
12_XA525.indd 20
Storage
-- Store appliance in a safe, dry location where it will
not be crushed, banged, or subject to damage.
11/12/12 11:36 AM
12_XA525.indd 21
English
21
-- Do not wrap the power cord around the
appliance.
-- Put the protective cap on the shaving attachment.
Assistance
-- For assistance, visit our website:
www.philips.com/support or
call toll free 1-800-243-3050
-- Online information is available 24 hours a day,
7 days a week.
Battery Removal
-- This Philips Norelco appliance contains a
rechargeable Nickel Metal Hydride Battery.
-- Battery should only be removed when appliance is
to be discarded.
-- For assistance, visit our website, www.philips.com/
support or call toll free: 1-800-243-3050.
1Turn appliance ON.
2Allow appliance to run until battery is depleted.
3Turn appliance OFF.
4Undo the screw in the back panel with a
screwdriver (1) and remove the back panel (2).
5Bend the hooks aside and remove the power
unit.
11/12/12 11:36 AM
22
English
6Break the snap hooks (1) and remove front
panel of the power unit (2).
7Take out battery holder (1) and cut battery
tags with pliers (2).
8Remove rechargeable battery.
Be careful, the battery strips are sharp.
12_XA525.indd 22
9Do not attempt to replace battery. Insulate
battery ends by covering with tape and/or in a
small plastic bag.
10Discard appliance. Do not attempt to plug
power cord into outlet or recharge appliance
after the battery has been removed.
11Contact your local town or city officials
for battery disposal information or call
1-800-8-BATTERY or www.rbrc.com for
battery drop-off locations.
Accessories
-- Replacement Razor Heads Model RQ32 – For
maximum razor performance, replace your Philips
Norelco razor heads every 12 months.
-- Replacement Bodygroom Foil Model BG2000 –
Philips Norelco Replacement Foil
-- Shaving Head Cleaning Spray
Model HQ110 – Philips Norelco Shaving Head
Cleaning Spray
-- Philips Norelco Accessories may be purchased
at a store near you, or on our website
www.philips.com/store
11/12/12 11:36 AM
English
23
FULL TWO YEAR WARRANTY
Philips Electronics North America Corporation warrants each new Philips Norelco Product, Model XA525
(except cutters, combs and foil) against defects in materials or workmanship for a period of two years
from the date of purchase, and agrees to repair or replace any defective product without charge.
IMPORTANT: This warranty does not cover damage resulting from accident, misuse or abuse, lack
of reasonable care, the affixing of any attachment not provided with the product or loss of parts or
subjecting the product to any but the specified voltage.* Use of unauthorized replacement parts will void
this warranty.
PHILIPS ELECTRONICS NORTH AMERICA CORPORATION WILL NOT PAY FOR
WARRANTY SERVICE PERFORMED BY A NON-AUTHORIZED REPAIR SERVICE
AND WILL NOT REIMBURSE THE CONSUMER FOR DAMAGE RESULTING FROM
WARRANTY SERVICE PERFORMED BY A NON-AUTHORIZED REPAIR SERVICE. NO
RESPONSIBILITY IS ASSUMED FOR ANY SPECIAL, INCIDENTAL OR CONSEQUENTIAL
DAMAGES.
In order to obtain warranty service, simply go to www.philips.com/norelco or call 1-800-243-3050 for
assistance. It is suggested that for your protection you return shipments of product by insured mail,
insurance prepaid. Damage occurring during shipment is not covered by this warranty.
NOTE: No other warranty, written or oral, is authorized by Philips Electronics North America
Corporation.
This warranty gives you specific legal rights, and you may also have other rights which vary from state to
state. Some states do not allow the exclusion or limitation of incidental or consequential damages, so the
above exclusion and limitations may not apply to you.
* Read enclosed instructions carefully.
Manufactured for:
Philips Consumer Lifestyle
A Division of Philips Electronics North America Corporation
P.O.Box 10313, Stamford, CT 06904
This symbol on the product’s nameplate means it is
listed by Underwriters’ Laboratories, Inc.
AXE is a trademark of Unilever PLC.
Norelco and Tripleheader are Registered Trademarks of Philips Electronics North America Corporation.
PHILIPS is a Registered Trademark of Koninklijke Philips Electronics N.V.
© 2012 Philips Electronics North America Corporation. All Rights Reserved.
12_XA525.indd 23
11/12/12 11:36 AM
24
ESPAÑOL
INSTRUCCIONES
IMPORTANTES DE
SEGURIDAD
Cuando utilice un artefacto eléctrico, tome las precauciones
básicas.
Lea las instrucciones antes de utilizar este producto.
PELIGRO
Para reducir el riesgo de descarga eléctrica:
1. No intente sujetar un aparato enchufada que se haya caído al agua. Desenchúfela inmediatamente.
2. El conector no deben sumergirse ni usarse en la ducha.
3. No utilice el artefacto con un cable de extensión.
4.Siempre desenchufe este aparato del tomacorriente inmediatamente después del uso, excepto cuando esté recargando el aparato.
5. Desenchufe y retire el cable de alimentación del aparato antes de realizar la limpieza.
ADVERTENCIA
Para reducir el riesgo de quemaduras, incendios,
descargas eléctricas y lesiones:
1. Es necesaria una estricta supervisión cuando el aparato sea utilizada en niños o personas con discapacidad, en ellos o cerca de ellos.
2. Utilice este aparato para el uso doméstico al cual está
destinada según se describe en este manual. No use accesorios
no recomendados por Philips Electronics North America
Corporation.
3. Nunca use este aparato si el cable o el conector de carga
están dañados, si no funciona correctamente, si se cayó o está
12_XA525.indd 24
11/12/12 11:36 AM
ESPAÑOL
25
dañada o si se sumergió en agua mientras estaba conectada.
Para solicitar asistencia, comuníquese al 1-800-243-3050.
4. Mantenga el aparato, el cable y el enchufe de carga lejos de
superficies calientes.
5. No deje caer ni introduzca ningún objeto en las aberturas.
6. No cargue ni enchufe el aparato al aire libre ni la utilice en
lugares donde se usen aerosoles (sprays) o se administre
oxígeno.
7. No utilice este aparato con un peine deteriorado o roto, ya que podría ocasionar lesiones en la cara. Compruebe siempre la lamína, cuchillas y los recortadores antes de usar. No lo use lamína, cuchillas y los recortadores están dañados ya que
pueden ocasionar lesiones.
8. Siempre enchufe el conector del aparato en primer lugar y
luego al tomacorriente. Asegúrese de que el enchufe esté
firmemente conectado a la base de carga, hasta la marca
indicada en éste. Para desconectar, retire el enchufe de carga
del tomacorriente.
9. Nunca exponga el aparato a la luz solar directa ni los guarde
en lugares con temperaturas superiores a los 60ºC (140ºF).
10.Mantenga el cable secos en todo momento. No los maneje con
manos mojadas.
11.Utilice sólo el cable proporcionado. Para evitar daños en el cable de alimentación, no lo enrolle alrededor del aparato.
12.Utilice únicamente el conector de alimentación y otro accesorios suministrados con el aparato.
CONSERVE ESTAS
INSTRUCCIONES
IMPORTANTE: el conector de alimentación contiene un
transformador. Para evitar situaciones de riesgo, no lo sustituya
por otro.
12_XA525.indd 25
11/12/12 11:36 AM
26
12_XA525.indd 26
ESPAÑOL
GARANTÍA DE DEVOLUCIÓN DEL IMPORTE
DE 45 DÍAS
Use su nuevo aparato Philips Norelco para hombres como método exclusivo
de afeitado durante tres semanas para disfrutar de un afeitado cómodo y al ras.
Esto permite que su pelo y su piel se acostumbren al sistema de afeitado Philips
Norelco. Si después de este período de prueba no está satisfecho con los resultados de su aparato Philips Norelco, puede devolver el producto con el recibo
de compra que contenga la fecha de adquisición y le reembolsaremos el precio
de compra íntegramente. El aparato debe enviarse por correo asegurado
prepago junto con el recibo de compra original que indique la fecha
de compra, el importe, y el formulario de autorización de garantia de
devolución abonado. No nos responsabilizamos por la pérdida de la correspondencia. La fecha de envío debe estar dentro de los 45 días posteriores a
la compra. Philips Norelco se reserva el derecho de verificar el precio de compra
del aparato y limitar el reembolso al precio de venta al por menor sugerido.
Para obtener el formulario de autorización de reembolso garantizado
y solicitar asistencia, comuníquese al 1-800-243-3050. La entrega del
cheque con reembolso se realizará de 6 y 8 semanas DESPUÉS del
recibo del producto devuelto.
11/12/12 11:36 AM
12_XA525.indd 27
ESPAÑOL
27
Tabla de contenido
Características.........................................28-29
Nuestra Historia...........................................30
Antes del primer uso...................................30
Carga/(Re)carga.......................................30-31
Carga rápida...................................................31
Periodo de adaptación de la piel...............32
Afeitado.....................................................32-34
Cuidados del cuerpo..............................34-37
Limpieza.....................................................37-40
Reemplazo de los cabezales de afeitado
de la unidad de afeitado........................40-41
Reemplazo de la hoja de cuidados
del cuerpo.......................................................41
Almacenamiento.....................................41-42
Ayuda...............................................................42
Extracción de las baterías.....................42-43
Accesorios......................................................44
Garantía..........................................Back Cover
11/12/12 11:37 AM
28
ESPAÑOL
características
A Tapa protectora
B Unidad de afeitado
C Botones de liberación de la unidad de afeitado
D Accesorio de afeitado
E Botón Encendido/Apagado
FPantalla
GAdaptador
H Conector pequeño
I Cepillo de limpieza
J Accesorio para cuidado del cuerpo
K Cepillo recortador para cuidado del cuerpo
L Soporte del cabezal de afeitado
MPeine
NCortadora
O Anillo retenedor
12_XA525.indd 28
11/12/12 11:37 AM
12_XA525.indd 29
ESPAÑOL
29
A
B
O
C
N
D
M
L
K
E
J
F
G
I
H
11/12/12 11:37 AM
30
12_XA525.indd 30
ESPAÑOL
NUESTRA HISTORIA
Esta herramienta lo hace todo y, ahora, usted
también puede. Los cabezales se colocan y se sacan
a presión, por lo que puede cambiar del afeitado de
la cara al afeitado del cuerpo sin interrupción. Una
vez que termine, comparta su suavidad con quien
quiera. Extiende tu estilo agregando accesorios
adicionales.
Antes del primer uso
Importante
-- Antes de colocar o retirar partes de la
unidad, realizar cualquier tipo de limpieza y
mantenimiento o antes de almacenarlo, asegúrese
de que la unidad esté apagada, desenchúfela del
tomacorriente y retire el cable de alimentación de
la unidad.
Carga y recarga
-- Cargar y recargar el equipo a temperaturas
inferiores a 40°F o superiores a 95°F disminuye la
vida útil de la batería.
-- No cargue la afeitadora si se encuentra dentro e
una funda.
1Enchufe el conector pequeño directamente
en la unidad y conecte el conector de carga
a cualquier tomacorriente de 100 V a 240
V de corriente alterna. Solo use el cable de
alimentación suministrado.
11/12/12 11:37 AM
12_XA525.indd 31
ESPAÑOL
31
-- En algunos países puede ser necesario el uso
de un adaptador para el conector de carga.
Utilice un adaptador apropiado para el tipo de
tomacorriente. El conector de carga realizará un
proceso automático de conversión de sistemas de
100 V a 240 V de CA.
-- Durante la carga, el símbolo de batería parpadea
en verde.
2La carga y recarga demoran una hora completa
y proporcionan un tiempo de afeitado
inalámbrico de 40 minutos.
Nota: Para cargar la batería por primera vez o para
recargarla después de no haberla utilizado por un
periodo prolongado, el tiempo de carga debe ser
de 90 minutos.
- Cuando la batería está completamente cargada,
- Cuando la batería está casi vacía, el símbolo de
el símbolo de batería permanece encendido en
verde. Después de 30 minutos aproximadamente,
la luz se apagará.
enchufe parpadean en naranjo.
Consejo: El tiempo de operación puede variar
dependiendo de las preferencias de afeitado o
modelado y el tipo de barba.
Carga rápida
Después de 5 minutos de carga y el símbolo de
batería deja de parpadear, la afeitadora contará con
suficiente energía para un retoque rápido.
11/12/12 11:37 AM
32
12_XA525.indd 32
ESPAÑOL
Periodo de adaptación de la piel
-- Es posible que al principio no obtenga el afeitado
al ras que desea e incluso su piel puede irritarse
levemente. Esto es normal, ya que la barba y la
piel necesitan tiempo para acostumbrarse. Pruebe
este producto durante 3 semanas y pronto
disfrutará al máximo de su nueva afeitadora.
-- ¡Sea perseverante! Si alterna métodos de afeitado
durante el período de adaptación, será más difícil
acostumbrarse.
Afeitado
-- Este símbolo indica que la afeitadora puede
utilizarse en el baño y en la ducha.
-- Esta afeitadora es solo para uso doméstico, tal
como se describe en este manual.
-- Utilice el accesorio de afeitado para afeitar el vello
facial.
Consejo: Para un conveniente y rápido retoque
entre afeitados, puede afeitarse usando crema,
gel de afeitar o puede afeitarse en seco.
Obtendrá mejores resultados al afeitarse con el
rostro limpio.
1Coloque la unidad de afeitado en la afeitadora.
No la gire.
11/12/12 11:37 AM
12_XA525.indd 33
ESPAÑOL
33
Afeitadoras en seco
1Encienda la afeitadora (ON).
2Presione gentilmente la unidad de afeitado
sobre la piel. Mueva la unidad de afeitado con
movimientos rectos y circulares.
3Apague la afeitadora (OFF).
4Limpie la unidad de afeitado siempre después
de afeitarse (consulte ‘Limpieza’).
5Coloque la tapa protectora en el aparato.
Afeitado húmedo
1Humedezca su rostro con agua tibia.
2Aplique crema o gel de afeitar sobre la piel.
11/12/12 11:37 AM
34
12_XA525.indd 34
ESPAÑOL
3Enjuague la unidad de afeitado bajo el agua.
4Encienda la afeitadora (ON).
5Presione suavemente la afeitadora sobre la piel.
Mueva la afeitadora en forma recta y circular
Consejo: Enjuagar con agua la unidad de
afeitado antes y durante el afeitado asegura
que los cabezales de la afeitadora se muevan
suavemente sobre su piel al tiempo que
remueven residuos de espuma o gel de afeitar.
Para obtener resultados óptimos, presione
suavemente la afeitadora sobre la piel. Estirar
la piel puede prevenir la irritación.
6Apague la afeitadora (OFF).
7Seque su rostro con un paño suave.
8Limpie los cabezales después de cada afeitado
(consulte ‘Limpieza’).
9Coloque la tapa protectora en el aparato.
Cuidados del cuerpo
-- Utilice el accesorio de cuidado del cuerpo solo
para cortar el vello corporal que está debajo de la
línea del cuello. No lo utilice para afeitar o cortar
el vello del rostro ni de la cabeza
Nota: Antes de usarla, revise que la lámina, las
chuchillas, los recotradores y los peines no estén
gastados o danados. Si alguna de estas piezas
muestra signos de degaste o danos, no use.
11/12/12 11:37 AM
ESPAÑOL
35
Reemplace de inmediato (consulte la sección
‘Reemplazo de la hoja de cuidados del cuerpo’)..
1Tire del accesorio de afeitado para retirarlo de
la unidad. No lo gire.
2Coloque el accesorio de cuidado del cuerpo.
Presione con fuerza.
Uso del peine recortador
12_XA525.indd 35
Nota: Si el vello mide más de 10 mm, primero,
recórtelo con el peine hasta alcanzar los 3 mm,
para facilitar el afeitado.
1Coloque el peine en la afeitadora asegurándose
de que los dientes del peine apunten en la
dirección hacia la que moverá la afeitadora.
-- Si mueve la afeitadora hacia usted, las puntas
deben apuntar hacia usted.
-- Si mueve la afeitadora hacia el lado opuesto a
usted, las puntas deben apuntar hacia la misma
dirección.
2Encienda la afeitadora (ON).
3Mueva la afeitadora en dirección contraria al
crecimiento del vello.
11/12/12 11:37 AM
36
12_XA525.indd 36
ESPAÑOL
4Asegúrese de que la parte plana del peine
recortador esté siempre en contacto con la
piel.
5Corte el vello debajo de la línea del cuello.
6Apague la afeitadora (OFF).
7Limpie el accesorio de afeitado corporal
después de cada uso (consulte ‘Limpieza’).
Afeitado corporal
1Coloque el accesorio de afeitado corporal en
la afeitadora.
2En