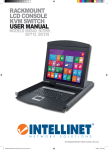
1
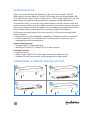
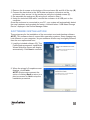
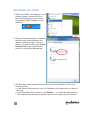
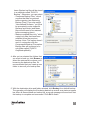
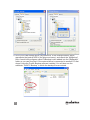
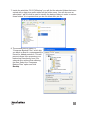
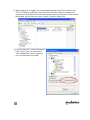
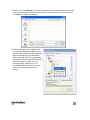
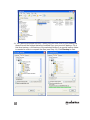
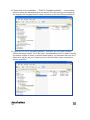
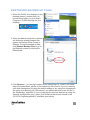
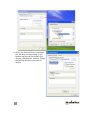
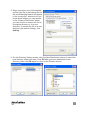
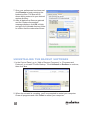
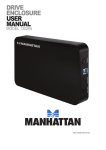
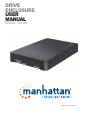
DRIVE
ENCLOSURE
USER
MANUAL
MODEL 130349
MAN-130349-UM-0613-02
INTRODUCTION
Thank you for purchasing this Manhattan® Drive Enclosure, Model 130349.
With support for large-capacity 2.5-inch SATA drives and with SuperSpeed USB
(3.0) data transfer rates of up to 5 Gbps (up to 1 TB for large-capacity drives), this
device helps you optimize high-performance computer storage applications.
A convenient built-in, one-touch copy feature helps to quickly transfer, share and
archive important data, while its durable, two-piece construction protects sensitive
drives from exposure and daily hazards. It’s a versatile and portable data solution
without bulky external power supplies or annoying cables and adapters.
By following the instructions in this user manual, you’ll soon be enjoying these
popular features:
• Plug and Play and hot-swappable capabilities; Windows and Mac compatible
• Lifetime Warranty (For a complete list of country-specific warranties, go to
manhattan-products.com/warranty.)
System Requirements
• Available USB 3.0 Standard-A port
• Windows XP/Vista/7/8; or Mac OS 8.6 or later versions
Package Contents
• Drive Enclosure
• USB 3.0 cabl, USB to DC power cable, screws (8), rubber feet (4)
• Software CD with user manual; multilanguage quick install guide
HARDWARE & DRIVER INSTALLATION
A
B
C
D
2
1.Remove the 4 screws on the bottom of the enclosure (A) and lift off the top (B).
2.Connect the hard drive to the SATA data and power connectors on the
enclosure, then secure it to the enclosure using the included screws (C).
3.Re-assemble the enclosure (D) using the 4 screws in Step 1.
4.Using the included USB cable, connect the enclosure to a USB port on the
computer.
Once the enclosure is connected to your PC, your system will automatically detect
the new hardware and complete the setup, confirmed when “USB Mass Storage
Device” displays in the Device Manager folder.
SOFTWARE INSTALLATION
These steps are for the installation of the convenient one-touch backup software.
NOTE: This software doesn’t support Mac operating systems. Some images may
look different on your computer, as your software version may be slightly different
than the one represented here.
1. Load the included software CD. The
Prolific Backup program’s InstallShield
Wizard Welcome screen will display
automatically. Click Next to continue.
2. When the wizard’s Complete screen
displays, click Finish.
NOTE: Most screens present the
option of clicking Back to return to a
previous screen or Quit to stop the
installation procedure.
3
BACKING UP FILES
1.When the Prolific icon displays on the
desktop (below), double-click it to
launch the program (or go to Start /
Programs / Prolific Storage on your
desktop).
2.When the backup program is opened,
the Welcome screen presents two
options for Backup Files: Create or
Restore. To back up files, click Create
Backup Files or go to the Backup
screen by clicking the Backup tab.
3. The Backup screen presents Source Directories, the Destination Drive and
backup options.
• In the Source Directories list, you can click/select the folders that you want to
back up.
• In the Destination Drive section, click Browse (...) to select the external drive. • The default setting among the backup options is to simply copy all selected
4
items. Backed-up files will be stored
in a subfolder called “PL2X7X
Backup.” Otherwise, you can select:
- “Compress Backup Files,” which
requires that files be restored
before opening (see Restoring
Backup Files). If you also select
“User-defined file name,” you’ll first
be prompted to enter a specific
filename and folder (and these
files will still need to be restored
before accessing them).
- “Backup modified files only,” which
copies only files that have been
modified since the previous
backup. Note: This option doesn’t
work in conjunction with the
Compressed Backup Files option.
Backup files will be stored on a
sub-folder called “PL2X7X
OnlyBackupModify.”
4. After you’ve selected the folders that
you want to back up, click Browse to
select the external drive where you’ll
be saving the backed-up files. It’s
recommended that you create a new
folder to store all your backup files.
5.With the destination drive and folder selected, click Backup for a default backup. The operation will display the files being backed up as well as a status progress
bar. After all files selected are backed up, a pop-up message will announce that
the backup is complete and successful. Click OK to finish.
5
6. Go to your USB storage drive (“MyUSBDrive” in the example below, which
represents the backup HDD in the drive enclosure), and check the “MyBackup”
files. A small utility program called PLBackup is also added into the “MyBackup”
folder so you can execute it if the external drive is connected to another PC that
doesn’t have the Prolific Backup software installed. You will also see the
subfolder “PL2X7X Backup” in which the backup files are stored.
6
7. Inside the subfolder “PL2X7X Backup” you will find the selected folders that were
copied with a date-time prefix added on the folder name. You will also see an
associated “.pbi” file that is used to identify the backup folders in order to restore
those folders. It is important that you do not delete this .pbi file.
8. The second backup option is
“Compress Backup Files,” which lets
you back up files to a compressed file
format for added protection. This will
prevent others from accessing your
backed-up files directly from your
external drive without first restoring
the files. Select the “Compress
Backup Files” option and click
Backup.
7
9. When backup is complete, the compressed backup files will be stored in the
“PL2X7X Backup” subfolder. Note that each selected folder is compressed
separately with a date-time folder name prefix used as a filename. Note also the
associated .pbi file that you need in order to restore these files.
10. When using the “Compress Backup
Files” option, you can also select
“User-defined file name” to specify
your own filename and folder.
8
11. When you click Backup, you’ll be prompted to enter the filename to be used
for the compressed backed-up files and the folder directory to store the files.
Click Save to begin the backup.
12.When the backup is complete, the
compressed backed-up files will be
stored in the folder you specified and
with the filename(s) you specified.
Each selected folder is compressed
separately with the specified filename
used as a prefix. Again, note the
corresponding .pbi file with your
specified filename that you need in
order to restore these files (see
below).
9
13. The “Backup modified files only” option lets you save time by just backing up
those files on the folders that were modified from your previous backup. For a
first-time backup, a full backup of the selected folders in a special backup folder
is needed in order to compare the files (see Step 14). Click Backup to start.
10
14. Notice that a new subfolder — “PL2X7X OnlyBackupModify” — was created,
which is where the backed-up files are stored. The next time you do a backup,
the program will compare the files and only back up the files that are modified.
15. Inside the “PL2X7X OnlyBackupModify” subfolder you’ll find the selected
folders that were copied. You’ll also see a corresponding .pbi file used to identify
the backup folders in order to restore those folders. It’s important that you don’t
delete this .pbi file, as you’ll need to point to this file/folder when running the
restore operation.
11
16. The next time you back up your files, the folder where the files are stored will
just be updated with those files that were modified. Note that a new .pbi file will
be created each time you do a backup. Always use the latest .pbi file to restore
the files.
ONE-TOUCH BACKUP FUNCTION
With the drive enclosure loaded with a
backup hard drive and connected to
your computer (and powered on), you
can simply press the Backup button on
the enclosure to launch the software
and begin backing up selected files.
• Allow the backup to continue while
the status screen is displayed. (Or
click Abort if you need to interrupt or
stop the process.)
• When the “Backup Succeeded!”
message displays, click OK.
• If you last set to your options to back
up modified files only, the program
will only back up the files that have
been modified since your previous
backup operation, which will save you
more time without having to back up
all needed files again.
12
RESTORING BACKED-UP FILES
1.When the Prolific icon displays on the
desktop (below), double-click it to
launch the program (or go to Start /
Programs / Prolific Storage on your
desktop).
2.When the backup program is opened,
the Welcome screen presents two
options for Backup Files: Create or
Restore. To restore backed-up files,
click Restore Backup Files or go to
the Restore screen by clicking the
Restore tab.
3. Click Browse (...) to find the location of the backed-up file. Click on the folder
where the associated .pbi file of the backed-up file is found. If you’re restoring
a file that was backed up using the default setting or by using the compressed file option (see Backing Up Files above), you should be able to find the file in
the “MyBackup” subfolder. If you’re restoring file that was backed up using the
“Backup modified files only” option, the file should have been stored in the
“PL2X7X OnlyBackupModify” subfolder (see below).
13
4. When the desired folder is selected,
the .pbi files corresponding to the
backed-up files will be listed in the
“Select a backup file” window. Select
the backup filename you want to
restore.
14
5. When you select one of the backed up files (.pbi file) in the backup file list,
the actual backup folders will appear
in the “source file” window to let you
know which folders you can restore.
In the “Restore Directories” panel,
you can choose to restore the file to
its original directory or to a new
directory. To restore the file to a new
directory (the default setting), click
Setting.
6. On the Directory Setting screen, click the New Directories column to select the
new directory folder you want. Click OK after you have selected the new
directory, then click OK again to return to the Restore screen.
15
7. Once your preferences have been set,
click Restore to begin restoring the
backed-up files. The files will be
shown being restored to your desired
restore directory.
8.After all backed-up files are restored
and the “Restore succeeded!”
message displays, click OK to finish
and go to the intended directory folder
to confirm that the restored are there.
UNINSTALLING THE BACKUP SOFTWARE
1. In the Control Panel, go to “Add or Remove Programs” or “Programs and
Features” to uninstall “Prolific Backup.” Click Uninstall or Remove to continue,
then click Yes.
2. When the uninstall is complete, you’ll be prompted to restart your computer.
Close all programs and click Finish to restart your computer.
16
SPECIFICATIONS
Standards and Certifications
• USB 3.0 to SATA interface
• CE
• FCC
• WEEE
• RoHS
General
• P12771 chipset
• SATA 7P + 15P internal data and power connections
• USB 3.0 Standard-A to Micro-B cable, 60 cm (1.97 ft.)
• Working temperature: 0 – 45ºC
• ABS (top) / metal (base)
• Integrated one-touch copy button and power/activity LED indicator
• 13.46 x 7.95 x 1.75 cm (5.3 x 3.13 x 0.69 in.)
• 142 g (5 oz.) without hard drive
System Requirements
• Available USB 3.0 Standard-A port
• Windows XP/Vista/7/8; or Mac OS 8.6 or later versions
Package Contents
• Drive Enclosure
• USB 3.0 cable, USB to DC power cable, screws (8), rubber feet (4)
• Software CD with user manual; multilanguage quick install guide
17
All trademarks and trade names are the property of their respective owners.
Alle Marken und Markennamen sind Eigentum Ihrer jeweiligen Inhaber.
Todas las marcas y nombres comerciales son propiedad de sus respectivos dueños.
Toutes les marques et noms commerciaux sont la propriété de leurs propriétaires respectifs.
Wszystkie znaki towarowe i nazwy handlowe należą do ich właścicieli.
Tutti i marchi registrati e le dominazioni commerciali sono di proprietà dei loro rispettivi proprietari.
© IC Intracom. All rights reserved. Manhattan is a trademark of IC IIntracom, registered in the U.S. and other countries.