1
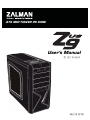
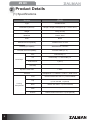
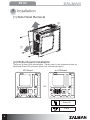
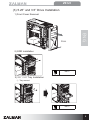
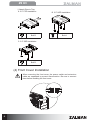
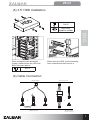
$7;0,'72:(53&&$6( 8VHU V0DQXDO ೠӖ&OHMJTI 7FS Z9 U3 1 Cautionary Note 1) Please read this manual thoroughly prior to installation. 2) Before installing, check the components and condition of the product, and if any problem is found, contact the retailer. 3) Avoid inserting objects or hands into the system while it is in operation to prevent product damage and injuries. 5) Do not block the front intake vent or the rear exhaust vent. ENG 4) Check the manual when connecting cables. Incorrect connections PD\FDXVHVKRUWFLUFXLWVOHDGLQJWR¿UHKD]DUGV 6) Keep this unit away from heat sources, direct sunlight, water, oil, and KXPLGHQYLURQPHQWVDQGSODFHWKHXQLWRQDÀDWVWDEOHYLEUDWLRQIUHH DQGZHOOYHQWLODWHGDUHD 7) Do not clean the product surface with chemicals or wet cloth. FKHPLFDOVLQGXVWULDOEULJKWHQHUZD[EHQ]HQHDOFRKROSDLQWWKLQQHU mosquito repellent, aromatics, lubricant, detergent etc.) 8) Please wear gloves while handling this product to prevent injuries. 3URGXFWGHVLJQDQGVSHFL¿FDWLRQVPD\EHUHYLVHGWRLPSURYHTXDOLW\ and performance. Disclaimer) Zalman Tech Co., Ltd. is not responsible for any damages due to external causes, including but not limited to, improper use, problems with electrical power, accident, neglect, alteration, repair, improper installation, or improper testing. 1 Z9 U3 2 Product Details 6SHFLᚏFDWLRQV Models Z9 U3 7\SH $7;0LG7RZHU 'LPHQVLRQV:+' :[+['PP[[ರ :HLJKW NJOE 0DWHULDOV 3ODVWLF6WHHO &RORU %ODFN 0RWKHUERDUG&RPSDWLELOLW\ 6WDQGDUG$7;P$7; 3RZHU6XSSO\&RPSDWLELOLW\ 6WDQGDUG$7;$7;9 3&,$*3&DUG&RPSDWLELOLW\ )XOO6L]Hᓔ 'ULYH%D\V ([WHUQDO%D\[ ಯ ([WHUQDO%D\[,QWHUQDO%D\[ ರ LQ +RWVZDS ([SDVLRQ&DUG6ROWV 6ORWV ,23RUWV +HDGSKRQHV[86%[0LF[86%[ &RROLQJ &RPSRQHQWV 2 ರ )URQW PPPP)DQ9HQW[)DQLQFOXGHG 7RS PPPP)DQ9HQW[ )DQLQFOXGHGRSWLRQDO 5HDU PP)DQ9HQW[)DQLQFOXGHG 6LGH %RWWRP PPPP)DQ9HQW[)DQRSWLRQDO Z9 U3 3DUWV ENG User manual 6WDQG2IIî Main Unit %ROW$PPî [PSU, PCI] %ROW%0PPî [M/B, FDD, SSD] %ROW&0PPî >´%D\2''@ %ROW'PPî [3.5” Bay HDD] %ROW(PPî [3.5” HDD] +''$QWLYLEUDWLRQUXEEHU î [3.5” Bay HDD] PCI Slot × 2 CPU 12V Extension Cable × 1 Cable Tie × 5 3 Z9 U3 3 Installation (1) Side Panel Removal ② ① (2) Motherboard Installation 7KHUHDUH6WDQG2IIVSUHLQVWDOOHG3OHDVHUHIHUWRWKHGLDJUDPVEHORZIRU DGGLWLRQDO6WDQG2IISRVLWLRQVEDVHGRQPRWKHUERDUGW\SH P$7;%RDUG ATX Board or 6WDQG2II B Bolt 4 Z9 U3 (3) 5.25” and 3.5” Drive Installation 1) Front Cover Removal ENG PULL 2'',QVWDOODWLRQ Bolt C 3) 2.5” / 3.5” Tray Installation ① Tray removal Bolt C 5 Z9 U3 ② Attach Drive to Tray A. 3.5” FDD Installation B. 3.5” HDD Installation D D H 5” 3. 5” 3. FD D Bolt B Bolt A C. 2.5” SSD Installation D SS Bolt B (4) Front Cover Installation When removing the front cover, the power switch and extension cable are separated to prevent disconnection. Be sure to connect them before installing the front cover. 6 Z9 U3 (5) 3.5” HDD Installation D D H Bolt D +''$QWL vibration rubber ENG When transporting an assembled system, please secure the HDD with Bolt E as shown above. When removing HDD, pull the fastening lever outwards and then remove it. Bolt E (6) Cable Connection Power Button Fan Connection or or Power LED Mother Board PSU Power Mother Board (3-Pin Fan Connector) 7 Z9 U3 ,23RUW 86%RU86% 0RWKHU%RUDG,2 MotherBoard Ȅ3RZHUDQG,2SRUWVWRFRQQHFWSOHDVHUHIHUWR\RXUPRWKHUERDUGPDQXDO Ȅ 3URGXFWGHVLJQDQGVSHFL¿FDWLRQVPD\EHUHYLVHGWRLPSURYHTXDOLW\DQGSHUIRUPDQFH ´+''66'2SWLRQDO 2.5" HDD and SSDs can be installed on the right side of case as shown in the diagram below. Bolt B 2SWLRQDO)DQ,QVWDOODWLRQDQG5HSODFHPHQW 7RS3DQHO)DQPP,QVWDOODWLRQ When installing fan, press the Top Panel’s eight Hook’s towards each other to remove and install as shown in diagram below. The Z9U3 comes with one PP)DQSUHLQVWDOOHG 8 Zalman Tech Co., Ltd. GDHU\XQJ7HFKQR7RZQ,,,*DVDQGRQJ*XPFKXQJX6HRXO.RUHD 7HO)D[ZZZ]DOPDQFRPHPDLO]DOPDQ#]DOPDQFRP Zalman USA, Inc. 1RUWRQ$YH%XLOGLQJ&KLQR&$


![取扱説明書 [PDF形式]](http://vs1.manualzilla.com/store/data/006678815_2-ecc3be02ac01814d4ef02fc63ff2d802-150x150.png)