1
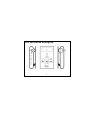
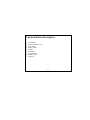
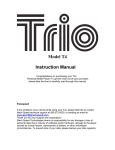
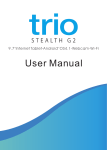
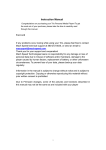
ECLIPSE POBTABLE MEDIA PLAYER CLD MP3 Player User’s Manual CLD MP3 Player User’s Manual Thank you for your purchase of this CLD MP3 player. To better learn how to use this product to its maximum potential, it is recommended that you read the entire user’s manual. 1 Technical Specifications Compatible Formats -Audio formats: MP3, WMA (non encrypted) Battery Information -Charging Time: One hour and 30 minutes -Playback Time: Six hours (depending on function in use and power settings). 2 Contents Page 4: Foreward Page 6: Safety Precautions Page 5: Unit and Button Description Page 9: Basic Operation Page 12: Uploading Files Page 18: Music Mode Page 19: Menu Mode Page 20: Menu Settings Page 22: Contact Us 3 Foreward Please take note: Mach Speed Technologies is not responsible for loss of personal data or damage to property due to malfunction in hardware or firmware, improper handling of the unit, or improper storage of the unit. Information contained within this manual is subject to change without prior notice. Information contained within this manual is subject to copyright protection. Copying or reproduction of the user’s manual without prior written consent from Mach Speed Technologies is not permitted. 4 Foreward This equipment has been tested and found to comply with the limits for Class B Digital device, pursuant to part 15 of the FCC rules. These limits are designed to provide reasonable protection against harmful interference in a residential installation. This equipment generate, uses and can radiate radio frequency energy and, if not installed and used in accordance with the instructions, may cause harmful interference to radio or telephone reception, which can be determined by turning the equipment off and on, the user in encouraged to try to correct the interference by one or more of the following measures: Reorient or relocate the receiving antenna. Increase the separation between the equipment and the receiver Connect the equipment to an outlet on a circuit different from that to which the receiver is connected. Consult the dealer or an experienced radio/TV technician for help. 5 Safety Precautions Avoid using in extreme temperature conditions (-20ºC / -4ºF or below; +45ºC / +114ºF or above). Avoid dropping. Do not immerse or expose to water Do not disassemble or flash 3rd party firmware. The playback times listed refer to the maximum playback times possible, using the best power savings. The actual playback time may differ as adjustments to screen brightness, power savings modes, volume, etc are made. As parameters such as formats, bitrate, codecs, frame rates, and resolutions differ, the player will not be compatible with all listed files. If you are experiencing issues playing your files on this player, we recommend using a supported conversion tool to reconvert your file to the specifications of the device. Failure to follow these precautions may lead to damaged or inoperable units, and will void the warranty. 6 Unit and Button Description 7 Unit and Button Description 1. 2. 3. 4. 5. 6. 7. 8. 9. LCD screen Power switch On / Off Play / Pause Menu / Select Volume Next track Previous track Earphone jack USB port 8 Basic Operation Powering On and Off -To power the player on, slide the power switch to the on position. Alternatively, press and hold the play / pause button for 5 seconds if the unit is powered off but the power switch is in the on position. -To power the unit off, slide the power switch to the off position. Alternatively, press and hold the play / pause button until the unit powers off. Note: If the player is powered off by sliding the power switch to the off position while the player is still running, all saved settings such as last song played or time settings will be lost. 9 Basic Operation Recharging the Battery -The player can be charged by connecting the supplied charger cable between the player’s charging jack and a wall outlet, or by connecting the player to a computer using the supplied USB cable. -The player will charge while either turned on or turned on off. Note: If using 3rd party wall adapters, make sure the voltage is compatible with AC input 120V and 5V DC, 300mA. 10 Basic Operation Menu Browsing -Press the menu / select button to access the menu while in play mode. -Press the next track button or the previous track button to navigate menu options. -Press the menu / select button to select a menu option. -Press the play / pause button to return to a previous menu. Volume Control -To increase the volume, press the volume button and the volume icon will light up. Next press the next track button to increase volume and the previous track button to decrease volume. -When the desired volume level is reached, press the volume button again. 11 Uploading Files to the Player -This player can have files uploaded via drag and drop / copy and paste, or by using Window’s Media Player. Window’s Media Player Method -Open Windows Media Player and connect the player to a working USB port. Windows Media player will display a setup screen asking for a name for the MP3 player. 12 Uploading Files to the Player Window’s Media Player Method -Once the MP3 player has been named, select Finish, and Windows Media Player will open to the Sync tab. 13 Uploading Files to the Player Window’s Media Player Method -Drag music to the sync list (on the right of the screen) from the list on the left. Once all desired music you has been added to the player, press Sync, and Window Media Player will load the songs to the player. 14 Uploading Files to the Player Window’s Media Player Method -Once all the songs added are synced to the unit, and Windows Media Player says that is safe to disconnect the player, disconnect the device. Note: 1. To use this feature, Windows Media Player 10 or later must be used. 2. This player does not support DRM encrypted audio or video files such as those downloaded from the Windows Media Player "Overdrive" download service. 15 Uploading Files to the Player Drag and Drop / Copy and Paste Method -Go to “My computer”, and a new removable disk drive with a letter in parenthesis will appear. Disk drive names vary from computer to computer. 16 Uploading Files to the Player Drag and Drop / Copy and Paste Method -Double click, or right click then select open to access the player’s internal memory. -Without closing the removable drive already selected, locate and open where music is stored on the computer (often located in My Music). -If music can not be easily located, click “Start”, select “Search”, select “Pictures, music or video”, then search for *.MP3, *.WMA. -Locate the desired file or folder, and either drag and drop the file or folder, or copy and paste the file or folder to the player’s removable internal memory. 17 Operation Music Mode -By default, when the player is turned on, it will start in music mode -When audio files are playing, these options are available; volume control, next / previous track, next / previous 10 tracks, fast forward / rewind, play / pause. -Volume control –see page 11. -Press the next track button to select the next track and press the previous track key to select the previous track. -Press and hold the next track button while an audio track is paused to skip 10 tracks, or press and hold the previous track button while an audio track is playing go back previous 10 tracks. -Press and hold the next track button while an audio track is playing to fast forward, or press and hold the previous track button while an audio track is playing to rewind. -Press the play / pause button to pause or play an audio track while it is playing. 18 Operation Menu Mode -Use the menu to adjust settings and find information about the player. -Press the menu / select key while in music mode to access the menu. -When the menu is selected, these options are available; Music, About, Folder, Settings. -Select music to return to the music mode when browsing the menu. -Select about to receive information about the player. -Select folder to view all audio files stored on the player located within or without folders. Press the menu / select key on audio files to begin playback. -Note: It is recommended (but not necessary) that audio files are placed within named folders, and then that these folders are moved from a PC to the player. 19 Operation Menu Settings -When settings is selected, these options are available; EQ Set, Play Mode, LCD Set Language, Auto off. -Select auto off to choose how long the player remains on before shutting automatically off -Select language to choose different languages available for the player. Menu Settings - LCD Set -Select LCD set to choose power saving options -When LCD set is selected, these options are available: Backlight, Contrast -Select backlight to set how long before the player’s screen darkens when not in use -Select contrast to set how bright the screen’s backlight is. 20 Operation Menu Settings - Play Mode -Select play mode to select different playback options while in music mode. -When play mode is selected, these options are available: Normal, Repeat One, Repeat All, Random, Repeat Folder -Select normal to have all audio files located within one folder or all song located outside folders play, after which the player will switch to stop mode and playback will cease until the play / pause button is pressed. -Select repeat one to constantly replay the same audio file. -Select repeat all to have all audio files located within or without folders play one after the other without the player ever going to stop mode. -Select random to play random tracks within a selected folder or among audio tracks outside a folder. -Select repeat folder to have all audio files located within a folder play over and over again without the player ever going to stop mode. 21 Contact Us If you notice any mistakes or omissions that you would like to tell us about, please feel free to contact our technical support department at [email protected]. 22