1
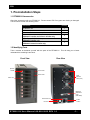
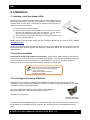
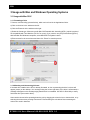
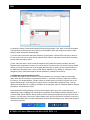
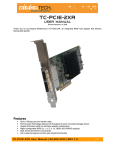
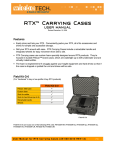
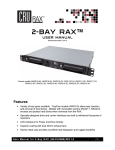
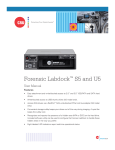
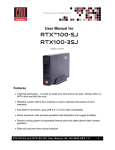
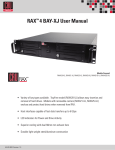
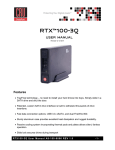
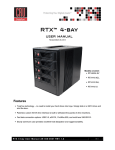
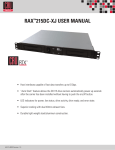
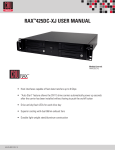
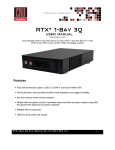
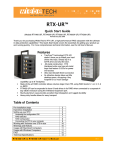
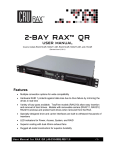
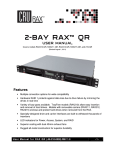
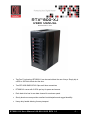
RTX™800-XJ USER MANUAL Revised October 31, 2012 • TrayFree™ technology! RTX800-XJ can be used without the use of trays. Simply slip in a SAS or SATA drive and shut the door. • Two SFF-8088 SAS/SATA 6 Gbps multi-lane connections • RTX800-XJ comes with 2 LEDs per bay for power and access. • Each hard drive has its own data channel for maximum speed. • Sturdy aluminum case provides excellent heat dissipation and rugged durability • Heavy-duty handle allowing for easy transport R T X 8 0 0 - X J U s e r M a n u a l A9 - 8 0 0 - 0 0 0 2 R E V 1 . 0 -1- CRU Table of Contents 1. Pre-Installation Steps 3 1.1 RTX800-XJ Accessories 1.2 Identifying Parts 3 3 2. Installation 4 2.1 Installing a Host Bus Adapter (HBA) 2.2 Installing Hard Drives 2.3 Connecting and Powering 4 4 4 3. Usage with Mac and Windows Operating Systems 5 3.1 Usage with Macintosh Computers 5 3.1.1 Formatting a drive 3.1.2 Mounting and unmounting volumes 3.1.3 Creating a boot drive 5 5 6 3.2 Usage with Windows Operating System 6 3.2.1 Formatting a drive 3.2.2 Mounting and unmounting volumes 4. Frequently Asked Questions (FAQ) 5. Technical Specifications R T X 8 0 0 - X J U s e r M a n u a l A9 - 8 0 0 - 0 0 0 2 R E V 1 . 0 6 7 8 10 -2- CRU 1. Pre-Installation Steps 1.1 RTX800-XJ Accessories Check the accessories with your RTX800-XJ. Please contact CRU if any parts are missing or damaged. The box should contain the following items: Accessories RTX800-XJ unit Power cord Quick Start Guide and warranty info Multi-lane SAS/SATA cable (SFF-8088) RTX800-XJ bundles and forensic bundles only ATTO ExpressSAS R680 Adapter RTX800-XJ bundles only RedPort SAS 6G card RTX800-XJ forensic bundles only Quantity 1 1 1 2 1 1 1.2 Identifying Parts Take a moment to familiarize yourself with the parts of the RTX800-XJ. This will help you to better understand the remaining instructions. Front View Ejection Handle Rear View Power LED Access LED Dual Exhaust Fans (8cm) Slide Lock Multi-lane SAS/SATA Ports (SFF-8088) PSU Power Port PSU Fan R T X 8 0 0 - X J U s e r M a n u a l A9 - 8 0 0 - 0 0 0 2 R E V 1 . 0 Power Switch -3- CRU 2. Installation 2.1 Installing a Host Bus Adapter (HBA) (Optional) Install a host bus adapter (HBA) with multi-lane SAS/SATA ports into an empty expansion slot inside your computer. The following general steps will work for most cards. Instructions for individual cards may vary, so consult your card’s user manual. a) Power down the computer system. b) Insert the PCI card into an available PCI slot. Do not force it, but it will take firm pressure to fully seat the interface. It may help to gently rock the card back and forth as you apply pressure. c) Once the card is fully seated in the slot, secure it in place with a screw. d) Turn the computer back on. NOTE: Drivers for the R680 that comes with the RTX800-XJ Bundle can be found at ATTO’s website: www.attotech.com. Drivers for the RedPort SAS 6G card are also found at the ATTO website. Use the drivers for the ATTO ExpressSAS H644. RedPort SAS 6G was designed in partnership with ATTO, and is based on ATTO’s H644 hardware. 2.2 Hard Drive Installation Install a SATA (Serial-ATA) hard drive into each bay. Simply pull the ejection handle to open the bay door, slide in your SAS or SATA drive, and shut the door behind it. The drive is inserted with the label up and the connection on the drive inserted first. With RTX800-XJ, you can lock the bay for additional security, but make sure to unlock it before pulling on the ejection handle again. NOTE: If any of the drives are inaccessible after powering on the unit, try the following steps: 1. Turn off the power. 2. Remove the drive(s) in question. 3. Reinsert the drive(s). 2.3 Connecting and Powering RTX800-XJ RTX800-XJ has two multi-lane SAS/SATA (SFF-8088) connections on the rear of the unit. These connections can go to any host bus adapter so long as the proper converter cable is attached. (RTX800XJ Bundle includes the appropriate cables.) Plug in the SAS/SATA cable from your computer to the RTX800-XJ. Plug in the power cord. With hard drives in the unit, turn it on. RTX800-XJ is ready to use! Multi-lane SAS/SATA connection (SFF-8088) If the hard drives are already formatted, RTX can be used right away. If the hard drives are brand new, or the formats are not compatible with your computer, the drives will need to be formatted before being used. R T X 8 0 0 - X J U s e r M a n u a l A9 - 8 0 0 - 0 0 0 2 R E V 1 . 0 -4- CRU 3 Usage with Mac and Windows Operating Systems 3.1 Usage with Mac OS X 3.1.1 Formatting a Drive To format, use Disk Utility (pictured below), which can be found in the Applications folder. a) Click on the drive in the window to the left. b) Click the Erase tab in the window to the right. c) Select the format type. Most users prefer Mac OS Extended with Journaling (HFS+), which is required for compatibility with Time Machine (OS 10.5 or newer). If you need to use your [Product Brand] [Model] with both Mac and Windows computers, select MS-DOS File System instead. d) Enter a name for the new volume and then click “Erase” to start the process. 3.1.2 Mounting and Unmounting Volumes If the hard drive installed in the RTX is already formatted, an icon representing the drive’s volume will appear (mount) on the desktop. You can begin using the volume right away. If the drive is unformatted, a message will appear on the desktop saying that the disk is unreadable. Use OS X’s Disk Utility to easily format the drive (see section above). Unmount the volume before powering down the unit by dragging the volume’s icon to the trash bin, or by selecting the volume then pressing Command-E. Disconnecting the unit without first unmounting the volume can result in data loss. R T X 8 0 0 - X J U s e r M a n u a l A9 - 8 0 0 - 0 0 0 2 R E V 1 . 0 -5- CRU 3.1.3 Creating a Boot Drive To activate this feature, you must first install OS X on the hard drive in your carrier. The easiest way to do this is to clone an existing system drive using a utility such as Carbon Copy Cloner or Super Duper. Next, go to System Preferences Startup Disk. A window will list the available bootable volumes. Select the volume from which you wish to boot. Another method is to hold down the Option key during boot up. A screen should appear that allows you to select the volume you wish to use. This is useful if you are only sporadically booting from the hard drive. 3.2 Usage with Windows Operating Systems 3.2.1 Formatting a Drive When you first mount a drive to a Windows operating system, a pop-up window will ask you if you would like to format it. Click “Format Disk” and skip to Step F. If the prompt does not pop up, use the Disk Management utility by following these steps: a) Right-click on the My Computer icon on the desktop (Windows XP) or the Computer button in the Start Menu (Windows Vista, 7, Server 2008, Server 2008 R2, Server 2012), then select Manage. For Windows 8, select your Desktop, then open Windows Explorer from the toolbar. Right-click on “Computer” in the left-hand navigation pane and select Manage. The Computer Management window will open. b) In the left pane of this window, left-click on Disk Management (labeled ‘B’ in the picture below). c) The drive should appear in the list of Disks in the lower middle/right pane. You may need to scroll down to see it. If the drive is already formatted, you can identify it easily by its volume name. If the Device Properties Box (labeled ‘C’ in the picture below) says “Not Initialized”, you’ll need to initialize the disk before formatting it. Right-click on the Device Properties Box and select Initialize Disk. If you are prompted to select a partition type, select MBR for volumes 2TB or smaller, or GPT for volumes larger than 2TB. Note: Windows XP does not support GPT for volumes larger than 2TB. d) To format the volume, right-click the Drive Properties Box (labeled ‘D’ in the picture below) and select “New Partition…” (Windows XP) or “New Simple Volume...” (Windows Vista, 7, 8, Server 2008, Server 2008 R2, Server 2012). R T X 8 0 0 - X J U s e r M a n u a l A9 - 8 0 0 - 0 0 0 2 R E V 1 . 0 -6- CRU e) Unless you wish to customize the settings in these dialog prompts, Click “Next” on the Select Partition Type (shows up in Windows XP only), Specify Volume/Partition Size, and Assign Drive Letter or Path dialog prompts, leaving the default settings. f) You will now see a window that allows selection of a file system. Choose NTFS and enter a name for the new volume. Be sure to check the box labeled “Quick Format”, which will ensure that the formatting process takes less than a minute. g) Click “Next” and then “Finish” to start the format process. When the format is complete, the Drive Properties Box will update to show the new volume name. The new volume can now be found by doubleclicking on the My Computer icon on the desktop (Windows XP), by clicking on the Computer button in the Start Menu (Windows Vista, 7, Server 2008, Server 2008 R2), or by clicking on “Computer” in the navigation pane of a Windows Explorer window (Windows 8, Windows Server 2012). 3.2.2 Mounting and Unmounting Volumes If the hard drive inside of the RTX carrier is already formatted, you can begin using the volume right away. When the RTX is properly connected and turned on, a window may open to allow you access to the volume. If no window appears, find the volume by double-clicking on the My Computer icon on the desktop (Windows XP), by clicking the Computer button in the Start Menu (Windows Vista, 7, Server 2008, Server 2008 R2), or by clicking on Computer in the navigation pane of a Windows Explorer window (Windows 8, Windows Server 2012). Unmount the RTX before powering it down by left-clicking the green arrow icon on the task bar (in Windows XP) or the USB plug icon with the green checkmark on the Desktop task bar (Windows Vista, 7, 8, Server 2008, Server 2008 R2, Server 2012), and then selecting the proper device from the menu that pops up. You may have to click on the “Show Hidden Icons” arrow on the task bar to find the correct icon. Windows will indicate when it is safe to disconnect the RTX. Disconnecting the unit without first ejecting it can result in data loss. R T X 8 0 0 - X J U s e r M a n u a l A9 - 8 0 0 - 0 0 0 2 R E V 1 . 0 -7- CRU 4. Frequently Asked Questions (FAQ) Q: How do I set up the RAID on my product? A: RTX800-XJ by itself does not have RAID capability. However, coupled with a ATTO ExpressSAS R680 Adapter that comes with the RTX800-XJ bundle, it is capable of creating RAIDs. Please see the ATTO ExpressSAS R680 Adapter manual at www.attotech.com for instructions on setting up such RAIDs. Q: If one of the hard drives fails, how will I know? How do I replace it? A: The ATTO Configuration Tool is where you’d find hard drive failure alerts. It will show if there are any failed drives or degraded RAID states. Q: What type of cable plugs into RTX800-XJ? A: RTX800-XJ’s connection type is SFF-8088. RTX800-XJ bundles ship with two SFF-8088 to SFF-8088 cables. Q: My RTX800-XJ does not mount when I turn it on, is something wrong? A: There are a few trouble-shooting steps that can be taken to fix the problem. First, check to make sure that drivers have been installed for the host bus adapter (HBA). If you are using a new HBA chances are that the newest drivers haven’t been installed on your system yet. Check the HBA vendor website for the latest drivers and install those. Another reason the drives won’t mount is that they may not be formatted. If you bought drives from WiebeTech with your RTX800-XJ then we’ve formatted the drives for you. If you purchased drives separately then you’ll need to format the drives. Section 3 of this manual will give you basic instructions for formatting hard drives. The final check should be for hardware connections. Be sure that the HBA is seated firmly in place. Also check to make sure the data connections are plugged in correctly and firmly. If you are still running into trouble then contact Technical Support for further trouble shooting. Q: What is RAID? What are the benefits of using it? A: The two most common types of RAID are Mirrored (RAID 1) and Striped (RAID 0). Mirrored is the most secure but not as fast as a Striped RAID. Striped RAIDs are faster, but not secure. Here's why: A Striped RAID splits the incoming data into two or more paths, depending on how many drives are used in the RAID. Each path goes to a different drive. This divides the workflow so the incoming data is written faster. Each drive writes a fraction of the total data and stores it. There is no redundancy in the stored data. If one drive should fail, all information across the Striped RAID (0) is lost. The Mirrored RAID (1) is slower because it writes the same data to two or more drives. If one drive should fail, a mirror image of the data is still stored on the remaining drive(s). The more drives that are used, the safer the data becomes. Another RAID scheme is RAID 5. Raid 5 is a Striped RAID with redundancy. In other words, the drives are striped together in a single volume but portions of the data are evenly spread out over segments of the remaining drives. If one drive should fail, the remaining drives contain all of the data that was stored on the failed drive. There are other RAID schemes that may be used. This is not meant to be a tutorial on RAIDs, only to give a brief description of the advantages of the different types mentioned. R T X 8 0 0 - X J U s e r M a n u a l A9 - 8 0 0 - 0 0 0 2 R E V 1 . 0 -8- CRU Q: Why is my hard drive experiencing data corruption? A: Many things can cause data corruption on hard drives, whether they are inside your computer or inside an external storage product. Malicious software, OS bugs, failure to properly disconnect external devices, or no reason at all. Data corruption or loss is therefore not covered by warranty (this is the case with all rational companies in the storage industry). The first thing to try is restarting both the computer and the external device. If the data is still corrupted, try running built-in OS utilities (such as Mac OS X's Disk Utility First Aid) on the hard drive. For best results, boot your computer with a Mac OS X Installation CD, and launch Disk Utility from the CD. When you reach the Mac OS Installation program, you can run Disk Utility from one of the menus at the top of the screen. From Disk Utility, you can run "Verify Disk" and "Repair Disk" to find and fix any errors that may be present in your Mac OS installation. If the OS utility doesn't help, you may need Data Rescue. This is a great solution for recovering lost data from a hard drive which has suffered data loss or corruption. If there is a true hardware failure of your hard drive that prevents it from communicating with your computer, there is no software solution in existence that can fix this problem. However, since we cannot tell you with any certainty whether or not you are experiencing hardware failure in your particular hard drive, we would encourage you to download a free demo version of ProSoft’s Data Rescue from www.prosofteng.com. It is limited, in that it only allows you to recover one file per session, but it will tell you if it even sees any files. Q: Can I access drives formatted NTFS on my Mac? A: Mac OS 10.3 or higher allows drives formatted in NTFS to mount and be seen as read-only volumes. Data may not be written to the drives, but it may be copied from the drives. Q: What brands/models of drives work best with the ATTO RAID host card? A: ATTO Technologies, the manufacturer of this RAID host card, recommends using enterprise class SATA or SAS drives with this card. Such drives generally have higher tolerance for command timeouts and retries, which improves RAID performance and compatibility. Desktop class drives are not recommended, but some brands/models have been tested with this card with no problems found: • Hitachi Deskstar drives • Western Digital 2TB Sparta+ and Mantis+ drives (though non-"+" models may need to be configured in 1.5GHz mode via a small plastic jumper on the rear of the drive. This improves compatibility and does not affect throughput.) Seagate 7200.11 AS series drives should not be used. (Performance varies depending on the drive’s firmware revision – they work best with firmware version sd1a or newer – but ATTO does not recommend using these drives even with the firmware update). R T X 8 0 0 - X J U s e r M a n u a l A9 - 8 0 0 - 0 0 0 2 R E V 1 . 0 -9- CRU 5. Technical Specifications Product name/code: RTX800-XJ Host Interfaces: Multi-lane SAS/SATA (SFF-8088) Drive Types Supported: 3.5-inch SATA or SAS hard drives TrayFree Technology: Yes Power LED: Yes Access LED: Yes Operating System Requirements: • Windows 8, 7, Vista, or XP • Windows Server 2012, 2008, and 2003 product families • Mac OS X 10.4.x or higher Operating Temperature: Linux distributions that support the connection type used 50 – 85° Fahrenheit (10 – 30° Celsius) Operating Humidity: 5% to 95%, noncondensing Power Switch: 2 position: On / Off Input: 100-240VAC Output: 350 Watts Dual 8cm Ball Bearing Fans Power Supply: Cooling Fan: External Material: Shipping Weights: Dimensions: Support: Aluminum alloy case 24 lbs without drives, 36 lbs with drives (units only) 27 lbs without drives, 39 lbs with drives (bundles) 270mm x 180mm x 315mm Technical Support is standing by and ready to help. Contact Technical Support through cru-dataport.com/support or call (800) 260-9800 or (360) 816-1800 © 2012 CRU Acquisitions Group, LLC. All rights reserved. RTX and TrayFree are trademarks of CRU Acquisitions Group, LLC. Other marks are the property of their respective owners. Product Warranty CRU-DataPort (CRU) warrants this product to be free of significant defects in material and workmanship for a period of 3 years from the original date of purchase. CRU’s warranty is nontransferable and is limited to the original purchaser. Limitation of Liability The warranties set forth in this agreement replace all other warranties. CRU expressly disclaims all other warranties, including but not limited to, the implied warranties of merchantability and fitness for a particular purpose and non-infringement of third-party rights with respect to the documentation and hardware. No CRU dealer, agent, or employee is authorized to make any modification, extension, or addition to this warranty. In no event will CRU or its suppliers be liable for any costs of procurement of substitute products or services, lost profits, loss of information or data, computer malfunction, or any other special, indirect, consequential, or incidental damages arising in any way out of the sale of, use of, or inability to use any CRU product or service, even if CRU has been advised of the possibility of such damages. In no case shall CRU’s liability exceed the actual money paid for the products at issue. CRU reserves the right to make modifications and additions to this product without notice or taking on additional liability. FCC Compliance Statement: “This device complies with Part 15 of the FCC rules. Operation is subject to the following two conditions: (1) This device may not cause harmful interference, and (2) this device must accept any interference received, including interference that may cause undesired operation.” This equipment has been tested and found to comply with the limits for a Class A digital device, pursuant to Part 15 of the FCC Rules. These limits are designed to provide reasonable protection against harmful interference when the equipment is operated in a commercial environment. This equipment generates, uses, and can radiate radio frequency energy and, if not installed and used in accordance with the instruction manual, may cause harmful interference to radio communications. Operation of this equipment in a residential area is likely to cause harmful interference in which case the user will be required to correct the interference at this own expense. In the event that you experience Radio Frequency Interference, you should take the following steps to resolve the problem: 1) Ensure that the case of your attached drive is grounded. 2) Use a data cable with RFI reducing ferrites on each end. Tested to comply 3) Use a power supply with an RFI reducing ferrite approximately 5 inches from the DC plug. with FCC standards 4) Reorient or relocate the receiving antenna. FOR OFFICE OR COMMERCIAL USE R T X 8 0 0 - X J U s e r M a n u a l A9 - 8 0 0 - 0 0 0 2 R E V 1 . 0 - 10 -