1
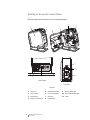
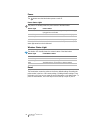
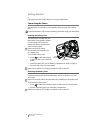
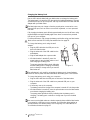
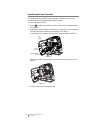
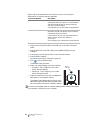
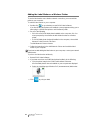
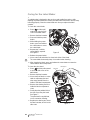
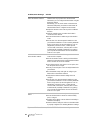
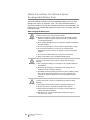
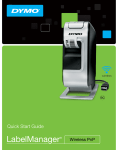
LabelManager Wireless PnP ® USER GUIDE dymo.com Copyright © 2013 Newell Rubbermaid Europe LLC. All rights reserved. No part of this document or the software may be reproduced or transmitted in any form or by any means or translated into another language without the prior written consent of Newell Rubbermaid Europe LLC. Trademarks DYMO, DYMO Label, and LabelManager are registered marks in the US and other countries. All other trademarks are the property of their respective holders. Contents 4 4 About Your New Label Maker Registering Your Label Maker 5 6 6 6 6 Getting to Know the Label Maker Power Power Status Light Wireless Status Light Reset 7 7 7 7 8 9 Getting Started Connecting the Power Inserting the Battery Pack Removing the Battery Pack Charging the Battery Pack Inserting the Label Cassette 10 10 10 10 11 11 11 Using Your Label Maker as a Local Printer Connecting the Label Maker to Your Computer Starting the Built-In Software Disconnecting the Label Maker from Your Computer Printing Labels with the Built-In Software Capturing and Inserting an Image Using the Auto-Cut Feature 12 12 14 14 15 16 17 Using Your Label Maker as a Network Printer Configuring Your Label Maker on Your Wireless Network Configuring Your Label Maker Using Standard Configuring Your Label Maker Using Advanced Viewing Wireless Settings Downloading and Installing DYMO Label Software Adding the Label Maker as a Wireless Printer 18 About DYMO Label Software 18 Label Maker Status 19 Caring for the Label Maker 20 20 21 Troubleshooting General Wireless 23 Documentation Feedback 23 Environmental Information 24 Safety Precautions for Lithium-Polymer Rechargeable Battery Pack About Your New Label Maker With the DYMO® LabelManager Wireless PnP electronic label maker, you can create a wide variety of high-quality, self-adhesive labels. You can choose to print your labels in many different fonts, font sizes, and styles. The label maker uses DYMO D1 label cassettes in widths of 6 mm (1/4”), 9 mm (3/8”), 12 mm (1/2”), 19 mm (3/4”), or 24 mm (1”). Labels are available in a wide range of colors. Visit www.dymo.com for information on obtaining labels and accessories for your label maker. You can use your label maker either as a local printer attached to your computer with a USB cable or as a network printer on your wireless network. See Using Your Label Maker as a Local Printer on page 10 and Using Your Label Maker as a Network Printer on page 12 for more information. Registering Your Label Maker Visit www.dymo.com/register to register your label maker online. During the registration process, you will need the serial number, which is located above the label cassette inside the label maker. See Figure 1 on page 5. Register your label maker to receive these benefits: An additional one year of warranty Email notification of free software upgrades Special offers and new product announcements 4 LabelManager® Wireless PnP User Guide Getting to Know the Label Maker Become familiar with the features shown in the following figure. 5 1 6 4 2 3 9 10 7 11 8 Back View Top View Figure 1 5 1 Side cover 5 Serial Number label 9 2 Label exit slot 6 Label compartment 10 Power button/status light 3 Cleaning tool 7 USB port 11 Cutter 4 Battery compartment 8 Reset button LabelManager® Wireless PnP User Guide Wireless status light Power The button turns the label maker power on and off. Power Status Light The power LED visually shows the power status of the label maker. Status Light Power Status Off The label maker is off; the battery pack may still be charging if plugged into a wall outlet Slow Blinking The label maker is on and the battery pack is charging Fast Blinking The label maker is on and there is an error Solid The label maker is on and the battery pack is not charging When the label maker is turned on but not connected to a power source, the status light remains on but is dimmed. Wireless Status Light The wireless LED visually shows the network status of the label maker. Status Light Label Maker Status Off The label maker is not connected to a wireless network Slow Blinking The label maker is connecting to a wireless network Fast Blinking The label maker is registering with a wireless network Solid The label maker is connected to a wireless network Reset The Reset button resets the printer to the factory default settings. Resetting the printer results in the loss of all current settings, including wireless settings. Press this button only if you want to erase all current information on the label maker. To press the Reset button, use a thin object such as the tip of a pen or pencil. 6 LabelManager® Wireless PnP User Guide Getting Started Follow the instructions in this section to set up your label maker. Connecting the Power The label maker is powered by a rechargeable, lithium-polymer (LiPo) battery pack. For best performance, fully charge the battery pack before using your label maker. Inserting the Battery Pack The battery pack included with your label maker comes partially charged. For best results, fully charge the battery pack before using the label maker for the first time. Make sure the USB cable is disconnected before handling the LiPo battery pack. To insert the battery pack 1 Press and then pull outward to open the side cover of the label maker. Press and pull Figure 2 2 Insert the battery pack into the battery compartment as shown in Figure 2. 3 Close the side cover of the label maker. Make sure to read the LiPo Safety Precautions found on page 24. Removing the Battery Pack Remove the battery pack when the label maker will not be used for more than seven days. Make sure the USB cable is disconnected before handling the LiPo battery pack. To remove the battery pack 1 Press and then pull outward to open the side cover of the label maker. 2 Remove the battery pack from the battery compartment. Make sure to read the LiPo Safety Precautions found on page 24. 7 LabelManager® Wireless PnP User Guide Charging the Battery Pack Use the USB cable included with your label maker to recharge the battery pack. The battery pack is charged by USB through the included wall adapter or through a powered USB port on your computer. Use only the included USB cable and wall adapter with your label maker. The label maker may not charge or function properly when connected to a nonpowered USB port, such as those on some Mac keyboards, or a non-powered USB hub. Fully charging the battery pack will take approximately two and a half hours using the wall adapter and approximately eight hours when connected to a powered USB port on your computer. For best performance, fully charge the battery pack before using your label maker. Make sure to read the LiPo Safety Precautions found on page 24. To charge the battery pack using the wall adapter 2 1 Plug the USB cable into the USB port on the back of the label maker. 2 Plug the other end of the USB cable into the wall adapter. 3 Plug the wall adapter into a power outlet. 1 4 If the label maker is turned off, press the power button to turn the label maker on and start charging the battery pack. The power status light blinks slowly, indicating that the battery pack is charging. The battery pack continues to charge even if you turn the label maker off. Figure 3 The wall adapter is only used for recharging the battery pack; the wall adapter cannot be used to power the label maker when the battery pack is not inserted. To charge the battery pack using your computer 1 Plug the USB cable into the USB port on the back of the label maker. 2 Plug the other end of the USB cable into a powered USB port on your computer. 3 If necessary, turn on the computer. The battery pack will not charge if the computer is turned off or in sleep mode. 4 If the label maker is turned off, press the power button to turn the label maker on and start charging the battery pack. The power status light blinks slowly, indicating that the battery pack is charging. The battery pack continues to charge even if you turn the label maker off. You cannot use the label maker as a wireless network printer while the label maker is connected to a USB port on your computer. For information about setting up your label maker as a wireless printer, see Configuring Your Label Maker on Your Wireless Network on page 12. 8 LabelManager® Wireless PnP User Guide Inserting the Label Cassette Your label maker uses DYMO D1 label cassettes. Visit www.dymo.com for information about purchasing additional label cassettes. To insert the label cassette 1 Press and then pull outward to open the side cover of the label maker. See Figure 4. 2 Make sure the tape and ribbon are taut across the mouth of the cassette and that the tape passes between the label guides. See Figure 4. If necessary, turn the ribbon rewind spool clockwise to tighten the ribbon. Label guides Press and pull Ribbon rewind spool Figure 4 3 Insert the cassette and press firmly until the cassette clicks into place. See Figure 5. Figure 5 4 Close the side cover of the label maker. 9 LabelManager® Wireless PnP User Guide Using Your Label Maker as a Local Printer You can use your label maker as a local printer connected to a powered USB port on your computer. You do not need to install additional software or drivers to use the label maker as a local printer. You cannot use the label maker as a wireless network printer while the label maker is connected to a USB port on your computer. Connecting the Label Maker to Your Computer The label maker connects to your computer using the USB connection located on the back of the label maker. To connect the label maker to your computer 1 Plug the USB cable into the USB port on the back of the label maker. 2 Plug the other end of the USB cable into a powered USB port on your computer. The label maker must be connected to a powered USB port. The label maker may not charge or function properly when connected to a non-powered USB port, such as those on some Mac keyboards, or a non-powered USB hub. Starting the Built-In Software The built-in software resides on the label maker; no installation is required. To start the software for Windows® 1 If necessary, press the power button to turn on the label maker. Depending on Windows AutoRun or AutoPlay settings, the software may start automatically. 2 If the software does not start automatically, do one of the following: • If the AutoRun or AutoPlay dialog box appears, follow the on-screen instructions to start the DYMO Label Light software. • If the AutoRun or AutoPlay dialog box does not appear, navigate to DYMO Label My ComputerDYMO W-PNP, and then click Light.exe. To start the software for Mac OS® 1 If necessary, press the power button to turn on the label maker. The DYMO Wireless PnP volume appears on your desktop. 2 Double-click DYMO W-PNP to open the volume. 3 Double-click to start the software. Disconnecting the Label Maker from Your Computer To disconnect the label maker from your computer 1 (Mac Only) Drag the DYMO W-PNP volume to the trash. 2 Press the power button to turn off the label maker. 3 Unplug the USB cable from your computer. 10 LabelManager® Wireless PnP User Guide Printing Labels with the Built-In Software The following figure shows some of the features available in the built-in software. Capture an area of the screen and insert on your label. Choose to print a horizontal or vertical label. Add a border around the label. Change the units of measure or language settings. Start advanced DYMO Label v.8 software. Configure the label maker for wireless access. Create a new label. Rotate images 90 degrees. Insert text you’ve copied to the Clipboard. Crop an image added to the label. Select the font, size, and style for your label text. Match the label width to the label cassette in the label maker. Zoom the label. View the status of the label maker. Print a label. Choose a fixed length for the label or make the label resize automatically to fit the text. Choose to automatically cut each label as printed or to only cut between print jobs. To print a label 1 Click once on the label in the Edit area and type some text. 2 Click to print the label. Capturing and Inserting an Image You can quickly capture an image from your desktop and add it to your label. To capture and insert an image from your desktop 1 Click on the toolbar. 2 Drag the curser to draw a selection box around the area to capture. The selected area is inserted into your label. Using the Auto-Cut Feature When printing multiple labels, the label maker automatically cuts each label before printing the next label. You can turn this feature off, so that multiple labels print continuously and a label separator cut mark prints between each label. The label maker always automatically cuts after the last label is printed. To turn off the auto-cut feature Clear the Cut each label as printed check box. 11 LabelManager® Wireless PnP User Guide Using Your Label Maker as a Network Printer You can use your label maker as a network printer on your wireless network. You must have a network with a wireless router or wireless access point to use your label maker as a wireless network printer. Ad-hoc wireless communication (device to device) is not supported. To use your label maker as a wireless printer on your network, you must do the following: 1 Configure the printer using the Wireless Setup tool in the built-in software. 2 Disconnect the printer from your computer and plug the printer into a wall outlet using the wall adapter. 3 Download and install DYMO Label v.8.5 or later on each computer that will need to print to the printer. 4 Add the printer to each computer as a wireless printer. 5 Design and print labels using DYMO Label software. For best performance, place the printer as close to your router or access point as possible with as few obstructions as possible. Large objects and walls between the printer and the router, as well as interference from other electronic devices, can affect the performance of the printer. Configuring Your Label Maker on Your Wireless Network Before configuring the label maker, you must determine the connection method to use to connect to your wireless network. The label maker stores only one wireless network configuration at a time. You must reconfigure the label printer on the wireless network each time the printer is moved from one network to another. When configuring your label maker on your wireless network, you may need the MAC address or Host Name. You can find this information on the sticker located on the bottom of the label maker. The following authentication and encryption types are supported for configuring the printer on a wireless network. 12 Authentication Type Encryption Types Open None WEP 64 WEP 128 Shared WEP 64 WEP 128 WPA Personal TKIP AES WPA2 Personal TKIP AES WPA Enterprise PEAP/MS-CHAPV2 WPA2 Enterprise PEAP/MS-CHAPV2 LabelManager® Wireless PnP User Guide Refer to the documentation that came with your router or access point to determine the connection methods supported. Connection Method Description Standard Use this method if you want the Wireless Setup tool to automatically detect your network. Your network will be detected automatically and you will be prompted to enter your security information. See Configuring Your Label Maker Using Standard. Advanced Use this method if you want to enter all network information manually. The Wireless Setup tool will not automatically detect your network. Use this method only if you are very familiar with your wireless network, or if the other method is unsuccessful. See Configuring Your Label Maker Using Advanced. To configure the label maker on your wireless network 1 Plug one end of the USB cable into the USB port on the back of the label maker. 2 Plug the other end of the USB cable into an available USB port on your computer. 3 If necessary, press the power button to turn on the label maker. 4 Start the built-in software. See Starting the Built-In Software on page 10. 5 Click on the software toolbar. The Wireless Setup tool starts. 6 Select one of the following connection methods: • Standard - See Configuring Your Label Maker Using Standard. Wireless status light • Advanced - See Configuring Your Label Maker Using Advanced. 7 Follow the instructions in the tool to configure the label maker on your wireless network. The wireless status light located on the top of the label maker turns solid blue when the label maker has successfully connected to a wireless network. You cannot use the label maker as a wireless network printer while the label maker is connected to a USB port on your computer. 13 LabelManager® Wireless PnP User Guide Configuring Your Label Maker Using Standard When you configure your printer using the Standard method, the Wireless Setup tool automatically detects your network and you are prompted to enter your security information. To configure the label maker using Standard 1 From the Wireless Setup tool, click Standard. A list of all detected networks is displayed. This may take up to two minutes. 2 Do one of the following: • If your network appears in the list, select your network and click Next. • If your network does not appear in the list, select Network is not listed above, click Next, and then enter the name of your network in the Network Name (SSID) field. 3 Enter the required security information in the available fields, and then click Next. Depending on the type of security used on your wireless network, you may need a certificate file, passphrase, or other information. Contact your network administrator if you need help locating this information. 4 When the wireless setup is complete, click one of the following: • Yes, download and install now to close the tool and download and install DYMO Label software now. • No, close to close the tool and install DYMO Label software at a later time. You cannot use the label maker as a wireless network printer while the label maker is connected to a USB port on your computer. 5 Disconnect the label maker from your computer. See Disconnecting the Label Maker from Your Computer on page 7. 6 Place the label maker in an easily accessible location. 7 Plug the USB cable into the wall adapter and then plug the wall adapter into a wall outlet. 8 If necessary, press the power button to turn the printer on. Configuring Your Label Maker Using Advanced Configure your label maker using the Advanced method if you want to enter all network information manually. The Wireless Setup tool will not automatically detect your network. Use this method only if you are very familiar with your wireless network, or if the other method is unsuccessful. To configure the label maker using Advanced 1 From the Wireless Setup tool, click Advanced. 2 Enter the name of your network in the Network Name (SSID) field. 3 Enter the required information in the available fields on the Security tab. Depending on the type of security used on your wireless network, you may need a certificate file, passphrase, or other information. Contact your network administrator if you need help locating this information. 4 Select the IP Address tab and enter the required information in the available fields. 14 LabelManager® Wireless PnP User Guide 5 Click Next. 6 When the wireless setup is complete, click one of the following: • Yes, download and install now to close the tool and download and install DYMO Label software now. • No, close to close the tool and install DYMO Label software at a later time. You cannot use the label maker as a wireless network printer while the label maker is connected to a USB port on your computer. 7 Disconnect the label maker from your computer. See Disconnecting the Label Maker from Your Computer on page 7. 8 Place the label maker in an easily accessible location. 9 Plug the USB cable into the wall adapter and then plug the wall adapter into a wall outlet. 10 If necessary, press the power button to turn the printer on. Viewing Wireless Settings You can view the label maker wireless settings from within the built-in software. To view the wireless settings 1 Plug one end of the USB cable into the USB port on the back of the label maker. 2 Plug the other end of the USB cable into an available USB port on your computer. 3 If necessary, press the power button to turn on the label maker. 4 Start the built-in software. See Starting the Built-In Software on page 10. 5 Click on the software toolbar. The Wireless Setup tool starts. 6 Click Advanced. The current wireless settings for the label maker are displayed. 15 LabelManager® Wireless PnP User Guide Downloading and Installing DYMO Label Software To use your label maker over a wireless network connection, you must install DYMO Label software version 8.5 or later on each computer that needs wireless access to the label maker. To install the software on a Windows® system 1 Download the DYMO Label software version 8.5 or later from the Support section of the DYMO Web site at www.dymo.com. 2 Close all open Microsoft Office applications. 3 Double-click the Installer icon. After a few seconds, the installation screen appears. 4 Click Install and follow the instructions in the installer. When the software installation is complete, you are prompted to connect your printer. 5 Without connecting your printer, click Finish. 6 Double-click on your desktop to start DYMO Label software and add your wireless network printer. See Adding the Label Maker as a Wireless Printer. To install the software on a Mac OS® system 1 Download DYMO Label software version 8.5 or later from the Support section of the DYMO Web site at www.dymo.com. 2 Double-click the Installer icon and follow the on-screen instructions. When the software installation is complete, you are prompted to connect your printer. 3 Without connecting your printer, click Finish. 4 Double-click on your desktop to start DYMO Label software and add your wireless network printer. See Adding the Label Maker as a Wireless Printer. 16 LabelManager® Wireless PnP User Guide Adding the Label Maker as a Wireless Printer To use the label maker over a wireless network connection, you must add the printer to your computer. To add the label maker to your computer 1 Double-click on your desktop to start DYMO Label software. If no other DYMO label printers are installed, a prompt appears asking you to either plug in a DYMO label printer or add a network printer. 2 Do one of the following: • If this is the first DYMO label printer installed on the computer, click Yes when prompted by the software to add the label maker as a wireless printer. • If a DYMO label printer is already installed on the computer, choose Add Network Printer from the File menu. The Add Network Printer tool starts. 3 Follow the instructions in the Add Network Printer tool to add the label maker to your computer. If you have trouble adding the label maker to your computer, contact your network administrator. To print to the label maker wirelessly 1 Restart DYMO Label software. 2 If you have more than one DYMO label printer installed, do the following: a Click the printer image in the DYMO Label software Print area. All of the label printers that are installed on your computer are displayed. b Select the LabelManager Wireless PnP (nnnnnnnnnnnn) label maker. 3 Click 17 to print your label. LabelManager® Wireless PnP User Guide About DYMO Label Software The following figure shows some of the major features available in DYMO Label software. Apply a recently used layout to a label. Capture an area of the screen to insert on your label. Visually choose your label type and apply layouts. Insert text, addresses, images, shapes, lines, barcodes, dates, and counters. Store your favorite addresses or other data in the Address Book; automatically insert the data on your label. Select a label maker to print your labels. View the status of the label maker. Print a label. For complete details on using the software, refer to the online Help or the DYMO Label User Guide. From the Help menu in DYMO Label software, you can view the following: DYMO Label Help DYMO Label User Guide LabelManager Wireless PnP User Guide Label Maker Status The label maker status is displayed in the built-in software or the DYMO Label software window. The following table describes the possible states of the label maker. Label maker is connected and battery pack is charging Label maker is connected and battery pack is not charging Label maker is not connected or is turned off Label maker is connected and there is a problem with the battery pack 18 LabelManager® Wireless PnP User Guide Caring for the Label Maker Your label maker is designed to give you long and trouble-free service, while requiring very little maintenance. Clean your label maker from time to time to keep it working properly. Clean the cutter blade each time you replace the label cassette. To clean the cutter blade 1 Press and then pull outward to open the side cover of the label maker. Cutter blade 2 Remove the label cassette. 3 Press and hold the power button. 4 While holding the power button, press and release the cutter button to move the cutter blade. 5 Repeat step 3 until the cutter blade is exposed. See Figure 6. Figure 6 6 Release the power button. 7 Use a cotton ball and alcohol to clean both sides of the blade. The cutter blade is extremely sharp. Use caution when cleaning. 8 After cleaning the blade, press and release the cutter button to return the cutter blade to the home position. To clean the print head 1 Press and then pull outward to open the side cover of the label maker. Cleaning tool Print head 2 Remove the label cassette. 3 Use a small, soft brush or cotton swab to wipe away dust and other stray particles from the inside of the label compartment. 4 Remove the cleaning tool from inside the label compartment cover. 5 Gently wipe the padded side of the tool across the print head. See Figure 7. The print head is very delicate, so use care when cleaning. 6 Replace the cleaning tool, insert the label cassette, and close the side cover. 19 LabelManager® Wireless PnP User Guide Figure 7 Troubleshooting Review the following sections if you encounter a problem with your label maker. General Review the following possible solutions if you encounter a problem with your label maker. Problem/Error Message Solution Poor print quality Attach the charging adapter to the label maker to recharge the battery pack. See Charging the Battery Pack. Clean the print head. See Caring for the Label Maker. Ensure the label cassette is inserted properly. Replace the label cassette. Poor cutter performance Clean the cutter blade. See Caring for the Label Maker. Label maker error; power LED Ensure the label cassette is inserted properly and not blinks quickly jammed or empty. Ensure the battery pack is inserted properly. Recharge the battery pack. See Charging the Battery Pack. Label maker does not turn on Ensure the battery pack is inserted properly. Ensure the label maker is connected to a powered USB port or working wall outlet. Recharge the battery pack. See Charging the Battery Pack. Battery level is too low to print Recharge the battery pack and reprint the label. See Charging the Battery Pack. Battery is not charging Ensure the label maker is connected to a powered USB port or working wall outlet. See Charging the Battery Pack. If the label maker is connected to a USB port on your computer, make sure the computer is on and not in sleep mode. Battery level is low Recharge the battery pack. See Charging the Battery Pack. Two LabelManager Wireless PnP printers are showing up in DYMO Label software If you connected the LabelManager Wireless PnP printer to your computer using the USB cable AND added the printer as a wireless printer through the Add Network Printer tool, you will see two versions of the printer installed: a USB connected printer and a wireless printer. However, both printers cannot be active at the same time. Make sure you choose the correct printer in DYMO Label software before you print a label. If you need further assistance, visit the DYMO Web site at www.dymo.com. 20 LabelManager® Wireless PnP User Guide Wireless Review the following possible solutions if you encounter a problem using your label maker as a wireless network printer. Problem/Error Message Solution General wireless connection issues Ensure the computer has the most recent driver for the network adapter. An outdated driver is a common cause of wireless issues. Run the Wireless Setup tool to configure the label maker before trying to access the label maker over a wireless connection. Make sure the router or access point is plugged securely into a power outlet and that all the lights are on. Turn off the label maker, press the power button to turn the label maker back on, and then wait several minutes for the label maker to reconnect to the network. Verify that other wireless devices on the network have wireless access. If other devices are unable to connect, there may be a problem with the network. Avoid placing the label maker on top of any electrical equipment, such as a computer, printer, or router. Place the label maker and the router several feet away from sources of interference, such as microwave ovens and cordless phones. Allow several minutes for the label maker to connect to the wireless network. Place the wireless router, computer, and label maker near each other when troubleshooting wireless issues. Wireless LED does not turn on Ensure the label maker is on and is not connected to a USB port on your computer. Wireless functionality is turned off when the label maker is connected to a USB port on your computer. Wireless Setup tool does not accept security credentials Check the router settings to confirm you have selected the correct security type for your network. Ensure you are using the correct key or passphrase for your network. Run the Wireless Setup tool again and ensure you select the correct network. 21 LabelManager® Wireless PnP User Guide Problem/Error Message Solution Wireless Setup tool does not detect the wireless network Ensure the router is set to broadcast the wireless network name. If you prefer not to broadcast this information, you can configure the label maker using the Advanced method. Alternatively, you can set the router to broadcast the information temporarily, and then turn this feature off after the label maker is configured on the network. Adjust the antenna on the router to point in a different direction. Verify the network name on another device that is connected to the network. Ensure the label maker is within range of the wireless router. Ensure there is no electromagnetic interference near your network. Interference can be caused by Bluetooth devices, large motors (as used in appliances such as refrigerators), microwave ovens, cordless phones, concrete walls, metal doors, and many other sources. To eliminate the possibility of interference, try placing your computer and label maker closer to the wireless router or access point. Label maker loses connection Ensure the label maker is within range of the wireless to the wireless network router and the computer. Ensure the wireless router is working and the wireless network is functioning properly. Verify that other wireless devices are able to access the network. Turn off the power to your router or access point, then turn the power back on again. Ensure you are using the correct security information for your network. Run the Wireless Setup tool again to configure your label maker on the wireless network. Verify that the wireless network settings have not changed. Ensure there is no electromagnetic interference near your network. Interference can be caused by Bluetooth devices, large motors (as used in appliances such as refrigerators), microwave ovens, cordless phones, concrete walls, metal doors, and many other sources. To eliminate the possibility of interference, try placing your computer and label maker closer to the wireless router or access point. Unable to print to the label maker Ensure the label cassette is not jammed or empty. Ensure the label maker is turned on and the battery pack is charged. If printing from a laptop, ensure wireless functionality is enabled on the laptop. View the wireless settings to make sure the label maker is properly configured. See Viewing Wireless Settings. If you need further assistance, visit the DYMO Web site at www.dymo.com. 22 LabelManager® Wireless PnP User Guide Documentation Feedback We are constantly working to produce the highest quality documentation for our products. We welcome your feedback. Send us your comments or suggestions about our user guides. Please include the following information with your feedback: Product name, model number, and User Guide page number Brief description of instructions that are inaccurate or unclear, areas where more detail is needed, and so on We also welcome your suggestions about additional topics you would like to see covered in the documentation. Send email messages to: [email protected] Please keep in mind that this email address is only for documentation feedback. If you have a technical question, please contact Customer Support. Environmental Information The equipment that you have bought requires the extraction and use of natural resources for its production. It may contain substances that are hazardous to health and the environment. In order to avoid the dissemination of those substances in our environment, and to diminish the pressure on natural resources, we encourage you to use the appropriate take-back systems. These systems will reuse or recycle most of the materials of your end-of-life equipment in an environmentally sound way. The crossed-bin symbol marked on your device indicates you should use these systems. If you need more information on the collection, reuse, and recycling of this product, please contact your local or regional waste administration. You can also contact DYMO for more information on the environmental performance of our products. 23 LabelManager® Wireless PnP User Guide Safety Precautions for Lithium-Polymer Rechargeable Battery Pack Inaccurate handling of a lithium-polymer rechargeable battery pack may cause leakage, heat, smoke, an explosion, or fire. This could cause deterioration of performance or failure. This may also damage the protection device installed in the battery pack. This could damage equipment or injure users. Thoroughly follow the instructions below. While Charging the Battery Pack To reduce the risks associated with fire and explosion, which if not avoided, could result in serious injury or death: Danger Danger of explosion if a battery pack is incorrectly handled, charged, disposed or replaced. Replace only with the same or equivalent type recommended by DYMO. When charging the battery pack, use dedicated chargers and follow the specified conditions. Do not connect directly to an electric outlet or cigarette lighter charger. Do not store the battery pack close to fire or at extremely high temperatures over 60°C (140°F), for example, a vehicle, strong direct sunlight. Do not short-circuit the battery pack under any circumstances. Never charge battery pack near highly flammable objects. To reduce the risks associated with fire and explosion, which if not avoided, could result in serious injury or death and/or property damage: Warning Stop charging the battery pack if charging is not completed within the specified time. Never leave the battery pack unattended during charging. Do not attempt to charge a cell that is damaged. Immediately remove the battery pack from the device or battery charger and stop use if the battery pack gives off an odor, generates heat, becomes discolored or deformed, or in any way appears abnormal during use. To reduce the risks associated with various hazards, which if not avoided, may result in minor or moderate injury and/or property damage: Caution Thoroughly read this document before charging the battery pack. Lithium cells must be completely discharged before disposal. Always dispose the battery pack in a manner consistent with local, regional and national regulation. Battery pack can only be charged within a temperature range of 0°C~45°C (32°F~113°F). 24 LabelManager® Wireless PnP User Guide When Discharging the Battery Pack To reduce the risks associated with fire and explosion, which if not avoided, could result in serious injury or death and/or property damage: Danger Use the battery pack only in the specified equipment. Do not discharge the battery pack close to fire or at extremely high temperatures over 60°C (140°F), for example, a vehicle, strong direct sunlight. To reduce the risks associated with various hazards, which if not avoided, may result in minor or moderate injury and/or property damage: Caution Battery pack can only be used within a temperature rage of 20°C~60°C (-4°F~140°F). 25 LabelManager® Wireless PnP User Guide