Download StarTech.com PCI Wireless N Adapter - 300 Mbps PCI 802.11 b/g/n Network Adapter Card – 2T2R 2.2 dBi

Transcript
PCI 802.11n 300Mbps WiFi Adapter - 2T2R
PCI300WN2X2
*actual product may vary from photos
DE: Bedienungsanleitung - de.startech.com
FR: Guide de l'utilisateur - fr.startech.com
ES: Guía del usuario - es.startech.com
IT: Guida per l'uso - it.startech.com
NL: Gebruiksaanwijzing - nl.startech.com
PT: Guia do usuário - pt.startech.com
For the most up-to-date information, please visit: www.startech.com
Manual Revision: 10/24/2013
FCC Compliance Statement
This equipment has been tested and found to comply with the limits for a Class B digital
device, pursuant to part 15 of the FCC Rules. These limits are designed to provide reasonable
protection against harmful interference in a residential installation. This equipment generates,
uses and can radiate radio frequency energy and, if not installed and used in accordance with
the instructions, may cause harmful interference to radio communications. However, there
is no guarantee that interference will not occur in a particular installation. If this equipment
does cause harmful interference to radio or television reception, which can be determined by
turning the equipment off and on, the user is encouraged to try to correct the interference by
one or more of the following measures:
• Reorient or relocate the receiving antenna.
• Increase the separation between the equipment and receiver.
• Connect the equipment into an outlet on a circuit different from that to which the receiver
is connected.
• Consult the dealer or an experienced radio/TV technician for help.
FCC ID: VYTLP-7665
This Class B digital apparatus complies with Canadian ICES-003.
Cet appareil numérique de la classe [B] est conforme à la norme NMB-003 du Canada.This
device complies with Industry Canada licence-exempt RSS standard(s).
Operation is subject to the following two conditions:
(1) This device may not cause interference, and
(2) This device must accept any interference, including interference that may cause undesired
operation of the device.
Le présent appareil est conforme aux CNR d’Industrie Canada applicables aux appareils radio
exempts de licence.
L’exploitation est autorisée aux deux conditions suivantes:
(1) l’appareil ne doit pas produire de brouillage, et
(2) l’utilisateur de l’appareil doit accepter tout brouillage radioélectrique subi, même si le
brouillage est susceptible d’en compromettre le fonctionnement.
IC Radiation Exposure Statement:
This equipment complies with IC RSS-102 radiation exposure limit set forth for an
uncontrolled environment. This equipment should be installed and operated with minimum
distance 20cm between the radiator and your body.
Déclaration d’exposition à la radiation:
Cet équipement respecte les limites d’exposition aux rayonnements IC définies pour un
environnement non contrôlé. Cet équipement doit être installé et mis en marche à une
distance minimale de 20 cm qui sépare l’élément rayonnant de votre corps.
L’émetteur ne doit ni être utilisé avec une autre antenne ou un autre émetteur ni se trouver à
leur proximité.
IC: 11232A-PCI300WN2X2
Instruction Manual
Use of Trademarks, Registered Trademarks, and other Protected Names and Symbols
This manual may make reference to trademarks, registered trademarks, and other
protected names and/or symbols of third-party companies not related in any way to
StarTech.com. Where they occur these references are for illustrative purposes only and do not
represent an endorsement of a product or service by StarTech.com, or an endorsement of the
product(s) to which this manual applies by the third-party company in question. Regardless
of any direct acknowledgement elsewhere in the body of this document, StarTech.com hereby
acknowledges that all trademarks, registered trademarks, service marks, and other protected
names and/or symbols contained in this manual and related documents are the property of
their respective holders.
Instruction Manual
3
Table of Contents
Introduction.............................................................................................1
Packaging Contents.................................................................................................................................. 1
System Requirements............................................................................................................................... 1
Installation...............................................................................................2
Hardware Installation............................................................................................................................... 2
Driver Installation....................................................................................................................................... 3
Verifying Installation................................................................................................................................. 4
How to Use...............................................................................................5
Windows XP................................................................................................................................................. 5
Windows Vista/7/8..................................................................................................................................... 6
Ralink WLAN Utility.................................................................................................................................... 7
Connecting to an Available Network.................................................................................................. 8
Manually Creating a Profile.................................................................................................................... 10
Wi-Fi Protected Setup (WPS).................................................................................................................. 11
Specifications...........................................................................................12
Technical Support...................................................................................13
Warranty Information.............................................................................13
Instruction Manual
i
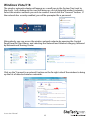
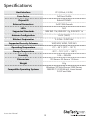
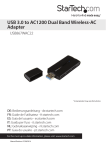
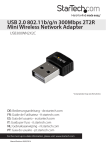
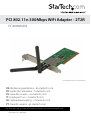
Introduction
The PCI300WN2X2 PCI 300Mbps Wireless N Card adds high speed wireless network
connectivity to almost any PCI-enabled desktop/workstation PC. Using a 2T2R (2
Transmitter/2 Receiver) design over the 2.4GHz frequency, this PCI wireless card
provides up to 300Mbps of data bandwidth over an 802.11n network, while improving
signal reception and range.
Backward compatible with 802.11b/g networks (11/54Mbps), this WiFi N adapter
offers a versatile wireless networking solution with support for standard and advanced
security options such as WEP, WPA and WPA2, along with wireless Quality of Service
(QoS) support and quick and easy setup through WPS.
This easy-to-install PCI card is backed by StarTech.com’s 2-year warranty and free lifetime
technical support, making for an excellent wireless upgrade or first-time setup option.
Packaging Contents
• 1x PCI Wireless-N Card
• 1x Low Profile Bracket
• 2x Antenna
• 1x Driver CD
• 1x Instruction Manual
System Requirements
• Available PCI expansion card slot
• Wireless B, G or N compatible router or access point
• Microsoft® Windows® XP/Vista/Server 2003/Server 2008 R2/7/ 8 (32/64-bit), or Linux
kernel 2.6.32 and later
Instruction Manual
1
Installation
WARNING! PCI cards, like all computer equipment, can be severely damaged by static
electricity. Be sure that you are properly grounded before opening your computer
case or touching your PCI card. StarTech.com recommends that you wear an anti-static
strap when installing any computer component. If an anti-static strap is unavailable,
discharge yourself of any static electricity build-up by touching a large grounded metal
surface (such as the computer case) for several seconds. Also be careful to handle the
PCI card by its edges and not the gold connectors.
Hardware Installation
1. Turn your computer off and any peripherals connected to the computer (i.e. Printers,
external hard drives, etc.). Unplug the power cable from the rear of the power
supply on the back of the computer and disconnect all peripheral devices.
2. Remove the cover from the computer case (see documentation for your computer
system for details).
3. Locate an open PCI slot and remove the metal cover plate on the rear of the
computer case (refer to documentation for your computer system for details).
NOTE: If installing the card into a small form factor/low profile system, replacing the
pre-installed full profile bracket with the included low profile installation bracket may
be necessary.
4. Insert the card into the open PCI slot and fasten the bracket to the rear of the case.
5. Place the cover back onto the computer case.
6. Attach the included external antennas to the rear bracket of the card.
7. Insert the power cable into the socket on the power supply and reconnect all other
connectors removed in Step 1.
Instruction Manual
2
Driver Installation
Windows XP/ Server 2003
1. Upon starting Windows, if the “Found New Hardware” wizard appears on the screen,
cancel/close the window and insert the included Driver CD into the computer’s CD/
DVD drive.
2. AutoPlay should automatically launch the Driver/Software installation splash screen.
If not, open “My Computer” then open the CD/DVD drive the disk is inserted into
and double-click the file Setup.exe.
3. Select the option to install the Drivers. This will launch the Driver Installation wizard.
4. During the installation, you will be prompted to install only the drivers or also the
Ralink WLAN Utility. If you wish to use the built-in Windows utility for setting up your
wireless connection, then install the drivers only. If you do not wish to use the builtin Windows Utility (Zero Configuration Utility), then also install the Ralink Utility.
NOTE: You can switch to using the Windows Utility at any time.
Windows Vista/ 7/ 8
1. Upon starting Windows, if the “Found New Hardware” wizard appears on the screen,
cancel/close the window or choose not to install the drivers and insert the included
Driver CD into the computer’s CD/DVD drive.
2. AutoPlay should automatically launch the Driver/ Software installation splash screen
or prompt you to run Setup.exe. If not, open “Computer” open the CD/ DVD drive
the disk is inserted into and double-click the file Setup.exe.
3. Select the option to install the Drivers. This will launch the Driver Installation wizard.
4. During the installation, you will be prompted to install only the drivers or also the
Ralink WLAN Utility. If you wish to use the built-in Windows utility for setting up your
wireless connection, then install the drivers only. If you do not wish to use the builtin Windows Utility (Zero Configuration Utility), then also install the Ralink Utility.
NOTE: You can switch to using the Windows Utility at any time.
5. Complete the wizard and this will automatically install all of the drivers/software.
Restart the computer when prompted.
Instruction Manual
3
Windows Server 2008 R2 Note:
By default, the Microsoft “Wireless LAN Service” Feature is not installed. Before any
wireless networking can be enabled, this feature must be installed through the
Windows Server Manager window. Refer to Windows’ documentation for details.
Verifying Installation
Windows 2000/XP/Vista/7/8
From the main desktop, right-click on “My Computer” (“Computer” in Vista/7), then
select Manage. In the new Computer Management window, select Device Manager
from the left window panel.
Double-click on the “Network adapters” option to open it. A new Wireless adapter
should be listed.
Instruction Manual
4
How to Use
Connecting to a wireless network is done through the Windows wireless configuration
utilities. You must know the name of the wireless network (SSID), the type of security
it is using (if any) and it’s associated password to connect to a wireless network.
Consult the documentation for your wireless access point (AP) or contact your network
administrator or the wireless AP manufacturer for details.
Windows XP
The wireless network adapter may appear in
the System Tray (next to the clock), or you may
have to access it through the Control Panel. If
visible in the System Tray, right-click on the icon
and select “View available wireless networks”.
This will bring up a new window that will show
you all available wireless networks that Windows
has found.
Alternatively, you can access this window by
opening the Control Panel from the Start Menu
and double-clicking the Network Connections
icon. Right-click on the Wireless Network
Connection icon (there may be multiple; the
highest number should be the latest) and select
“View available wireless networks”.
Select the wireless network you wish to connect to
from the list, and click on the “Connect” button in
the bottom right corner. If the network has security
enabled, you will be prompted for the password.
Instruction Manual
5
Windows Vista/7/8
The wireless network adapter will appear as a small icon in the System Tray (next to
the clock). Left-clicking on this icon will bring up a list of detected wireless networks.
Select the wireless network you wish to connect to and click the “Connect” button. If
the network has security enabled, you will be prompted for a password.
Alternatively, you can access the wireless network adapter by opening the Control
Panel from the Start Menu, and selecting the Network and Internet category, followed
by Network and Sharing Center.
Click on the “Connect to a network” option on the far right side of the window to bring
up the list of detected wireless networks.
Instruction Manual
6
Ralink WLAN Utility
Instead of using the built-in Windows wireless utility, a 3rd party utility, Ralink WLAN
Utility, can be used. This utility provides access to additional advanced features of the
wireless card, such as Wi-Fi Multimedia options (WMM) and Wi-Fi Protected Setup
(WPS). If the Ralink WLAN utility is installed, then a small icon will appear in the system
tray area near the clock. Double-click the icon to open the utility window, or right-click
on it to bring up the menu and select the ‘launch’ option.
From the main interface, different sub sections can be accessed via the buttons along
the top of the window.
1
2
3
4
5
6
7
8
9
1. Profile: A list of connection profiles for each Wi-Fi network you have previously or
wish to connect to.
2. Network: Lists all available Wi-Fi networks detected.
3. Advanced: Advanced settings options.
4. Statistics: Tracks successful/failed frame transmission.
5. WMM: Enable/disable Wi-Fi Multimedia options
6. WPS: Wi-Fi Protected Setup configuration options.
7. Radio On/Off: Enable/disable the wireless antenna.
8. About: Software version.
9. Help: Help menu.
Instruction Manual
7
Connecting to an Available Network
1. To connect to a wireless network, bring up “Network” from the main window. This
will list all of the detected wireless networks in the area.
2. Once you locate the network you wish to connect to, select it from the list by click
on the entry, then click the ‘Connect’ button. If this is a network that you will be
connecting to often, then you may wish to create a persistent profile by clicking
the “Add to Profile” button and following the prompts. The Ralink Utility will always
automatically try connecting to any network that has a profile.
3. If the network uses encryption, you will need to enter the proper authentication
information (i.e. password/passphrase).
Instruction Manual
8
4. Once successfully connected to the network, information about the wireless router/
access point will be listed in the detailed information section of the main utility window.
Open/Close Detailed Info
Instruction Manual
9
Manually Creating a Profile
If the network you want the computer to connect to is currently not available (off site),
or otherwise not listed as an available network (no SSID broadcast), a profile for the
network can be manually created. You must know the name of the network (SSID), the
type of encryption and any passwords/passphrases required to connect to the network
prior to creating a profile. Multiple profiles can be created, if you regularly connect to
different wireless networks in different locations.
1. From the main utility window, click on the “Profile” button.
2. In the Profile window, click on the “Add” button. This will expand the bottom section
of the main utility window.
3. Enter in a name for this profile, then enter the name of the network you wish to
connect to in the “SSID” field. Click the “Auth/Encry.” button above the Profile Name
field when ready.
4. Select the type of Authentication/Encryption used by the network (if any). Enter in
the password/passphrase in the fields below.
5. Click the “OK” button once all settings have been entered.
Instruction Manual
10
Wi-Fi Protected Setup (WPS)
WPS can be used to quickly and easily setup a secure wireless connection to a WPSenabled wireless router/access point (AP). The WPS configuration section can be
accessed via the Profile List window.
Select the WPS-enabled AP from the list of detected networks and select the method
of configuring the WPS connection (push button or PIN code) using the buttons on the
bottom left side.
Instruction Manual
11
Specifications
Host Interface
PCI (32-bit, 3.3/5V)
Form Factor
Full/Low Profile
Chipset ID
Ralink RT3062F
External Connectors
2x RP-SMA female
LEDs
N/A
Supported Standards
IEEE 802.11b, IEEE 802.11g, IEEE 802.11n
Antenna Configuration
2x2:2 (TxR:S)
Wireless Frequencies
2.4 GHz~2.484 GHz
Supported Security Schemes
WEP, WPA, WPA2, TKIP/AES
Operating Temperature
0°C ~ 55°C (32°F ~ 131°F)
Storage Temperature
-20°C ~ 70°C (-4°F ~ 158°F)
Humidity
10% ~ 90% RH
Dimensions
129.0mm x 53.0mm x 19.0mm
Weight
50g
Compatible Operating Systems
Windows XP/Vista/Server 2003/Server
2008 R2/7/ 8 (32/64-bit), Linux kernel
2.6.32 and later
Instruction Manual
12
Technical Support
StarTech.com’s lifetime technical support is an integral part of our commitment to
provide industry-leading solutions. If you ever need help with your product, visit
www.startech.com/support and access our comprehensive selection of online tools,
documentation, and downloads.
For the latest drivers/software, please visit www.startech.com/downloads
Warranty Information
This product is backed by a two year warranty.
In addition, StarTech.com warrants its products against defects in materials
and workmanship for the periods noted, following the initial date of purchase.
During this period, the products may be returned for repair, or replacement with
equivalent products at our discretion. The warranty covers parts and labor costs only.
StarTech.com does not warrant its products from defects or damages arising from
misuse, abuse, alteration, or normal wear and tear.
Limitation of Liability
In no event shall the liability of StarTech.com Ltd. and StarTech.com USA LLP (or their
officers, directors, employees or agents) for any damages (whether direct or indirect,
special, punitive, incidental, consequential, or otherwise), loss of profits, loss of business,
or any pecuniary loss, arising out of or related to the use of the product exceed the
actual price paid for the product. Some states do not allow the exclusion or limitation
of incidental or consequential damages. If such laws apply, the limitations or exclusions
contained in this statement may not apply to you.
Instruction Manual
13
Instruction Manual
14
Hard-to-find made easy. At StarTech.com, that isn’t a slogan. It’s a promise.
StarTech.com is your one-stop source for every connectivity part you need. From
the latest technology to legacy products — and all the parts that bridge the old and
new — we can help you find the parts that connect your solutions.
We make it easy to locate the parts, and we quickly deliver them wherever they need
to go. Just talk to one of our tech advisors or visit our website. You’ll be connected to
the products you need in no time.
Visit www.startech.com for complete information on all StarTech.com products and
to access exclusive resources and time-saving tools.
StarTech.com is an ISO 9001 Registered manufacturer of connectivity and technology
parts. StarTech.com was founded in 1985 and has operations in the United States,
Canada, the United Kingdom and Taiwan servicing a worldwide market.