1
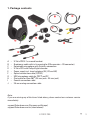
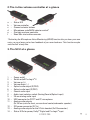
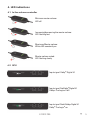
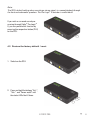
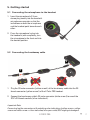
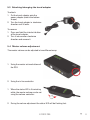
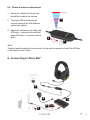
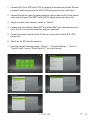
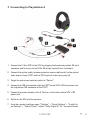
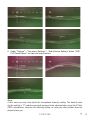
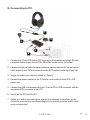
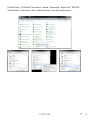
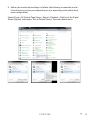
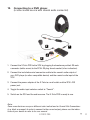
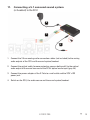
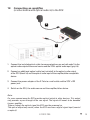
Manual X-Tatic PRO – Manual Table of contents 1. Package contents 2. The in-line volume controller at a glance 3. The SCU at a glance 4. LED indications 4.1 In-line volume controller 4.2 SCU 4.3 Restore the factory default / reset 5. Getting started 5.1 Connecting the microphone to the headset 5.2 Connecting the breakaway cable 5.3 Attaching/changing the travel adapter 5.4 Master volume adjustment 5.5 Channel volume adjustment 6. Connecting to Xbox 360® 7. Connecting to Playstation®3 8. Connecting to PC 9. Connecting to a tablet PC (or other sound source with 3.5 mm analog connector) 10. Connecting to a DVD player (or other sound source with coaxial audio connector) 11. Connecting a 5.1 surround sound system (or headset) to the SCU 12. Connecting an amplifier (or other device with optical audio in) to the SCU 3 4 4 5 5 5 6 7 7 7 8 8 9 9 11 13 16 17 18 19 Dear customer! Congratulations for purchasing one premium quality SHARKOON product. For a long life time and to take full advantage of this product we recommend that you read this manual completely. Have a good time with our product! SHARKOON Technologies X-TATIC PRO 2 1. Package contents A B C D E F G H I J – – – – – – – – – – X-Tatic PRO 5.1 surround headset Breakaway cable with in-line controller (G9 connector > G9 connector) Detachable microphone with QuickOn connection X-Tatic SCU with Dolby®Digital decoder Power supply incl. travel adapters (EU, US and UK) Optical connection cable (S/PDIF) USB microphone cable for PS3™ and PC Chat cable for Xbox 360® (3.5 mm jack > 2.5 mm jack) Coaxial connection cable 3.5 mm analog connection cable Note: If you are missing any of the items listed above, please contact our customer service immediately: [email protected] (Germany and Europe) [email protected] (international). X-TATIC PRO 3 2. The in-line volume controller at a glance a b c d e f – – – – – – Status LED Volume controller Channel selector buttons Microphone mute/MVM selector switch* Chat voice volume controller Xbox 360® chat cable connector *Activating the Microphone Voice Monitoring (MVM) function lets you hear your own voice, so you always get a clear feedback of your own loudness. This function may be switched off at any time. 3. The SCU at a glance 1 – 2 – 3 – 4 – 5 – 6 – 7 – 8 – 9 – 10 – 11 – 12 – 13 – 14 – Power on/off Switch on/off Pro Logic® II Volume up (+) Volume down ( –) Optical audio output (S/PDIF) Optical audio input (S/PDIF) Coaxial audio input Audio input selector switch (Analog/Coaxial/Optical input) 3.5 mm analog audio input USB connector for PS3™ and PC microphone Analog audio outputs (3x 3.5 mm jacks for front, surround and center/subwoofer speaker) ISO power connector (DC In) Analog audio outputs for the X-Tatic headset (2x G9 connector) Status LEDs for power, Dolby® Digital and Pro Logic® input X-TATIC PRO 4 4. LED indications 4.1 In-line volume controller Minimum master volume: LED off Increasing/decreasing the master volume: LED flashing fast Maximum Master volume: White LED constantly on Master volume muted: LED flashing slowly 4.2 SCU Input signal: Dolby® Digital 5.1 Input signal: Not Dolby® Digital 5.1 Dolby® Pro Logic® II off Input signal: Nicht-Dolby® Digital 5.1 Dolby® Pro Logic® on X-TATIC PRO 5 Note: The SCU’s default setting, when receiving a stereo signal, is a sound playback through the front and subwoofer speakers. The Pro Logic® II decoder is switched off. If you wish a surround sound processing through Dolby® Pro Logic® II, you may enable this function by pressing the respective button (PLII) on the SCU: 4.3 Restore the factory default / reset 1. Switch on the SCU: 2. Press and hold the buttons “Vol -”, “Vol +” and “Power on/off” until the status LEDs flash 3 times. X-TATIC PRO 6 5. Getting started 5.1 Connecting the microphone to the headset 1. Insert the microphone’s 3.5 mm stereo plug loosely into the headset’s microphone connector so that the indications on both the microphone and the headset point towards each other. 2. Press the microphone’s plug into the headset’s jack completely; turn the microphone to the front and into the desired position. 5.2 Connecting the breakaway cable 2 1 1. Plug the G9 male connector (yellow arrow!) of the breakaway cable into the G9 female connector (yellow arrow!) of the X-Tatic PRO headset. 2. Connect the breakaway cable’s G9 male connector (white arrow!) to one of the SCU’s G9 female sockets (silver indication!). Important Note: Ensure to plug the connectors with matching color indications (yellow arrow > yellow arrow and white arrow > silver indication) else your cable/SCU might get damaged! X-TATIC PRO 7 5.3 Attaching/changing the travel adapter To attach: 1. Put the travel adapter onto the power adapter (watch the bottom shape). 2. Turn the travel adapter in clockwise direction until it locks. To remove: 1. Press and hold the interlock button of the travel adapter. 2. Turn it into counter-clockwise direction and remove it. 5.4 Master volume adjustment The master volume can be adjusted in two different ways: 1. Using the master volume buttons of the SCU: 2. Using the in-line controller: 1. When the status LED is illuminating white, the master volume can be set using the volume controller: 2. During the volume adjustment the status LED will be flashing fast. X-TATIC PRO 8 5.5 Channel volume adjustment 1. Select the channel for which you would like to adjust the volume. 2 2. The status LED will indicate the current volume level with different colors (see above). 3. Adjust the volume to your liking (red LED color = maximum volume level; green LED color = minimum volume level). 3 1 Note: To adjust another channel’s volume and / or the master volume wait until the LED has turned back to white color. 6. Connecting to Xbox 360® 4 5 2 1 3 X-TATIC PRO 9 1. Connect the X-Tatic PRO to the SCU by plugging the breakaway cable’s G9 male connector (white arrow) into the SCU’s G9 female socket (silver indication). 2. Connect the optical cable (remove protective caps on both ends!) to the optical audio output of your Xbox 360® and the SCU’s optical audio input (grey lid). 3. Toggle the audio input selector switch to “Optical”. 4. Connect the chat cable for Xbox 360® to the Xbox 360® chat cable connector on the X-Tatic’s in-line volume controller and your gamepad. 5. Connect the power adapter of the X-Tatic to a wall outlet and the SCU‘s ISO power jack. 6. Switch on the SCU and the console. 7. From the console’s settings menu (“System” > “Console Settings” > “Audio” > “Digital Output”) select “Dolby Digital 5.1” as output format: X-TATIC PRO 10 7. Connecting to Playstation®3 1 5 3 2 4 1. Connect the X-Tatic PRO to the SCU by plugging the breakaway cable’s G9 male connector (white arrow) to the SCU’s G9 female socket (silver indication). 2. Connect the optical cable (remove protective caps on both ends!) to the optical audio output of your PS3™ and the SCU’s optical audio input (grey lid). 3. Toggle the audio input selector switch to “Optical”. 4. Connect the USB microphone cable for PS3™ to the SCU’s USB connector and the respective USB connector of the PS3™. 5. Connect the power adapter of the X-Tatic to a wall outlet and the SCU‘s ISO power jack. 6. Switch on the SCU and the console. 7. From the console’s settings menu (“Settings” > “Sound Settings” > “Audio Out put Settings” > “Optical Digital”) select “Dolby Digital 5.1 Ch.” as output format: X-TATIC PRO 11 8. Under “Settings” > “Accessory Settings” > “Audio Device Settings” define “USB PnP Sound Device” as input and output device: Note: In this menu you may also adjust the microphone intensity setting. The default value for this setting is “3” and does normally not need to be adjusted when using the X-Tatic PRO’s microphone. Increase the intensity setting, in case your chat partner does not properly hear you. X-TATIC PRO 12 8. Connecting to PC 1 3 4 2 5 1. Connect the X-Tatic PRO to the SCU by plugging the breakaway cable’s G9 male connector (white arrow) to the SCU’s G9 female socket (silver indication). 2. Connect the optical cable (remove protective caps on both ends!) to the optical audio output of your PC ‘s sound card and the SCU’s optical audio input (grey lid). 3. Toggle the audio input selector switch to “Optical”. 4. Connect the power adapter of the X-Tatic to a wall outlet and the SCU’s ISO power jack. 5. Connect the USB microphone cable for PC to the SCU’s USB connector and the respective USB connector of your PC. 6. Switch on the SCU and the PC. 7. Define your audio input settings as follows (the following screenshots are for illustration only and may vary depending on your operating system and/or hard ware configuration): X-TATIC PRO 13 Control Panel > All Control Panel Items > Sound > Recording > Right-click “USB PnP Sound device” and choose “Set as default device” from the context menu: X-TATIC PRO 14 8. Define your audio output settings as follows (the following screenshots are for illustration only and may vary depending on your operating system and/or hard- ware configuration): Control Panel > All Control Panel Items > Sound > Playback > Right-click the Digital Output (Optical) and choose “Set as Default Device” from the context menu: X-TATIC PRO 15 9.Connecting to a tablet PC (or other sound source with 3.5 mm analog connector) 1 4 2 3 1. Connect the X-Tatic PRO to the SCU by plugging the breakaway cable’s G9 male connector (white arrow) to the SCU’s G9 female socket (silver indication). 2. Connect the included 3.5 mm analog connection cable to the analog audio output of your tablet PC (or other compatible device) and the 3.5 mm audio input of the SCU. 3. Toggle the audio input selector switch to “Analog”. 4. Connect the power adapter of the X-Tatic to a wall outlet and the SCU‘s ISO power jack. 5. Switch on the SCU and the audio source. The X-Tatic PRO is ready for use. Note: Under this configuration the SCU will receive a stereo input signal. The default setting is a sound playback through the front and subwoofer speakers. If you wish a surround sound processing through Dolby® Pro Logic® II, you may enable this function by pressing the respective button (PLII) on the SCU. X-TATIC PRO 16 10. Connecting to a DVD player (or other sound source with coaxial audio connector) 3 1 4 2 1. Connect the X-Tatic PRO to the SCU by plugging the breakaway cable’s G9 male connector (white arrow) to the SCU’s G9 plug female socket (silver indication). 2. Connect the included coaxial connection cable to the coaxial audio output of your DVD player (or other compatible device) and the coaxial audio input of the SCU. 3. Connect the power adapter of the X-Tatic to a wall outlet and the SCU‘s ISO power jack. 4. Toggle the audio input selector switch to “Coaxial”. 5. Switch on the SCU and the audio source. The X-Tatic PRO is ready to use. Note: Some manufacturers may use different color indications for Coaxial Out Connections (e.g. black or orange). In order to connect to the correct output, please see the indications of your device or refer to its user manual. X-TATIC PRO 17 11. Connecting a 5.1 surround sound system (or headset) to the SCU 3 1 2 1. Connect the 3.5 mm analog audio connection cables (not included) to the analog audio outputs of the SCU and the sound system/headset. 2. Connect the optical cable (remove protective caps on both ends!) to the optical audio output of the sound source and the SCU’s optical audio input (grey lid). 3. Connect the power adapter of the X-Tatic to a wall outlet and the SCU‘s ISO power jack. 4. Switch on the SCU, the audio source and the sound system/headset. X-TATIC PRO 18 12. Connecting an amplifier (or other device with optical audio in) to the SCU 3 1 2 1. Connect the included optical cable (remove protective caps on both ends!) to the optical audio output of the sound source and the SCU’s optical audio input (grey lid). 2. Connect an additional optical cable (not included) to the optical audio output of the SCU (black lid) and the optical audio input of the amplifier/other compatible device. 3. Connect the power adapter of the X-Tatic to a wall outlet and the SCU‘s ISO power jack. 4. Switch on the SCU, the audio source and the amplifier/other device. Note: For more convenience the SCU provides optical output to other devices. This output only provides a pass through of the raw signal. The signal still needs to be decoded by your amplifier. To pass through the optical signal the SCU must be powered on. The optical output only works, when the SCU receives a digital signal input (coaxial or optical). X-TATIC PRO 19 Important notes: Avoid listening at a high volume level for a longer period of time. Doing so may harm your hearing. Additional safety considerations: Ensure correct connection between the individual connectors – the connectors are marked in corresponding colors (white, yellow and silver arrows)! Ensure the plugs are not twisted when connecting. Should you notice resistance with the connections, disconnect the links and check to ensure the plugs are properly orientated. Do not try to forcibly connect! During play/use arrange all cables so that people and pets are not likely to trip over or accidentally pull on them as they move around or walk through the area. When the headset is not in use, disconnect all cables and keep them out of the reach of children and pets. Be careful not to drop and step on the microphone. Protect all cables from being stepped on. Do not pinch or sharply bend the cables, particularly where they connect to the power outlet, the power adapter and the headset/other device. Do not jerk, knot, sharply bend, or otherwise abuse the cables. Do not expose the headset, its accessories and cables to sources of heat or direct sunlight. Do not wrap the cable around the power adapter. Keep children and pets away from the cables and the accessory parts of the headset. Do not allow them to play with the cables/accessories, to bite or chew on them, as this may lead to damages and choking. When disconnecting the cables, pull on the plug – not on the cable. Legal disclaimer: PlayStation, PlayStation 3, PS3 and the respective images/logos are registered trademarks or trademarks of Sony Computer Entertainment Inc. Xbox, Xbox 360, Xbox Live, Microsoft and the respective images/logos are registered trademarks or trademarks of Microsoft Corporation in the U.S. and/or other countries. Dolby, Pro Logic II, the double-D symbol and the respective images/logos are registered trademarks or trademarks of Dolby Laboratories. All named products and descriptions are trademarks and / or registered trademarks of the respective manufacturers and are accepted as protected. As a continuing policy of product improvement at SHARKOON, the design and specifications are subject to change without prior notice. National product specifications may vary. All rights reserved especially (also in extracts) for translation, reprinting, reproduction by copying or other technical means. Infringements will lead to compensation. All rights reserved especially in case of assignation of patent or utility patent. Means of delivery and technical modifications reserved. Disposal of your old product Your product is designed and manufactured with high quality materials and components, which can be recycled and reused. When this crossed-out wheeled bin symbol is attached to a product, it means the product is covered by the European Directive 2002/96/EC. Please be informed about the local separate collection system for electrical and electronic products. Please act according to your local rules and do not dispose of your old products with your normal household waste. The correct disposal of your old product will help prevent potential negative consequences to the environment and human health. © SHARKOON Technologies 2012 X-TATIC PRO 20