1
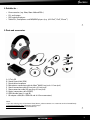
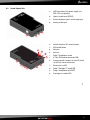
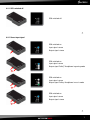
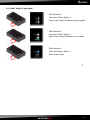
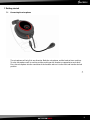
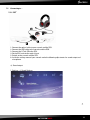
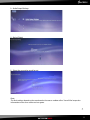
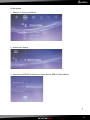
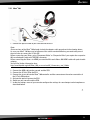
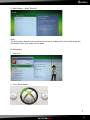
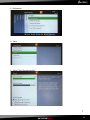
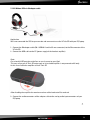
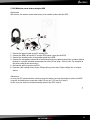
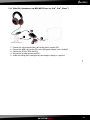
Manual www.sharkoon.com Table of contents page 1. Basic information1 2. Features 1 2.1Headphones 1 2.2 Sound Control Unit (SCU) 1 3. Specifications 3.1 Headphones 3.2 Microphone 3.3 Sound Control Unit (SCU) 2 2 2 2 4. Suitable for... 4 5. Parts and accessories 4 6. The device at a glance 4 6.1 X-Tatic SR 4 6.2 Volume controller 4 6.3 Sound Control Unit 5 6.4 The LED indications of the Sound Control Unit 6 6.4.1 SCU switched off 7 6.4.2 Stereo input signal 7 ® 6.4.3 Dolby Digital 5.1 input signal 8 7. Getting started 9 7.1 Connecting the microphone 9 7.2 Connecting to… 10 ™ 7.2.1 PS3 10 7.2.2 Xbox® 360 13 7.2.3 PC/Laptop 17 7.2.3.1 With SCU via optical connection 17 7.2.3.2 Without SCU via G6 adapter cable 18 7.2.3.3 With other stereo headset using the SCU 19 7.2.4 Tablet-PCs, Smartphones and MP3-/MVP-Player (e.g. iPod®, iPad®, iPhone®)20 8. Legal disclaimer Dear customer! Congratulations for purchasing this premium quality SHARKOON product. For a long life time and to take full advantage of this product we recommend you to read this manual completely. Enjoy our product! SHARKOON Technologies 21 1. Basic information The X-Tatic SR is a multi-platform headset that supports the Dolby®-Headphone technology, thus delivering a completely new sound experience: Dolby® Headphone makes sound more spatial, creating a natural sound feeling and – in connection with Dolby® Pro Logic® II – reproducing 5.1 surround sound on stereo headphones in a realistic way. This leads to both a more sophisticated sound design and a considerably enhanced sound reproduction and localization. 2. Features 2.1Headphones • • • • • • • • • Dolby® Headphone for multi-platform gaming (Xbox® 360, PS3™, PC etc.) USB-powered, no additional power adaptor needed Supports Xbox® Live Supports the PlayStation® 3 chat function (via USB) Flexible, detachable microphone Microphone connected to Xbox® 360 controller (2.5 mm plug) Microphone connected via USB (USB to PS3™) In-line amplifier with volume controller and microphone mute Separate volume adjustment for voice communication 2.2Sound Control Unit (SCU) • • • • • • • Supports Dolby® Digital 5.1, Dolby® Pro Logic® II and Dolby® Headphone Dolby® Headphone function can be activated/deactivated (stereo bypass) 3D stereo function (stereo expander) can be activated/deactivated Analog and digital input Supports the chat function of PS3™, Xbox® and Xbox® 360 Connector for additional stereo headset (3.5 mm line out) Connector for additional analog sound source (3.5 mm line in) 1 3. Specifications 3.1Headphones • • • • • • • Diameter: 40 mm with NdFeB magnet Impedance: 32 Ω Sound pressure level: 119 dB +/- 3 dB at 1 KHz Frequency response: 20 Hz – 20 kHz Power output: 30 mW Cable length: 400 cm +/-10 cm Connector: 1x 6-pin analog plug 3.2Microphone • Dimensions: 6 x 5 mm • Directivity: omni directional • Sensitivity: -58 dB +/- 3 dB 3.3Sound Control Unit (SCU) • • • • • • • 1x digital optical input (S/PDIF) 1x analog 3.5 mm audio input (line in / stereo) 1x 6-pin audio output for the X-Tatic SR headset (G6) 1x analog 3.5 mm audio output (line out / stereo) for additional headset 1x USB B connector (power and PS3™ chat) Dimensions: 22.5 x 106 x 63 mm (H x L x W) Weight: ~89 g 2 4. Suitable for ... • • • • Game consoles (e.g. Xbox, Xbox® 360 und PS3™) PCs and Laptops DVD and media players Tablet PCs, Smartphones and MP3/MVP players (e.g. (z.B. iPod®, iPad®, iPhone®) 5. Parts and accessories A E D C F B G A B C D E F G H I H I X-Tatic SR Sound Control Unit (SCU) Detachable microphone Microphone connection cable for Xbox® 360 (3.5 mm jack > 2.5 mm jack) Stereo connection cable (3.5 mm jack > 3.5 mm jack) Stereo extension cable (3.5 mm plug > 3.5 mm jack) Optical connection cable (S/PDIF) USB2.0 cable (type A > type B) G6 adapter cable (G6 > USB2.0 A and 2x 3.5 mm connectors) Note: If you are missing any of the items listed above, please contact our customer service immediately: [email protected] (Germany and Europe) [email protected] (international) 3 6. The device at a glance 6.1 X-Tatic SR A B D E C A B C D E Padded headband Adjustable headphone Connection cable (cable length: 400 cm +/-10 cm) Cable integrated amplifier with volume controller and microphone mute 1x 6-pin analog connector (G6) for SCU connection 6.2 Volume controller A B C D E A Microphone on/off switch B Connector for Xbox® 360 microphone C Microphone volume controller D Volume controller E Amplifier on/off switch 4 6.3 Sound Control Unit a – USB connection (for power supply and PS3™-/PC-microphone) b – Optical audio input (S/PDIF) c – Switch between optical and analog input d – Analog audio input a d c b e – On/off switch for 3D stereo function f – SCU on/off button l g – Volume + m h – Volume - n o e f g k h i j i – Dolby® Headphone switch j – X-Tatic SR headset connector (G6) k – Analog input for speakers or non-SR head set (3.5 mm stereo connector) l – Power/source LED m – Dolby® ProLogic II® on/off LED n – Dolby® Headphone on/off LED o – Gaming/music mode LED 5 6.4 The LED indications of the Sound Control Unit The SCU supports the sound input formats "Stereo" and "Dolby® Digital 5.1". Both these signals can be converted into a Dolby® Headphone output signal by the SCU. As the input signal is depending on the medium (game, movie etc.) used, we recommend you to check the package and/or documentation of the medium used to find information about the supported sound modes. Furthermore the input signal depends on the selected playback mode of the playback device (console, DVD player etc.). Please refer to the respective documentation of the playback device to make the correct settings. The SCU offers two different playback modes for the reproduction of Dolby® Headphone signals. These playback modes are different in tone color and sound impression. The gaming mode focuses on heavy basses so especially in-game sound effects are accurately reproduced. In contrast the music mode of the SCU offers a well-balanced tone color which is recommended for music listening. Depending on the input and output signals the LEDs of the SCU will illuminate in different combinations and colors: 6 6.4.1 SCU switched off SCU switched off 6.4.2 Stereo input signal SCU switched on Input signal: stereo Output signal: stereo SCU switched on Input signal: stereo Output signal: Dolby® Headphone in gaming mode 1x SCU switched on Input signal: stereo Output signal: Dolby® Headphone in music mode 2x SCU switched on Input signal: stereo Output signal: stereo 3x 7 6.4.3 Dolby® Digital 5.1 input signal SCU switched on Input signal: Dolby® Digital 5.1 Output signal: Dolby® Headphone in gaming mode 1x SCU switched on Input signal: Dolby® Digital 5.1 Output signal: Dolby® Headphone in music mode 2x SCU switched on Input signal: Dolby® Digital 5.1 Output signal: stereo 3x 8 7. Getting started 7.1 Connecting the microphone The microphone will only fit in one direction. Both the microphone and the headset bear markings. Turn the microphone until its marking and the marking on the headset are opposite to each other. Press the microphone into the connector of the headset and turn it to the front and into the desired position. 9 7.2 Connecting to… 7.2.1 PS3™ 1. Connect the optical cable to your console and the SCU. 2. Connect the USB cable to the console and the SCU. 3. Connect the X-Tatic SR to the SCU. 4. On the SCU activate the optical input. 5. Switch on the console and the SCU. 6. Inside the settings menu of your console make the following adjustments for sound output and microphone: a) Sound output: 1. Settings > 2. Sound Settings 10 3. Audio Output Settings 4. Optical Digital 5. Select the respective sound format Note: The final settings depend on the sound modes the source medium offers. You will find respective information on the cover of the movie or game. 11 b) Microphone 1. Settings > 2. Accessory Settings 3. Audio Device Setting 4. Input device: USB PnP Sound Device / Output Device: USB PnP Sound Device 12 7.2.2Xbox® 360 1. Connect the optical cable to your console and the SCU. Note: Some versions of the Xbox® 360 already include the adapter cable greyed out in the drawing above. In case your Xbox® 360 does not include one of the cables mentioned below, you need to buy one of them in order to connect the X-Tatic SR: When connecting your Xbox® using "Component Video" or "Composite Video" you require the respective Microsoft adapter cable with TOSLINK connector. When connecting the Xbox® via HDMI you need the Microsoft Xbox® 360 HDMI cable with optical audio adapter. You will find further information here: http://en.wikipedia.org/wiki/Xbox_360_accessories#AV_Connectors_and_Cables 2. Connect the USB cable to the console and the SCU. 3. Connect the X-Tatic SR to the SCU. 4. Connect the chat cable to the Xbox® 360 controller and the connector on the volume controller of the X-Tatic SR headset. 5. Activate the optical input on the SCU. 6. Switch on your console and the SCU. 7. Inside the settings menu of your console configure the settings for sound output and microphone as described below: 13 a) Sound output: 1. System Settings 2.Console Settings 3. Audio 14 4. Digital Output > Dolby® Digital 5.1 Note: The final settings depend on the sound modes the source medium offers. You will find respective information on the cover of the movie or game. b) Microphone 1. Login user 2. Press "Guide" button 15 3. Preferences 4. Voice 5. Select "Play Through Headset" 16 7.2.3 PC/Laptop The X-Tatic SR can be connected to a PC in different ways: 7.2.3.1 With SCU via optical connection 1. Connect the optical cable to the optical connector of your PC sound card and the SCU. 2. Connect the USB cable to the PC and the SCU (power supply and microphone connection!). 3. Connect the X-Tatic SR to the SCU. 4. Activate the optical input on the SCU. 5. Inside the audio settings menu of your PC operating system set "Optical digital out" as output device and "CMedia USB Audio device" as recording device (defining "CMediaUSB Audio device" as output device will cause pure sound reproduction). Note: Please pay attention to the microphone level, as this level may be set to zero by default under Windows 7. Alternative: In case your PC soundcard does not have an optical output, you may alternatively connect the SCU using the included stereo connection cable (3.5 mm jack > 3.5 mm jack / step 1). In this case you need to activate the analog input on the SCU (step 4). 17 7.2.3.2 Without SCU via G6 adapter cable Application: You have connected the SCU to your console and now want to use the X-Tatic SR with your PC/laptop. 1. Connect the G6 adapter cable (G6 > USB2.0 A and 2x 3.5 mm connectors) to the G6 connector of the X-Tatic SR. 2. Connect the USB cable to the PC (power supply of the headset amplifier). Note: Occasionally USB ports do not deliver as much current as specified. This may cause your X-Tatic SR not to work as its included amplifier is not powered sufficiently. In this case disable the amplifier of the X-Tatic SR: After disabling the amplifier the maximum volume of the headset will be reduced. 3. Connect the audio connectors of the adapter cable to the analog audio input connectors of your PC/laptop. 18 7.2.3.3 With other stereo headset using the SCU Application: You want to use another stereo headset (e.g. from another maker) with the SCU. 1. Connect the optical cable to the PC and the SCU. 2. Connect the USB cable to the PC and the SCU (power supply for the SCU). 3. Connect the headset to the analog audio output of the SCU. 4. Connect the microphone connector of the headset to the microphone input of the soundcard either directly or using the included stereo extension cable (3.5 mm plug > 3.5 mm jack). Pay attention to the color coding of the connectors! 5. Activate the optical input on the SCU. 6. From the audio settings menu of your PC operating system select "Optical digital out" as output device. Alternative: In case your PC soundcard does not have an optical output, you may alternatively connect the SCU using the included stereo connection cable (3.5 mm jack > 3.5 mm jack / step 1). In this case you need to activate the analog input on the SCU. (step 4). 19 7.2.4 Tablet-PCs, Smartphones and MP3-/MVP-Player (e.g. iPod®, iPad®, iPhone®) 1. Connect the stereo connection cable to the device and the SCU. 2. Connect the USB cable to the SCU and a USB power adapter (not included!). 3. Connect the X-Tatic SR to the SCU. 4. Activate the analog input on the SCU. 5. Inside the setting menu configure the sound output settings as required. 20 8. Legal disclaimer All named products and descriptions are trademarks and/or registered trademarks of the respective manufacturers and are accepted as protected. All rights reserved especially (also in extracts) for translation, reprinting, reproduction by copying or other technical means. Infringements will lead to compensation. All rights reserved especially in case of assignation of patent or utility patent. Means of delivery and technical modifications reserved. Xbox, Xbox 360, Xbox Advanced AV Pack, Xbox Communicator, Xbox Live and the respective images/logos are registered trademarks or trademarks of Microsoft Corporation in the U.S. and/or other countries PlayStation, PlayStation 2, PlayStation 3, PS2, PS3 and the respective images/logos are registered trademarks or trademarks of Sony Computer Entertainment Inc. Dolby, Pro Logic, the double-D symbol and the respective images/logos are registered trademarks or trademarks of Dolby Laboratories. IPod, iPad, iPhone and the respective images/logos are registered trademarks or trademarks of Apple Inc. in the U.S. and/or other countries. Disposal of your old product Your product is designed and manufactured with high quality materials and components, which can be recycled and reused When this crossed-out wheeled bin symbol is attached to a product, it means the product is covered by the European Directive 2002/96/EC. Please be informed about the local separate collection system for electrical and electronic products. Please act according to your local rules and do not dispose of your old products with your normal household waste. The correct disposal of your old product will help prevent potential negative consequences to the environment and human health. © SHARKOON Technologies 2011 www.sharkoon.com 21