1
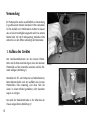
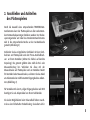
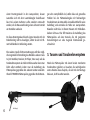
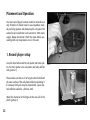
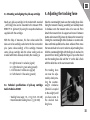
Bedienungsanleitung
Instructions for Use
TD 295 MKIV
Deutsches
Inhaltsverzeichnis:
Aufbau
4
Anschließen
5
Tonarm
6
Einstellungen
7
Technische Daten
10
Garantie
10
English
Table of Contents:
Setup
12
Connections
13
Tonearm
14
Adjustments
15
Technical Specifications 18
Warranty
2
18
Bitte prüfen Sie den Inhalt Ihrer Verpackung!
Packungsinhalt:
1 x Chassis
1 x Bedienungsanleitung
1 x Antriebsriemen
1 x Steckernetzteil
1 x Adapter für Single-Schallplatten
1 x Antiskatinggewicht
1 x Gegengewicht für den Tonarm
1 x Staubschutzhaube
1 x Cinchkabel
1 x Plattenteller mit Filzmatte
Konformitätserklärung:
Wir bestätigen, dass das Gerät, zu dem diese Bedienungsanleitung gehört, den zum
Zeitpunkt der Drucklegung gültigen EG-Richtlinien zur Erlangung des CE-Zeichens
entspricht. Die notwendigen Prüfungen wurden mit positivem Ergebnis vorgenommen.
Please check if each of the following items has been supplied:
1 x Record player chassis
1 x Instructions for Use
1 x Drive belt
1 x Mains transformer unit
1 x Adaptor for single records
1 x Anti-skating weight
1 x Tonearm counterweight
1 x Dust cover
1 x RCA interconnect
1 x Platter with felt mat
Declaration of Conformity
This is to certify that the device, to which this instruction manual belongs and by the time this
manual was printed, has been manufactured in accordance to valid EC regulations in order to
obtain the CE-label. All required examinations and tests have successfully been carried out.
Sehr geehrter Thorens-Kunde,
in die Kulturgeschichte des 20. Jahrhunderts geht die Erfindung
der Schallplatte als eine ihrer wichtigsten Erfindungen ein.
Ihr THORENS-Plattenspieler TD 295 MK IV läßt Sie in optimaler Weise daran teilhaben.
„In optimaler Weise“ bedeutet hier die perfekte Ausnutzung der Tonqualität der Schallplatte
bei gleichzeitig größtmöglicher Schonung ihrer Schallrillen.
THORENS-Plattenspieler besitzen ein besonders schweres Chassis aus einem akustisch stark
dämpfenden Holzwerkstoff. Dadurch werden störende, die Klangeigenschaften beeinträchtigende,
Resonanzen unterdrückt. Sein äußerst ruhig laufender Synchronmotor wird aus einem präzise arbeitenden elektronischen Generator gespeist. Er hält störende Einflüsse, die vom Stromnetz
kommen könnten, vom Gerät fern.
Der TD 295 MK IV ist ein Präzisionsgerät, das bei sachgemäßer Behandlung
über viele Jahre seine hervorragenden Eigenschaften behält. Bitte lesen Sie
diese Bedienungsanleitung, bevor Sie Ihr Gerät auspacken und in Betrieb nehmen.
Sie vermeiden dadurch Schäden am Gerät und an Ihren Schallplatten.
Ihr Thorens-Team
3
Verwendung
Ihr Plattenspieler wurde ausschließlich zur Verwendung
in geschlossenen Räumen konstruiert. Bitte verwenden
Sie ihn deshalb nur in Wohnräumen. Achten Sie darauf,
dass er keiner Feuchtigkeit ausgesetzt wird. Das externe
Netzteil wird mit 230 V Netzspannung betrieben. Bitte
ziehen Sie vor dem Öffnen unbedingt den Netzstecker.
1. Aufbau des Gerätes
Den Gummiantriebsriemen um den inneren Plattenteller und die Riemenscheibe legen. Dann den äußeren
Plattenteller auf den Innenteller aufsetzen und die Filzmatte auflegen (Abbildung 1).
Abbildung1
Vermeiden Sie Öl- oder Fettspuren auf Antriebsriemen,
Motor-Riemenscheibe und der Lauffläche des inneren
Plattentellers. Falls notwendig, sind diese Teile mit
einem in reinem Alkohol getränkten, nicht fasernden
Lappen zu reinigen.
Nun wird die Staubschutzhaube in die Scharniere am
Chassis eingeschoben (Abbildung 2).
4
Abbildung 2
2. Anschließen und Aufstellen
des Plattenspielers
Durch die Auswahl eines entsprechenden THORENS-Netztransformators kann der Plattenspieler an allen vorkommenden Netzwechselspannungen betrieben werden. Der Niederspannungsstecker am Kabel des Steckernetztransformators
wird in die entsprechende Buchse an der Geräterückseite
gesteckt (Abbildung 3).
Verbinden Sie das mitgelieferte Cinchkabel mit den Cinchbuchsen am Plattenspieler und den Phono-Anschlußbuchsen an Ihrem Verstärker (Achten Sie hierbei auf korrekte
Verpolung). Die getrennt geführte Litze stellt die Erd- oder
Masseverbindung her. Verbinden Sie diese mit der
Masseschraube am Plattenspieler und am Verstärker. Besitzt
Ihr Verstärker keine Masseschraube, so können Sie das Kabel
am Außenrand einer nicht benutzten Eingangsbuchse anklemmen (Abbildung 4).
Rückansicht
Für Verstärker mit einer 5-poligen Eingangsbuchse nach DIN
benötigen Sie ein Adapterkabel von Ihrem Fachhändler.
Die vielen Möglichkeiten beim Erdanschluß führen manchmal zu einer fehlerhaften Erdverbindung. Sie äußert sich in
Abbildung 3
Abbildung 4
5
einem Brummgeräusch in den Lautsprechern, dessen
Lautstärke sich mit dem Lautstärkeregler beeinflussen
lässt. Bei seinem Auftreten sollte zunächst untersucht
werden, ob die Masseverbindung einen sicheren Kontakt
am Verstärker aufweist.
Ist dieses Brummgeräusch durch eigene Versuche mit der
Erdverbindung nicht zu beseitigen, sollten Sie sich mit Ihrem Fachhändler in Verbindung setzten.
Eine weitere Quelle für Brummstörungen stellt die mögliche magnetische Einstrahlung des Netzteiles anderer Geräte (z.B. Verstärker, Receiver, CD-Player, Tuner usw.) auf das
Tonabnehmersystem dar. Solche Fehlerursachen kann man
leicht selbst ermitteln, indem man die Aufstellung des
Plattenspielers gegenüber den anderen Geräten verändert.
Obwohl THORENS-Plattenspieler gegenüber Erschütterun-
6
Abbildung 5
gen sehr unempfindlich sind, stellen diese ein generelles
Problem bei der Plattenwiedergabe mit hochwertigen
Tonabnehmern dar. Man wähle ein stabiles Möbel für seine
Aufstellung und vermeide die Nähe von Lautsprechern.
Bisweilen reicht dies in älteren Häusern mit Holzbalkendecken nicht aus. Hier hilft meistens die Aufstellung des
Plattenspielers auf einer Konsole, die mit geeigneten
Konsolenträgern an eine tragende Zimmerwand geschraubt ist.
3. Tonarm und Tonabnehmersystem
Wurde der Plattenspieler mit einem bereits montierten
Tonabnehmer geliefert, so brauchen die nachfolgenden
ersten Absätze dieses Kapitels, die sich mit der Montage
befassen, nicht beachtet werden.
3.1. Montage und Justierung des Tonabnehmers
4. Einstellen der Auflagekraft
Am Tonarm TP 41 (Abbildung 5) können nahezu alle auf
dem Markt befindlichen Tonabnehmer mit dem standardisierten Abstand der Befestigungslöcher von 12,5 mm
(1/2 inch) montiert werden.
Das Gegengewicht wird von hinten auf das Tonarmrohr
geschoben und im Uhrzeigersinn aufgedreht.
Der Tonarm wird nun bei abgesenktem Lift zwischen
Tonarmstütze und Plattenteller postiert (Abbildung 6).
Durch verdrehen des Gegengewichts wird jetzt der
Tonarm ausbalanciert. Danach wird der Tonarm wieder in
die Tonarmstütze eingerastet. Zur Einstellung der Auflagekraft wird nun das Gegengewicht mit einer Hand am
Verdrehen gehindert, während mit der anderen Hand die
vorne am Gegengewicht befindliche Skalenscheibe auf
Null gedreht wird. D.h., die Ziffer Null muß senkrecht
über dem Einstellstrich des Tonarmrohres stehen.
Die vier farblich gekennzeichneten Anschlußlitzen werden auf die entsprechenden Anschluß-Stifte (gleiche
Farbe) des Tonabnehmersystems geschoben. Ältere
Tonabnehmer weisen manchmal diese Kennfarben nicht
auf. Es bedeutet:
Weiß
Blau
Rot
Grün
–
–
–
–
linker Kanal, Innenleiter, (Signal)
linker Kanal, Außenleiter, (Masse)
rechter Kanal, Innenleiter, (Signal)
rechter Kanal, Außenleiter, (Masse)
3.2. Technische Daten Audio Technika AT-95E
• Auflagekraft: 1,5 – 2,5 g
• Empf. Auflagekraft: 2 g
Die gewünschte
Auflagekraft kann
nun durch Verdrehen des Gegengewichtes im Uhrzeigersinn eingestellt
werden.
Abbildung 6
7
Rille 1
Rille 2
5. Einstellen der Antiskatingkraft
Rille 3
Die Reibung zwischen dem Abtastdiamant und der
Schallrille erzeugt eine Kraft, die den Tonarm nach innen
in Richtung Plattenetikett ziehen will. Man nennt sie
Skatingkraft. Sie ist unerwünscht, denn sie bewirkt, dass
die Auflagekraft auf der Innenwand der Rille stärker als
auf der Außenwand ist.
Mit dem Antiskatinggewicht das am Einhängungsstift des
Tonarmes über den Drahtbügel eingehängt wird, kann
man die Skatingkraft kompensieren.
Weil die Stärke der Skatingkraft von der gewählten
Auflagekraft abhängt, muss man die Antiskatingkraft entsprechend einstellen. Die Einstellbereiche sind in die
Rillen 1, 2 und 3 am Einhängestift aufgeteilt.
Rille 1 = entsprechende Auflagekraft
Rille 2 = entsprechende Auflagekraft
Rille 3 = entsprechende Auflagekraft
8
10 – 15 mN
15 – 20 mN
> 20 mN
Abbildung 7
6. Bedienung des TD 295 MK IV
7. Tonarmlift
Der links vom Plattenteller angeordnete Drehknopf dient
zur Wahl der Geschwindigkeiten (33 / 45). Rechts neben
dem Drehknopf befindet sich die Start/Stop-Taste
(Abbildung 8).
Den Tonarm über die Einlaufrille der Schallplatte oder über
den Anfang des gewünschten Stückes positionieren.
Danach wird durch Umlegen des Lifthebels nach vorne
der Tonarm auf die Schallplatte abgesenkt.
6.1. Geschwindigkeitswahl
und Start
7.1. Endabschaltung
Wählen Sie für Langspielplatten mit dem Wahlschalter 33
Umdrehungen pro Minute aus und für kleine Platten 45
Umdrehungen pro Minute.
Zum Starten des Plattenspielers
drücken Sie die Start/Stop-Taste.
Abbildung 8
Erreicht der Tonarm die Auslaufrille, so tritt eine elektronische Abschaltvorrichtung in Tätigkeit: Das Gerät wird
ausgeschaltet. Den Tonarm mittels Handlift von der Platte
abheben.
Soll der Plattenspieler
ausgeschaltet werden, bevor der Tonarm die Auslaufrille
erreicht hat, drückt
man die Start/StopTaste. Der Tonarm
wird mittels Handlift
von der Platte abgehoben.
Abbildung 9
9
Technische Daten
THORENS-Werksgarantie
Für weitere Fragen steht Ihnen unser
Service gerne zur Verfügung unter:
e-mail: [email protected]
Technische Änderungen vorbehalten.
Wir verpflichten uns, fehlerhafte Teile dieses Gerätes kostenlos zu ersetzen oder das Gerät in unseren, bzw. von uns
anerkannten Vertragswerkstätten kostenlos Instandzusetzen, falls es innerhalb der Garantiezeit versagen sollte. Diese beträgt 2 Jahre vom Kaufdatum an gerechnet.
TD 295 MKIV
Antriebsystem:
Riemenantrieb
(geschliffener Präzisionsriemen)
Antrieb:
elektronisch geregelter
AC-Synchronmotor
Geschwindigkeiten:
33, 45 U/min
Geschwindigkeitsumschaltung: elektronisch
Plattenteller:
304 mm/2,3 kg, nicht magnetisch
Tonarm:
Thorens TP 41
mit AT-95E Tonabnehmersystem
Antiskating:
Gewicht
Automatik:
halbautomatisch
Endabschaltung:
optoelektronisch
Kabelkapazität:
160 pF
Stromversorgung:
Steckernetzteil verfügbar
für alle wichtigen Stromnetze
Abmessungen (BxTxH): 434 x 339 x 131 mm
Gewicht:
8,5 kg
Farbausführung:
Pianolack Schwarz
Pianolack Mahagoni
Pianolack Anis
10
Tritt innerhalb der Garantiezeit ein Mangel an Ihrem
Gerät auf, so wenden Sie sich bitte an Ihren Händler. Falls
das Gerät zurückzusenden ist, verpacken Sie es gemäß
den Angaben in der Bedienungsanleitung in der Originalverpackung. Porto und Versicherung sind vom Absender
zu bezahlen.
Fehler, die durch Nichtbeachtung der Bedienungsanleitung, ferner durch äußere mechanische Einwirkungen
entstehen, sowie Transportschäden sind durch diese Garantie nicht gedeckt.
Die Garantie erlischt, wenn das Gerät außerhalb des offiziellen THORENS-Service geändert, demontiert oder repariert wurde. NB: Bitte beachten Sie evtl. ergänzende
Garantiebestimmungen unserer jeweiligen Landesvertreter.
Dear THORENS customer:
The invention of the phonograph record is one of the most significant events in the cultural
history of the 20th Century.
Your THORENS record player TD 295 MK IV provides you with the opportunity to experience the
culmination of this development. This means the realisation of optimum audio quality from your
vinyl records with the highest possible protection of the modulated grooves.
THORENS record players feature a particularly heavy plinth made of an acoustically "dead" woodcompound. Owing to this material any distortions that may have a deteriorating influence on the
sonic properties are effectively suppressed. The outstandingly smooth-running synchronous
motor is supplied and controlled by a precise electronic generator which also keeps away any
sound-degrading interferences induced by the mains voltage supply.
The TD 295 MK IV is a precision device which with reasonable care will provide you with musical
pleasure for many years to come. In order to avoid malfunction or damage of your valuable
records you are kindly requested to read these instructions for use before unpacking the unit
and putting it into operation.
Sincerely yours,
THORENS team
11
Placement and Operation
Your new record player has been made for domestic use
only. Therefore it should never be used anywhere outside your living quarters and always kept in a dry place. The
external mains transformer unit connects to 230V mains
supply. Always disconnect it from the mains before proceeding with any manipulation at or in this unit.
1. Record player setup
Loop the drive belt around the sub-platter and motor pulley. Put main platter onto sub-platter and lastly add felt
mat (picture 1).
picture 1
Please make sure that no oil or fat gets onto the belt and
the outer surface of the sub-platter while manipulating it.
If necessary both parts may be cleaned with a pure alcoholic dillution added to a lint-free cloth.
Attach the dustcover to the hinges at the rear side of the
plinth (picture 2).
picture 2
12
The supplied THORENS mains transformer unit can be connected to nearly any mains voltage supply. The low-tension
plug at the cord of the transformer unit is to be inserted into
the respective socket at the rear panel (right) of the record
player (picture 3).
Connect one end of the supplied RCA leads to the record
player's RCA jacks at the rear panel (left) and the other end
to the dedicated phono jacks at your amplifier. Make sure
that polarity is correct, i.e. right/left channel output to
right/left channel input. The separate thinner lead is used to
make a connection to ground (GRD). Connect this lead between the ground post of the record player and the respective ground post of your amplifier. If your amplifier does not
feature a separate ground post you may connect the lead
with the outer rim of an unused RCA input at the amplifier
(picture 4).
rear view
For amplifiers featuring a 5-pin DIN jack at the phono input
section you will have to acquire a special adaptor (DIN to
RCA) from your THORENS dealer.
The many possibilities of grounding an audio system may
sometimes cause trouble in so far that a certain hum is audible through the speakers. This humming noise gets louder if
picture 3
picture 4
13
the volume knob is turned up. If hum can be heard we
advise to first re-check the ground connection at your
amplifier for a secure fit.
In case the cause of the hum cannot be localised and
eventually eliminated please contact your THORENS dealer for help.
Another source for hum can be electro-magnetic radiations coming from the power supply of other devices in
the audio chain (e.g. amplifier, receiver, CD player, tuner,
etc.). These interferences can cause a distorting effect in
the sensitive pick-up cartrige. However this can be easily
remedied by simply changing the position of the record
player with respect to the other devices. Although THORENS record players react quite insensitive towards
mechanical foot-fall shock or air-born resonance these
phenomena still remain a general problem when it
comes to playing back vinyl records with a high-quality
14
picture 5
pick-up cartridge. For the correct placement of ones
record player it is therefore highly recommended to
choose a stable piece of furniture and to avoid the proximity of the record player to loudspeakers. Under certain
circumstances this may not be enough in older houses
with wooden floor construction, yet in most cases a solid
console firmly mounted to a supporting wall can be very
benefical for the sonic properties of the record player
being placed on that console.
3. Tonearm and pick-up cartridge
If your record player has been delivered with a premounted pick-up cartridge you may disregard the following first paragraphs of this chapter.
3.1. Mounting and aligning the pick-up cartridge
4. Adjusting the tracking force
Nearly any pick-up cartridge in the market with standard
_-inch fixing holes can be mounted to the tonearm THORENS TP 41 (picture 5) by using the respective hardware
supplied with the cartridge.
Take the counterweight (make sure the tracking force dial is
facing the tonearm's bearing assembly!) and carefully rotate
it clockwise onto the tonearm tube at its rear end. Then
detach the tonearm from its support and move it between
platter and tonearm lift (picture 6). Balance the tonearm by
rotating the counterweight either clockwise or counter-clokkwise until total equilibrium has been achieved. Then move
the tonearm back to its rest. In order to adjust tracking force
hold the counterweight tight with the fingers of one hand to
prevent it from turning whilst the fingers of your other hand
turn the tracking force dial until the "0" on the dial is flush
with the white line on the rear tonearm tube.
With the help of tweezers, the four colour-coded litzwires are to be carefully pushed onto the four connection
pins (same colour-coding) of the cartridge. However
some pick-up cartridge lack the colour coding and are
marked with letters instead, whereby the meaning is
R = right channel = red wire (signal)
G = right channel = green wire (ground)
L = left channel = white wire (signal)
G = left channel = blue wire (ground)
3.2. Technical specifications of pick-up cartridge
Audio Technica AT-95E
• Tracking force range: 1.5 - 2.5 g (10.5 - 25 mN)
• Recommended tracking force: 2 g (20 mN)
The tracking force
can now be adjusted by slowly rotating the counterweight clockwise
(the dial is coupled
to the weight) until
you have come to
the desired trakking force.
picture 6
15
notch 1
notch 2
5. Adjusting anti-skating force
notch 3
The friction between pick-up stylus and record groove
while playing is generating a force which drags the tonearm towards the centre of the record. This movement
(dubbed "skating force") is certainly not desired as it
tends to increase the tracking force at the inner groove
whilst decreasing it at the outer groove.
The supplied anti-skating weight-on-string however is a
way out of this dilemma. In order to compensate the skating force it's attached at the notched rod behind the
bearing assembly and looped over the outrigger. Since
the strength of the skating force is roughly proportional
to the tracking force it has to be adapted accordingly. The
adaption range is provided by 3 notches on the rod whereby (picture 7)
notch 1 equals a tracking force of 1 - 1.5 g (10 - 15 mN)
notch 2 equals a tracking force of 1.5 - 2.0 g (15 - 20 mN)
notch 3 equals a tracking force of > 2.0 g (> 20 mN)
16
picture 7
6. Operation of the TD 295 MK IV
7. Tonearm lift
The rotary knob at the left side of the plinth selects the
record player speed (33 / 45 rpm). Next to the speed
selector knob is the START / STOP button (picture 8).
Move the tonearm from its rest and position it above the
lead-in groove or above the desired piece to be played.
Lower the lever of the tonearm lift whereupon the tonearm sinks onto the record.
6.1 Selecting speed and start up
7.1. End-of-record shut-off
Switch the rotary knob to 33 (rpm) for playing LPs and to
45 (rpm) for playing singles.
After the tonearm respectively the pick-up cartridge has
reached the lead-out groove the automatic shut-off function is triggered and the motor/platter stops. The tonearm is manually lifted up from the record by the lift-lever.
To start up your record player press the START / STOP button.
If the record player
is to be shut off
before the cartridge
has reached the
lead-out groove,
simply press the
START / STOP button and lift the arm
manually.
picture 9
picture 8
17
Technical Specifications:
THORENS Factory Warranty
In the event of further queries, we shall
be pleased to assist you by email:
[email protected]
Technical modifications subject
to change without prior notice.
In case a failure or malfunction occurs in your record player
during the warranty period we guarantee to replace any
defective part of this unit, or to repair the unit free of charge
in a service centre maintained or authorized by us. This factory warranty covers two years from the date of purchase.
TD 295 MKIV
Drive system:
belt drive
(precision-ground belt)
Motor:
electronically controlled
AC synchronous motor
Speed:
33 and 45 rpm
Speed selection:
electronically
Platter:
304 mm / 2.3 kg, non-magnetic
Tonearm:
THORENS TP 41 equipped with
pick-up cartridge AT 95E
Anti-skating:
by weight-on-string
Automatic functions: semi-automatic
Automatic shut-off:
opto-electronic
Capacity of leads:
160 pF
Voltage/Power supply: mains transformer unit available
for all major mains supplies
Dimensions: (WxDxH): 434 x 339 x 131 mm
Weight:
8.5 kg
Finish:
piano laquer black
piano laquer mahogany
piano laquer beige
18
If a defect or malfunction occurs within the warranty period you should inform your THORENS dealer or general
representative. If the unit has to be returned for repair or
service purposes you are kindly requested to send the unit
in its original shipping box whereby shipping charges and
insurance are to be covered from your side.
Any damage or malfunction caused by failure to observe
the instructions contained in this manual as well as damages occurred in transport or shipping are not covered by
this warranty.
This warranty will be void if the device has been modified,
disassembled or repaired by others than an appointed
THORENS service. NB: please be aware that there may be
additional warranty conditions issued and made applicable
by the THORENS representative in your country.
Notizen/Notes:
19
[email protected] · www.thorens.com · www.thorens.ch