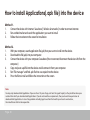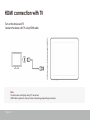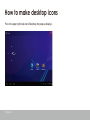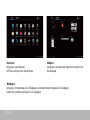
1
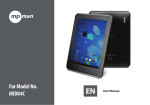
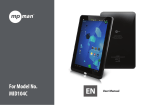
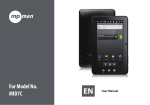
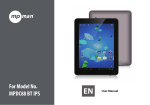
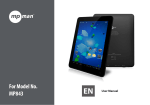
For Model No.
MP959
EN
User Manual
This manual contains important safety precautions and information of correct use.
Please be sure to read this manual carefully before use so as to avoid any accidents.
Do not place the product in hot, wet or dusty environment, especially in summer,
do not leave the product inside a car with all windows closed.
Avoid dropping, impacting or shaking the product violently, otherwise it may cause damages or malfunctions.
Select a proper volume to avoid ear problem when using earphones.
Do not cross the road or drive vehicles, using headphones to avoid traffic accidents.
Be sure to use the provided chargers and accessories in the package.
Be sure to charge the product when the following situations take place,
- The battery icon shows lower or empty.
- System automatically shut down and it turns off soon after restart.
- Operation keys do not respond properly.
- The device shows
on the top right corner.
Page 1
Specification
Hardware specification
Software specification
9.7" IPS 1024*768 Capacitive touch panel
Capacitive 10-point multi-touch screen
CPU: ARM cortex A8 processor
RAM : DDR3 1GB (3D accelerator possible for 3D games)
Wi-Fi (IEEE802.11 b/g/n) for internet connection
Dual camera 2M pixel (backside), 0.3M pixel (front)
HDMI port for TV-out (1080p output support)
USB host for OTG function
G-sensor
Micro SD card slot recognizing up to 32GB
Built-in speaker & Built-in MIC
5V DC power adapter
Andriod 4.0 ICS
Google browser
Wi-Fi connection
e-Book function (all e-book formats supported by application)
1080p HD file playback
VoIP phone function with Wi-Fi connection
Possible to view/edit MS office files by application
Video: AVI, RM/ RMVB, FLV, MPG4 – 1, MPEG – 2 etc.
Audio: MP3, WMA, AAC, WAV etc
Photo: JPEG, BMP, GIF, PNG, TIFF
Page 2
Name
Important Notice
- If the device is freezing or stuck, press the reset
button (a small hole). Another way to turn off the
device by force is to hold pressing power button
for more than 7 seconds.
- When the performance is slow after using some
applications, it is recommended to close running
application in setting menu.
- Use “File Manager” at main menu to search files.
Volume +
Instruction
P959
Volume ESC
USB/OTG/host
Charger
USB
Camera(front)
TV-OUT
Earphone
Power
Speaker
MicroSD
Page 3
Camera(back)
Reset
Charging
- Be sure to use the power adapter (DC5V, 2A) that is provided in the package, otherwise, the device may be
damaged and does not work.
- See the battery icon (
) on the status bar to check charging.
- It takes approx.. 8-10 hours to be fully charged from empty battery. Do not charge more than 15hours to
protect the device.
Note
The device is equipped with high performance processor.
It may be warm in case of using long or while charging, but not the problem.
Page 4
1. Power On/Off
Long press power button to turn on/off the device. It may take a minute to boot the device.
Short press power button to turn on/off the screen.(Standby mode. Refer to 3. below)
2. Desktop
After turning on the device, desktop displays with shortcut icons and arrow panel at the right side
Page 5
3. Standby mode(Screen off mode) /
Unlock the screen
Short press the power button to turn on/off the screen (standby mode on/off).
After standby mode off, slide the lock icon in order to unlock the screen.
Page 6
4. System settings
On the desktop, press menu button and select system settings.
Page 7
Press system settings
1. Wireless & networks
2. Sound
Wi-Fi – Press Wi-Fi to turn on/off
Wi-Fi settings - Press Wi-Fi settings, then the device
will automatically search the available Wi-Fi signals.
Select the network you want to connect with.
Set up each setting as you like.
Page 8
3. Display
4. Storage
•
Set up each setting as you like.
Check device memory and microSD card status.
Unmount SD card – Unmount the SD card for
safe removal.
Note
To search the files, run “File Manger” at main menu. On the top screen, press
to see files inside device.
Press
to see files of microSD card. Press
to see files of external storage.
Page 9
5. Battery
6. Apps
Check battery usage status.
Manage downloaded or running applications.
Downloaded
All installed application are listing.
Page 10
Keep pressing an application to manage.
Press Uninstall to uninstall the selected application.
Page 11
Running services
View and control currently running services.
7. Account & sync
Create your account. After connecting Wi-Fi network, the e-mailing system synchronizes your account
with the device. Emails are automatically downloaded into the device.
8. Location services
Google’s location service - Let apps use data from sources such as WiFi and mobile networks to
determine your approximate location
Page 12
9. Security
Screen lock – Protect your device from unauthorized use by creating a personal screen unlock pattern
Make passwords visible – Show password as you type.
Unknown sources - If you want to allow installation of non-Market Applications,
Press Unknown sources and presses OK.
Install from SD card – Install encrypted certificates from SD card.
Page 13
10. Language & input
Language – Choose your preferable language.
Keyboard & input method – Change keyboard & keyboard settings.
On Language & input settings, if you need other languages besides English on keyboard, press the relevant
keyboard and enter the chosen Keyboard settings, select Keyboards, press the language you need.
Page 14
11. Date & time
Set date & time and format
12. Developer options
Set options for application development
13. About tablet
See status, legal information, ETC
Page 15
How to connect/disconnect the device
with/from the computer
On main desktop, connect the device with the PC,
touch right side of the status bar on the bottom of desktop
Page 16
Press “USB connected”, select “Turn on USB storage”.
The device is recognized at Explorer of the computer.
Now you can use it as an external storage.
After finishing your work,
Press “Turn off USB storage” to unmount it.
Page 17
How to install Applications(.apk file) into the device
Method 1.
1.
Connect the device with internet. See above [1.Wireless & networks] in order to connect internet.
2.
Run android market and search the applications you want to install.
3.
Follow the instruction on the screen for installation.
Method 2.
With your computer, search application file(.apk) that you want to install into the device.
1.
Download the file(.apk) into your computer.
2.
3.
Connect the device with your computer. See above [How to connect/disconnect the device with/from the
computer.]
Copy and paste .apk file into the device and disconnect it from your computer.
4.
5.
Run “File manager” and find .apk file that was copied into the device.
6.
Press the file to install and follow the instruction on the screen.
Note
You may only download adult applications if you are at least 18 years of age, or at least the age of majority in the jurisdiction where you
reside or from which you download adult applications. If you do not meet these requirements, then you do not have permission to
download adult applications. In case of any problems including legal issues from the breach by end-user’s own decision,
the manufacturer shall not be responsible.
Page 18
HDMI connection with TV
Turn on the device and TV
Connect the device with TV using HDMI cable.
Note
The device does not display during TV connection.
HDMI cable is optional, it may not come in the package, depending on countries.
Page 19
How to make desktop icons
Press the upper right side icon of desktop, the pop-up displays.
Page 20
Shortcuts
Long press your desired
APK icon and put it on the desktop.
Widgets
Long press your desired wiget icon and put it on
the desktop.
Wallpaper
Long press the desktop, press Wallpapers and select one of categories of wallpaper.
Select one you desire and press Set wallpaper.
Page 21
Change Input Method
If your device was installed with other more input method,
long press setting icon of keyboard, and the pop-up displays.
Select the installed keyboard, then the keyboard will appear with your desired language you installed.
Page 22
Caractéristiques
OS
CPU
SDRAM
Display
Multi-touch screen
Built-in flash memory
Audio port
USB port
DC port
IO PORTS
HDMI port
Micro SD
OTG port
Button
Speaker
G-sensor
Camera
Wi-Fi
Power
Battery
Dimension
Charging time
by charger
Page 23
Android 4.0 ICS
ARM cortex A8 processor
DDR3 1GB (3D accelerator possible for 3D games and 3D movie)
9.7" IPS 1024x768 Capacitive touch panel
multi-touch
2 / 4 / 8 / 16GB, see the package
3.5ø earphones
1 x 5pin micro USB port (2.0 high speed)
5V, 2A
Yes
Micro SD card
1 x 5pin micro USB host and OTG
Power, VOL-, VOL+, back
Frequency response : 20Hz – 20k Hz, N/S : >90%
Yes
0.3M pixel (front), 2M pixel (backside)
802.11b/g/n
Adaptor 5V -2A
3.7V Li-Polymer
242 x 189 x 9.8 mm / 610g
approx. 8~10hours
For more information please check our website
www.mpmaneurope.com