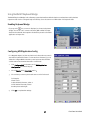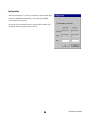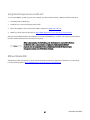
1
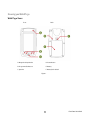
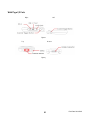
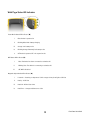
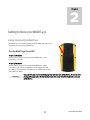
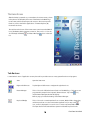
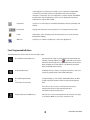
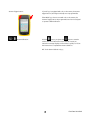
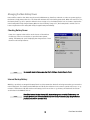
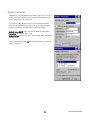
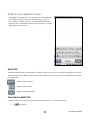
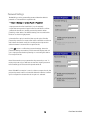
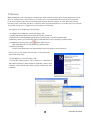
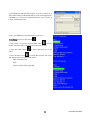
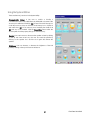
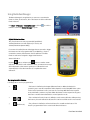
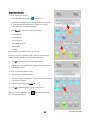
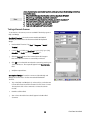
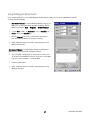
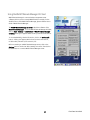
WebDT 430 Rugged Handheld POS Copyright© 2009, DT Research, Inc. All Rights Reserved 1 Rev Date 9/16/2010 Please Read Before Proceeding Note BATTERY IS NOT CHARGED and must be fully charged before using your device. DO NOT REMOVE THE BATTERY PACK WHEN THE DEVICE IS CHARGING. YOUR WARRANTY IS INVALIDATED IF the device outer casing is opened or subject to misuse. 2 Rev Date 9/16/2010 Table of Contents PLEASE READ BEFORE PROCEEDING .................................................................................................................................... 2 INTRODUCTION ................................................................................................................................................................... 5 KEY FEATURES ..................................................................................................................................................................... 6 INSIDE THE PACKAGE ........................................................................................................................................................... 7 KNOWING YOUR WEBDT 430 .............................................................................................................................................. 8 WEBDT 430 VIEWS...................................................................................................................................................................... 8 WEBDT 430 I/O PORTS ................................................................................................................................................................ 9 WEBDT 430 STATUS LED INDICATORS........................................................................................................................................... 10 GETTING TO KNOW YOUR WEBDT 430 .............................................................................................................................. 11 GETTING STARTED WITH THE WEBDT 430 ......................................................................................................................... 11 TURN THE WEBDT 430 ON AND OFF ............................................................................................................................................. 11 INSTALL/REMOVE BATTERY PACK ...................................................................................................................................... 12 TOUCH SCREEN CALIBRATION............................................................................................................................................ 13 THE HOME SCREEN ............................................................................................................................................................ 14 TASK BAR ICONS ......................................................................................................................................................................... 14 FRONT PROGRAMMABLE BUTTONS ................................................................................................................................................ 15 MANAGING THE MAIN BATTERY POWER........................................................................................................................... 17 CHECKING BATTERY POWER .......................................................................................................................................................... 17 CHARGING INTERNAL BATTERY ...................................................................................................................................................... 18 MANAGING YOUR DEVICE MEMORY ................................................................................................................................. 19 WIRELESS CONNECTION .................................................................................................................................................... 20 RDP CONNECTION ............................................................................................................................................................. 21 WEBDT ON SCREEN KEYBOARD CE VERSION ...................................................................................................................... 22 WEBDT OSK ............................................................................................................................................................................. 22 SHOW/HIDE THE WEBDT OSK ..................................................................................................................................................... 22 SAVE SETTINGS .................................................................................................................................................................. 24 PASSWORD SETTINGS ........................................................................................................................................................ 25 OS RECOVERY .................................................................................................................................................................... 26 USING APPLICATIONS ........................................................................................................................................................ 29 USING THE WEBDT UPDATE ............................................................................................................................................... 30 3 Rev Date 9/16/2010 USING THE SYSTEM UTILITIES ............................................................................................................................................ 31 USING THE BUTTON MANAGER ......................................................................................................................................... 32 USING THE BARCODE SCANNER ......................................................................................................................................... 34 CONFIGURING A SCANNER ............................................................................................................................................................ 34 TESTING A BARCODE SCANNER ...................................................................................................................................................... 35 USING THE MAGNETIC STRIPE READER .............................................................................................................................. 36 USING THE WEBDT REMOTE MANAGER CE CLIENT ............................................................................................................ 37 USING THE WEBDT KEYBOARD WEDGE ............................................................................................................................. 38 ENABLING KEYBOARD WEDGE ....................................................................................................................................................... 38 CONFIGURING MSR APPLICATION CONFIG ...................................................................................................................................... 38 CONFIGURATION......................................................................................................................................................................... 39 USING THE ACTIVESYNC TO CONNECT WITH A PC.............................................................................................................. 40 RFID AND VIBRATOR SDK .................................................................................................................................................. 40 SAFETY PRECAUTIONS FOR POWER SUPPLY UNIT .............................................................................................................. 41 4 Rev Date 9/16/2010 1 Chapter Introduction T he WebDT 430 features a 4.3” TFT LCD display, an integrated magnetic stripe reader (MSR), and optional point-of-service modules in a compact, rugged, and lightweight package. With on-screen soft keyboard, integrated Bluetooth connectivity, and options for integrated, barcode scanner or RFID, the WebDT 430 enables efficient point-of-service applications, inventory management, and field services. IP54 rated for water and dust resistance with IP65 sealed front panel, the WebDT430 performs indoors, outdoors, and in harsh environments. The WebDT Point-of-Service Handheld provides the precise features needed to streamline operations and improve productivity, data accuracy, and service. 5 Rev Date 9/16/2010 Key Features 4.3” WQVGA TFT-LCD touch screen Outdoor-viewable display Integrated magnetic strip reader (MSR) Slim and lightweight design IP54 rated for dust and water resistance with additional IP65 front panel Dynamic soft keyboard Support for Microsoft® Windows® CE Built-in Wireless LAN and Bluetooth connectivity Extended operation through hot-swappable battery packs Optional integrated 1D / 2D barcode scanner or RFID reader 6 Rev Date 9/16/2010 Inside the Package The following are included inside the box: 1 x WebDT 430 with Battery Pack 1 x Hand Strap attached on the WebDT 430 1 x Stylus with Lanyard Basic Operation Guide 7 Rev Date 9/16/2010 Knowing your WebDT 430 WebDT 430 Views Front Back A: Magnetic Stripe Reader D: Power Button B: Programmable Buttons E: Battery C: Speaker F: Battery Pack Switch Figure 1 8 Rev Date 9/16/2010 WebDT 430 I/O Ports Right Left Figure 2 Top Bottom Figure 3 9 Rev Date 9/16/2010 WebDT 430 Status LED Indicators Power Mode Status LED Indicator (): i. Blue: Device is powered on ii. Blinking Blue: Main battery charging iii. Orange: Low battery mode iv. Blinking Orange: Extremely low battery mode v. Off: Device is powered off or in suspend mode WiFi Status LED Indicator () : i. Blue: The device has been connected to a wireless AP ii. Blinking blue: The device is connecting to a wireless AP. iii. Off: WiFi is disabled Magnetic Stripe Reader LED Indicator (): i. Power On – Powering on Sequence: blinks orange 2 times, then lights solid blue ii. Ready – Solid blue iii. Read Ok – Blinks blue 1 time iv. Read Error – Orange and then turn to blue 10 Rev Date 9/16/2010 2 Chapter Getting to Know your WebDT 430 Getting Started with the WebDT 430 The WebDT 430 comes with a partially charged battery pack that you can use when you start to use your WebDT 430. Turn the WebDT 430 On and Off To turn on the device Use the stylus to push and hold down the POWER button on the backside for 2 seconds. To turn off the device Use the stylus to push and hold down the POWER button on the backside for 4 seconds. If you experience some sluggishness with your device, you can perform a Hard Reset to shut down all programs and restart your device. Warning You may lose data or your installed programs after you turn off the device. Be sure to Save Settings (See page 24) or backup all important data under Resident Flash before you turn off the device. 11 Rev Date 9/16/2010 Install/Remove Battery Pack The battery comes with WebDT430 is shipped partially charged. Before you start using your device, please fully charge the battery. Follow the steps below to install the battery pack for your WebDT 430: 1. 2. Removing a Battery Pack i. Hold the device with one hand with the front panel turned down. ii. Slide the Battery Pack Switch up to release the battery. iii. If necessary, lift the battery pack up with the stylus. iv. Tilt the battery pack until it disengages from the device. v. Slide the battery pack out to remove. Installing a Battery Pack i. Align the battery pack’s guide pins at the bottom with the two concave indentations inside the battery compartment. ii. Push the battery gently into place. iii. Move the Battery Pack Switch down to lock the battery pack in place. iv. The battery pack is now successfully installed. Note 3. The WebDT 430 can only be powered when the Battery Pack Switch is correctly in place. Charging the Battery- There are three ways to charge the WebDT430 battery. i. Charge the WebDT 430 directly by connecting the AC adapter to the DC-in port of the WebDT 430. The Power LED will be flashing while charging. When the Power LED turns to be steady blue, the battery is fully charged. ii. Put WebDT 430 on the desktop charging cradle. The Power LED will be flashing while charging. When the Power LED turns to be steady blue, the battery is fully charged. iii. Put the WebDT 430 battery on the back of the desktop charging cradle to charge the battery. The battery is fully charged after about 8 hours of charging. 12 Rev Date 9/16/2010 Touch Screen Calibration The first time you turn on the WebDT 430, the system will automatically direct you to do a screen calibration. To calibrate the WebDT 430 touch screen again, follow the steps below: Hold the function key and press to start calibration. Or Click Start → Settings → Control Panel → Stylus Select Calibration tab Click Recalibrate button (as show at right side). Follow the instructions described on the screen to complete the touch screen calibration. After starting to run the touch calibration, if users do not touch the screen within 30 seconds, the operation will be automatically terminated. If users do not perform the calibration precise enough, then the calibration process will be activated again until the calibration is done precisely or cancelled by users. 13 Rev Date 9/16/2010 The Home Screen After the device is powered on, you are taken to the Home screen, shown in the picture. The default Home screen of the device is the WebDT 430 Home screen, which allows finger-touch access to the most important functions, such as the built-in applications of Internet Explorer, My Documents and more. The task bar at the bottom of the Home screen contains standard WinCE icons, like Battery Status, Internet connection, Time, and so on. You can also find Keyboard Wedge bar. and Button Manager icons in the task Task Bar Icons Located at the bottom of application screens, the task bar provides access to many system functions and programs. Start Open the Start menu Right and Left Arrows Tap the right and left arrows to navigate through these icons. Button Manager This tool is used to define the button function of the WebDT 430. The buttons are icon, programmable, except for the Suspend/ Resume button. Tap on the and the Button Manager window will display. Refer to page 31 for detailed settings of the Button Manager. Keyboard Wedge This tool is used to convert input data from a scanner, MSR or RFID to keystrokes, and then pass them on to the current active application. If you tap on the icon, a menu is displayed. You can choose to connect a Scanner, MSR or RFID. The input data from the selected data capture module will be passed to the 14 Rev Date 9/16/2010 active application as keystrokes. For MSR, you can select the Configure MSR command to parse input raw data and specify the start and end sentinel characters on each track. Choose Configuration to enable/ disable “Add ENTER key after data” and add delimiters at start or end to distinguish if the data is captured from scanner, RFID or MSR. Input Panel Tap this icon to manually choose between the default soft input panel (SIP) and DTOSK. Date & Time Displays the current time. Double-tap this icon to change the time and date. Power Indicates the status of battery power. Double-tap this icon to open the Power Management Settings. Windows Tap this icon to switch to the Desktop or other open applications. Front Programmable Buttons The default functions of these buttons are: (From left to right) Show/Hide On Screen Keyboard: Pressing the button will show the selected On Screen Keyboard. on the taskbar can set the Clicking on the Input Method icon default On-Screen keyboard. You can select Microsoft On-Screen Keyboard (Keyboard in the taskbar) or DT Research On-Screen Keyboard (DTOSK in the taskbar). Programmable button: At default, there is no function assigned to this button. Users can assign any specific function in the Button Manager. Show/Hide System Utility or Combination Function Key In System Utility, you can enable/ disable WiFi, Bluetooth, RFID or MSR, adjust the speaker volume and adjust LCD brightness level. This button is also used as a combination function key to execute other functions when pressing the button simultaneously with another button. Suspend/ Resume the WebDT 430: Press the icon once to enter Suspend mode. Press the icon again to resume the WebDT 430 back into operation mode. 15 Rev Date 9/16/2010 Scanner Trigger buttons: If your DT430 is equipped with a 1D or 2D scanner, the scanner trigger buttons (see image to the left) are not programmable. If the WebDT 430 doesn’t come with a 1D or 2D scanner, the Scanner Trigger buttons are programmable and can be assigned to operate a different function. + Screen Calibration: Hold the button, and press the button to start the screen calibration. Before the screen calibration starts, an instruction message displays on the screen to guide you. Follow the instructions to complete the screen calibration. Ref: Touch Screen Calibration Pg 13 16 Rev Date 9/16/2010 Managing the Main Battery Power Data and files saved on the device may be stored in RAM memory; therefore, maintain a continuous power supply to the device to help prevent data loss. The Power LED indicates the main battery power level. When it shows blue color, the battery level is good for operation. When it shows orange color, the battery level is low. It is better to replace the main battery with a fully charged battery. When it shows blinking orange color, the battery level is critical low. You have to replace the main battery with a fully charged battery immediately. Checking Battery Power Power icons appear in the task bar at the bottom of the window. Double-tap on the icon at any time to open the Power system setting. The Battery tab opens displaying the charge status of both the main and backup batteries. Note To manually check battery power, tap Start > Settings > Control Panel > Power. Internal Backup Battery WebDT430 provides hot-swappable battery function; this prevents the device from being reset when you remove the main battery pack. This battery retains RAM data and allows the real-time clock to remain operational for up to 10-15 minutes. If the device is left without the main battery pack for more than 10-15 minutes, the device will shut down and the data in the RAM will be lost. Note Even if the internal backup battery fails, data and programs stored in Flash memory are not lost. However, the device automatically reset when you install a fully charged battery pack and you need to reset the clock. 17 Rev Date 9/16/2010 Charging Internal Battery The power to charge the internal battery can be external power (using a charging peripheral) or an installed charged battery pack or a combination of both. To ensure that the internal backup battery functions properly, maintain a consistent power supply for the first eight hours of terminal operation. 18 Rev Date 9/16/2010 Managing your Device Memory Run Start → Settings → System. In the System Properties window, select the Memory tab. Follow the instructions to adjust the slider to the left to increase the memory used for running a program and adjust to the right to increase the storage space. 19 Rev Date 9/16/2010 Wireless Connection The WebDT430 includes WiFi function which supports 802.11 b/g. In default, if there is a WiFi Access Point found, a dialog window pops up automatically as seen on the right: To connect to a WiFi Access Point, choose the available wireless network from the Wireless Information tab by double-clicking the network. The Wireless Properties window will then display: Network name (SSID): Input or modify the Network name (SSID) Encryption: choose from TKIP or AES Authentication: Choose from Open, Shared, WPA, WPA2, WPA-PSK, and WPA2-PSK Input the Network Key, click OK and save the settings to create the wireless connection. 20 Rev Date 9/16/2010 RDP Connection Remote Desktop Protocol (RDP) is a multi-channel protocol that allows a user to connect to a networked computer. Tap Start → Programs →RDP Connection Clients exist for most versions of Windows (including handheld versions), Linux/Unix, Mac OS X and other modern operating systems. The server listens by default on TCP port 3389.[1] Microsoft refers to the official RDP server software as Terminal Services or Remote Desktop Services. On WebDT430 you can use wireless networks for RDP applications by entering a local IP address and clicking Connect. A box will pop up, and then enter a user name and password to create a connection. 21 Rev Date 9/16/2010 WebDT On Screen Keyboard CE Version In the WebDT 430, the Microsoft on screen keyboard and the WebDT On Screen Keyboard (OSK) coexist in the operating system, so you can choose which one of them you want to use. The WebDT OSK features bigger keys and a user-friendlier interface, which can help you correctly and easily key in the characters. WebDT OSK The WebDT OSK will enlarge a character when it’s tapped to make it easier for you to see that you’ve tapped the correct key. The WebDT OSK has three different keyboard layouts: alphabetical, numeric and symbol. You can switch layouts by clicking the following icons: : Switch to numeric keypad : Switch to symbol keypad : Switch to alphabetical keypad Show/Hide the WebDT OSK The WebDT OSK can be shown by pressing the first programmable button or from the Input Panel: 1. Tap in the taskbar. 22 Rev Date 9/16/2010 2. Select DTOSK to show the WebDT OSK. 3. To hide the OSK, either press the first programmable button 4. Tap or from the Input Panel. in the taskbar. 5. Click Hide Input Panel to hide the WebDT OSK. 23 Rev Date 9/16/2010 Save Settings To avoid data or installed application loss after the device is turned off, execute the Save Settings function to insure data and application integrity. Tap Start → Settings → Control Panel → Save Settings 1. Select the Save Current Settings radio button as shown in the right figure and click OK. A message “The system will save current settings into persistent storage” will pop up. 2. Click OK, a message “Save current settings finished!” displays. Click OK again. All data and settings in Windows/Desktop, Windows/Start up and Windows/ Programs (Resident Flash data included) will be saved. Please be aware that data and settings stored in other locations will be lost after the device is powered off. To return to default settings, select the Reset to Default Settings radio button and press OK. Then the factory default settings will be loaded and the device will be restarted. 24 Rev Date 9/16/2010 Password Settings The WebDT 430 can be protected by password when the device is powered on or resumed from suspend mode. Tap Start → Settings → Control Panel → Password 1. Input password in first blank field. (1~40 characters) 2. Input the same password again in the second field to confirm. 3. Select the checkbox to enable password protection when powering on the device. The default setting does not enable this function as shown in right picture. 4. Once the first option is enabled, the second option “Enable password protection for screen saver” will be available to select as well. Check the checkbox will also enable password protection when the device is resumed from suspend mode. 5. Click OK button to confirm the password settings. Once the password settings are enabled, a full screen will display and ask you to input password when powering on or resuming the device from suspend mode. Note: Please make sure you remember the password you set. To reset your password, you will have to enter the original password before entering to the Password Properties window. Note: If the WiFi connection is set to be alive at suspend mode, the password protection will not be enabled when the device is woken up from suspend mode even the above option is selected. 25 Rev Date 9/16/2010 OS Recovery When the WebDT430 OS is damaged (For example, the device might stop at the splash screen when turned on) but eBoot is still alive, there is still a chance to recover the OS. To ensure the device eBook still works, pressing the fourth button and then third button immediately right after the device is powered on. If the device can enter OS Recovery screen successfully, the eBoot is still alive. Then follow below guidelines to do OS Recovery for your device. This OS Recovery process is suggested to be executed by an IT Manager. The required tools for OS Recovery are as following: 1. Your WebDT 430 and WebDT430 desktop charging cradle. 2. One Windows System (XP and above) desktop computer or Notebook. 3. USB cable (for connecting between the desktop computer/ Notebook and the charging cradle). 4. USB driver, secusb2.sys. (Download from http://www.dtresearch.com/product/DT430/download.htm). 5. The WebDT430 OS Recovery program (Please download from http://www.dtresearch.com/product/DT430/download.htm) 6. WebDT 430 OS Image (Please contact DT Research sales representative to get an OS image for recovery purpose) Once above tools are ready, follow the steps as outlined below to execute the OS recovery: 1. Put the WebDT430 onto the charging cradle. 2. Connect the charging cradle to a PC or Notebook by a USB cable. A dialog window asking for driver installation will display, select a target folder that contains OS Recovery drivers and then complete the driver installation. 26 Rev Date 9/16/2010 3. Run WebDT430 USB Recovery program on the PC or Notebook. A dialog window (DT430 USB Update) will be shown as the right picture. The WebDT 430 should be connected with the PC now as shown at bottom of the dialog window. 4.Turn on the WebDT430. After the device is turned on, immediately press the fourth button . 5. Then, within 0.5 seconds, press the third button , then the OS Recovery menu will be shown as the blue screen at right. 6. Press the fourth Button menu. to select “Recovery OS” in the 7. Press the third button to execute Recovery OS. The screen will display below message as right picture: Enter LowLevelFormat. Done. Please send the file through USB. 27 Rev Date 9/16/2010 8. On the WebDT430 USB Recovery program at PC or Notebook side, select a correct OS image file and click the Update button as shown on the picture to the right. A progress bar displays on the bottom while updating the OS image. A message displays, “Downloading OS, please waiting about 1-3 minutes.” After a successful update, the WebDT430 starts to enter WinCE OS. Then the OS Recovery has been done successfully now. If the system still does not boot, the problem might not be caused by a damaged OS. Please contact DT Research’s technical support team for further help. 28 Rev Date 9/16/2010 3 Chapter Using Applications The WebDT 430 provides several useful applications and utilities that can be accessed from the Windows/Programs directory: WebDT Update lets you update the OS and Firmware in WebDT 430. System Utilities lets you to quickly enable or disable WiFi, Bluetooth, RFID or MSR, adjust the speaker volume and adjust LCD brightness level. Button Manager lets you to assign button functions for the 3 front programmable buttons and the 2 side trigger buttons. Scanner Configuration lets you configure the scanner settings and add/delete symbologies. WebDT Terminal lets you to connect to COM ports and test your scanner or MSR. Keyboard Wedge lets you to convert scanner/ MSR/ RFID input data to keystrokes. WinCE Remote Manager Client lets you connect to the WebDT Device Manager server and remotely update packages, applications, registry keys, etc. 29 Rev Date 9/16/2010 Using the WebDT Update The WebDT 430 operating system and Firmware can be updated through an FTP, HTTP or a local storage device such as a USB Disk. To run the Update program, click Start → Programs → Update. FTP/HTTP update: Select FTP/ HTTP and input the OS image filename or Firmware, server address and login information in the blank field, as shown in the right figure. Then click the Update button to start the update process. A message box will be shown to show the progress. During the update, please make sure the DT430 is powered by external DC power or the main battery power level is more than 25% Local (USB Device) update: If the OS image or Firmware is in a USB Disk, select Local then click Browse or enter the full path of the OS image file. Click the Update button and a message box will be displayed to show the OS update progress. Remote update via Device Manager WebDT430 also supports Remote Update from WebDT Device Manager server (if available). In this case, the WebDT Remote Manger–CE Client must be run and connected to a Device Manager. Then the user can update the WebDT430 OS or Firmware from the Device Manager. Note: Firmware update allows you to extend battery life and better control LED status. 30 Rev Date 9/16/2010 Using the System Utilities There are three major sections in the System UtilityCommunication Status- It lets user to enable or disable a communication accessories, WiFi, Bluetooth, RFID, MSR or Scanner. If the accessory is installed and enabled, “ON“ shown in the circle bitmap icon under the accessory. User can click the circle bitmap icon to disable it and it will show “OFF”. If an accessory is not installed, then it will show OFF and can not be enabled. Click the Propertities button under the accessory will show the property dialog box of the accessory. Speaker- User can increase or descrease the speaker volume by clicking on the up and down arrow icons. User can also mute the speaker by clicking on the speaker icon. Click the icon again will unmute the speaker. Brightness- User can increase or decrease the brightness of the LCD panel by clicking on the up and down arrow buttons. 31 Rev Date 9/16/2010 Using the Button Manager The Button Manager is an application you can use to customize the functions of the 3 front buttons, the 2 side buttons and the combination function buttons. Run Start → Programs → Button Manager or click the taskbar to launch the Button Manager program. icon in the Default Button Functions The 3 front buttons are user programmable (predefined: activate/deactivate on-screen keyboard, no action, and activate/deactivate System Utility). If a scanner is installed, the two side trigger buttons are used to trigger the scanner and are not programmable. If your WebDT 430 doesn’t come with a scanner, then these two buttons will have no default functions and can be assigned to trigger other functions. Screen Calibration: Hold the button, and press the button to start the screen calibration. Before the screen calibration starts, an instruction message will be displayed on the screen to guide you to calibrate the touch screen displays. Follow the instructions to complete the screen calibration. Non-programmable Buttons: Following buttons are non-programmable: 1. 2. 3. : This button is defined as the Suspend/Resume function. When the device is in operation, press once will suspend the device. Depends on the “Keep WiFi alive” option in the Control Panel Power control, user can choose to keep WiFi alive in the suspend mode, which will consume more power. When the device is in the suspend mode, press the button once will resume the device to normal operation mode. + : This combination function button is defined as touch screen calibration. After pressing the buttons, the touch calibration will start. This can be used if the touch is not accurate. (FnON mode) : The 3rd button is defined as a functional button for use with another button. This button is programmable if it is not used as the functional button. 32 Rev Date 9/16/2010 Assign Button Function: To assign a function to a button: 1. Start Button Manager by tapping in the task bar. 2. Tap the button (3 buttons at the bottom and 2 buttons on the top) to be programmed. The tapped button changes to an orange status, as shown in the picture to the right. 3. In the Normal tab, there are 6 predefined functions Internet Explorer Show/Hide OSK Touch calibration Run a specific program System Utility No action User can select one of the functions to incorporate. If user chooses to run a specific program, user has to enter the path name of the executable program and its parameters if has. 4. Click OK to assign the function to the selected button. 5. The function is now assigned. Click the previously selected button to enable the function. To assign a combination function button: 1. Tap the button to be programmable. 2. Click on the “Fn On” tab. Only the 2nd button is programmable. Click on the button to select it. 3. Select a function listed on the FnON tab. 4. Click OK to enable this function on the selected button. After a successful configuration, click button to enable the function. then click the predefined 33 Rev Date 9/16/2010 Using the Barcode Scanner Before using scanner, user needs to run the Scanner Configure program to make sure the target barcode symbology is selected. By using the Scanner Configure program, user can add, delete or reset symbology. Note Before executing the Scanner Configure program, make sure to disconnect the scanner in the Keyboard Wedge. Configuring a Scanner To configure the scanner module settings: Run ScannerConfig.exe: Tap Start → Programs → Scanner Configure. A dialog box is displayed and the COM port settings have been displayed as right figure. 2D Scanner Module COM1 for Port 1 for Stop bits 57600 for Baud rate None for Parity. 8 for Data bits 1D Scanner Module COM1 for Port 1 for Stop bits 19200 for Baud rate None for Parity. 8 for Data bits Click on the Connect button to activate the scanner module. After connecting to the scanner module, the Firmware version, Available symbologies and Symbologies in used will be displayed on the screen. User can check if the target symbology is listed in the Symbologies in used listbox. If yes, click the OK button to finish the scanner configuration. If not, select the target symbology in the Available symbologies listbox and click the “Add” button. The selected target symbology will be added into the Symbologies in used listbox. Then click the OK button to finish the scanner configuration. Note Adding only the symbologies you need for testing will give the best results. Adding too many symbologies all at the same time will influence performance. 34 Rev Date 9/16/2010 Note Some of symbologies cannot exist together; make sure you use the following instructions to avoid this issue: 1. When UCC.EAN Composite CC-A/B is activated, deactivate UPC/EAN 2. When TLC 39 is activated, deactivate Codablock F 3. When EAN.UCC Composite A/B is activated, deactivate Codablock F 4. When MicroPDF is activated, deactivate Codablock F 5. Code 39 and Codablock A cannot coexist 6. Code 128 and Codablock F cannot coexist Testing a Barcode Scanner To test the bar code scanner, user can use WebDT Terminal program or Keyboard Wedge. Use WebDT Terminal- To test the scanner module with WebDT Terminal, the scanner has to be disconnected with the keyboard Wedge. 1. Run the WebDT Terminal. Tap Start → Programs → WebDT Terminal. 2. Connect Port to COM1, set Baud Rate to 57600 (2D)/ 19200(1D), Data bits to 8, Parity to None, and Stop bits to 1. 3. Click the Connect button. The Connect button will change to Disconnect after the scanner is successfully connected. 4. Click OK to close the window and test the scanner by pressing one of the side buttons. The output will appear in the Receive Data field. 5. Verify the captured data. Use Keyboard Wedge- To test the scanner module with Keyboard Wedge, the scanner has to be disconnected with the WebDT Terminal. 1. Tap on the (Keyboard Wedge icon) on the task bar, and make sure it shows Disconnect Scanner in the menu list. If it shows Connect Scanner, then click on the command to connect the scanner module. 2. Run Microsoft WordPad. 3. Scan a barcode and the barcode will appear in the WordPad document. 35 Rev Date 9/16/2010 Using the Magnetic Stripe Reader User can write application to control MSR (Magnetic Strip Reader) via COM port. User can test MSR either by WebDT Terminal or Keyboard Wedge. 1. Use WebDT Terminal- To test the MSR with WebDT Terminal, the MSR has to be disconnected with the keyboard Wedge. Run the WebDT Terminal from Start → Programs → WebDT Terminal. 2. Connect Port to COM3, set Baud Rate to 19200, Data bits to 8, Parity to None, and Stop bits to 1. 3. Click the Connect button. The Connect button will change to Disconnect after the MSR is successfully connected. 4. Swipe a Magnetic Stripe Card and the output will appear in the WebDT Terminal field. Use Keyboard Wedge- To test the MSR with Keyboard Wedge, the MSR has to be disconnected with the WebDT Terminal. 1. Tap on the (Keyboard Wedge icon) on the task bar, make sure it shows Disconnect MSR in the menu list. If it shows Connect MSR, then click on the command to connect the MSR. 2. Run Microsoft WordPad. 3. Swipe a Magnetic Stripe Card and the output will appear in the WordPad document. 36 Rev Date 9/16/2010 Using the WebDT Remote Manager CE Client WebDT Device Manager is a remote device management server software, which is used to manage WebDT devices remotely. For the detail functions of the WebDT Device Manager, please refer the User’s Guide of WebDT Device Manager. The WebDT Remote Manage CE Client is the client software of the WebDT Device Manager. To run the WebDT Remote Manager CE Client, click on Start-> Settings -> Control Panel -> WebDT Remote Manager CE Client. A dialog box appears which shows you the CE Client Version. To show the WebDT430 device information, click on the Device Info button. A dialog box appears which shows you the board revision, model number, OS version, Eboot version, etc. Before connecting to a WebDT Device Manager server, click on the Settings button to make sure all the settings are correct. Then click on the Start button to connect a WebDT Device Manager server. 37 Rev Date 9/16/2010 Using the WebDT Keyboard Wedge The WebDT Keyboard Wedge is the software program that interfaces with the device to translate data read by the data capture module–such as a magnetic strip card reader, a barcode scanner or a RFID reader–into keystroke data. Enabling Keyboard Wedge If you tap on the icon, a menu is displayed, as shown in the picture at right. You can choose to connect a Scanner, MSR or RFID. The input data from the selected data capture module will be passed to the active application as keystrokes. Configuring MSR Application Config For a Magnetic Stripe Card, the raw data in each data track may contain start and end sentinel characters. To remove those characters, you can select the Configure MSR command to parse input raw data and filter out the start and end sentinel characters on each track. 1. Click Configure MSR in the menu, and a MSR Application Configuration window will display. 2. Choose Enable in the Parse Data section. 3. Choose data you want to parse at the start or end of each track. For Example: Check Track 1 In Start Sentinel Character, select % In End Sentinel Character, select? See the picture at the right. 4. Click OK to complete the settings. 38 Rev Date 9/16/2010 Configuration Select the Configuration command, a Configuration window will display. Check the “Add ENTER key after data” to automatically add ENTER command after data captured. Input Start or End sentinel characters for Scanner, RFID or MSR to help distinguish where the captured data come from. 39 Rev Date 9/16/2010 Using the ActiveSync to Connect with a PC To connect the WebDT 430 with your personal computer, you will need the hardware, software and driver listed below: 1. A charging cradle for WebDT 430 2. A USB cable to connect the charging cradle and PC 3. Microsoft ActiveSync: Please download from Microsoft web site, www.microsoft.com. 4. WebDT 430 driver: Please download from: http://www.dtresearch.com/product/dt430/download.htm After you have installed the Microsoft ActiveSync and connected the WebDT 430 to the PC, the computing system detects the new hardware (hardware driver installation is required). Note When communicating via ActiveSync, your device must be connected to the host workstation with a communication peripheral sold/manufactured by DT Research. Use of any peripheral not sold/manufactured by DT Research may damage your device and will void the warranty. RFID and Vibrator SDK The WebDT 430 RFID module (factory option) and vibrator SDK are available for application developers for downloading from the following address: http://www.dtresearch.com/product/DT430/download.htm. 40 Rev Date 9/16/2010 SAFETY PRECAUTIONS FOR POWER SUPPLY UNIT Handle battery packs carefully Warning Danger of explosion if battery is incorrectly replaced. To reduce risk of fire or burns, do not disassemble, crush, puncture, short external contacts, expose to temperature above 60° C (140° F), or dispose of in fire or water. Replace only with specified batteries. Recycle or dispose of used batteries according to the local regulations or reference guide supplied with your product. Take extra precautions Keep the battery or device dry and away from water or any liquid as it may cause a short circuit. Keep metal objects away so they don’t come in contact with the battery or its connectors as it may lead to short circuit during operation. Do not use a battery that appears damaged, deformed, or discolored, or the one that has any rust on its casing, overheats, or emits a foul odor. Always keep the battery out of the reach of babies and small children, to avoid swallowing of the battery. Consult the doctor immediately if the battery is swallowed. If the battery leaks: Do not allow the leaking fluid to come in contact with skin or clothing. If already in contact, flush the affected area immediately with clean water and seek medical advice. Do not allow the leaking fluid to come in contact with eyes. If already in contact, DO NOT rub; rinse with clean water immediately and seek medical advice. Take extra precautions to keep a leaking battery away from fire as there is a danger of ignition or explosion. Copyright ©2010 DT Research, Inc. All Rights Reserved. DT Research and WebDT are either registered trademarks or trademarks of DT Research, Inc. Microsoft, Windows, Windows CE, Internet Explorer, ActiveSync and Windows Media are either registered trademarks or trademarks of Microsoft Corporation in the United States and/or other countries. 41 Rev Date 9/16/2010