1
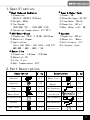
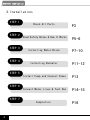
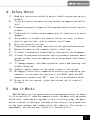
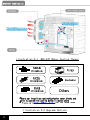
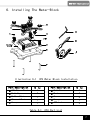
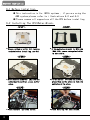
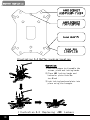
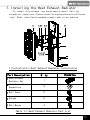
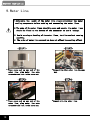
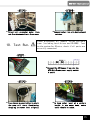
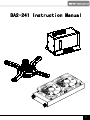
BA2-241 Instruction BA2-241 Instruction Manual 1 BA2-241 Instruction Table of contents 1 2 3 4 5 6 7 8 9 10 11 12 2 BA2-241 Specifications ····· P3 BA2-241 Part Descriptions ···· P3 BA2-241 Installation ······ P4 Safety Notes ·········· P5 How It Works ·········· P5-6 Installing the Water-Block 6-1 Before Installing ······ P8 6-2 Installing the CPU Water-Block P8-11 Installing the Radiator 7-1 Installing the Radiator ··· P13 Installing the Pump & Connect Power P14 Water Lines ··········· P15-16 Test Run ············ P16 Completing the System Installation 11-1 Completion ········· P17 11-2 Maintenance ········ P17 11-3 Trouble shooting ······ P18 Warranty 12-1 Coverage ·········· P18 12-2 Terms and Conditions ···· P18 BA2-241 Instruction 1.Specification: Heat Exhaust Radiator 1) Dimension: 300(L)X 124(W)X 35(H)mm 2) Weight:680g 3) Fan Speed: 1200 RPM (7V) - 1800 RPM (12V) 4) Operation Temperature:0℃~35℃ CPU Water-Block 1) Dimension:45(L) X 45(W) X30(H)mm 2) Material:Copper 3) Application: Intel LGA 1366 / LGA 1156 / LGA 775 AMD AM3 / AM2 / AM2+ / K8 Water Line 1) Dimension:I/D-6mm ;O/D-8mm 2) Material:PU 3) Life:2 yrs 4) Max. Temperature:50℃ Pump & Water-Tank 1) Power:5W 2) Rated Voltage:DC 12V 3) Flow Rate:72L/Hr 4) Capacity:150 ml 5) Max. Water Lift:2M Coolant 1) Capacity:250 ml 2) Material: Water 3) Anti-Freeze:-5℃ 4) Lifespan:2yrs 2.Part Description: Description Q’ty Description Q’ty Radiator ×1 Water Line ×1 Supports ×2 Instruction Manual ×1 Pump ×1 Fan Connector ×1 CPU Water-Block ×1 I/O Water Line Shield ×1 ×1 Pump Connector ×1 Coolant ×1 ATX Connector ×1 Tower Cover ×1 Radiator Accessories ×1 CPU Accessories Package 3 BA2-241 Instruction 3.Installation: STEP 1 STEP 2 STEP 3 STEP 4 STEP 5 STEP 6 STEP 7 4 Check All Parts Read Safety Notes & How It Works Installing Water-Block Installing Radiator P3 P5-6 P7-10 P11-12 Install Pump and Connect Power P13 Connect Water Lines & Test Run P14-15 Completion P16 BA2-241 Instruction 4. Safety Notes 1) 2) 3) 4) 5) 6) 7) 8) 9) 10) 11) 12) 13) 14) Read this instruction carefully before installing and running this product. If you are new to the water cooling system, we suggest you ask for help. Please disconnect all powers of the computer before installing this product. Please note all safety issues common with all electronics to avoid damages. The product is suitable for home or office use only, no other special applications, such as medical are allowed. Only use Larkooler coolant. Please place in open space, avoid direct sunlight and heat sources. Backup the data on the computer before installing. All water lines must be locked tightly into place to avoid damages. If there is problem with the water cooling system or the motor makes unusual noises, turn off computer for a system check (see Trouble Shooting). If leakage appears, shut down system for repair and checking (see Trouble Shooting). Conduct regular checks on the water volume in the system. We suggest installing a temperature controlling program on your computer, or activate the function in the BIOS, when the CPU temperature reaches over 65℃, turn off for maintenance check. Do not drink the coolant; place the coolant out of reach of children. 5. How It Works BA2-241 Water cooling system uses the heat exchange theory (as shown in illustration 5-1), when the computer starts, the water cooling system would start, under the diving power of the circulation pump, the water would circulate in the pipes, the heat of the chips will be transmitted to the heat exhaust and transpired by the radiator. The system is upgradable; the options are listed in illustration 5-2. 5 BA2-241 Instruction Illustration 5-1 BA2-241 Water Cooling Theory Illustration 5-2 Upgrade Options 6 BA2-241 Instruction 6. Installing The Water-Block Illustration 6-1 Part Description A. CPU Water Block C. Bolt Cap E. Buffer Plate G. Thermal Paste I. Scraper CPU Water Block Installation Q’ty 1 4 1 1 1 Table 6-1 Part Description B. Bolt Base D. Washer F. Screws H. Hexagon J. AMD Locker Q’ty 4 4 4 1 2 CPU Part List 7 BA2-241 Instruction 6-1 Before Installing: This instruction is for INTEL systems , if you are using the AMD system please refer to illustrations 6-2 and 6-3. Please remove all supporters off the CPU before installing. 6-2 Installing The CPU Water-Block: -STEP1- z Choose suitable buffer(E)locking sockets before installing, see 6-2. -STEP3- z Aline sockets on buffer (E)with the motherboard position, place buffer ontop. -STEP5- z Place washers (D)onto screws. 8 -STEP2- z If the motherboard model is INTEL LGA 1366-1156, remove retangular buffer in the middle. -STEP4- z Fix the screws (F)onto the buffter, place them on the plate to lock the motherboard in place. -STEP6- z Place bolt cap (C) onto screws. BA2-241 Instruction -STEP7- -STEP8- z Before applying thermal paste, clean the surface of the CPU, place sufficient amount of thermal paste (G) onto CPU. z Using the scraper (H), evenly spread thermal paste onto CPU. -STEP9- -STEP10- z Remove protectie shield on the bottom before installing the CPU Water-Block. z Aline the CPU locker and the screws (F), gently put the Water-Blcok on top of the CPU evenly. -STEP11- z Screw the bolt bases (B) onto the screws (F) until the Water-Block is tightly locked in. -STEP12- z Complete 9 BA2-241 Instruction Illustration 6-2 Buffer Locking Location Operation: 1)Use the hexagon to dissemble the screws, plate and locking hands. 2)Place AMD lcoking hands and Larkooler plate onto Water-Blcok . 3)Lcok locking hands and plate into place using the hexagon. Illustration 6-3 10 Replacing AMD Lockers BA2-241 Instruction 7. Installing the Heat Exhaust Radiator To install this product, you would need scissors, Phillips screwdriver, and pliers. Please install at a quite place with sufficient light. Other installation methods please refer to our website. Illustration7-1 Heat Exhaust Radiator Installation Part Description A. Heat Exhaust Radiator Set B. Heat Exhaust Supporters Q’ty Illustration 1 2 C. Bolt Caps 2 D. Screws 8 E. Bolt Bases 4 Table 7-1 Heat Exhaust Radiator Part List 11 BA2-241 Instruction 7-3 Installing the Heat Exhaust Radiator -STEP1- z Use the (D) Screw to pass through the socket on the supporter (B), lock in bolt base (E) until tight, repeat 4 times. -STEP3- z Chose relevant sockets, place bolt caps (C) into the sockets at the back of supporters, lock in until tight. -STEP5- z Connect the fan connecter cable, one end onto the radiator, the other onto the computer power. 12 -STEP2- z Aline supporter with locked in bolts onto the sockets at the back of main frame case, screw on screws (D) until tight. -STEP4- z Repeatfour times until installation finished. -STEP6- z Remove side panel, threat fan cable as shown on picture, screw on I/O water line shield until locked in. BA2-241 Instruction 8. Installing the Pump & Connect Power: -STEP1- z Remove velcro at the bottom of pump. -STEP3- z Connect pump connector cable, one end onto the pump, the other onto the computer power. -STEP2- z Place at suitable position. -STEP4- z Connect pump connector cable onto computer. -STEP5- z Connect the two fan connectors. 13 BA2-241 Instruction 9.Water Line: 1.Determine the length of the water line required between the water cooling components before cutting and connecting the water lines. 2.The ends of the water lines should be even and smooth, the water lines should be fixed to the bottom of the connecter to avoid leakage. 3. Avoid curving or bending of the water lines, to allow coolant running smoothly. 4. The order of water line connection does not affect the cooling effect. -STEP1- z Place screw nut on one end of the water line, plug water line onto connecter and lock in the screw nut. -STEP3- z Place screw nut on one end of the water line, plug water line onto connecter and lock in the screw nut. 14 -STEP2- z Connect the other water line the same way. -STEP4- z Repeat with the other line. BA2-241 Instruction -STEP5- -STEP6- z Thread both connecter water lines out from the back of main frame case. 10. Test Run: z Connect water line onto heat exhaust radiator. Please disconnect all powers inside the main frame (including hard drives and CD-ROM). Test run the system for 20 mins, check if all parts are correctly connected. -STEP1- z Connect the ATX jumper line onto the ATX-Main Frame power supply socket 4 and 6. -STEP2- z Press the main power button to start, the pump will start functioning, dropping the water level slightly. -STEP3- z To keep water level at a certain height in the water tank, extra water should be added. 15 BA2-241 Instruction 11. Completing The System Installation: 11-1 Completion z After system test run is complete, you can start using the BA2-241 water cooling system. z Before starting the computer, remove ATX jumper from the ATX-Main Frame power sockets, reconnect all hardware power cables. 11-3 Maintenance: We value the reliability and convenience during the development of this product, however you would still need to note the following: 1. Check regularly whether there are any color or quality changes of the water lines, if so replace the lines regularly. 2. Check regularly if there are any damages or worn parts in the system, replace immediately. 3. Check the water volume and quality in the system regularly, should there be quality or color changes, replace the coolant immediately; recommended change time ever 6 months. 4. Make sure no foreign substance is in the system, these substances may cause blockage to the water-block, causing system circulation problems. 5. If system has been moved (transported) or has not been used for a long time, please check system before using. 16 BA2-241 Instruction 11-4 Trouble Shooting We list the common issues and their solutions as follows, if there is a system problem, please refer below. If the issues persist, contact us for technical support. Common Issue Solution Water line leakage ●Check if all connections are locked tight. ●Check if water line is plugged in correctly, and all bolts and screws are tightly locked in. Mother board water splash ●Dry the mother board for 8-12 hrs, or blow dry the mother board. Bad heat transmittance ●Is the pump connected to power and running. ●Are the water lines bend to stop circulation. ●Is the CPU Water-Block correctly installed onto the CPU. ●Are there obstructions near the BA2-241 system to stop the exhaust fan from releasing air. ●Is the heat of the system released ●Is the fan speed too slow ●If you are cooling multiple locations CPU + display card + bridges), you need another cooling component. ●Check if pump is connected to power, Water circulation stopped Is it turned on. or is slow ●Check if water volume in the tank is sufficient. ●Check if water lines are bend ●Check if system water is clean and has no foreign objects. ●Check if water volume in the tank is sufficient. Pump is too loud ●Check if there is air in the pump. ●Depending of personal convenience, no The order of connecting strict order is required and the order does not affect the heat transmitting effect. 17 BA2-241 Instruction 12. Warranty: 12-1 Coverage: Larkooler values the quality and safety of our products, and strict quality control measures are in place. Within one (1) year of purchase is our warranty period, if you encounter any issues during such time, a free service will be carried out. The warranty only covers Larkooler products themselves, other issues caused by the user, or by applying our products onto hardware that is not recommended, or by the user modified our product, are not covered by the warranty and Larkooler cannot be held responsible. As for damages caused by natural forces, and other issues Larkooler should not be held responsible, are not covered by the warranty and Larkooler will not be responsible to any of such issues. 12-2 Terms and Conditions: 1) Warranty period starts from the date users purchase the product from the distributer. 2) Warranty only covers Larkooler products; other products (such as motherboard, CPU and VGA card) are not covered. 3) Warranty is only valid under normal usage circumstances, issues caused by the user (for instance by modifying the product), are not covered by Larkooler. 4) Misuse, maintenance failure by the user or damages caused during transportation are not covered under warranty. z Please go to http://www.gbuintl.biz for the latest news. Manufacture Date : 18 ver.:1.1