Transcript
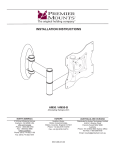
HCER/HCERW
HCER/HCERW
Hole Cutter/Escutcheon Ring
Directions
Escutcheon Ring
(Qty 1)
Hole Cutter
(Qty 1)
Step 1. Separate the escutcheon ring and the hole cutter.
Step 2. Attach the hole cutter to a portable drill. If no drill is available, you may turn by
hand.
Step 3. Determine where the hole will be and mark this location with a pencil (A).
Step 4. Place the hole cutter over the spot where the mark was made (B).
Step 5. Carefully depress the trigger on the portable drill and begin to drill the
hole, being careful not to damage the ceiling tile (B)
Step 6. Once complete, place the drill off to the side and pick up the escutcheon
ring.
Step 7. Line the escutcheon ring up with the drilled whole in the ceiling tile (C).
Step 8. Insert the escutcheon ring into the hole and gently push it into place (D).
You may need to pinch the escutcheon ring into place. This can be done
by taking your index finger and placing it up into the mounting hole and
pressing down from the top. Your thumb will press up from the bottom,
effectively pinching the escutcheon ring into place.
(A)
(B)
Ceiling Tile
Hole Cutter
Drill
(C)
Mounting Hole
(D)
Escutcheon Ring
Escutcheon Ring
The escutcheon ring has been designed
for use with 1-1/2” and 2” NPT.
NORTH AMERICA
3130 East Miraloma AvenueAnaheim, CA
92806 USA
USA and Canada –
Phone: 800-368-9700Fax: 800-832-4888
Other Locations – Phone: (001)-714-632-7100; Fax: (001)-714-632-1044
©Premier Mounts 2008
9533-555-001-00
EUROPE
Swallow House,
Shilton Industrial Estate,
Shilton, Coventry, England CV79JY
Phone: +44 (0) 2476 614700
Fax: +44 (0) 2476 614710
Hand
AUSTRALIA, NEW ZEALAND, OCEANIA (DISTRIBUTOR)
P.O. Box 295
Mordialloc Victoria 3195
Australia
Phone: 039586 6330
www.premiermounts.com.au