1
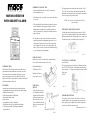
®
SECURITY
INTERNATIONAL
�
MOTION DETECTOR
WITH SECURITY ALARM
Important Safety Tips
• Do not install alarm where it will be exposed to
direct sunlight or rain
• The alarm siren is very loud, never put the unit close
to your ear
• The unit should be directed away from heat sources
such as radiators, heating ducts and stoves. If the
alarm sounds at random, it is possibly located too
close to a heat source. Change the location or direction of the unit.
• If you make an error or the unit does not respond
properly during the programming procedure—or if
you forget the password—remove the battery and
wait 3 minutes for the unit to rest, then replace the
battery. This resets the system to the default settings
so you can begin reprogramming.
We suggest that you mount the unit between 3 to 6.5
feet (1 to 2 meters) above the floor and position the
adjustable sensor head to the left or right to obtain the
best coverage of the protected area.
NOTE: unit can also be installed with Velcro
(not included)
For Shelf Top Installation
Turning the sensor head clockwise, rotate it 180 degrees, so it is facing backwards. The head can then be
adjusted upward to the desired angle for coverage. Lay
the unit flat on top of a shelf as shown in figure 3.
Fig. 3
MODEL #80200
Installation
Remove the screw from the battery compartments
cover, slide it down to remove the cover.
Introduction
The Motion Alert’s unique passive infrared system
concentrates motion detection on an area you select.
The motion detector responds only when a person
moves into range of the sensor and will sound an
alarm. In the Entry Chime mode, the chime will sound
each time motion is detected.
Install an alkaline 9
Volt battery (fig. 1)
Features
• motion sensor detects motion & activates alarm
• programmable security code and entry delay timing
• adjustable sensor head
• built-in high output 105dB alarm
• alarm/door chime option
• panic button
• program & low battery indicator
• verification tone for key pad and arm/disarm
• 9V battery operated/AC adaptor compatible
(not included)
For wall
mount
Using the battery cover
as a template, mark the
location of holes and install anchors and screws.
Place the unit over the
screws and slide the unit
down to secure in place.
(fig. 2)
Replace the battery
cover and the screw
Fig. 1
To use AN AC Adaptor
(not included)
The unit can be powered with an AC adaptor with output 9V DC 200 MA with 3.5mm diameter male plug,
center positive (+). Plug to the adaptor jack on the side
of the unit
(fig 4).
Fig. 4
Program settingS
The security code is factory set at 0-0-0. After you
install a battery you can program your own security
code, using up to six digits. If more than 6 digits are
entered you will hear an error tone.
continued on back >>>
Fig. 2
To program the security code
1. Press the digits 0-0-0
2. Press the program button
3. Enter your new code number (up to six digits)
4. Press the program button again
Note:
• make sure the chime switch is set to OFF before
arming the unit
• There will be a beep after 60 seconds sensor warmup and exit delay after arming the unit
To change existing code
to a new code
1. Enter the old code number
2. Press the program button
3. Enter your new code number (up to six digits)
4. Press the program button again
To Disarm the unit
1. Enter your security code
2. Press the disarm button, you should hear one
beep to confirm that the unit has been disarmed
To program the alarm timing
1. Press the program button
2. Choose one of three options:
• Press 1 for 30 second alarm,
2 cycles, 30 seconds rest in between or;
• Press 2 for 60 second alarm,
2 cycles, 30 seconds rest in between or;
• Press 3 90 second alarm,
2 cycles, 60 seconds rest in between
The default setting is Option 1
To program the entry
delay timing
1. Press the program button
2. Choose one of three options:
• Press 7 for 15 second delay (default setting)
• Press 8 for 8 second delay
• Press 9 for 0 second delay/instant alarm
NOTE: For added protection the unit can only be
programmed when it’s set to the DISARM mode.
To arm the unit
1. Enter your security code (or 0-0-0 if you did not
change the code)
2. Press the ARM button, you should hear 3 short
beeps to confirm that the unit is armed
activating the Door chime
1. Slide the chime switch to on
2. Wait for 60 seconds after a beep for the sensor to
warm up
3. Whenever movement is detected the unit will sound
a “DING-DONG” chime
4. Slide the switch to off to deactivate the door
chime mode
NOTE: the door chime does not function when the unit
is in ARM mode
Panic Button
Pressing the Panic button triggers an immediate
30-second alarm. To stop the alarm enter your security
code and press the DISARM button.
TESTING THE DETECTION AREA
After selecting a location for installation of the unit,
turn the chime on and wait 60 seconds for the sensor to warm up. Walk in front of the unit. When the
unit detects motion, the chime will sound. You can
determine the coverage by walking around the area.
There will be no chime sound if you walk beyond the
sensor’s range. By testing the detection range you can
adjust the location and the sensor head angle for best
coverage of the area you want. Turn the chime off
after you’ve tested the unit.
Battery Low Indicator
When in ARM mode the LED will flash once every 3
seconds to indicate when the battery is low. Change
the battery promptly to ensure proper functioning.
Intrusion Memory Indicator
If there has been an intrusion while the unit was set to
ARM mode, it will be indicated by the LED flashing
three times when you DISARM the system. Be sure to
check your home/office thoroughly after entering.
Trouble Shooting
Cannot Arm/Disarm the Unit
• Re-enter the security code to make sure it was
entered correctly
• if it still doesn’t work, remove the battery, wait three
minutes before replacing, and try again
If the Alarm Sound is Low or the Sensor is not
Detecting Movement, it indicates that the battery is
low, replace battery promptly.
ISCLAIMER: This unit can provide valuable protecD
tion for your home and property if utilized properly.
However, this unit cannot guarantee complete protection against burglary or robbery, therefore MSI will
not be held responsible for any loss or damages which
may occur.
®
�