1
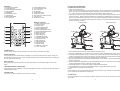
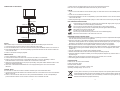
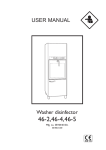
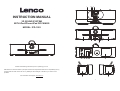
1 23 4 INSTRUCTION MANUAL 3D SOUND SYSTEM WITH iPod/iPhone/iPad DOCKINGS MODEL: IPD-1003 5 6 7 8 13 14 15 16 17 18 9 11 12 10 5 5 Please read following instructions prior to operating your unit. Manufacturer of this unit follows a principle of continuous improvement and has no responsibility for any changes that are made to the unit nor any liability for these changes. Thanks for your choice of our products. For information and support, www.lenco.eu 0 5 5 1 MAIN UNIT 1. iPod/iPhone DOCKING 2. CLOSE BUTTON 3. iPad DOCKING OPEN AREA 4. iPad DOCKING 5. SPEAKERS 6. STANDBY BUTTON 7. LCD DISPLAY 8. REMOTE SENSOR 9. VOL- BUTTON 10. FUNCTION BUTTON 11. PLAY/PAUSE BUTTON 12. VOL+ BUTTON 13. AC SOCKET 14. POWER BUTTON 15. VIDEO OUT JACK 16. LEFT & RIGHT LINE IN JACKS 17. AUX IN JACK 18. COAXIAL IN JACK STANDBY VIDEO ON/OFF 1 2 3 4 5 6 7 8 9 SLEEP 10 MUTE iPad iPhone COAXIAL IN AUX IN LINE IN BASS RAN REP TREBLE VOL 11 12 13 14 15 16 17 18 19 REMOTE CONTROL 1. VIDEO ON/OFF BUTTON 2. iPhone BUTTON 3. iPad BUTTON 4. PLAY/PAUSE BUTTON 5. PREVIOUS BUTTON 6. FAST FORWARD BUTTON 7. FAST BACKWARD BUTTON 8. BASS+/- BUTTON 9. SLEEP BUTTON 10. MUTE BUTTON 11. STANDBY BUTTON 12. COAXIAL IN BUTTON 13. AUX IN BUTTON 14. NEXT BUTTON 15. LINE IN BUTTON 16. RAN BUTTON 17. REP BUTTON 18. TREBLE+/- BUTTON 19. VOL+/- BUTTON POWER SUPPLY Connect the AC cable to the AC SOCKET on the rear of the unit and the main power. SLEEP FUNCTION During playback, press SLEEP button repeatedly to cycle through the sleep time options. When your desired sleep time shows on the screen, release the SLEEP button. When the sleep time is expired, the unit will switch off automatically. MUTE THE UNIT During playback, press MUTE button to switch off the audio. Press the button again to resume the audio. TREBLE/BASS EFFECT ADJUSTING During playback, press TREBLE+/- button or press BASS+/- button on the remote to adjust the effect of treble/bass respectively. VOLUME LEVEL Press VOL+/- button to adjust the volume level accordingly. 2 iPod/iPhone/iPad OPERATING PLAYING AN iPod/iPhone/iPad 1. Lifting up the iPad docking. (Note: To close the iPad docking, press CLOSE button first, then press down the iPad docking by hand. User can press CLOSE button together with lifting up the iPad docking, but make sure the lock is in correct position so that iPad dock is opened and locked securely before use.) 2. The iPad pin connector is also compatible with iPod or iPhone. Before docking an iPad or iPhone to iPad pin connector, please install the iPad/iPhone’s back plate (be supplied) to the unit first. In the absence of such iPad back plate, this pin connector will be damaged during use if iPad is directly docked (Slide down a corresponding back plate for locking it to the iPad bracket behind the iPad pin connector properly as below). iPad back plate iPhone back plate 3. Dock iPad/iPod/iPhone onto the unit at respective docking location. 4. Press the POWER button on the rear of the unit and then press STANDBY button to turn the unit on. 5. Press the FUNCTION button on the unit continuously or press iPhone button/iPad button on the remote to toggle the unit to iPhone or iPad mode. The unit will play the inserted device automatically. 6. Press PLAY/PAUSE button to pause or start the iPod/iPhone playback. 7. During normal playback, Press PREVIOUS/NEXT button on the remote to skip the track/chapter ahead or backward. 8. Press and hold FAST FORWARD or FAST BACKWARD button on the remote to search through the current track/chapter forward or backward at a high speed. 9. Press RAN button on the remote to enable or disable random playback. 10. Press REP button on the remote repeatedly to repeat a single track/chapter, repeat all tracks/chapters or disable the repeat function. NOTE: During playback, the connected iPod/iPhone may skip to another song accidently. Once the problem occurs, please set the iPod/iPhone to shake off. 3D FUNCTION In case the speaker cut off on the chipset protection, please turn OFF and ON as reset to resume the 3D function. 3 3. Audio from the connected audio source will now be played through the unit. Note: The unit is compatible with SPDIF PCM code only for the coaxial. CONNECTING ILLUSTRATION LINE IN 1. Use a 3.5mm audio cable to connect an MP3 player or other audio source to the LINE IN jacks on the unit. 2. Power on the unit and the audio source. 3. Press FUNCTION button on the unit repeatedly or press LINE IN button on the remote to switch the unit to LINE IN mode. 4. Audio played through the connected MP3 player or other audio source will now play through the unit. Video in Video cable Video out Coaxial in Coaxial audio cable (optional) Coaxial out AUX IN Follow below steps to connect the unit to another audio device like MP3 player and the like: 1. Connect the Audio Out of the device to AUX IN jack with audio cable. 2. Press the POWER button on the rear of the unit and then press STANDBY button to turn the unit on. 3. Press FUNCTION button on the unit repeatedly or press AUX IN button on the remote to switch the unit to AUX IN mode. 4. Power on the device and begin playback. VIDEO OUTPUT 1. Dock a iPod/iPhone or iPad to the unit. 2. Connect a RCA cable to the Video Out on the unit and Video in on a television. 3. Power on the TV set and the unit. Press FUNCTION button on the unit repeatedly or iPhone button/iPad button on the remote to switch the unit to iPhone or iPad mode. 4. Adjust the connected television to the proper input setting. And press VIDEO ON/OFF button on the remote for outputting the video. 5. Video from a docked iPhone/iPod/iPad can now be played through the unit to the connected television. COAXIAL INPUT You will need: An audio source with a COAXIAL OUTPUT jack and coaxial audio cable. 1. Connect the Coaxial Audio Cable to the COAXIAL OUTPUT on the audio source and to the COAXIAL INPUT on the unit. 2. Power on the unit and the audio source. Then press FUNCTION button on the unit repeatedly or press COAXIAL IN button on the remote to switch the unit to COAXIAL IN mode. 4 DISC HANDLING PRECAUTIONS Hold the disc by the edge so the surface will not be soiled with finger prints. Finger prints, dirt and scratches can cause skipping and distortion. Do not write on the label side with a ball-point pen or other writing utensils. Do not apply benzine, thinner, and liquid that prevents against static electricity. Be careful not to drop or bend the disc. Install only one disc on the disc tray. Do not try to close the disc tray when the disc is not installed properly. Be sure to store the disc in its case when not in use. IMPORTANT SAFETY INSTRUCTIONS The apparatus shall not be exposed to dripping or splashing and that no objects filled with liquids, such as vases, shall be placed on the apparatus. When the mains plug or an appliance coupler is used as the disconnect device, the disconnect device shall remain readily operable. To be completely disconnected the power input, the mains plug of the apparatus or the appliance coupler shall be disconnected from the mains completely. No naked flame sources, such as lighted candles, should be placed on the apparatus. Minimum distances 2.0cm around the apparatus for sufficient ventilation. The ventilation should not be impeded by covering the ventilation openings with items, such as newspapers, table-cloths, curtains, etc. The use of apparatus is in tropical and/or moderate climates. Attention should be drawn to the environmental aspects of battery disposal. CAUTION: Danger of explosion if battery is incorrectly replaced. Replace only with the same or equivalent type. Battery shall not be exposed to excessive heat such as sunshine, fire or the like. The marking plate is located at the back of the apparatus. PECIFICATIONS: Power source: AC 100V~240V 50/60Hz Power consumption: 80W Remote control: CR2025 Dimensions: 545.5(L) x 196.5(W) x 140(H) mm Operating Humidity Range: 10 % to 75 % If at any time in the future you should need to dispose of this product please note that: Waste electrical products should not be disposed of with household waste. Please recycle where facilities exist. Check with your Local Authority or retailer for recycling advice. (Waste Electrical and Electronic Equipment Directive) 5