1
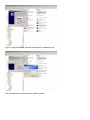
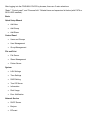
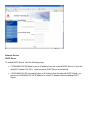
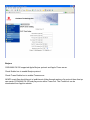
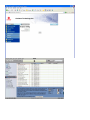
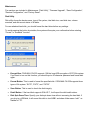
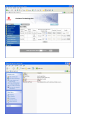
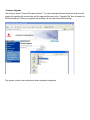
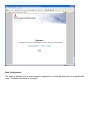
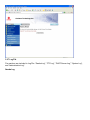
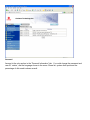
General Description Contacts Table of Contents I. II. III. IV. V. VI. VII. VIII. IX. X. XI. XII. XIII. XIV. XIV. XV. Setting up of COOLMAX CN-330 Assigning an IP address to the COOLMAX CN-330 Map COOLMAX CN-330 disk into Local Network Operating COOLMAX CN-330 through GUI Web Interface Administration of the COOLMAX CN-330 COOLMAX CN-330 Configuration Account Information Quick Setup Users and Groups File and Print A. Share Management B. Windows and FTP Access C. NFS Access D. Delete Share E. Printer Server System setting A. LAN Settings: B. IP Address Setting: C. Time Setting D. RAID Setting E. Turn Off Server F. Disk Usage G. Monitoring Services Setting H. Email Notification Setting I. Pop-Up Notification Setting Network Service A. DHCP Server B. Bonjour C. BTorrent Maintenance A. Disk Utility B. Firmware Upgrade C. Save Configuration D. Restore Configuration E. Factory Reset Log File A. FTP Log B. DHCP Server Log C. System Log D. Administration Log Account Log Out Setting up COOLMAX CN-330 Assigning an IP Address: This COOLMAX CN-330 has DHCP function built in. The default setting is DHCP client 192.168.1.1. When the COOLMAX CN-330 is connected to a LAN that already has a DHCP server present, the COOLMAX CN-330 takes an IP address assigned to it by the server. When the COOLMAX CN-330 is connected to a LAN that does not have a DHCP server, the COOLMAX CN-330 becomes the DHCP server in the network. The COOLMAX CN-330 may be assigned an IP address manually with DHCP functions disabled. It is recommended that the user first start the evaluation of COOLMAX CN-330 in an isolated network environment. Map COOLMAX CN-330 disk into Local Select Tools -> Map Network Drive from client window explorer Input the logical drive and the path of network share directory Log in using the SAMBA User Account which is created by you. The network drive can be found on client’s system. Operating COOLMAX CN-330 through GUI Web Interface Once the COOLMAX CN-330 is connected to the network, use the browser (supports Microsoft Internet Explorer 5.0 or later, Netscape Navigator 4.5 or later) to complete administrative task of COOLMAX CN-330. Administration of the COOLMAX CN-330 The following methods allow an administrator to access the administration page. Launch your web browser if you know the IP address of the COOLMAX CN-330. Type the correct IP address in the browser. Input the username and password in the login page, “admin” is the username and password by default; change security privilege is recommended. COOLMAX CN-330 Configuration After logging into the COOLMAX CN-330 by browser, there are 3 main selections: “Basic”, “Control panel”, and “Personal Info”. Related items and expansion list below (with PATA or SATA HDD installed): Basic Quick Setup Wizard Add User Add Group Add Share Control Panel Users and Groups User Management Group Management File and Print File Server Share Management Printer Server System LAN Settings Time Settings RAID Setting Turn Off Server Information Disk Usage Error Notification Network Service DHCP Server Bonjour BTorrent Maintenance Disk Utility Firmware Upgrade Save Configuration Restore Configuration Factory Reset Log File Samba Log FTP Log DHCP Server Log System Log Administration Log Account Information The hard drive should be automatically detected by the system whether or not it is installed A new non-formatted hard drive should be found and formatting the hard drive is suggested by the pop-up window. The system will restart automatically after the format is completed. If a formatted hard drive is found, the system will attempt to retrieve user information from the hard drive. Quick Setup To modify the language support on the web page, please follow the instruction below: To add user support, select the Add User chapter for setting. Please refer to Users and Groups chapter for more detail. To add group support, select the Add Group chapter for setting. Please refer to Users and Groups chapter for more detail. To add folder sharing support, select the Add Share chapter for setting. Please refer to Share Management chapter for more detail. Users and Groups In the User Management menu, there will be a display of all existing users in the system. A new user can be created by filling out the form and clicking the “Save” button when done. To delete a specific user, select the existing user and click on the “Delete User” button. Click the “Group” button to enter the Group Management menu. In the Group Management menu, you will see all existing groups in the system. A new group can be created by filling out the form and clicking the “Save” button when done. Select the existing group name and click the “Delete Group” button to delete a specified group. To add or remove users from an existing group, highlight the group name and click the “Members” button. File and Print Three sections are included in “File and Print“: “File server”, “Share Management”, and “Printer server”. File Server Windows Setting Click the “Enable” check box to enable Microsoft Windows connection Set Workgroup name for Windows client to access Define Windows Internet Name Server IP address FTP Server setting Click “Enable” to enable FTP server function, and default port 21. NFS Server Setting Click “Enable” to enable NFS server function Guest Access Setting Click “Enable” to allow access to the guest-share folder and guest-user set upload quota (Mega Bytes) Share Management It shows all existing shared names; “public” was the factory default share name located at system/shares/public directory. Create Share Fill in the “Share name” and “Path” boxes. By pressing “save”, a new share name will be created. Property Change Click a share name in the “Existing Shares” box to modify the property of the share name. Press “Windows, FTP Access” or “NFS Access” button could set or remove read/write permission of the share. Windows and FTP Access “Allow for all” is to allow all users to access the shared storage in the server. You may also specify the User/Group name in the Access box and select “Read Only” or Writable permission to the User/Group. NFS Access You could check “Allow for all” to allow all clients access to the NFS server. Or you can add client PCs IP address/Subnet mask to the permission list to allow only those on the permission list to access the NFS server. Delete Share “Delete Share” deletes a specified share name. Printer Server Check the Printer Server “Enable” box to enable Print Server functions. System setting There are eight sections included in “System Setting”, which are “LAN Settings”, “Time Setting,”, “RAID Setting”, “Turn Off Server”, “Information”, “Disk Usage”, and “Error Notification”. LAN Settings: Hostname: You must assign a unique name for each COOLMAX CN-330 as the identification within your local area network. IP address setting: Obtain IP address automatically: The system obtains the IP address automatically via DHCP protocol if the local network has DHCP server available. The default IP address is 192.168.1.1 if it fails to get an IP address from DHCP server. Use static IP address: Acquire a unique IP address, Subnet mask, and Default gateway information from your network system administrator. Then fill in the information to the GUI. Obtain DNS server address automatically: The system gets DNS server addresses from DHCP server if available. Use static DNS server addresses: Specify DNS server address in the GUI. Time Setting Set current Date, Time and Time zone. Specify NTP server if you want to get Date and Time from time server. RAID Setting COOLMAX CN-330 supports RAID type 0, 1 and 5 depending on the hard driver amount. If COOLMAX CN-330 only plugs in one hard driver, the “RAID Type” box will show “None” item. If COOLMAX CN-330 plugs in two hard drivers, the “RAID Type” box will show “None”, “raid0” and “raid1” items. If COOLMAX CN-330 plugs in three or four hard drivers, the “RAID Type” box will show “None”, “raid0”, “raid1” and “raid5” items. Save button: This is used to format the hard driver from ext2 to ext3 or from ext3 to ext2 file system. Scan Button: This is used to check the disk integrity. Refresh button: This is used to refresh the hard driver status. Rebuild button: This is used to rebuild the RAID file system when the hard driver is broken. Turn Off Server To restart the server, click the “Restart” button. To power off the server, click the “Shutdown” button. Disk Usage Collects and displays all HDDs usage summary and user’s quota information. Error Notification Monitoring Services Setting: Disk Usage: The system will send a message informing the administrator when the disk usage reaches 90%. Windows File Sharing Server: The system will send a message informing the administrator if the samba task encounters any problems. FTP Server: The system will send a message to the administrator if the FTP Server task encounters any problems. DHCP Server: The system will send a message informing the administrator if the DHCP Server task encounters any problems. Check Interval: You can select intervals from hourly to daily to have the system perform checks. Email Notification Setting: Enable: Enable notification method by an email. Error Handling Mail Server: Specify your email host name. Error Handling Email Addresses: Specify administrator email address. Pop-Up Notification Setting: Enable: Enable notification method by Windows pop-up messages. Error Handling Pop-Up Machines: Specify administrator PC IP address. Network Service DHCP Server To enable DHCP Server, take the following steps: If COOLMAX CN-330 failed to get an IP address from the external DHCP Server, it uses the default IP address 192.168.1.1 and turn on its DHCP Server automatically. If COOLMAX CN-330 successfully gets an IP address from the external DHCP Server, you should set COOLMAX CN-330 IP address to a static IP address before enabling DHCP Server. Bonjour COOLMAX CN-330 supported Apple Bonjour protocol and Apple iTunes server. Check Enable box to enable Bonjour protocol. Check iTunes Enable box to enable iTunes server. All MP3 music files should be put in /public/music folder through samba or ftp protocol then client pc can search COOLMAX CN-330 and play music within iTunes tool. The iTunes tool can be downloaded from Apple’s website. BTorrent COOLMAX CN-330 supported BTorrent P to P download function. You can download the seed to the system by inputting the correct path and the seed name in the “Open torrent file” Box, or browse by Windows Explorer. Set maximum bandwidth down rate limit Set maximum bandwidth up rate limit Add Button: This is used to add new seed to system. Start Button: This is used to start download job. Stop Button: This is used to stop download job. Delete Button: This is used to delete job. Refresh Button: This is used to refresh BTorrent job status. Maintenance Five sections are included in Maintenance: “Disk Utility”, “Firmware Upgrade”, “Save Configuration”, “Restore Configuration”, and “Factory Reset”. Disk Utility Disk utility shows the device name, type of file system, total disk size, used disk size, volume mounted, and disk mount status of all disks. For new attached hard disk, you should format the hard drive before any settings. To avoid pressing the button by mistake, the system will acquire your confirmation before starting “Format” or “Scandisk” function. Encrypt Box: COOLMAX CN-330 supports 128 bits loop-AES encryption of EXT2 file system. If you want to turn on this function, you should input a 20 character password and format disk again. Format Button: This is used to format the specified disk. COOLMAX CN-330 supports three types of file system: “EXT2”, “EXT3”, and “FAT32”. Scan Button: This is used to check the disk integrity. Detail Button: If the hard disk supports S.M.A.R.T, it will report the disk health status. Disk Spin Down Time: Specify your disk spin down time without accessing the hard disk. If you plug in a USB disk, it will mount this disk to /mnt/USB1 and share folder name “usb1” on Samba or FTP. Firmware Upgrade This function shows “Current Firmware Version”. You can download the latest firmware version to the system by inputting the correct path and the upgrade file name in the “Upgrade File” box or browse by Windows Explorer. When you upgrade the firmware, all the network services will stop. The system counts down and reboots when download completes. Save Configuration This function will back up the current system configuration to a local disk and save it in a specified file name. The default file name is “config.tar”. Restore Configuration When the system configuration is destroyed, lost, or incorrectly changed, you can restore the system configuration that you saved using the “Save Configuration” function. Select a configuration file by Windows File Explorer, and press the “Restore” button to restore the system configuration using the selected configuration file. Factory Reset Factory Reset will reset the system configuration to factory default configuration. When this button is pressed, all users, networking, and other configuration information will be lost. 3.2.7 Log File Five sections are included in Log File: “Samba Log”, “FTP Log”, “DHCP Server Log”, “System Log”, and “Administration Log”. Samba Log FTP Log DHCP Server Log System Log: Specify the destination Linux PC that you want to redirect system log file. Administration Log Account Account is the only section in the “Personal Information” tab. You could change the password and user ID, ‘admin’, and the language shown in the menu. Share list, system disk quota and the percentage of disk used is shown as well. Logout