1
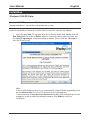
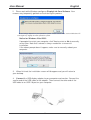
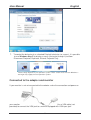
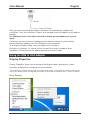
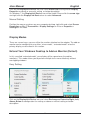
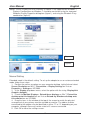
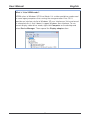
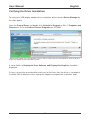
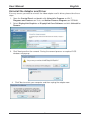
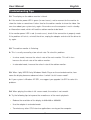
USB to VGA Adapter English User Manual LINDY No. 42744 www.lindy.com © LINDY ELECTRONICS LIMITED & LINDY-ELEKTRONIK GMBH – SECOND EDITION (July 2011) User Manual English 2 User Manual English Introduction Thank you for purchasing the USB VGA Adapter. This USB VGA Adapter enables you to connect an additional display device (CRT/LCD monitor, projector) to your desktop or notebook PC. The connected display can act as mirrored or extended desktop (it can also be used as the primary display) of the main display on your PC. The flexibility of USB 2.0 technology saves the need to open the computer and install a VGA graphics card. System Requirements • Available USB 2.0 port • Minimum Requirement for the PC: Intel/AMD Single Core 1.2GHz or higher processor, RAM: 512MB memory or higher • Windows 2000 SP4 / Windows XP Home or Professional SP2 or SP3, Vista SP1 (32-bit or 64-bit) and Windows 7 (32-bit or 64 bit), Mac OS 10.4 and above (see www.displaylink.com for Mac drivers) Package Contents • • • • USB 2.0 to VGA Adapter USB A to Mini-B cable, 1m Driver CD LINDY Manual Features • • • • • • USB 2.0 compliant supports high resolutions up to 1920 x 1080@32bit Plug-and-Play USB connectivity Display Modes: Primary, Extended, Mirror Resumes from hibernation and suspend modes Supports up to 6 USB display adapters to work simultaneously 3 User Manual English Installation Windows 2000/XP/Vista: Caution: DO NOT connect the USB display adapter to your computer before you install the provided driver. You will be instructed to do so later. Follow the procedures below to install the driver and then connect the adapter: 1. Insert the provided CD into your disc drive. Please locate and double-click the Run Setup.exe file under x:\Driver where x is your disc drive letter.You may see the License agreement screen prompted as below. Please click on I Accept to start the Driver install. Note: If the installer program doesn’t run automatically, please locate and double-click on the Autorun.exe file in the CD to launch the install program. If you encounter a User Account Control dialog box when attempting to install a program, enter an administrator password or click Allow to start the installation. 4 User Manual English 2. Please wait while Windows configures DisplayLink Core Software. Your screens may temporarily go black or flash during this process. *Actual strings depend on your operation system. These screen shots are from Windows XP and might vary slightly for each operation system. Notice for Windows Vista/2000: If prompted to restart your computer, click Yes to restart or No to manually restart later. Note that a reboot is always needed for a successful installation. If the reboot prompt doesn’t appear, make sure to manually reboot your computer. 3. When finished, the installation screen will disappear and you will return to your desktop. 4. Connect the USB display adapter to your computer and monitor. Connect the smaller end of the USB cable to the adapter. Then connect the other end of the USB cable to an USB 2.0 port on your computer. 5 User Manual 5. English After the installation is completed, you will see the DisplayLink Manager Icon in System Tray that looks like a monitor as below. Click on the icon to bring up the menu. Extend Mode: The screen is part of the extended desktop. Mirror Mode: The screen copies the contents of the primary screen. Off Mode: The screen is black. Set as Main Monitor: The screen is the primary screen. Notebook monitor off: The Notebook screen is black and the DisplayLink screen is the primary screen. Windows 7 Caution: DO NOT connect the USB display adapter to your computer before you install the provided driver. You will be instructed to do so later. Follow the procedures below to install the driver and then connect the adapter: 1. Insert the provided CD into your disc drive and installer program will run automatically when the Driver CD is inserted. Please click on Run Setup.exe to execute the installer program. 6 User Manual English Note If the installer program doesn’t run automatically, please locate and double-click on the Setup.exe file in the Driver folder to launch the setup program. If you encounter a User Account Control dialog box when attempting to install a program, enter an administrator password or click Allow to start the installation. 2. When you see the License Agreement screen prompted as below, please click on I Accept to install the software for USB display adapter... 7 User Manual English 3. Please wait while Windows configures DisplayLink Core Software. Your screens may temporarily go black or flash during this process. 4. When finished, the installation screen will disappear and you will return to your desktop. 5. Connect the USB display adapter to your computer and monitor. Connect the smaller end of the USB cable to the adapter. Then connect the other end of the USB cable to an USB 2.0 port on your computer. 6. After the installation is completed, the following Window will pop up. You can change the appearance of your displays through the Window. Moreover, additional controls are available in Windows 7: Orientation (Portrait, landscape, rotated portrait, rotated landscape). 8 User Manual 7. English To control the behavior of an attached DisplayLink device (or screen), it is possible to use Windows Key+P to display a menu (and cycle through it) to allow: Disconnect Projector, Duplicate, Extend, Projector Only. *Actual strings depend on your operation system. These screen shots are from Windows 7 and might vary slightly for each operation system. Connected to the adapter and monitor If your monitor is not yet connected to the adapter, make the connection and power on your monitor. Use a VGA cable (not provided) to connect the VGA jack to a monitor equipped with VGA input jack. 9 User Manual English After you have connected the adapter, Windows will automatically complete the installation. Once the installation is done, an extended screen will appear on the add-on monitor. For Windows Vista, if the add-on monitor is blank, please reboot your system again. If required, you can connect and disconnect the add-on monitor any time without disconnecting the adapter from the USB port on your computer. To change the display mode, see next chapter for instructions. During the installation, it’s normal that the screen flicks black a couple of times. Sometimes it takes time for the add-on monitor to show the video. Using the USB to VGA Adapter Display Properties Display Properties allows you to configure the display mode, color quality, screen resolution and physical arrangement of your monitors. *The USB display adapter Display mode and adjusting Resolution, Color Depth and Refresh Rate. Please refer to the “Display mode” and Adjusting Resolution, Color Depth and Refresh Rate “” section for details. Easy Setting 10 User Manual English Click on the DisplayLink Device icon and select Advanced to configuration Display Properties as above or manually setting as below description. On Windows 7, the DisplayLink Device icon will be hided. Please click the arrow sign and right click the DisplayLink Device icon to select Advanced. Manual Setting Position the mouse anywhere on your computer desktop, right-click and select Screen Resolution on Win 7, Personalize > Display Settings on Vista or Properties > Settings on XP/2000. Display Modes There are several ways you can utilize the monitor attached on the adapter. The add-on monitor can be configured to use either “mirror mode”, “extended mode” or be the primary display as described in this section. Extend Your Windows Desktop to Add-on Monitor (Default) In this so-called “extended mode”, your display will be spread over the add-on monitor(s). This mode allows you to perform multiple tasks more effectively without overlapping windows. Easy Setting Click on the DisplayLink Device icon and select Exchange or Extend to Right; Left; Above; Below to configuration the setting as above or manual setting as below description. 11 User Manual English Notice: The full DisplayLink User Interface as above is not supported on Windows 7. Displays Configuration on Windows 7 should be carried out using the improved Windows Display Properties dialog box (figure1), and using the Windows-P key combination (figure2). Figure 1 Figure 2 Manual Setting Extended mode is the default setting. To set up the adapter to use or restore extended mode, follow these steps: 1. Position the mouse anywhere on your computer desktop, right-click and select Screen Resolution on Win 7, Personalize > Display Settings on Vista or Properties > Settings on XP/2000. 2. In the Display drop-down menu, select the option with the string “DisplayLink Graphics Adapter”. 3. Check the Multiple Displays> Extend these displays on Win 7, Extend the desktop onto this monitor box on Vista or Extend my Windows desktop onto this monitor box on XP/2000. 4. Drag the icons in the window at the top of the screen to match the physical arrangement of your primary monitor and add-on monitor. The add-on monitor connected to the adapter may be identified as either "2" or “3”, depending on your computer, although there may not be a total of 3 screens connected. 5. Click OK to close the settings screen. 12 User Manual English Once the setting is done, to use your extended desktop, simply drag and drop your open windows over to your second monitor. However, note that some applications may not support display on the extended desktop. Cursor disappeared? If you’re in extneded mode but the add-on monitor is not connected, the desktop still pans to the add-on monitor and it’s possible that your cursor has moved to the extended desktop so that you cannot find it on the primary display. To solve the problem in such a case, connect the add-on monitor to the adapter or keep moving your mouse to try or unplug the adapter first to restore the cursor. Video and DVD Playback in Extended Mode On Windows Vista with extended mode, it’s suggested that you run video or DVD playback programs on your primary monitor instead of the add-on monitor to ensure the playback performance. 13 User Manual English Mirror Your Windows Desktop This mode is referred to as “mirror” or “clone” mode. In this mode, your original screen (the primary display) will be mirrored to the add-on monitor. Easy Setting Click on the DisplayLink Device icon and select Mirror to configuration the setting as above, or manually setting as below description. Notice: The full DisplayLink User Interface as above is not supported on Windows 7. Displays Configuration on Windows 7 should be carried out using the improved Windows Display Properties dialog box (figure1), and using the Windows-P key combination (figure2). 14 User Manual English Figure 1 Figure 2 Manual Setting In mirror mode, the adapter will automatically select the settings (screen resolution, color quality and refresh rate) for the add-on monitor. But you can manually adjust the settings as required. However, the settings of the add-on monitor are limited by that of the primary monitor. For example, even though your add-on monitor supports a resolution of up to 1920x1080, you can only configure it to use 1280x1024 due to the primary monitor only supports a resolution of up to 1280x1024. If you change the video output to extended mode and then want to switch back to mirror mode, follow these steps: 1. Position the mouse anywhere on your computer desktop, right-click and select Screen Resolution on Win 7, Personalize > Display Settings on Vista or Properties > Settings on XP/2000. 2. In the Display drop-down menu, select the option with the string “DisplayLink Graphics Adapter”. 3. Check the Multiple Displays> Duplicate these displays on Win 7, uncheck the 15 User Manual English Extend the desktop onto this monitor on Vista or Extend my Windows desktop onto this monitor on XP/2000. 4. Click OK to close the settings screen Be the Primary Monitor To make the add-on monitor the primary display: 1. 3. Position the mouse anywhere on your computer desktop, right-click and select Screen Resolution on Win 7, Personalize > Display Settings on Vista or Properties > Settings on XP/2000. In the Display drop-down menu, select the option ends with DisplayLink Graphics Adapter. Check the This is my main monitor box on Vista/Win 7 or Use this device as the primary monitor box on XP/2000. On some PCs and laptops it is necessary to disable the main display (i.e. uncheck the Extend the desktop onto this monitor or Extend my Windows desktop onto this monitor box for the main display) as part of the same settings change. 4. Click OK to close the settings screen. 2. The add-on monitor stays primary if the PC enters hibernate or suspend mode or is rebooted. If the add-on monitor is unplugged, the main display becomes primary again. Adjusting Resolution, Color Depth and Refresh Rate There are three components that make up the screen mode: Resolution: In common usage, this refers to the number of pixels displayed on screen horizontally and vertically. Color Depth: This defines the number of different colors that can be shown on the screen at the same time. Refresh rate: Measures the speed that the entire screen is rescanned. Higher frequencies reduce flicker. 16 User Manual English Some monitors advertise the supported modes through the video connector. If this is the case, the adapter identifies the supported modes from the monitor. If the monitor does not advertise the supported modes, the adapter software chooses a set of common screen modes for the monitor. The software supports the modes listed below. Color Depth Name Refresh rates available at 16 bit color quality VGA 60 72 75 85 60 72 75 85 SVGA 56 60 72 75 85 56 60 72 75 85 XGA 60 70 75 85 60 70 75 85 720p 60 60 WXGA+ 60 75 85 60 75 85 WXGA 60 60 SXGA 60 75 85 60 75 WXGA+ 60 60 SXGA+ 60 75 85 60 75 85 SXGA+ 60 75 85 60 UXGA 60 60 WSXGA+ 60 60 Resolution 640x480 800x600 1024x768 1280x720 1280x768 1280x800 1280x1024 1366x768 1400x1050 1440x900 1600x1200 1680x1050 Refresh rates available at 32 bit color quality 1080p 60 60 1920x1080 *Note that interlaced modes and reduced blanking modes are not supported. About the resolutions and refresh rates available to users The resolutions and refresh rates available to the user through Windows are a comprise of the support from the following elements: The USB display adapter The primary monitor and the add-on monitor The primary video card on your computer and installed drivers Therefore, for example, if your monitor doesn’t support a resolution of 1440x900, then 1440x900 is not possible even you are using a USB display adapter with 1440x900 support. This ensures that the monitor cannot be put into an unsupported mode, which might damage it. 17 User Manual English If cloning the primary display, the video component will try to use the preferred monitor mode. In some cases, this may not be the most appropriate mode for the cloned desktop. It is recommended that the primary display resolution be changed to closer match the default resolution of the add-on monitor. Configure the components To configure the three components (resolution, color depth and refresh rate) of a screen mode, follow these steps: Easy Setting Click on the DisplayLink Device icon and select Color Quality; Screen Rotation ; Screen Resolution to configuration the setting as above, or manually setting as below description. Color Quality There are two kinds of color quality, the Medium (16-bit) and the Highest (32-bit). Screen Rotation There are four kinds of screen rotation, the Normal, Rotated Left, Rotated Right and Upside-Down. 18 User Manual English Screen Resolution The resolution will be depends on your computer setting, resolution support of moniter and else…. Manual Setting 1. Position the mouse anywhere on your computer desktop, right-click and select Screen Resolution on Win 7, Personalize > Display Settings on Vista or Properties > Settings on XP/2000. 2. In the Display drop-down menu, select the option ends with DisplayLink Graphics Adapter. 3. To change the screen resolution or color quality, select those options on the screen. Be sure to select one of the supported resolutions and color quality numbers in the table above. For an add-on monitor, you can also select any resolution or color quality supported by that monitor. 19 User Manual English 4. To change the refresh rate, click Advanced… and then click Monitor. 5. Select a refresh rate from the Screen refresh rate drop-down list and then click Apply. 6. Click OK to close the settings screen. Standby and Hibernate, Shut Down and Restart When the adapter is connected to a computer and an external monitor, if the computer goes into standby or hibernate mode, the external monitor display goes blank. When the computer returns to an active state, the external monitor display keeps the same settings it had before the computer went into standby or hibernate mode. However, if the add-on monitor was set for extended mode, windows that were previously on the external monitor will not move back to that secondary monitor. Also, if the add-on monitor is in extended mode and the computer requires a login after standby or hibernate mode, the login screen appears on the primary computer monitor, not the external monitor. If the computer is shut down, restarted and logged in, again the add-on monitor returns to the same mode as it was before shutdown. 20 User Manual English Disconnecting the Adapter If the adapter is unplugged from the computer, the add-on monitor goes blank. All windows and icons move to the primary screen. On reconnection of the adapter, the adapter returns to the same mode as it was before disconnection. However, windows and icons that were previously on the screen will not be moved back. Using Dual Adapters Up to two adapters can be simultaneously attached to one computer. To use two adapters: 1. Install the driver as described above and connect the first adapter to your computer. 2. Then connect the second adapter to your computer. The system will automatically complete the installation. While two adapters are connected to a computer, in most cases both adapters supports extended and mirror modes. The only exception is on Windows Vista XDDM mode as described below. Limitation for dual adapters on Windows Vista in XDDM mode: In this mode one extended screen and one mirrored screen is supported. Only the first connected adapter can be configured to use extended mode; the second adapter is forced to use mirror mode. When you bring out the Windows display settings dialog box, you will find that only one …DisplayLink Graphics Adapter (representing your first attached adapter) is configurable. 21 User Manual English What is Vista XDDM mode? XDDM refers to Windows XP Driver Mode. It is a video card driver mode used in some legacy computers that running the new generation Vista OS. It provides an interface similar to Windows XP user Interface on Vista and one of its characteristics is that it doesn’t support Windows Aero interface. To see current display video driver mode, right-click Computer on the desktop and select Device Manager. Then expand the Display adapters item. 22 User Manual English Verifying the Driver Installation To verify your USB display adapter driver installation, please launch Device Manager by the steps below: Open the Control Panel and double-click Uninstall a Program on Win 7, Programs and Features on Vista, and Add or Remove Programs on XP/2000. *Actual strings depend on your operation system. These screen shots are from Windows Vista 32-bit and might vary slightly for each operation system. A string similar to DisplayLink Core Software and DisplayLink Graphics should be displayed. If there is a question or exclamation mark next to that item, then the driver is not properly installed. Please delete the item, unplug the adapter and repeat the installation steps. 23 User Manual English Uninstall the Adapter and Driver If for any reason you want to uninstall the video adapter and its driver, please take these steps: 1. Open the Control Panel and double-click Uninstall a Program on Win 7, Programs and Features on Vista, and Add or Remove Programs on XP/2000. 2. Select DisplayLink Graphics or DispalyLink Core Software and click Uninstall or Remove. 3. Click Yes to confirm the removal. During the removal process a couple of DOS windows will pop up. 4. Click Yes to restart your computer and then unplug the adapter now. 24 User Manual English Troubleshooting Tips Q1: The display on the add-on monitor is blank. A: If the monitor power LED is green (in most cases), wait a moment for the monitor to show the video as sometimes it takes time for the add-on monitor to show the video. You can also reboot your system to try again. Also make sure the computer is not in standby or hibernation mode, which will lead the add-on monitor to be blank. If the monitor power LED is red (in most cases), check if the connection is properly made. If the problem still exists, uninstall the driver, unplug the adapter and reinstall the driver to try again. Q2: The add-on monitor is flickering. A: This is usually caused by a low refresh rate. To solve this problem: • In mirror mode, increase the refresh rate of the main monitor. This will in turn increase the refresh rate of the add-on monitor. • In extended mode, increase the refresh rate of the add-on monitor. Q3: When I play MPEG file by Windows Media Player on the extended monitor, how come the display becomes abnormal when I switch it to full screen mode? A: If your system is Windows XP SP1, we suggest you upgrade it to SP2 to solve this problem. Q4: When playing the video in full screen mode, the motion is not smooth. A: Try the following tips to improve the smoothness of the movie playback: • Reduce the resolution of the display to 640x480 or 800x600. • Use the adapter in extended mode. • Terminate any other CPU intensive applications running on the computer. 25 User Manual English If you still have issues playing media content on the adapter, try the following steps: • As some media players require DirectX hardware support to correctly operate, try a different media player which requires less DirectX support. • Drag the media player to the add-on screen and close the player. Restart the player and it should open on the add-on monitor. Now try playing the media file again. • Try reducing the hardware acceleration level of the primary display (NOT the add-on monitor) to levels 1,2 or 3 and restarting the media player. The hardware acceleration can be found by right-clicking on your desktop and click Properties > Settings > Advanced > Troubleshoot. Some players use this setting even when playing on a different display. • The video playback may be unusual when the add-on monitor is mirroring the primary display and there is another extended screen connected to the computer. The extended screen must be disabled before the content will be correctly cloned to the add-on monitor. Q5: In extended mode, the add-on monitor appears to have a black border around the desktop. A: This happens when the resolution used by the add-on monitor is larger than the resolution used by the primary monitor. To solve this problem, configure the add-on monitor to use the same resolution as the primary monitor. 26 CE/FCC & Recycling Information CE Certification This equipment complies with the requirements relating to electromagnetic compatibility, EN55022/EN55024 class B for IEC/EN61000-4-2/3 the essential protection requirement of Council Directive 89/336/EEC on the approximation of the laws of the Member States relating to electromagnetic compatibility. FCC Certification This equipment has been tested and found to comply with the limits for a Class B digital device, pursuant to part 15 of the FCC Rules. These limits are designed to provide reasonable protection against harmful interference in a residential installation. This equipment generates, uses, and can radiate radio frequency energy and, if not installed and used in accordance with the instructions, may cause harmful interference to radio communications. However, there is no guarantee that interference will not occur in a particular installation. If this equipment does cause harmful interference to radio or television reception, which can be determined by turning the equipment off and on, the user is encouraged to try to correct the interference by one or more of the following measures: • Reorient or relocate the receiving antenna • Increase the separation between the equipment and receiver • Connect the equipment into an outlet on a circuit different from that to which the receiver is connected • Consult the dealer or an experienced technician for help You are cautioned that changes or modification not expressly approved by the party responsible for compliance could void your authority to operate the equipment. This device complies with part 15 of the FCC Rules. Operation is subject to the following two conditions: 1. This device may not cause harmful interference, and 2. This device must accept any interference received, including interference that may cause undesired operation. WEEE (Waste of Electrical and Electronic Equipment), Recycling of Electronic Products United Kingdom In 2006 the European Union introduced regulations (WEEE) for the collection and recycling of all waste electrical and electronic equipment. It is no longer allowable to simply throw away electrical and electronic equipment. Instead, these products must enter the recycling process. Each individual EU member state has implemented the WEEE regulations into national law in slightly different ways. Please follow your national law when you want to dispose of any electrical or electronic products. More details can be obtained from your national WEEE recycling agency. Germany Die Europäische Union hat mit der WEEE Direktive umfassende Regelungen für die Verschrottung und das Recycling von Elektro- und Elektronikprodukten geschaffen. Diese wurden von der Bundesregierung im Elektro- und Elektronikgerätegesetz – ElektroG in deutsches Recht umgesetzt. Dieses Gesetz verbietet vom 24.März 2006 an das Entsorgen von entsprechenden, auch alten, Elektro- und Elektronikgeräten über die Hausmülltonne! Diese Geräte müssen den lokalen Sammelsystemen bzw. örtlichen Sammelstellen zugeführt werden! Dort werden sie kostenlos entgegen genommen. Die Kosten für den weiteren Recyclingprozess übernimmt die Gesamtheit der Gerätehersteller. France En 2006, l' union Européenne a introduit la nouvelle réglementation (DEEE) pour le recyclage de tout équipement électrique et électronique. Chaque Etat membre de l’ Union Européenne a mis en application la nouvelle réglementation DEEE de manières légèrement différentes. Veuillez suivre le décret d’application correspondant à l’élimination des déchets électriques ou électroniques de votre pays. Italy Nel 2006 l’unione europea ha introdotto regolamentazioni (WEEE) per la raccolta e il riciclo di apparecchi elettrici ed elettronici. Non è più consentito semplicemente gettare queste apparecchiature, devono essere riciclate. Ogni stato membro dell’ EU ha tramutato le direttive WEEE in leggi statali in varie misure. Fare riferimento alle leggi del proprio Stato quando si dispone di un apparecchio elettrico o elettronico. Per ulteriori dettagli fare riferimento alla direttiva WEEE sul riciclaggio del proprio Stato. LINDY No. 42744 1st Edition July 2011 www.lindy.com © LINDY ELECTRONICS LIMITED & LINDY-ELEKTRONIK GMBH – SECOND EDITION (July 2011)