1
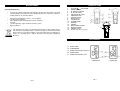
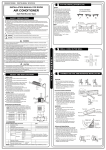
RXS40
INSTRUCTION MANUAL
MAINTENANCE
Care and maintenance
•
To clean the cabinet, unplug the unit and wipe off dust and stains with a soft cloth
moistened with a mild soap and water solution only. Do not use benzene, thinner or
similar chemicals to clean the cabinet.
•
Do not place naked flame sources, such as lighted
candles on the apparatus.
Take attention to the environmental aspects of battery
disposal.
Use the apparatus only in moderate climates (not in
tropical climates).
•
•
If at any time in the future you should need to dispose of this product, please
note that waste electrical products should not be disposed of with household
waste. Please recycle where facilities exist. Check with your local authority or
retailer for recycling advice. (Waste Electrical and Electronic Equipment
Directive)
DESCRIPTIONS
1.
2.
3.
4.
5.
6.
7.
8.
9.
10.
11.
12.
13.
14.
15.
16.
VOLUME
/OFF KNOB
MODE BUTTON
AL ON/OFF BUTTON
AL SET BUTTON
LIGHT/TIME BUTTON
AM/FM BUTTON
HOUR BUTTON
MIN BUTTON
LCD DISPLAY
TUNING KNOB
MIRROR
HANDLE
ADJUSTABLE STAND
BATTERY DOOR
HANGER SLOT
Suction cup (an accessory)
16
LCD DISPLAY
17.
18.
19.
20.
21.
CLOCK TIME
ALARM MODE
RADIO FREQUENCY DISPLAY
RADIO BAND
RADIO FREQUENCY UNIT
POWER OFF
GB-1
GB-2
POWER ON
BATTERY INSTALLATION
1. Remove the screw and then the battery door.
2. Insert 4 pcs AAA/ UM4 batteries (not supplied) with polarities (+/-) matching
the engraved markings in the battery compartment.
Reversed batteries may cause damage to the unit.
3. Replace the battery door with the screw.
Precautions of using batteries
1. Use only the size and type of batteries specified.
2. Do not mix different types of batteries together (e.g. alkaline, rechargeable and
standard (carbon zinc)) or old batteries with fresh ones.
3. Exhausted batteries have to be removed to prevent possible battery leakage.
4. Dispose of batteries properly according to environmental regulations.
MOUNTING
Using the adjustable stand
The unit can stand on the table at two different angles by pulling out the adjustable stand,
which will stop at one of the two clicks with the back cabinet.
Using the handle
Take out the handle and hang it on the hooker mounted securely on the wall.
Using the hanger hole
Hang the unit on the wall using the hanger slot at the back of the unit and the screw on the
wall.
Using the suction cup
Insert the suction cup (an accessory) to the hanger slot and press the suction cup firmly
against the wall.
TIME SETTING
Set the clock
1.
2.
With batteries inserted and VOLUME/OFF knob set at OFF position, press and hold
LIGHT/TIME button and press HOUR button to set the hour.
Press and hold LIGHT/TIME button and press MIN button to set the minute.
Set the alarm time
Follow the steps in “Set the clock” except using the AL SET button, instead of LIGHT/TIME
button.
Note: When the batteries are removed, the clock and alarm times are back up for 30
seconds to allow you to replace new batteries.
ALARM OPERATION
The unit allows you to wake up by buzzer.
Listen to FM/AM radio
1.
2.
3.
4.
5.
RADIO OPERATION
Turn VOLUME/OFF knob to turn on the unit. The radio frequency will be displayed. You
can view the clock time by pressing MODE button. After releasing the button, it will
return to the frequency display.
To select the band FM or AM, press AM/FM button.
Turn the TUNING knob to receive a station.
Adjust sound volume level by turning VOLUME/OFF knob.
To turn off the radio, turn VOLUME/OFF knob to OFF position when a click sound is
heard.
Note: Both FM and AM antennas are built in the unit. To achieve optimum reception, try to
orientate or re-locate the unit.
SPLASH PROOF
OTHER FUNCTIONS
The unit is designed for splash proof to the shower. But do not immerse it into the water.
BACKLIGHT
Press LIGHT/TIME button to turn on the display backlight for few seconds.
MIRROR
You can glance at yourself in the mirror.
Radio
Tuning range
Antennas
General
Output power
Speaker
Power source
Dimension
Weight
TECHNICAL SPECIFICATIONS
FM 87.5 – 108 MHz
AM 520 – 1600 kHz
FM wire antenna and AM bar built in the unit
400 mW
40mm 8 Ohm
DC 6V: batteries 4 x AAA/ UM4 (not supplied)
200 (H) x 75 (W) x 40 (D)
0.25 Kg
Note: Due to continuing improvements, the technical specifications are subject to change
without notice.
1.
Set VOLUME/OFF knob at OFF position, press AL ON/OFF button to activate the
alarm function. The ALARM icon is displayed.
2. When preset alarm time reaches, the alarm buzzer will be on.
3. Press AL ON/OFF button to stop the alarm or the alarm will stop after 3 minutes. It will
alarm again the next day.
4. To cancel the alarm function, press AL ON/OFF button.
Note: To view the alarm time, press AL SET button.
GB-3
GB-4