1
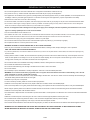
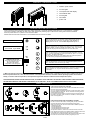
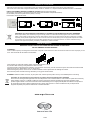
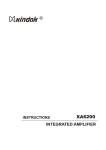
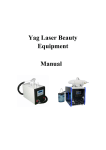
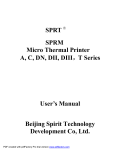
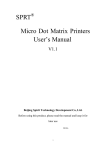
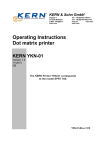
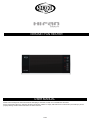
CERAMIC FAN HEATER
USER MANUAL
Please read carefully these instructions before attempting to assemble, install, use or maintain the fan heater.
Protect yourself and others by observing all safety information. Failure to comply with instructions could result in personal injury and/or
property damage. Retain these instructions for future reference.
V 02/09
GENERAL SAFETY INFORMATION
• Do not use the appliance for other than its intended use. This appliance is intended for household use only.
• This product is not a toy. Children would be supervised to ensure that they do not play with the appliance.
• This appliance is not intended for use by persons (including children) with reduced physical, sensory or mental capabilities, or lack of experience and
knowledge, unless they have been given supervision or instruction concerning use of the appliance by a person responsible for their safety.
• Disconnect from mains when not in use or when cleaning.
• To disconnect heater, turn switch to off position, then remove plug from outlet. Pull only by the plug. Do not pull on the cord when disconnect heater.
• Do not insert or allow fingers or foreign objects to enter any ventilation or exhaust opening as it may cause an electric shock or fire or damage the
heater. Do not block or tamper with the heater in any manner while it is in operation.
• Do not use the appliance with a damaged cord or plug. If the supply cord is damaged, it must be replaced by the manufacturer or its service
agent or a similarly qualified person in order to avoid a hazard.
• It is not recommended to use an extension cord.
• The heater is hot when in use. To avoid burns, do not let bare skin touch hot surface. Keep combustible materials, such as furniture, pillows, bedding,
papers, clothes and curtains at least 0.9m from the front of the heater and keep them at least 0.3m from the sides and rear.
• Do not immerse cord, plug or any part of the appliance in water or any other liquid.
• Do not use the heater in dusty environments or where flammable vapours are present (e.g. in a workshop or garage).
• Do not place the heater on or near any other source of heat.
• WARNING: IN ORDER TO AVOID OVERHEATING, DO NOT COVER THE HEATER.
• A fire may occur if the heater is covered with or touches flammable material, including curtains, drapes, bedding etc. when in operation.
KEEP THE HEATER AWAY FROM SUCH MATERIALS.
• To prevent a possible fire, do not block air intakes or exhaust in any manner. Do not place heater on soft surfaces, like a bed, where openings may
become blocked.
• Always place the heater on a stable, flat, level surface when operating, to avoid the chance of the heater overturning. Locate the power cord so the
heater or other objects are not resting on it. Do not run power cord under carpeting. Do not cover power cord with throw rugs, runners, or the like.
Arrange power cord away from room traffic and where it will not be tripped over.
• Do not use the heater in the immediate surroundings of bathtubs, showers, washing stands or swimming pools.
• Do not locate the heater below a socket-outlet.
• Do not let the mains lead hang over the edge of the table or work surface or touch hot surfaces.
• Do not use outdoors.
• Do not attempt to repair, disassemble or modify the appliance. There are no user-serviceable parts inside.
• WARNING: Do not use this heater with a programmer, timer or any other device that switches the heater on automatically, since a fire risk
exists if the heater is covered or positioned incorrectly.
• When the heater is turned on for the first time, it may release a slight, harmless odor. This odor is a normal occurrence caused by the initial heating of
the internal heating elements and should not occur again.
• Please do not put any unit on the product.
• In order to avoid any accident, please turn off the unit when people leave.
• Please do not use the product when there are no people to take care of children, animal or the disabled people.
• If do not use the product for a long time, please disconnect the plug, put the product into the box and stock the product in a dry and ventilated place
• When using the product, please do not make the air outlet and inlet next to the wall or curtain to avoid obstructing the air and influence the effect.
• Please do not use the product under the direct sunshine.
• The inflammable or explosive article is not allowed to put around the heater. And the product is not allowed to use in the environment filled inflammable
air or dust.
• Please do not make the power cord touching the net cover in order to avoid the high temperature hurts the power cord.
• Do not make the wet clothes hang above the heater, in order to avoid the dropped water make the product creepage.
• The power supply, voltage and frequency must comply to the main technical request of heater.
• The ammeter and the internal line used must bear the using frequency of heater, and also take into account that the other electrical appliance can be
WARNING: DO NOT DEPEND ON THE ON/OFF BUTTON SWITCH AS THE SOLE MEANS OF DISCONNECTING POWER.
WHEN SERVICING OR MOVING THE HEATER, ALWAYS UNPLUG THE POWER CORD.
V 02/09
PRODUCT DESCRIPTION
1.
ON/OFF power switch
2.
air outlet grille
3.
touch panel and LED display
4.
removable air filter
5.
air inlet grille
6.
feet rubber
7.
power cord
OPERATING INSTRUCTIONS
Firstly connect the power cord with correct power supply (220-240V~). Press the ON/OFF power switch (no. 1 in the picture) to “I” position.
The unit is in stand-by mode after two “didi” sound. Then press on/off (stand-by) key to make the unit working and all functions available.
Press the power switch to “0” position to turn off the fan heater.
Please follow the here below instructions to use the different functions of the fan heater.
ON/OFF (STAND-BY) LIGHT
POWER LEVEL INDICATOR
(Low= 1300W
High= 2000W)
ON/OFF (STAND-BY) KEY
When you touch this Key, the operation symbol (RED) appears and the unit
begins operating at low power level: the indication “Low” appears on
display, below on the left, and the ambient temperature appears too.
POWER LEVEL KEY
When you press this Key, the heating power pass from low to high level (from
1300W to 2000W): on display it appears the indication “High”. If you continue
to press this key the power level changes from one to the other level.
TEMPERATURE KEY (*)
When you press this Key, you can choose the desired temperature, from 5 to
35°C. To set the temperature you have to press this key, press + or – key and
then wait 5”, for setting confirmation.
The temperature then shown on the display will be the ambient temperature.
If You don’t set any temperature, the default one is 30°C.
LED DISPLAY:
TEMPERATURE OR TIME
When both temperature and time
are set, the display shows
alternatively the ambient
temperature or the resting time.
+ / - KEYS
When you press this Key, You can choose the desired temperature, from 5 to
35°C, or the time, from 1 to 12 hours (by 1h step).
TIMER (SWITCH OFF TIME)
To fix a time for the operation of the unit (from 0 to 12 hours, by 1h step), press
this key and then + or – key to fix the time and then wait 5”, for setting
confirmation.
(*) When the internal temperature sensor detects the set temperature, the heater enters in stand-by mode, the power indicator turns off and
the fan stops after about 10”; when the sensor detects a 2°C temperature decrease, the heater restarts operating at power level selected
initially. To ensure continuous operation, set temperature higher than desired or maximum value of temperature (35°C).
THIS FAN HEATER CAN BE PLACED ON THE FLOOR, ON A SHELF OR ON THE WALL: IN THE LAST CASE YOU MUST TAKE THE SPECIAL
HOLDER SUPPLIED WITH THE PRODUCT AND INSTALL IT ON THE WALL, AS BY FOLLOWING INSTRUCTIONS and PICTURES.
WALL SUPPORT
HOW TO PLACE THE WALL HOLDER
Take the wall holder set, screw out the knob widdershins to make
the three components separately.
You can choose the preferred height to put the wall holder, but the
minimum distance should be 20 cm from both the ceiling and the
nearest wall (horizontally).
Fix the base of wall holder by screw and then fix the wall holder to
the base by the knob. (N.B.: check the orientation, referring to the
mark on the appliance).
HOW TO PLACE THE UNIT ON THE WALL HOLDER
Put the unit on the wall holder, inserting firstly the top of the back
and then the bottom using the appropriate support points.
When hang on the wall, the unit can be fixed in different positions:
- parallel to the wall;
- directed downward;
- directed downward and to the right;
- directed downward and to the left.
To adjust the direction, remove the unit from the wall, loose the
knob, adjust the support in the desired position and then secure the
knob again firmly; then place again the unit on the wall.
To take out the unit from the wall holder press the small lever under
the lower arm of the holder and then pull gently the unit.
V 02/09
REMOTE CONTROL
There are six “soft touch” keys on the remote control, which functions are exactly the same as the ones of control panel keys.
This remote control uses lithium-manganese button battery, model no. CR2032 -3 V, compliant with New Batteries Directive no. 2006/66/EC.
HOW TO PUT/ REMOVE BATTERY OF REMOTE CONTROL (see the picture here below)
Open the door of the battery on the back of the remote control (press the button and pull back the door).
Put the battery into the door (make sure the polarity is correct).
Insert the door to the remote control.
Information for correct disposal of the battery in accordance with the European Directive 2006/66/EC
Please replace battery when its electricity charge is used up: please do not eliminate this battery together with normal household
waste. It must be taken to special local community waste collection centres or to a dealer providing this service. Disposing of a battery
separately avoids possible negative effects on the environment and human health deriving from an inappropriate disposal and enables
its components to be recovered and recycled to obtain significant savings in energy and resources. In order to underline the duty to
dispose of this equipment separately, the battery is marked with a crossed-out dustbin.
MAINTENANCE
WARNING: ALWAYS UNPLUG THE CORD BEFORE MOVING OR SERVICING.
DO NOT IMMERSE HEATER IN WATER.
CLEANING -
Clean the filter frequently, according to the environment: a dirty filter could restrict the air flow and cause the heater to function improperly or shut
down. Pull out the filter as the direction showed below.
Clean the filter by water with washing agent under the temperature of 30℃.
Dry the filter after cleaning it and put back the filter to the unit.
Use the soft cloth to wipe the dust of enclosure. If the enclosure is too dusty, use the soft cloth to wipe it with water mixed with neutral
detergent under 50℃ temperature. Then dry the product.
When cleaning the product, do not use oil or chemical material or other objects that can damage the surface.
Disconnect the power cord when cleaning. Otherwise you may get an electrical shock
STORAGE - Make the heater cool down, dry and pack well, and then put the product in a dry and ventilated place for stocking.
Information for correct disposal of the product in accordance with the European Directive 2002/96/EC
At the end of its working life this equipment must not be disposed of as an household waste. It must be taken to special local community
waste collection centres or to a dealer providing this service. Disposing of electrical and electronic equipment separately avoids
possible negative effects on the environment and human health deriving from an inappropriate disposal and enables its components to
be recovered and recycled to obtain significant savings in energy and resources. In order to underline the duty to dispose of this
equipment separately, the product is marked with a crossed-out dustbin.
www.argoclima.com
MADE IN CHINA
V 02/09