1
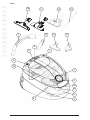
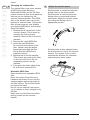
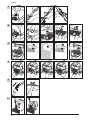
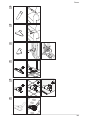
Nilfisk Power
User Manual
Betriebsanleitung
Instructions d’utilisation
Instrucciones de manejo
Instruções de operação
Istruzioni sull’uso
Gebruiksaanwijzing
Driftsinstruks
Driftsvejledning
Brugsvejledning
Käyttöohje
사용 방법
823 0089 000 e
Power
EN
16
17
18
19
DE
FR
ES
PT
IT
NL
13
4
14
15
SV
NO
2
DA
5
FI
1
KO
6
12
7
3
10
11
9
8
2
5
Power
English
Deutsch
Français
Español
Português
Italiano
Nederlands
Svenska
Norsk
Dansk
Suomi
한국의
Illustrations
4
12
20
28
36
44
52
60
68
76
84
92
102,103
EN
DE
FR
ES
PT
IT
NL
SV
NO
DA
FI
KO
3
Power
EN
Welcome!
DE
FR
Thank you for choosing a
Nilfisk vacuum cleaner.
ES
PT
IT
NL
SV
NO
DA
FI
KO
Overview
(inside front cover, page A)
1
2
3
4
5
6
7
8
9
10
11
12
13
14
15
16
On/off button
Suction control
Dust bag indicator
Suction valve
Parking bracket
Cable rewinder
Open/close button, accessory lid
Prefilter
Dust bag
Open/close button, dust container
Rating plate
HEPA filter
Crevice nozzle
Upholstery nozzle
Brush nozzle
Hard floor nozzle (not standard
on all models)
17 Combination nozzle
18 Turbo nozzle (not standard on all
models)
19 Telescopic tube
4
Table of contents,
page reference
Overview
A+4
Safety instructions
5
Instructions for use
6
Cleaning tips
9
Trouble shooting
10
Service and maintenance etc.
10
Guarantee and service
11
Line drawings
102, 103
B
= caption
(drawings inside the back
cover pages 102 and 103)
Specifications and details are subject
to change without prior notice.
Power
Safety instructions
•
•
•
•
•
•
•
•
•
•
•
•
•
•
•
•
•
Do not use the machine without
dust bag and all filters properly
fitted.
This machine is not intended for
suction of hazardous materials or
gas, doing so may expose people
to serious health risks.
The machine must not be used for
suction of water or other liquids.
Do not pick up sharp objects such
as needles or pieces of glass.
Do not pick up anything that
is burning or smoking such as
cigarettes, matches or hot ashes.
Use and store this machine indoors
and in a dry environment, 0 °C to
50 °C.
Do not use the machine outdoors
or on wet surfaces.
Do not handle the machine with
wet hands.
Turn off the machine before
unplugging.
To unplug, grasp the plug, not by
pulling on the cord. Do not carry or
pull the machine by the cord.
The machine must not be used
if the cord shows any sign of
damage. Regularly inspect the
cord for damage, in particular if it
has been crushed, shut in a door
or run over.
Do not use the machine if it
appears faulty. Have the machine
inspected by an authorized service
center if the machine has been
dropped, damaged, left outdoors or
has been exposed to water.
No changes or modifications to
the mechanical or electrical safety
devices should be made.
All repair must be carried out by an
authorized service center.
Use only original dust bags,
original filters and original
accessories from your local dealer.
Use of unauthorized dust bags and
filters will void the warranty.
Turn off the machine and unplug
before starting dust bag or filter
•
•
•
change, grasp the plug, not by
pulling on the cord.
Do not use the machine as a toy.
Do not leave children with the
machine without supervision.
This appliance is not intended for
use by young persons or infirm
persons without supervision
unless they have been adequately
supervised by a responsible
person to ensure that they can
use the appliance safely. Young
children should be supervised to
ensure that they do not play with
the appliance.
If the supply cord cord is damaged,
it must be replaced by the
manufacturer, its service agent or
similarly qualified persons in order
to avoid hazard.
This appliance conforms with
Directives 2004/108/EC, 2006/95/
EC, 93/68/EC.
The symbol
on the product
or on its packing indicates that
this product may not be treated as
household waste. Instead it shall
be handed over to the applicable
collection point for the recycling of
electrical and electronic equipment.
By ensuring this product is disposed
of correctly, you will help prevent
potential negative consequences for
the environment and human health,
which could otherwise be caused by
inappropriate waste handling of this
product. For more detailed information
about recycling of this product, please
contact your local city office, your
household waste disposal service or
the shop where you purchased the
product.
5
EN
DE
FR
ES
PT
IT
NL
SV
NO
DA
FI
KO
Power
EN
DE
FR
ES
PT
IT
NL
SV
NO
DA
FI
Instructions for use
Before using the machine make sure
that the voltage shown on the rating
plate corresponds with the mains
voltage.
The machine is supplied with dustbag,
prefilter and exhaust filter.
Start and stop
Start
Pull out the cord and plug the
machine into a wall socket. Start the
vacuum cleaner using the start/stop
button on top of the vacuum cleaner.
Stop
Turn off the machine using the start/
stop button. Unplug by grasping the
plug, not by pulling on the cord.
KO
6
A
Connecting hose, tube and nozzles
1. Insert the hose connector into the
suction inlet and press until the
hose engages with a click.
2. Connect the bent tube to the tube
and turn it until they engage with a
click.
3. Connect the tube and nozzle and
twist until they engage with a click.
4. The tube is telescopic and can be
adjusted to your height.
Push the button in the middle
of the tube to release the length
adjustment lock. Adjust the tube to
desired length.
Disconnect hose, tube and nozzle
• Disengage the nozzle from the
tube by pressing the button.
• Disengage the hose from the
tube by pressing the button.
• Release the hose connection
from the suction inlet by pressing
the locking mechanism and
remove.
Power
Change of dust bag and filters
The size and quality of the dust bag
and filters affect the efficiency of the
vacuum cleaner. Use of non-original
dust bags or non-original filters can
cause restricted air flow which may
lead to machine overload. Use of
accessories other than Nilfisk original
dust bags and Nilfisk original filters
will void the guarantee.
B Changing the dust bag
The fill level idicator of
dust bag. When indicator
is completly red the dust
bag must be changed in
order to prevent motor
damage.
Always use original dust bags from
Nilfisk.
1. Release the hose connection from
the suction inlet by pressing the
locking mechanism and then
remove it.
2. Open the lid to the dust container
by lifting the opening button in front
of/under the suction inlet.
3. Grip the handle of the dust bag
holder and remove the
holder and the full dust bag
from the dust container.
4. Seal the dust bag by pulling the
cardboard flap.
5. Remove the full dust bag from the
dust bag holder.
6. Insert the new dust bag by guiding
the cardboard into the slots of the
bag holder.
7. Insert the dust bag holder with new
dust bag into the dust bag
conainer. Check that the dust bag
is fully opened in the dust
container.
8. Close the lid of the dust container.
9. Insert the hose connection into the
suction inlet and press until the
hose engages with a click.
C
Changing the prefilter
EN
The prefilter protects the motor by
absorbing micro-particles that arn’t
captured by the dust bag. Change the
prefilter with every fourth dust bag.
The prefilter is located behind the dust
bag. Always use original filters from
Nilfisk.
1. Release the hose connection
from the suction inlet by pressing
the locking mechanism and then
remove it.
2. Open the lid to the dust container
by lifting the opening button in
front of/under the suction inlet.
3. Grip the handle of the dust bag
holder and remove the holder
and the full dust bag from the
dust container.
4. Seal the dust bag by pulling the
cardboard flap.
5. Take out the filter holder with
prefilter.
6. Open the filter holder.
7. Remowe the used prefilter.
8. Fit the new prefilter and close the
filter holder. Check that the
prefilter
is correctly fitted in the holder.
9. Place the filter holder in position
and press into place.
10. Insert the dust bag holder with
new dust bag into the dust bag
conainer. Check that the dust
bag is fully opened in the dust
container.
11. Close the lid of the dust container.
12. Insert the hose connection into
the suction inlet and press until
the hose engages with a click.
7
DE
FR
ES
PT
IT
NL
SV
NO
DA
FI
KO
Power
EN
DE
FR
ES
PT
IT
NL
SV
NO
DA
FI
KO
D Changing the exhaust filter
The exhaust filter is on some variants
of HEPA type (High Efficiency
Particulate Air filter) model.The filter
cleans exhaust air from micro particles
that are not not captured by the
vacuum bag and prefilter. The HEPA
filter or the exhaust filter can not be
brushed or washed clean. Change the
filter at least once per year. Always
use original HEPA filters and exhaust
filters from Nilfisk.
1. Release the lid on the back of the
vacuum cleaner. This is done by
pressing the locking button
upwards. Remove the lid from the
machine.
2. Remove the used HEPA filter.
3. Insert the new HEPA filter.
Do not touch the surface of the
filter. Handle using the plastic
frame that surrounds the filter.
Check that the HEPA filter is
installed correctly.
4. Replace the lid on the machine.
This is done by inserting the flaps
on the top of the lid in the corresponding notches on the
machine.
5. Then press the lower edge of the
lid so the lock closes the lid.
Washable HEPA filter
Some models have washable HEPA
filter.
Rinse the inside of the filter using
lukewarm tap water. Do not use any
cleaning agents and avoid touching
the filter surface. Tap the filter frame
to remove the water.
Do not use an external heat source,
e.g. a radiator or direct sunlight to dry
the filter.
Make sure to let the filter dry before
putting it back into the vacuum
cleaner.
8
E
Adjust the suction power
Suction power is controlled using the
sliding valve on the hose handle.
Suction power is maximal when the
sliding valve is closed and minimal
when open. Adjust the suction power
by moving the sliding valve in
appropriate position.
Suction power is also adjusted using
the slide control on top of the vacuum
cleaner. The symbol on the control
indicates the direction for maximum
and minimum suction power.
Power
F
Parking the tube and nozzle
There are two grooves for parking.
One located on the underside to use
when machine stands on the back,
and the other on the back to use when
the machine is standing on its wheels.
Adjust the suction power by means of
the slide control on top of the vacuum
cleaner or the sliding valve on the
hose handle.
G
Restart
1. Turn off the machine and unplug
from the wall socket.
2. Check that nothing blocks the air
flow through bent tube, hose, tube,
nozzle, dust bag or filters.
3. Let the machine cool down, for at
least 5-10 minutes.
4. Plug in the machine again and
start using the start/stop button.
The machine will not start until it is
sufficiently cool. If the machine does
not start turn it off using the start/
stop button and unplug. Try again in
a while.
H
I
J
DE
FR
ES
Crevice nozzle
PT
Use the crevice nozzle for narrow
spaces.
Thermal fuse
The vacuum cleaner is fitted with a
thermal fuse, which prevents it from
overheating. If the thermal fuse blows,
the vacuum cleaner stops and must
cool down before it can be started
again.
EN
Cleaning tips
IT
Upholstery nozzle
Use the upholstery nozzle for
upholstered furniture.
NL
Brush nozzle
SV
Use the brush nozzle for curtains and
window sills.
NO
Hard floor nozzle
DA
Use the nozzle for hard floors.
K
FI
Combination nozzle
Adjust the combination nozzle
depending on type of floor.
L
KO
Turbo nozzle
Use the turbo nozzle for efficient
carpet cleaning.
The different models of these vacuum
cleaners can include different nozzles.
WARNING
When activating the automatic
cord rewind, care must be taken
as the plug at the end of the cord
can swing during the last part of the
rewinding. It is recommended that you
hold on to the plug while rewinding.
9
Power
EN
DE
FR
ES
PT
Trouble shooting
Repair and service of your cleaner,
must only be carried out by an
authorized service center.
If the machine does
not start
A fuse in the building
may have blown and
need to be changed.
IT
The cord or plug
may be damaged
and must be
repaired by an
authorized service
center.
NL
SV
NO
If non of the above
actions will apply
- leave your cleaner
to an authorized
service center.
DA
FI
KO
Check that the plug
is correctly fitted to
the wall socket.
Reduced
suction
power
The dust bag may
be full and needs
to be changed, see
instructions.
The prefilter or
HEPA filter may be
blocked and have
to be changed, see
instructions.
The hose handle,
hose, tube or
nozzle may be
blocked and needs
to be cleaned.
If the machine stops
The thermal fuse
may have blown,
see instructions.
Service and maintenance
•
•
•
•
•
Store the machine in a dry
environment.
Change the prefilter with every
fourth dust bag. The dust bag
package includes four dust bags
and one prefilter.
Clean the machine surface with a
dry cloth or a damp cloth with a
little dishwashing liquid.
Original accessories are available
from a local dealer.
Service – contact your local dealer.
Recycling and disposal
Recycle packing and dispose of the
machine as recommended by your
local authority. Cut the cable close to
the machine to prevent injury or use of
the defective/disposed machine.
Environmental commitment
This machine is designed in an
environmentally conscious manner. All
plastic parts is marked for recycling.
Responsibility
Nilfisk disclaim all responsibility for all
damage caused by incorrect use or
modification of the machine.
Information
For more information see
www.nilfisk.com
Guarantee
The warranty can vary between
different countries. Contact your local
dealer for information.
Guarantee and service
This Nilfisk Series vacuum cleaner is
covered by a five (5) year guarantee
on the machine, which covers the
motor, cable rewinder, switch and
casing. The nozzles, filters, hoses,
tubes and other accessories are
covered twelve months due to
10
Power
manufacturing fault only and excludes
wear and tear.
The guarantee includes spare
parts and labour costs, and covers
manufacturing and material defects
that may occur during normal
domestic use.
Service under the guarantee will
only be performed if it can be proven
that the defect occurred within the
product’s guarantee period (a correctly
completed guarantee certificate or
printed/stamped cash register receipt
with date and product type) and on
the condition that the vacuum cleaner
was bought as a new product and
distributed by Nilfisk-Advance.
In the event of the repair of defects,
the customer must contact NilfiskAdvance to be directed to a service
agent at the customers own expense.
Upon completion of any repairs
necessary, the vacuum cleaner will be
returned to the customer at the risk
and expense of Nilfisk-Advance.
The guarantee does not cover:
•
Normal wear and tear of
accessories and filters.
• Defects or damage occurring as a
direct or indirect result of incorrect
use - such as the vacuuming of
rubble, hot ashes or carpet
deodorant powder.
• Abuse, loss or lack of maintenance
as described in Instructions for use.
• Plaster dust.
• Saw dust.
• Water.
• Should not be used for home
renovations.
Nor will it cover incorrect or poor
configuration, i.e. setting up or
connection, nor fire-damage, fire,
lightning strike or unusual voltage
fluctuations or any other electrical
disturbances such as defective fuses
or defective electrical installations on
the supply grid, and defects or
damage in general that NilfiskAdvance consider to be the result of
causes other than manufacturing and
material defects.
EN
The guarantee becomes void:
•
•
•
•
If a defect is caused by the use of
non-original Nilfisk dust bags and
filters.
If the identity number (serial
number) is removed from the
vacuum cleaner.
If the vacuum cleaner has
been repaired by a non-Nilfisk
authorized dealer.
If the machine is used in a
commercial environment, i.e.
building contractors, cleaning
contractors, professional trades or
any other non-domestic usage.
DE
FR
ES
PT
IT
NL
SV
NO
The guarantee is valid in:
Denmark, Sweden, Norway, Great
Britain, Ireland, Belgium, Holland,
France, Germany, Poland, Rusia,
Austria, Switzerland, Spain,
Portugal, Australia and New Zealand,
Estonia, Latvia, Lithuania, Hungary,
Greece,Slovenia, Slovakia, the Czech
Republic, Italy and Finland.
Addendum Australia:
Our goods come with guarantees that
cannot be excluded under the Australian Consumer Law. You are entitled
to a replacement or refund for a major
failure and for compensation for any
other reasonably foreseeable loss or
damage. You are also entitled to have
the goods repaired or replaced if the
goods fail to be of acceptable quality
and the failure does not amount to a
major failure.
Nilfisk vacuum cleaners for domestic
use are warranted for 2 years from the
date of purchase by:
Nilfisk-Advance Pty Ltd
Unit 1/13 Bessemer Street
Blacktown NSW 2148
Phone: 1300 556 710
E-mail: [email protected]
Find your local service agent here:
http://www.nilfisk.com.au.
The benefits under this warranty are in
addition to your national law of sale.
11
DA
FI
KO
Power
101
Power
A
1
2
3
4
B
1
2
3
4
5
C
5
6
7
8
9
D
1
2
3
4
5
E
F
102
Power
G
H
I
J
K
L
103
Nilfisk. Performance and durability since 1906
x 50.000
x 30.000
x 6.000
x 5.000
x 7.000
1.000 h
x 10.000
x 37.000
5 00 km
Nilfisk-Advance A/S
Industrivej 1
DK - 9560 Hadsund
tel.: (+45) 7218 2100
www.nilfisk.com