1
1
Advanced Handheld High‐Speed Laser Scanner USER’S MANUAL
Revision History Changes to the original manual are listed below: Version Date Description of Version 1.0 Jun. 25, 2010 Initial release 1.1 Sep. 07, 2010 Add configuration barcode value. Add settings of Code 11, Standard 2 of 5, Industrial 2 of 5, Telepen, Matrix 2 of 5. i Advanced Handheld High‐Speed Laser Scanner USER’S MANUAL Important Notice No warranty of any kind is made in regard to this material, including, but not limited to, implied warranties of merchantability or fitness for any particular purpose. We are not liable for any errors contained herein nor for incidental or consequential damages in connection with furnishing, performance or use of this material. We shall be under no liability in respect of any defect arising from fair wear and tear, willful damage, negligence, abnormal working conditions, failure to follow the instructions and warnings, or misuse or alteration or repair of the products without written approval. No part of this document may be reproduced, transmitted, stored in a retrieval system, transcribed, or translated into any human or computer or other language in any form or by any means electronic, mechanical, magnetic, optical, chemical, biological, manual or otherwise, except for brief passages which may be quoted for purposes of scholastic or literary review, without express written consent and authorization. We reserve the right to make changes in product design without reservation and without notification. The material in this guide is for information only and is subject to change without notice. All trademarks mentioned herein, registered or otherwise, are the properties of their various, ill, assorted owners. General Handling Precautions Do not dispose the scanner in fire. Do not put the scanner directly in the sun or by any heat source. Do not use or store the scanner in a very humid place. Do not drop the scanner or allow it to collide violently with other objects. Do not take the scanner apart without authorization Guidance for Printing This manual is in A5 size. Please double check your printer setting before printing it out. When the barcodes are to be printed out for programming, the use of a high‐resolution laser printer is strongly suggested for the best scan result. Copyright © 2010. All rights reserved. Advanced Handheld High‐Speed Laser Scanner ii USER’S MANUAL
Laser Safety This equipment generates, uses, and can radiate radio frequency energy. If not installed and used in accordance with the instructions in this manual, it may cause interference to radio communications. The equipment has been tested and found to comply with the limits for a Class A computing device pursuant to EN55022 and 47 CFR, Part 2 and Part 15 of FCC Rules. These specifications are designed to provide reasonable protection against interference when operated in a commercial environment. Radiant Energy: The laser scanner uses one low‐power visible laser diodes operating at 650nm in an opto‐mechanical scanner resulting in less than 3.9μW radiated power as observed through a 7mm aperture and averaged over 10 seconds. Do not attempt to remove the protective housing of the scanner, as unscanned laser light with a peak output up to 0.8mW would be accessible inside. Laser Light Viewing: The scan window is the only aperture through which laser light may be observed from this product. A failure of the scanner engine, while the laser diode continues to emit a laser beam, may cause emission levels to exceed those for safe operation. The scanner has safeguards to prevent this occurrence. If, however, a stationary laser beam is emitted, the failing scanner should be disconnected from its power source immediately. Adjustments: Do not attempt any adjustments or alteration of this product. Do not remove the protective housing of the scanner. There are no user‐serviceable parts inside. Optical: The use of optical instruments with this product will increase the eye hazard. Optical instruments include binoculars, magnifying glasses, and microscopes but do not include normal eye glasses worn by the user. CAUTION: Use of controls or adjustments or performance of procedures other than those specified herein may result in hazardous radiation exposure. For CE‐Countries This scanner is in conformity with CE standards. Please note that an approved, CE‐marked power supply unit should be used in order to maintain CE conformance. iii Advanced Handheld High‐Speed Laser Scanner USER’S MANUAL Table of Contents Important Notice.................................................................................................................. ii
Introduction .........................................................................................................................1
Scanner and Accessories..............................................................................................2
Connecting to a Host....................................................................................................3
Disconnecting the Cable from the Scanner..................................................................4
How to Scan .................................................................................................................5
Scanning in Handheld Mode ................................................................................5
Scanning in Stand Mode.......................................................................................5
Scanner Outline....................................................................................................................6
Assembling the Optional Stand....................................................................................7
Visible Indicators..........................................................................................................8
Sound Indicators ..........................................................................................................8
Troubleshooting...................................................................................................................9
Configuration Modes .................................................................................................10
Barcodes.............................................................................................................10
Serial Programming............................................................................................10
Programming Guide...........................................................................................................11
Programming Options................................................................................................11
Default Parameters ....................................................................................................11
Factory Default Setting ..............................................................................................12
Scanner Operation .............................................................................................12
Interface Communication ..................................................................................12
Symbologies .......................................................................................................13
Data Formating ..................................................................................................14
Program Procedure Using Barcode Manual .......................................................15
Parameter setting.......................................................................................................16
Scanner Operation .............................................................................................16
Interface Configuration ......................................................................................26
The Symbologies ................................................................................................34
Data Editing........................................................................................................58
Appendix 1: USB Virtual COM Driver Installation ..............................................................63
Appendix 2: Barcode Length Setting..................................................................................64
Appendix 3: Multi‐Barcode Editor .....................................................................................65
Appendix 4: Full ASCII Code 39 Table.................................................................................67
Advanced Handheld High‐Speed Laser Scanner iv USER’S MANUAL
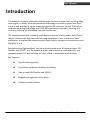
Introduction
This scanner is a newly released handheld single‐line laser scanner with a cutting‐edge scan engine. It utilizes the omnidirectional technology to transform seven laser lines into one and performs a superb scanning speed at 500 scans per second. The built‐in hardware decoding technology and 32‐bit MPU guarantees real‐time scanning and accuracy, ensuring an unbeatable first read success rate. The scanner comes with a stand of small footprint to save counter space. Its LED and beeper indicate scanning status and are programmable to cater to the users’ own preference. Its replaceable communication cable further increases its convenience and flexibility in use. Streamlined and light‐weighed, this handy device reads most 1D barcode types, GS1 DataBar and PDF417. It is the reliable business tool to enhance work efficiency at a competitive cost, the best solution for retail, office or warehouse environments. Key Features: 1
Superb scanning ability
Proprietary hardware decoding technology
Able to read GS1 DataBar and PDF417
Rugged and ergonomic form factor
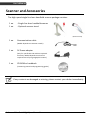
Flexible communications Advanced Handheld High‐Speed Laser Scanner USER’S MANUAL Scanner and Accessories The high‐speed single line laser handheld scanner package contains: 1 ea. ‐ Single‐line laser handheld scanner 1 ea. ‐ Optional scanner stand (with stand) 1 ea. Communication cable (without stand) (Model depends on customer needs.) 1 ea. 5V Power adapter (Only for specific RS‐232 cables as optional accessory. Model depends on electrical requirements of your geographic location) 1 ea. CD‐ROM or handbook (Containing manual and programming guide) If any contents are damaged or missing, please contact your dealer immediately. Advanced Handheld High‐Speed Laser Scanner 2 USER’S MANUAL
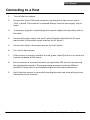
Connecting to a Host 1.
Turn off the host system. 2.
Connect the 10‐pin RJ45 male connector into the jack on the scanner until a “click” is heard. If the scanner is powered directly from the host supply, skip to step 5. 3.
If necessary, plug the L‐shaped plug of the power supply into the power jack on the cable. 4.
Connect the power supply into an AC outlet. (Double check that the AC input requirement of the power supply matches the AC outlet.) 5.
Connect the cable to the proper port on the host system. 6.
Turn on the host system. 7.
If the scanner is properly installed, the red, green, blue LED will turn on once and 3 power‐up beeps will be heard. 8.
Set the scanner to communicate with your particular POS terminal by scanning the appropriate barcodes. The programming procedure varies on different terminals. Please refer to the Programming section for more information. 9.
Verify that the scanner is successfully reading barcodes and transmitting correct information to the terminal. 3 Advanced Handheld High‐Speed Laser Scanner USER’S MANUAL Disconnecting the Cable from the Scanner The communication cable is designed to be field‐replaceable. Prior to removing the cable from the scanner, it is highly advised to turn off the power of the host system and disconnect the power supply from the cable. 1.
Locate the small hole at the bottom of the scanner. 2.
Use a metallic pin and insert into the hole. 3.
Gently pull the strain‐relief of the cable once a faint “click” is heard. Advanced Handheld High‐Speed Laser Scanner 4 USER’S MANUAL
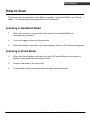
How to Scan The scanner can be operated in two different modes: “Handheld Mode” and “Stand Mode.” The following explains how these can be achieved. Scanning in Handheld Mode 1.
When the scanner is removed from the stand, the Handheld Mode is automatically activated.
2.
Press the trigger and aim at the barcode. 3.
When decoding is successful, the scanner beeps and the LED indicate blue/green. Scanning in Stand Mode 5 1.
When the Stand Mode is activated, the blue LED would blink as the scanner is placed on the optional presentation stand. 2.
Present a barcode in the scan field. 3.
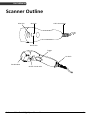
The barcode would be automatically decoded and transmitted. Advanced Handheld High‐Speed Laser Scanner USER’S MANUAL Scanner Outline Cable Connection Red LED Blue LED Green LED Trigger Pin Hole Exit Window Buzzer Sound Hole
Advanced Handheld High‐Speed Laser Scanner 6 USER’S MANUAL
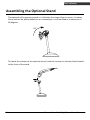
Assembling the Optional Stand The optional self‐supporting stand is to facilitate the usage of your scanner. It moves freely and can be placed anywhere on countertops. It can be tilted to a maximum of 60 degrees. 60°
To attach the scanner to the optional stand, hook the scanner on the two holes located at the front of the stand.
7 Advanced Handheld High‐Speed Laser Scanner USER’S MANUAL Visible Indicators There are three blue LED indicator bars and two green/red LED indicators on top of the scanner. These indicate the operational status of the scanner. LED Status LED Indication *The scanner is not powered. Blue, red, and green LEDs are off * When the scanner is in stand‐by mode, the trigger button is enabled. Present a barcode to the scanner and the red LED would turn on when the laser is turned on. Steady blue, red, and green The scanner is in Bootload Mode (firmware upgrade status) Steady red When the laser is active, the red LED is on. The red LED would remain on until the laser is deactivated. Green and blue LED flash once A barcode has been successfully decoded. Steady green * A barcode has been successfully decoded, but the object is not removed from the scan window. * The scanner is in programming mode. Steady red/green This indicates the scanner has a motor or laser failure. A beep is heard when a motor failure occurs. Return the unit for repair. Constant blue LED flashes While the scanner is on the stand, the laser would turn on (along with the red LED) when a barcode is presented in the scan field. The barcode would be automatically decoded and transmitted. Alternate red and green LED flashes The scanner detects a power failure. Please check whether the power is properly connected. Sound Indicators When the scanner is in operation, it provides audible feedback. The beeps indicate the status of the scanner. Beep One beep Three consequent beeps Two consequent beep Indication A barcode has been successfully decoded. *The scanner has passed the self‐test and is operating properly. * The scanner is powered up. This indicates that the scanner is in programming mode. Advanced Handheld High‐Speed Laser Scanner 8 USER’S MANUAL
Continuous beep tone This is a failure indication. Return the unit for repair. Troubleshooting Problem The scanner has no reaction; no LED, beeps, or laser The scanner is functioning but is not decoding. Possible Cause The power is not ON *The symbology of the barcode might be disabled.
*The number of characters of the barcode label does not match the initial setting. Solution Refer to the “Connecting to a Host” section of the manual *Enable the barcode type from the programming guide. *Adjust the label length setting of the barcode type. When using the keyboard wedge interface, the data transmission is slower than usual. The system is not compatible with the international ALT method. Under properties, select the language property that is suitable for your keyboard. A barcode is read but not accepted by the host device. Either a wrong interface is selected or the interface is incorrectly set. Check the interface cable used and the interface settings. Alternating red and green flashes There is a power failure in this scanner. Steady red/green LED
There is a laser failure in the scanner. Please check and see if the power is properly connected. Immediately power off the scanner and return the unit for repair. Characters are being dropped. The delay time in the inter‐
character needs to be increased. Adjust the character delay time. 9 Advanced Handheld High‐Speed Laser Scanner USER’S MANUAL Configuration Modes This scanner has two programming modes. Barcodes This scanner can be configured by scanning the barcodes located in the below “Programming Guide” section. Please refer to this guide for instructions. Serial Programming This mode gives end‐users the ability to send a series of commands using the serial port of the host system. For more information, please contact your dealer. Advanced Handheld High‐Speed Laser Scanner 10 USER’S MANUAL
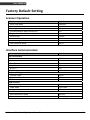
Programming Guide Scanning a series of programming barcode labels can configure the scanners. This allows decoding options and interface protocols to be tailored to a specific application. The configuration is stored in non‐volatile memory and will not be lost by removing power from the scanner. The scanner must be properly powered before programming. For RS‐232C type scanners, an external power adapter must be used to supply DC power to the scanner. If a keyboard emulation type scanner is used with an IBM PC/XT/ AT, PS/2 or any fully compatible computers, power will be drawn from the keyboard port. No external power adapter is required. If keyboard emulation type scanner is used with any other non IBM PC compatible computers, an external power adapter may be needed. During the programming mode, the laser scanner will acknowledge a good and valid reading with a short beep. It will give long beeps for either an invalid or bad reading. Programming Options Programmable options are divided into four groups. The first group includes the options that show the general behavior of the laser scanner. The second group governs the operation of different interfaces, RS‐232 serial ports, keyboard, and USB. The third group sets the decoding parameters for each barcode symbology. The last group is about more advanced data formatting. Default Parameters This table gives the default settings of all the programmable parameters. The default settings will be restored whenever the laser scanner is in programming mode and the "Reset" programming label is scanned. 11 Advanced Handheld High‐Speed Laser Scanner USER’S MANUAL Factory Default Setting Scanner Operation Parameter Same code delay Beeping frequency Beeping duration LED/Beep before data transmission Trigger mode (handheld mode) Stand mode Header and trailer Inter message delay Inter character delay Default 500msec Medium 50msec On Enable Enable None None None Interface Communication Parameter RS‐232 Interface Baud rate Parity Data Bits Stop Bit RTS/CTS Terminator Keyboard Wedge Interface Terminal Type Keyboard Terminator USB Interface Terminator type Code mode Keyboard Wand Emulation Wand emulation speed Data output Default 9600 none 8 1 off <CR><LF> PC/AT US keyboard Enter Enter Scan code US keyboard Normal Black=high Advanced Handheld High‐Speed Laser Scanner 12 USER’S MANUAL
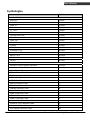
Symbologies Parameter Decoder Selection EAN/UPC Code 39 Code 32 Codabar ITF 2 of 5 MSI Chinese Post Code Code 93 Code 128 EAN‐128 Telepen Code 11 Standard 2 of 5 Industrial 2 of 5 Matrix 2 of 5 GS1 DataBar PDF417 Code Identifiers Identifier code as factory standard Identifier code as AIM standard Code 39 identifier code ITF 2 of 5 identifier code Chinese post code identifier code UPC‐A identifier code UPC‐E identifier code EAN‐13 identifier code EAN‐8 identifier code Codabar identifier code Code 128 identifier code Code 93 identifier code MSI identifier code Code 11 identifier code Standard 2 of 5 identifier code Industrial 2 of 5 identifier code Matrix 2 of 5 identifier code GS1 DataBar identifier code 13 Default Enable Enable Disable Disable Enable Disable Disable Enable Enable Disable Disable Disable Disable Disable Disable Disable Disable Disable Disable M I H A E F FF N K L P O S D G RS Advanced Handheld High‐Speed Laser Scanner USER’S MANUAL GS1 DataBar Limited identifier code GS1 DataBar Expanded identifier code PDF417 identifier code Barcode Length Codabar maximum Code 11 Standard 2 of 5 minimum Industrial 2 of 5 Matrix 2 of 5 Code 39 maximum Code 93 minimum Code 128 maximum Chinese Post Code minimum RL RX X maximum 32 minimum maximum minimum maximum minimum 4 14 14 48 6 MSI ITF 2 of 5 GS1 DataBar GS1 DataBar Limited GS1 DataBar Expanded 32 6 62 3 16 10 Data Formating Code EAN‐13 EAN‐8 UPC‐A UPC‐E Code 128 EAN‐128 Code 39 Codabar ITF 2 of 5 Chinese Post Code Code 93 MSI Message Format D1 D2 D3 D4 D5 D6 D7 D8 D9 D10 D11 D12 D13 D1 D2 D3 D4 D5 D6 D7 D8 D1 D2 D3 D4 D5 D6 D7 D8 D9 D10 D11 D12 D1 D2 D3 D4 D5 D6 D7 D8 D1‐Dx (default 3~62) C1 D1‐Dx (default 3~62) D1‐Dx (default 3~62) D1‐Dx (default 6~32) D1‐Dx (default 6~32) D1‐Dx (default 8~32) D1‐Dx (default 3~32) D1‐Dx (default 6~32) Advanced Handheld High‐Speed Laser Scanner 14 USER’S MANUAL
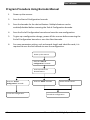
Program Procedure Using Barcode Manual 1.
Power up the scanner. 2.
Scan the Start of Configuration barcode. 3.
Scan the barcode for the desired feature. Multiple features can be enabled/disabled before scanning the End of Configuration barcode. 4.
Scan the End of Configuration barcode and save the new configuration. 5.
To give up a configuration change, power off the scanner before scanning the End of Configuration barcode or scan the Abort barcode. 6.
For some parameter setting, such as barcode length and identifier code, it is required to scan the Set barcode to save the configuration. Power up the scanner
Scan the “Start of Configuration” barcode Scan barcode of the desired feature Scan the “End of Configuration” barcode Finish the configuration 15 Scan the “Abort” barcode Power off the scanner
Discard the configuration
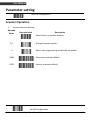
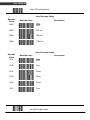
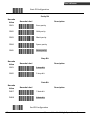
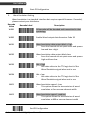
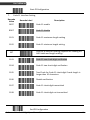
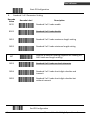
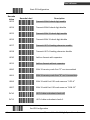
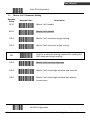
Advanced Handheld High‐Speed Laser Scanner USER’S MANUAL Parameter setting Start Of Configuration Scanner Operation 1.
System Function Setting Barcode Value ‐‐ Barcode Label %/ Description Reset (return to factory default) Display firmware version Abort :exit programming mode with no update ++ KE94 Return to customer default KE95 Save as customer default End Of Configuration Advanced Handheld High‐Speed Laser Scanner 16 USER’S MANUAL
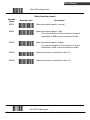
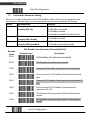
2.
Start Of Configuration Interface Setting Barcode Value KE97 Barcode Label Description Return to USB default KE99 Return to RS‐232 default KE87 Enable USB virtual COM (Virtual COM driver required. For installation steps refer to Appendix 1.) KE01 Enable IBM PC/AT/PS/2 Keyboard emulation KE05 Enable stand‐alone keyboard (Required no keyboard or key simulator. Only available for special firmware version.) KE98 Enable wand emulation (Only available for special firmware version.) KE77 Enable OPOS/JPOS (Available for USB interface only and requires driver. For RS‐232 interface, the scanner needs reset and identifier code has to be enabled.) 17 End Of Configuration Advanced Handheld High‐Speed Laser Scanner USER’S MANUAL 3.
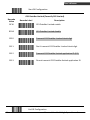
Start Of Configuration General Scan Mode Setting Handheld Operation Barcode Value SM01 Barcode Label Description Trigger Mode
The scanner becomes inactive as soon as the data is transmitted. It must be triggered to become active again. SM02 Auto Scan Mode
The scanner is still active after the data is transmitted but the successive transmission of the same barcode is not allowed when the trigger switch is pressed again. SM04 Pulse Mode
The scanner will light up and blink when press the scanner trigger switch once and the scanner will turn off after next pressing. The laser remains on for approximately 3 to 10 seconds after the pulse light is on. SM07 Auto Trigger Mode The scanner will automatically detect object and activate laser lighting. Barcode data is transmitted when the trigger is pressed.
Aim Mode
When the trigger is pressed once, the scanner will light up, blink and decode automatically. But the data is transmitted only when the trigger is released. The scanner will turn off when the trigger is pressed again. Momentary mode
The scanner will light up only when the trigger switch is pressed the scanner will turn off when the trigger switch is release. SM08 SM09 End Of Configuration Advanced Handheld High‐Speed Laser Scanner 18 USER’S MANUAL
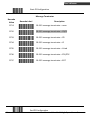
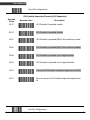
Start Of Configuration Stand Operation Barcode Value SM20 Barcode Label Description IR On (Auto scan on stand)
The scanner automatically activates laser, scans and transmits data when detecting object. IR Off (Scan by manual trigger) SM21 19 End Of Configuration Advanced Handheld High‐Speed Laser Scanner USER’S MANUAL 4.
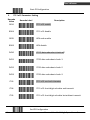
Start Of Configuration Operation Function Setting Good Read Beeper Tone Selection Barcode Value GR02 Barcode Label Description Low beeper tone GR01 Medium beeper tone GR03 High beeper tone GR05 Speaker disable Beeper Sound Selection Barcode Value GR13 Barcode Label Description Very short (5 msec) GR12 Short (20 msec) GR11 Medium (50 msec) GR10 Long (100 msec) GR14 Very Long (200 msec) GR15 Ultra long (500 msec) End Of Configuration Advanced Handheld High‐Speed Laser Scanner 20 USER’S MANUAL
Start Of Configuration Beeper Volume Selection Barcode Value GR20 Barcode Label Description Loud GR21 Medium GR22 Slight Beeper Timing Selection Barcode Value LB00 Barcode Label Description LED/Beep after transmission
Use this barcode to indicate a "good read" after a barcode has been successfully decoded. LED/Beep before transmission
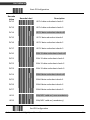
Use this barcode to indicate a “good read" before successfully transmitting the barcode data to the host. LB01 Power‐on tone enable LB03 LB04 Power‐on tone disable 21 End Of Configuration Advanced Handheld High‐Speed Laser Scanner USER’S MANUAL Start Of Configuration Inter Message Delay Barcode Value IM01 Barcode Label Description 0 ms IM02 100 ms IM03 500 ms IM04 1000 ms Inter Character Delay Barcode Value IC01 Barcode Label Description 0ms IC00 5ms IC02 10ms IC03 20ms IC04 50ms IC05 2ms End Of Configuration Advanced Handheld High‐Speed Laser Scanner 22 USER’S MANUAL
Start Of Configuration Same Code Delay Barcode Value Barcode Label Description SD01 Same code delay time 50msec SD02 Same code delay time 100msec SD03 Same code delay time 200msec SD04 Same code delay time 300msec SD05 Same code delay time 400msec SD06 Same code delay time 500msec SD07 Same code delay time 600msec SD08 Same code delay time 700msec SD09 Same code delay time 800msec SD10 Same code delay time 900msec SD11 Same code delay time 1000msec SD12 Same code delay time Infinite 23 End Of Configuration Advanced Handheld High‐Speed Laser Scanner USER’S MANUAL Start Of Configuration Connection to an Omnidirectional Scanner Instead of connecting to a host, sometimes the handheld scanner is to be connected to the AUX port of an omnidirectional scanner and transmit data to the host system via this omnidirectional scanner. Such application is not uncommon in places like hypermarkets and home improvement shops where there are products too heavy or bulky to be put on the counter and need a handheld scanner to read their barcodes. In most cases, the auxiliary input port’s data transmission format would follow the main output format of the omnidirectional scanner, including barcode symbologies and related parameters. For example, if the handheld scanner can read Codabar while the omnidirectional scanner can not, the handheld scanner would decode a Codabar barcode without transmitting the data. To complete the data transmission process, you have to re‐program the omnidirectional scanner and enable Codabar decoding capability. The following barcode allows you to enable and disable the AUX port. For more application and connection instructions, refer to the manual of the omnidirectional scanner. Barcode Value AUXS Barcode Label Description Enable AUX function Not all firmware versions support the AUX function. Please contact your distributor if you have any questions. End Of Configuration Advanced Handheld High‐Speed Laser Scanner 24 USER’S MANUAL
Start Of Configuration Pulse Light Flash On/Off Timeout Duration Barcode Value Barcode Label Description FT01 Fast FT00 Medium FT02 Slow Blue LED Barcode Value Barcode Label Description When scanner on stand, blue LED remains off when decoding LE00 LE01 When scanner on stand, blue LED lights on when decoding LE04 When handheld, blue LED remains off when decoding When handheld, blue LED lights on when decoding LE05 25 End Of Configuration Advanced Handheld High‐Speed Laser Scanner USER’S MANUAL Start Of Configuration Interface Configuration 1.
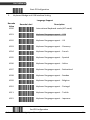
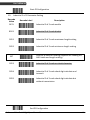
RS‐232C Interface Setting Same Code Delay Barcode Value Barcode Label Description BR09 115200 BR08 57600 BR00 38400 BR01 19200 BR02 9600 BR03 4800 BR04 2400 BR05 1200 End Of Configuration Advanced Handheld High‐Speed Laser Scanner 26 USER’S MANUAL
Start Of Configuration Parity Bit Barcode Value Barcode Label Description PB01 Even parity PB02 Odd parity PB03 Mark parity PB04 Space parity PB05 None parity Stop Bit Barcode Value Barcode Label Description SB01 1 stop bit SB02 2 stop bit Data Bit Barcode Value Barcode Label DB07 7 data bit DB08 8 data bit 27 Description End Of Configuration Advanced Handheld High‐Speed Laser Scanner USER’S MANUAL Start Of Configuration Handshaking Protocol Barcode Value HP01 Barcode Label Description None handshaking HP02 ACK/NAK HP03 Xon/Xoff HP04 RTS/CTS LB07 Enable BEEPER ON<BEL> CHARACTER LB08 Ignore BEEP ON <BEL> CHARACTER LB09 Disable ACK/NAK timeout beeper LB10 Enable ACK/NAK timeout beeper (three beeps) (Only available for Handheld High‐Speed Laser Scanner) RT01 ACK/NAK response time 300ms RT03 ACK/NAK response time 500ms RT05 ACK/NAK response time 1 sec RT02 ACK/NAK response time 2 sec RT04 ACK/NAK response time 3 sec RT06 ACK/NAK response time 5 sec RT07 ACK/NAK response time infinity End Of Configuration Advanced Handheld High‐Speed Laser Scanner 28 USER’S MANUAL
Start Of Configuration Message Terminator Barcode Value Barcode Label Description DT11 RS‐232 message terminator—none DT12 RS‐232 message terminator—CR/LF DT13 RS‐232 message terminator—CR DT14 RS‐232 message terminator—LF DT15 RS‐232 message terminator—H‐tab DT16 RS‐232 message terminator—STX/ETX DT17 RS‐232 message terminator—EOT 29 End Of Configuration Advanced Handheld High‐Speed Laser Scanner USER’S MANUAL 2.
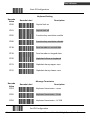
Start Of Configuration Keyboard Wedge and USB Interface Setting Language Support Barcode Value KL00 Barcode Label Description International Keyboard mode (ALT mode) KL01 Keyboard language support-USA KL02 Keyboard language support-UK KL03 Keyboard language support-Germany KL04 Keyboard language support-French KL05 Keyboard language support-Spanish KL06 Keyboard language support-Italian KL07 Keyboard language support-Switzerland KL08 Keyboard language support-Sweden KL09 Keyboard language support-Belgium KL10 Keyboard language support-Portugal KL11 Keyboard language support-Turkish KL15 Keyboard language support-Japanese End Of Configuration Advanced Handheld High‐Speed Laser Scanner 30 USER’S MANUAL
Start Of Configuration Keyboard Setting Barcode Value CP00 Barcode Label Description Capital lock on CP01 Capital lock off CP05 Function key emulation enable CP06 Function key emulation disable CP18 Send number as normal data CP19 Send number as keypad data CP20 Alphabet follow as keyboard CP21 Alphabet always upper case CP22 Alphabet always Lower case Message Terminator Barcode Value DT01 Barcode Label Keyboard terminator‐‐‐none DT02 Keyboard terminator‐‐‐Enter DT03 Keyboard terminator‐‐‐H‐TAB 31 Description End Of Configuration Advanced Handheld High‐Speed Laser Scanner USER’S MANUAL 3.
Start Of Configuration Want Emulation Setting Wand emulation is a standard interface but requires special firmware. If needed, please contact your distributor. Barcode Barcode Label Description Value All barcode will be decoded and transmitted in that WD01 symbology WD02 Enable Wand output data format as Code 39 WO01 Wand emulation data output black = high
Scan this barcode to set quiet zones and spaces low and bars =high. WO02 Wand emulation data output black=low
Scan this barcode to set quiet zones and spaces high and bars=low WO03 Idle = high
Idle state refers to the TTL logic level of the Wand Emulation signal when not in use WO04 Idle = low
Idle state refers to the TTL logic level of the Wand Emulation signal when not in use WS01 Wand emulation speed‐‐‐Low
This option allows the transmission of wand emulation at 1ms narrow element width WS02 Wand emulation speed‐‐‐medium
This option allows the transmission of wand emulation at 600us narrow element width End Of Configuration Advanced Handheld High‐Speed Laser Scanner 32 USER’S MANUAL
Start Of Configuration Wand Emulation Speed Barcode Value WS03 Barcode Label Description Wand emulation speed‐‐‐normal WS04 Wand emulation speed‐‐‐high
This option allows the transmission of wand emulation at 300us narrow element width WS05 Wand emulation speed‐‐‐higher
This option allows the transmission of wand emulation at 100 us narrow element width WS00 Wand emulation narrow/wide ratio 1:2 WS08 Wand emulation narrow/wide ratio 1:3 33 End Of Configuration Advanced Handheld High‐Speed Laser Scanner USER’S MANUAL Start Of Configuration The Symbologies 1.
Codabar Parameter Setting Barcode Value RC02 Barcode Label Description Codabar enable ( RD02 Codabar disable CB05 Codabar start/stop character transmission-none CB06 Codabar start/stop character transmission-A,B,C,D CB07 Codabar start/stop character transmission-
DC1~DC4 CB08 Codabar start/stop character transmission-
a/t,b/n,c/*,d/e CB09 Codabar maximum length setting CB10 Codabar minimum length setting SET CB11 CB12 Confirm to save this setting (required for reading full ASCII table and length setting) Codabar concatenation disable Codabar concatenation enable End Of Configuration Advanced Handheld High‐Speed Laser Scanner 34 USER’S MANUAL
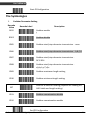
Start Of Configuration Barcode Value CB13 Barcode Label Description No check character CB14 Validate modulo 16,but don’t transmit CB15 Validate modulo 16 and transmit DC50 Codabar data redundant check=off DC51 Codabar data redundant check=1 DC52 Codabar data redundant check=2 DC53 Codabar data redundant check=3 35 End Of Configuration Advanced Handheld High‐Speed Laser Scanner USER’S MANUAL 2.
Start Of Configuration Code 39 Parameter Setting Barcode Value RC01 Barcode Label Description Code 39 enable RD01 Code 39 disable RC13 Code 32 enable RD13 Code 32 disable DC00 Code 39 data redundant check=off DC01 Code 39 data redundant check=1 DC02 Code 39 data redundant check=2 DC03 Code 39 data redundant check=3 3901 Standard code 39 3902 Full ASCII code 39 3903 Code 39 start/stop character transmission 3904 Code 39 start/stop character without transmission End Of Configuration Advanced Handheld High‐Speed Laser Scanner 36 USER’S MANUAL
Start Of Configuration Barcode Value 3905 Barcode Label Description Code 39 check digit calculate and transmit 3906 Code 39 check digit calculate but without transmit 3907 No check character 3908 Code 39 maximum length setting 3909 Code 39 minimum length setting SET Confirm to save this setting (required for reading full ASCII table and length setting) 3910 Code 39 concatenation enable 3911 Code 39 concatenation disable 3912 Code 32 (Italian pharmacy) transmit “A” character 3913 Code 32 (Italian pharmacy) without transmit ”A” character 37 End Of Configuration Advanced Handheld High‐Speed Laser Scanner USER’S MANUAL Start Of Configuration 3.
Code 93 Parameter Setting Barcode Value RC08 Barcode Label Description Code 93 enable RD08 Code 93 disable DC30 Code 93 data redundant check=off DC31 Code 93 data redundant check=1 DC32 Code 93 data redundant check=2 DC33 Code 93 data redundant check=3 9301 Code 93 maximum length setting 9302 Code 93 minimum length setting SET 9303 Confirm to save this setting (required for reading full ASCII table and length setting) Code 93 check digit calculate but without transmit 9304 Code 93 check digit not calculate and without transmit 9305 Code 93 check digit calculate and transmit End Of Configuration Advanced Handheld High‐Speed Laser Scanner 38 USER’S MANUAL
4.
Code 128 Parameter Setting Barcode Value RC06 Barcode Label Description Code 128 enable RD06 Code 128 disable RC10 EAN‐128 enable RD10 EAN‐128 disable DC40 Code 128 data redundant check=off DC41 Code 128 data redundant check=1 DC42 Code 128 data redundant check=2 DC43 Code 128 data redundant check=3 1801 Code128 FNC2 concatenation enable 1802 Code128 FNC2 concatenation disable 1803 No check character 1804 Calculate but not transmitted 1805 Calculate and transmit 1806 Code 128 maximum length setting 1807 Code 128 minimum length setting SET 39 Start Of Configuration Confirm to save this setting (required for reading full ASCII table and length setting) End Of Configuration Advanced Handheld High‐Speed Laser Scanner USER’S MANUAL 5.
Start Of Configuration Chinese Post Code Parameter Setting Barcode Value RC05 Barcode Label Description Chinese post code enable RD05 Chinese post code disable DC60 Chinese post code data redundant check=off DC61 Chinese post code data redundant check=1 DC62 Chinese post code data redundant check=2 DC63 Chinese post code data redundant check=3 SZ01 Chinese post code maximum length setting SZ02 Chinese post code minimum length setting SET Confirm to save this setting (required for reading full ASCII table and length setting) End Of Configuration Advanced Handheld High‐Speed Laser Scanner 40 USER’S MANUAL
Start Of Configuration 6.
MSI/Plessy Parameter Setting Barcode Value RC14 Barcode Label MSI enable RD14 MSI disable DC70 MSI data redundant check= off DC71 MSI data redundant check=1 DC72 MSI data redundant check=2 DC73 MSI data redundant check=3 MS01 MSI/Plessy maximum length setting MS02 MSI/Plessy minimum length setting SET MS03 Confirm to save this setting (required for reading full ASCII table and length setting) MSI/Plessy double check digit calculate but not transmit MSI/Plessy double check digit without calculate and transmit MSI/Plessy double check digit calculate but only first digit transmit MSI/Plessy double check digit calculate and both transmit MSI/Plessy single check digit calculate but without transmit MSI/Plessy single check digit calculate and transmit MS04 MS05 MS06 MS07 MS08 41 Description End Of Configuration Advanced Handheld High‐Speed Laser Scanner USER’S MANUAL Start Of Configuration 7.
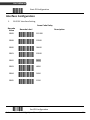
Code 11 Interface Setting Barcode Value RC07 Barcode Label Description Code 11 enable RD07 Code 11 disable 1101 Code 11 maximum length setting 1102 Code 11 minimum length setting SET Confirm to save this setting (required for reading full ASCII table and length setting) 1103 Code 11 one check digit verification 1104 Code 11 two check digit verification 1105 Two Check for Code 11 check digit if code length is longer than 10 characters 1106 Disable verification 1107 Code 11 check digit transmitted 1108 Code 11 check digit not transmitted End Of Configuration Advanced Handheld High‐Speed Laser Scanner 42 USER’S MANUAL
8.
Start Of Configuration ITF 2 of 5 Parameter Setting Barcode Value RC04 Barcode Label Description ITF 2 of 5 enable RD04 ITF 2 of 5 disable RC09 IATA code enable RD09 IATA disable DC80 ITF 25 data redundant check=off DC81 ITF25 data redundant check=1 DC82 ITF25 data redundant check=2 DC83 ITF25 data redundant check=3 IT03 ITF 2 of 5 no check character IT04 ITF 2 of 5 check digit calculate and transmit IT05 ITF 2 of 5 check digit calculate but without transmit 43 End Of Configuration Advanced Handheld High‐Speed Laser Scanner USER’S MANUAL Start Of Configuration Barcode Value IT01 Barcode Label Description ITF 2 of 5 code maximum length setting IT02 ITF 2 of 5 code minimum length setting IT06 ITF 2 of 5 one fixed length setting IT07 ITF 2 of 5 two fixed length setting SET Confirm to save this setting (required for reading full ASCII table and length setting) ITF 2 of 5 length variable IT08 End Of Configuration Advanced Handheld High‐Speed Laser Scanner 44 USER’S MANUAL
Start Of Configuration 9.
Standard 2 of 5 Parameter Setting Barcode Value RC22 Barcode Label Description Standard 2 of 5 code enable RD22 Standard 2 of 5 code disable D051 Standard 2 of 5 code maximum length setting D052 Standard 2 of 5 code minimum length setting SET D053 Confirm to save this setting (required for reading full ASCII table and length setting) Standard 2 of 5 code no check character D054 Standard 2 of 5 code check digit calculate and transmit D055 Standard 2 of 5 code check digit calculate but without transmit 45 End Of Configuration Advanced Handheld High‐Speed Laser Scanner USER’S MANUAL Start Of Configuration 10.
Industrial 2 of 5 Parameter Setting Barcode Value RC21 Barcode Label Description Industrial 2 of 5 code enable RD21 Industrial 2 of 5 code disable D251 Industrial 2 of 5 code maximum length setting D252 Industrial 2 of 5 code minimum length setting SET D253 Confirm to save this setting (required for reading full ASCII table and length setting) Industrial 2 of 5 code no check character D254 Industrial 2 of 5 code check digit calculate and transmit D255 Industrial 2 of 5 code check digit calculate but without transmission End Of Configuration Advanced Handheld High‐Speed Laser Scanner 46 USER’S MANUAL
11.
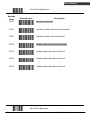
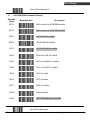
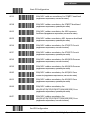
Start Of Configuration UPC/EAN/JAN Parameter Setting Barcode Value RC11 Barcode Label Description EAN convert to ISSN/ISBN enable RD11 EAN convert to ISSN/ISBN disable RC03 UPC/EAN/JAN enable RD03 UPC/EAN/JAN disable UE01 UPC/EAN/JAN all enable UE02 EAN‐8 or EAN‐13 enable UE03 UPC‐A and EAN‐13 enable UE04 UPC‐A and UPC‐E enable UE05 UPC‐A enable UE06 UPC‐E enable UE07 EAN‐13 enable UE08 EAN‐8 enable UE09 UPC/EAN Addendum disable 47 End Of Configuration Advanced Handheld High‐Speed Laser Scanner USER’S MANUAL Start Of Configuration Barcode Value UE10 Barcode Label Description Add on 5 only UE11 Add on 2 only UE12 Add on 2 or 5 UE13 Force UPC‐E to UPC‐A format enable UE14 Force UPC‐E to UPC‐A format disable UE15 Force UPC‐A to EAN‐13 format enable UE16 Force UPC‐A to EAN‐13 format disable UE44 Force EAN‐8 to EAN‐13 format enable UE45 Force EAN‐8 to EAN‐13 format disable UE17 Transmit UPC‐A check digit enable UE18 Transmit UPC‐A check digit disable UE19 Transmit UPC‐E leading character enable UE20 Transmit UPC‐E leading character disable UE21 Transmit UPC‐E check digit enable UE22 Transmit UPC‐E check digit disable End Of Configuration Advanced Handheld High‐Speed Laser Scanner 48 USER’S MANUAL
Start Of Configuration Barcode Value UE23 Barcode Label Transmit EAN‐8 check digit enable UE24 Transmit EAN‐8 check digit disable UE25 Transmit EAN‐13 check digit enable UE26 Transmit EAN‐13 check digit disable UE27 Transmit UPC‐A leading character enable UE28 Transmit UPC‐A leading character disable UE30 Add‐on format with separator UE31 Add‐on format without separator UE60 EAN‐13 country code first “0” can transmitted UE61 EAN‐13 country code first:”0” can’t transmitted UE66 EAN‐13 with first 0 ID code same as “UPC‐A” UE67 EAN‐13 with first 0 ID code same as “EAN‐13” DC10 UPC‐A data redundant check=off DC11 UPC‐A data redundant check=1 49 Description End Of Configuration Advanced Handheld High‐Speed Laser Scanner USER’S MANUAL Start Of Configuration Barcode Value DC12 Barcode Label Description UPC‐A data redundant check=2 DC13 UPC‐A data redundant check=3 DC14 UPC‐E data redundant check=off DC15 UPC‐E data redundant check=1 DC16 UPC‐E data redundant check=2 DC17 UPC‐E data redundant check=3 DC20 EAN‐13 data redundant check=off DC21 EAN‐13 data redundant check=1 DC22 EAN‐13 data redundant check=2 DC23 EAN‐13 data redundant check=3 DC24 EAN‐8 data redundant check=off DC25 EAN‐8 data redundant check=1 DC26 EAN‐8 data redundant check=2 DC27 EAN‐8 data redundant check=3 UE32 EAN/UPC +add‐on (none mandatory) UE33 EAN/UPC +add‐on (mandatory) End Of Configuration Advanced Handheld High‐Speed Laser Scanner 50 USER’S MANUAL
Start Of Configuration EAN/UPC +add‐on mandatory for 978/977 bookland UE35 (Supplement requirement, not sent for other) UE38 EAN/UPC +addon mandatory for 978/977 bookland (Supplement requirement, optionally for other) UE42 EAN/UPC +addon mandatory for 491 Japanese bookland (Supplement requirement, not sent for other) UE43 EAN/UPC +addon mandatory 491 Japanese bookland (Supplement requirement, optionally for other) UE34 EAN/UPC +addon mandatory for 378/379 French (Supplement requirement, not sent for other) UE37 EAN/UPC +addon mandatory for 378/379 French (Supplement requirement, optionally for other) UE36 EAN/UPC +addon mandatory for 434/439 German (Supplement requirement, not sent for other) UE39 EAN/UPC +addon mandatory for 434/439 German (Supplement requirement, optionally for other) UE40 EAN/UPC +addon mandatory for 419/414 Euro amounts (Supplement requirement, not sent for other) UE41 EAN/UPC +addon mandatory for 414/419 Euro (Supplement requirement, optionally for other) UE46 EAN/UPC +addon mandatory for 414/419/378/379/978/977/434/439/529/ Euro (Supplement requirement, optionally for other) UE47 EAN/UPC +addon mandatory for 414/419/378/379/978/977/434/439/529/ Euro (Supplement requirement, not sent for other) 51 End Of Configuration Advanced Handheld High‐Speed Laser Scanner USER’S MANUAL 12.
Start Of Configuration Telepen Parameter Setting Barcode Value RC25 Barcode Label Description Telepen enable RD25 Telepen disable TE03 Telepen numeric mode enable TE04 AIM Telepen enable End Of Configuration Advanced Handheld High‐Speed Laser Scanner 52 USER’S MANUAL
Start Of Configuration 13.
Matrix 2 of 5 Parameter Setting Barcode Value RC12 Barcode Label Description Matrix 2 of 5 enable RD12 Matrix 2 of 5 disable D151 Matrix 2 of 5 maximum length setting D152 Matrix 2 of 5 minimum length setting SET D153 Confirm to save this setting (required for reading full ASCII table and length setting) Matrix 2 of 5 no check character D154 Matrix 2 of 5 check digit calculate and transmit D155 Matrix 2 of 5 check digit calculate but without transmission 53 End Of Configuration Advanced Handheld High‐Speed Laser Scanner USER’S MANUAL 14.
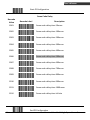
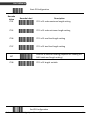
Start Of Configuration GS1 DataBar Parameter Setting There are 7 kinds of barcodes in the GS1 DataBar family and they are categorized into three groups. Barcode types in the same group use the same barcodes for setting. Group Representative Contents Group 1 GS1 DataBar Omnidirectional GS1 DataBar Omnidirectional (Formally RSS‐14) GS1 DataBar Truncated GS1 DataBar Stacked GS1 DataBar Stacked Omnidirectional Group 2 GS1 DataBar Limited GS1 DataBar Limited (Formally RSS Limited) Group 3 GS1 DataBar Expanded GS1 DataBar Expanded (Formally RSS Expanded) GS1 DataBar Expanded Stacked GS1 DataBar Omnidirectional (Formally RSS‐14) Barcode Barcode Label Description Value RC15 GS1 DataBar Omnidirectional enable RD15 GS1 DataBar Omnidirectional disable SS00 Transmit GS1 DataBar Omnidirectional check digit SS01 Do not transmit GS1 DataBar Omnidirectional check digit SS02 Transmit GS1 DataBar Omnidirectional application ID (01) SS03 Do not transmit GS1 DataBar Omnidirectional application ID (01) SS05 GS1 DataBar Omnidirectional /EAN‐128 emulation enable SS04 GS1 DataBar Omnidirectional /EAN‐128 emulation disable End Of Configuration Advanced Handheld High‐Speed Laser Scanner 54 USER’S MANUAL
Start Of Configuration GS1 DataBar Limited (Formally RSS Limited) Barcode Value RC16 Barcode Label Description GS1 DataBar Limited enable RD16 GS1 DataBar Limited disable SS10 Transmit GS1 DataBar Limited check digit SS11 Don’t transmit GS1 DataBar Limited check digit SS12 Transmit GS1 DataBar limited application ID (01) SS13 Do not transmit GS1 DataBar limited application ID 55 End Of Configuration Advanced Handheld High‐Speed Laser Scanner USER’S MANUAL Start Of Configuration GS1 DataBar Expanded (Formally RSS Expanded) Barcode Value RC17 Barcode Label Description GS1 DataBar Expanded enable RD17 GS1 DataBar Expanded disable SS07 GS1 DataBar Expanded/EAN‐128 emulation enable SS06 GS1 DataBar Expanded/EAN‐128 emulation disable SS08 GS1 DataBar Expanded check digital enable SS09 GS1 DataBar Expanded check digital disable SS16 Transmit GS1 DataBar Expanded application ID (01) SS17 Do not transmit GS1 DataBar Expanded application ID End Of Configuration Advanced Handheld High‐Speed Laser Scanner 56 USER’S MANUAL
15.
Start Of Configuration PDF417 Parameter Setting Barcode Value RC31 Barcode Label Description PDF 417 enable RD31 PDF 417 disable 57 End Of Configuration Advanced Handheld High‐Speed Laser Scanner USER’S MANUAL Start Of Configuration Data Editing 1.
Identifier Code Barcode Value IS00 Barcode Label Description Disable identifier code IS01 Enable identifier code table as factory standard IS03 Enable identifier code table as AIM standard. CI01 Code 39 identifier code setting CI02 ITF 2 of 5 identifier code setting CI03 Chinese Post Code identifier code setting CI04 UPC‐E identifier code setting CI05 UPC‐A identifier code setting CI06 EAN‐13 identifier code setting CI07 EAN‐8 identifier code setting SET Confirm to save this setting (required for reading full ASCII table and length setting) End Of Configuration Advanced Handheld High‐Speed Laser Scanner 58 USER’S MANUAL
Start Of Configuration Barcode Value CI08 Barcode Label Codabar identifier code setting CI09 Code 128 identifier code setting CI10 Code 93 identifier code setting CI11 MSI identifier code setting CI12 GS1 DataBar Omnidirectional identifier code setting CI13 GS1 DataBar Limited identifier code setting CI14 GS1 DataBar expanded identifier code setting CI15 Industrial 2 of 5 identifier code setting CI16 Code 11 Identifier code setting CI17 Standard 2 of 5 identifier code setting CI18 Matrix 2 of 5 identifier code setting SET 59 Description Confirm to save this setting (required for reading full ASCII table and length setting) End Of Configuration Advanced Handheld High‐Speed Laser Scanner USER’S MANUAL 2.
Start Of Configuration Header and Trailer Barcode Value CP11 Barcode Label Description Add code length as header enable (2 digits) Add code length as header disable (2 digits) CP12 Header (Preamble) HT01 Trailer (Postamble) HT02 Truncate header character HT03 Truncate trailer character HT04 SET Confirm to save this setting (required for reading full ASCII table and length setting) End Of Configuration Advanced Handheld High‐Speed Laser Scanner 60 USER’S MANUAL
3.
Start Of Configuration Multi‐Barcode Editing Refer to Appendix 3 for detail setup steps. Function Setting Barcode Barcode Label Description Value Start to edit multi‐barcode MC00 MC01 Multi‐barcode enable MC02 Multi‐barcode disable MC03 Apply output sequence
In this mode, the scanner would retain the barcode data until it reads all the conditioned barcodes and transmit the data all together. It the scanner reads a barcode not compliant with programmed format, it would consider it a normal barcode and transmit this data. MC04 Enforce output sequence
In this mode, every barcode must follow the programmed format; otherwise no data would be transmitted. MC05 Enable terminator MC06 Disable terminator SET Confirm to save this setting (required for reading full ASCII table and length setting) 61 End Of Configuration Advanced Handheld High‐Speed Laser Scanner USER’S MANUAL Start Of Configuration Barcode Type Setting Barcode Value $Q Barcode Label $A $B $C $F $G $E 4 Code39 Codabar ITF2 of 5 Code128 Code 93 MSI Chinese Post Code EAN‐8 D EAN‐13 /D $T $U $V $W Description UPC‐A UPC‐E GS1 DataBar Standard GS1 DataBar Expanded GS1 DataBar Limited End Of Configuration Advanced Handheld High‐Speed Laser Scanner 62 USER’S MANUAL
Appendix 1: USB Virtual COM Driver Installation Contact your distributor to get the driver and follow the steps below to enable USB virtual COM port. 1.
Connect the handheld scanner and the host (e.g. a PC) with a USB interface cable. 2.
Enable USB virtual COM port with programming barcodes on page 13. 3.
After the programming, the host would request driver installation. Browse your files to locate the driver and start installation. 4.
The USB virtual COM port is ready for use after driver installation. 63 Advanced Handheld High‐Speed Laser Scanner USER’S MANUAL Appendix 2: Barcode Length Setting Introduction The length of a barcode is the number of characters it contains, including check digits. As listed in the Default Parameters section, each barcode type has different default length. You may change the setting by the following procedure. To set up barcode length, the paramours to be determined are barcode type and the desired barcode length. Barcode length is consisted of 2 digits. For numbers smaller than 10, you need to add a “0” in the front. Example If the barcode length is 4 to 12 digits, the steps would be as below: Start Start of Configuration
Scan the “Start of configuration” barcode Read the “Full ASCII code 39” barcode Turn to the page of the barcode type to be set up Set up barcode length Set up minimum barcode length Scan the “Min“ barcode End
Set up maximum barcode length Set the “Max” barcode Scan the first digit: 0 Set up the first digit: 1 Scan the second digit: 4 Set up the second digit: 2 End of Configuration Scan the “Set” barcode to save this setting
Scan the “End of configuration” barcode
Use the ASCII table (Appendix 4) to set up barcode length. Be sure to enable the full ASCII code 39 option before you start and read the “Set” label to set your choice into memory. Advanced Handheld High‐Speed Laser Scanner 64 USER’S MANUAL
Appendix 3: Multi‐Barcode Editor Introduction The multi‐barcode editor function allows users to set up the sequence of barcode data transmission. After the configuration, the scanner would transmit data in the pre‐
programmed sequence even if the user doesn’t scan barcodes in the correct order. Users can set up the sequence of up to 5 pieces of barcode data. The three parameters to be programmed are: barcode type, barcode length and check digit. Set up as “0” if the barcode length is not required; set up as “NUL” is there is no need to check the first digit of the barcode value. Start Start of Configuration
Scan the “Start of configuration” barcode Set up data transmission sequence and requirement Set up the 1st barcode symbology Set up barcode type End
Set up the 2nd barcode symbology Set up barcode type Set up
Read the “Full ASCII code 39” barcode Set up barcode length Set up barcode length Scan the “Edit multi‐
barcode” barcode Check the first digit Check the first digit End of Configuration Scan the “End of configuration” barcode Use the ASCII table (Appendix 4) to set up barcode length and first digit checkup. Be sure to enable the full ASCII code 39 option before you start and read the “Set” label to set your choice into memory. 65 Advanced Handheld High‐Speed Laser Scanner USER’S MANUAL Example If the barcode data transmission sequence and requirements are as below: The 1st barcode symbology Barcode type Code 128 Barcode length 9 First digit A Set up data transmission sequence and requirement
Start Start of Configuration
The 2nd barcode symbology Barcode type Code 39 Barcode length 12 No check on the first digit is First digit required Start of configuration Set up the 1st barcode symbology Barcode type: Code 128 Length: 9
Full ASCII code 39 Set up the 2nd barcode symbology Barcode type: Code 39 Length: 12
Edit multi‐barcode End
0 1 9 2 Set
Set
The first digit
The first digit
A NUL End of Configuration End of configuration Advanced Handheld High‐Speed Laser Scanner 66 USER’S MANUAL
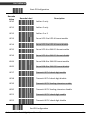
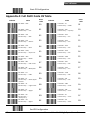
Start Of Configuration Appendix 4: Full ASCII Code 39 Table Code 39 ASCII Hexa‐
code Code 39 Hexa‐
code Full ASCII ‐‐‐NUL 00 Full ASCII ‐‐‐SI Function key‐‐‐‐‐“Shift” 0F Full ASCII ‐‐‐SOH Function key‐‐‐‐‐“Ins” 01 Full ASCII ‐‐‐DLE Function key‐‐‐‐‐“5(num)” 10 Full ASCII ‐‐‐STX Function key‐‐‐‐‐“Del” 02 Full ASCII ‐‐‐DC1 Function key‐‐‐‐‐“F1” 11 Full ASCII ‐‐‐ETX Function key‐‐‐‐‐“Home” 03 Full ASCII ‐‐‐DC2 Function key‐‐‐‐‐“F2” 12 Full ASCII ‐‐‐EOT Function key‐‐‐‐‐“End” 04 Full ASCII ‐‐‐DC3 Function key‐‐‐‐‐“F3” 13 Full ASCII ‐‐‐ENQ Function key‐‐‐‐‐“Up arrow” 05 Full ASCII ‐‐‐DC4 Function key‐‐‐‐‐“F4” 14 Full ASCII ‐‐‐ACK Function key‐‐‐‐‐“Down arrow” Full ASCII ‐‐‐BEL Function key‐‐‐‐‐“Left arrow” 06 Full ASCII ‐‐‐NAK Function key‐‐‐‐‐“F5” 15 07 Full ASCII ‐‐‐SYN Function key‐‐‐‐‐“F6” 16 Full ASCII ‐‐‐BS Function key‐‐‐‐‐“Backspace” 08 Full ASCII ‐‐‐ETB Function key‐‐‐‐‐“F7” 17 Full ASCII ‐‐‐HT Function key‐‐‐‐‐“TAB” 09 Full ASCII ‐‐‐CAN Function key‐‐‐‐‐“F8” 18 Full ASCII ‐‐‐LF Function key‐‐‐‐‐“Enter (alpha numeric” Full ASCII ‐‐‐VT Function key‐‐‐‐‐“right arrow” 0A Full ASCII ‐‐‐EN Function key‐‐‐‐‐“F9” 19 0B Full ASCII ‐‐‐SUB Function key‐‐‐‐‐“F10” 1A Full ASCII ‐‐‐FF Function key‐‐‐‐‐“PgUp” 0C Full ASCII ‐‐‐ESC Function key‐‐‐‐‐“F11” 1B Full ASCII ‐‐‐CR Function key‐‐‐‐‐
“Enetr(num.)” Full ASCII ‐‐‐SO Function key‐‐‐‐‐“PgDn” 0D Full ASCII ‐‐‐FS Function key‐‐‐‐‐“F12” 1C 0E Full ASCII ‐‐‐GS Function key‐‐‐‐‐“ESC” 1D ASCII 67 End Of Configuration Advanced Handheld High‐Speed Laser Scanner USER’S MANUAL Start Of Configuration Full ASCII Code 39 Table Code 39 ASCII Hexa‐
code Full ASCII ‐‐‐RS Function key‐‐‐‐‐“CTL(L)” 1E Full ASCII ‐‐‐US Function key‐‐‐‐‐“ALT(L)” 1F Full ASCII ‐‐‐SP 20 Code 39 ASCII Hexa‐
code Full ASCII ‐‐‐‐ 2D Full ASCII ‐‐‐. 2E Full ASCII ‐‐‐/ 2F Full ASCII ‐‐‐0 30 Full ASCII ‐‐‐1 31 Full ASCII ‐‐‐2 32 Full ASCII ‐‐‐3 33 Full ASCII ‐‐‐4 34 Full ASCII ‐‐‐5 35 Full ASCII ‐‐‐6 36 Full ASCII ‐‐‐7 37 Full ASCII ‐‐‐8 38 Full ASCII ‐‐‐9 39 Full ASCII ‐‐‐! 21 Full ASCII ‐‐‐“ 22 Full ASCII ‐‐‐# 23 Full ASCII ‐‐‐$ 24 Full ASCII ‐‐‐% 25 Full ASCII ‐‐‐& 26 Full ASCII ‐‐‐‘ 27 Full ASCII ‐‐‐ ( 28 Full ASCII ‐‐‐) 29 Full ASCII ‐‐‐* 2A Full ASCII ‐‐‐+ 2B Full ASCII ‐‐‐: 3A Full ASCII ‐‐‐, 2C Full ASCII ‐‐‐; 3B End Of Configuration Advanced Handheld High‐Speed Laser Scanner 68 USER’S MANUAL
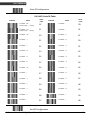
Start Of Configuration Full ASCII Code 39 Table Code 39 ASCII Full ASCII ‐‐‐< Hexa‐
code Code 39 ASCII 3C Hexa‐
code Full ASCII ‐‐‐K 4B Full ASCII ‐‐‐L 4C Full ASCII ‐‐‐M 4D Full ASCII ‐‐‐N 4E Full ASCII ‐‐‐O 4F Full ASCII ‐‐‐P 50 Full ASCII ‐‐‐Q 51 Full ASCII ‐‐‐R 52 Full ASCII ‐‐‐S 53 Full ASCII ‐‐‐T 54 Full ASCII ‐‐‐U 55 Full ASCII ‐‐‐V 56 Full ASCII ‐‐‐W 57 Full ASCII ‐‐‐X 58 Full ASCII ‐‐‐Y 59 Full ASCII ‐‐‐= 3D Full ASCII ‐‐‐> 3E Full ASCII ‐‐‐? 3F Full ASCII ‐‐‐@ 40 Full ASCII ‐‐‐A 41 Full ASCII ‐‐‐B 42 Full ASCII ‐‐‐C 43 Full ASCII ‐‐‐D 44 Full ASCII ‐‐‐E 45 Full ASCII ‐‐‐F 46 Full ASCII ‐‐‐G 47 Full ASCII ‐‐‐H 48 Full ASCII ‐‐‐I 49 Full ASCII ‐‐‐J 4A 69 End Of Configuration Advanced Handheld High‐Speed Laser Scanner USER’S MANUAL Start Of Configuration Full ASCII Code 39 Table Code 39 ASCII Hexa‐
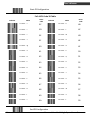
code Code 39 ASCII Hexa‐
code Full ASCII ‐‐‐Z 5A Full ASCII ‐‐‐i 69 Full ASCII ‐‐‐[ 5B Full ASCII ‐‐‐j 6A Full ASCII ‐‐‐\ 5C Full ASCII ‐‐‐k 6B Full ASCII ‐‐‐] 5D Full ASCII ‐‐‐l 6C Full ASCII ‐‐‐^ 5E Full ASCII ‐‐‐m 6D Full ASCII ‐‐‐_ 5F Full ASCII ‐‐‐n 6E Full ASCII ‐‐‐` 60 Full ASCII ‐‐‐o 6F Full ASCII ‐‐‐a 61 Full ASCII ‐‐‐p 70 Full ASCII ‐‐‐b 62 Full ASCII ‐‐‐q 71 Full ASCII ‐‐‐c 63 Full ASCII ‐‐‐r 72 Full ASCII ‐‐‐d 64 Full ASCII ‐‐‐s 73 Full ASCII ‐‐‐e 65 Full ASCII ‐‐‐t 74 Full ASCII ‐‐‐f 66 Full ASCII ‐‐‐u 75 Full ASCII ‐‐‐g 67 Full ASCII ‐‐‐v 76 Full ASCII ‐‐‐h 68 Full ASCII ‐‐‐w 77 End Of Configuration Advanced Handheld High‐Speed Laser Scanner 70 USER’S MANUAL
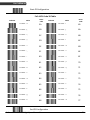
Start Of Configuration Full ASCII Code 39 Table Code 39 ASCII Hexa‐
code Full ASCII ‐‐‐x 78 Full ASCII ‐‐‐y 79 Full ASCII ‐‐‐z 7A Full ASCII ‐‐‐{ 7B Full ASCII ‐‐‐| 7C Full ASCII ‐‐‐} 7D Full ASCII ‐‐‐~ 7E Full ASCII ‐‐‐DEL 7F 71 End Of Configuration Advanced Handheld High‐Speed Laser Scanner