1
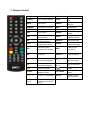
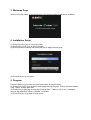
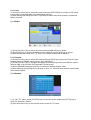
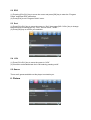
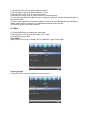
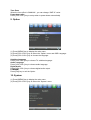
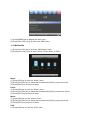
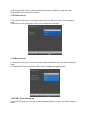
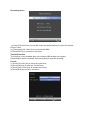
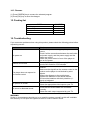
Movie Cube
N150H
User’s Manual
(v1.0)
TABLE OF CONTENTS
1. Main Features ................................................................................................................... 4
1.1 Front panel .................................................................................................................. 4
1.2 Back panel................................................................................................................... 4
2. Remote Control ................................................................................................................. 5
3. Welcome Page .................................................................................................................. 6
4. Installation Guide............................................................................................................... 6
5. Program ............................................................................................................................ 6
5.1 Program Edit................................................................................................................ 7
5.2 EPG............................................................................................................................ 9
5.3 Sort............................................................................................................................. 9
5.4 LCN ............................................................................................................................ 9
5.5 Games......................................................................................................................... 9
6. Picture ............................................................................................................................... 9
7. Channel Search................................................................................................................10
7.1 Auto Search................................................................................................................10
7.2 Manual Search ...........................................................................................................10
8. Time .................................................................................................................................11
9. Option...............................................................................................................................12
10. System ...........................................................................................................................12
11. USB ................................................................................................................................13
11.1 Multimedia ................................................................................................................14
11.2 Photo set up..............................................................................................................15
11.3 Movie set up .............................................................................................................15
11.4 PVR / Time shift set up..............................................................................................15
12. Firmware upgrade ..........................................................................................................16
13. Record function ..............................................................................................................17
14. Manage recordings.........................................................................................................17
14.1 Full screen................................................................................................................17
14.2 Delete .......................................................................................................................17
14.3 Rename...................................................................................................................18
15. Packing list .....................................................................................................................18
16. Troubleshooting..............................................................................................................18
SAFETY PRECAUTIONS
CAUTIONS:
The lightning flash with
The exclamation point within
Warning:
arrowhead symbol, within an
To reduce the risk of electric an equilateral triangle is
equilateral triangle, is intended
shock, don't open the cabinet. intended to alert the user to
to alert the user to "dangerous
Refer servicing to qualified important
operating
and
voltage" and to prevent from a
personnel only.
maintenance (servicing).
risk of electric shock.
WARNING: Do not use this STB where contact with or immersion in water is a possibility.
Do not use near flower vase, washbowls, kitchen sinks, laundry tubs, swimming pools, etc.
WARNING: Do not put the candle or lamp stand on the cabinet; otherwise, there is the
danger of fire.
WARNING: The unit should be connected to a power supply only of the type described in
the operating instructions or as marked on the unit. If you are not sure of the type of power
supply (for example, 120 or
230 V) to your home, consult your local dealer or local power company.
WARNING: This product installs diodes. Do not open the cabinet or touch any parts in the
inner mechanism. Consult your local dealer for technical service if the opening is required.
Note: To ensure proper use of this product, please read this User manual carefully and
retain for further reference.
Note: This product installs diodes. Do not open the cabinet to avoid the unit direct exposure
to radiation.
Unit Cleaning: After the unit power is turned off, you can clean the cabinet, panel and
remote control with a soft cloth lightly moistened with a mild detergent solution.
Attachments: Never add any attachments and/or equipment without the manufacturer
consent; as such additions may result in the risk of fire, electric shock, or other personal
injury.
Power-Cord Protection: Place the power-supply cord out of the way, where it will not be
walked on. Please take special attentions to cords at plugs, convenience receptacles, and
the point where they exit from the unit.
Object and Liquid Entry: Never put objects of any kind into this STB through openings, as
they may touch dangerous voltage points or short-out parts that could result in a fire or
electric shock. Never spill any liquid on the STB.
Parts Replacement: When the unit parts need to be replaced, user should make sure the
service technician use the replacement parts specified by the manufacturer or having the
same characteristics as the original part. Unauthorized replacement may put the unit In the
risk of fire, electric shock or other hazards.
Safety Check: After all the maintenances and repairs are done, user is required to request
the service technician to conduct the overall safety check to ensure the machine is In the
proper condition.
Locating: Slots and openings in the cabinet are provided for ventilation to protect it from
overheating. Do not block these openings or allow them to be blocked by placing the STB
on a bed, sofa, or other similar surface, nor should it be placed over a radiator or heat
register.
Preface
Thank you for purchasing the new N150H!
Please read this manual thoroughly before any use and keep it well for future reference.
It will help you keep abreast with many of the exciting features and contains important safe
measurements and correct operational information, so please read all the information
carefully in order to avoid any damage.
1. Main Features
DVB-T TV Receiver
Supports the reception of Digital Video Broadcasting Terrestrial (DVB-T) and the Electronic
Program Guide (EPG)
Media-player
- Video formats: MKV, MPEG1/2/4, H.264, AVI, VOB
- Audio formats: MP3, WMA
- Photo formats: support JPEG, BMP
PVR
Supports 3 recording modes:
- EPG Reservation Recording
- Manual Reservation Recording
- One Button Recording
1.1 Front panel
1. Power on/off
3. Channel down
2. USB jack
4. Channel up
1.2 Back panel
1. RF signal input
3. Coaxial jack
7. DC jack
9. VCR scart
2. RF signal output
6. HDMI
8. TV scart
2. Remote Control
Button
Function
Button
POWER
turn on/off the device
PLAY
MUTE
mute on/off
PAUSE
NUMBER
0-9 channel numbers
INFO
MENU
enter the main menu
FAV
EXIT
exit function
AUDIO
CH+
CHVOL+
move the cursor /
next channel
move the cursor /
previous channel
move the cursor /
increase the volume
SUB-T
Function
press to play the
file
press to pause
the file
display
information
favorite files
press to change
audio
press to set
subtitle options
REPEAT
repeat function
ZOOM
press to zoom
in/out the image
VOL-
move the cursor /
decrease the volume
RES.
change HD
resolution
OK
to confirm
ASPECT
change aspect
FF
press to fast forward
the current playback
P
return to
previous page
FR
press to fast rewind
the current playback
RED
timeshift function
GREEN
to enter the Electronic
Program Guide
TV / Radio
YELLOW
to enter TTX interface
GO TO
BLUE
to enter the schedule
recording list in DVB-T
mode
P
go to next page
return to up
folder
change TV /
radio
press to select
the time point
3. Welcome Page
When turning the power on for the first time, the welcome page will be shown as below:
4. Installation Guide
(1) Press [CH+/CH-] key to move the cursor.
(2) Press [VOL+/VOL-] key to select the item.
(3) Select [Channel Search] and press [OK] key to begin the auto scan.
(4) Press [Exit] key to exit menu.
5. Program
Press the [Menu] key to enter the main menu which shows as below:
(1) Press [VOL-/VOL+] key to select menu pages among Program, Picture, Channel Search,
Time, Option, System and USB.
(2) Press [CH-] or [OK] key to enter the “Program Edit”. If Menu Lock is “On”, a dialogue
inquires the password, which is “000000” for default.
(3) Press [Exit] key to go back to main menu.
5.1 Program Edit
When entering the “ALL TV” menu, which shows as below:
(1) Press [CH+/CH-] key to move the cursor.
(2) Press [P /P ] key to execute the Page Up/Page down function.
(3) Press the color key to execute the corresponding functions in “ALL TV”.
5.1.1 Move
(1) Press [CH+/CH-] key to move the cursor and press [RED] key to make a mark. There will
be a “moving mark” in the right side of the selected channel as above.
(2) Press [CH+/CH-] key to move the selected channel to the position that you want to place.
Press [RED] key to confirm your decision.
5.1.2 Skip
(1) Press [CH+/CH-] key to move the cursor and press [Green] key to make a “skip mark” in
the right side of the highlighted channel.
(2) After saving and exiting menu, the channel will be skipped while user changes channel in
the full screen.
5.1.3 Lock
(1) Press [CH+/CH-] key to move the cursor and press [YELLOW] key to make a “lock mark”
can be seen on the right side of the highlighted channel.
(2) After saving and exiting the menu, if you want to watch the locked channel, a password
will be required.
5.1.4 Delete
(1) Press [CH+/CH-] key to move the cursor and press [BLUE] key to delete.
(2) Press [OK] key to confirm the deletion of the channel or press [exit] key to cancel.
(3) After saving and exiting “ALL TV” menu, the marked channel will be deleted.
5.1.5 Favorite
(1) Press [CH+/CH-] key to move the cursor and press [FAV] key to open the “Favorite Type”
window showing “Disable, Movie, News, Sport and Music”.
(2) Press [CH+/CH-] key to navigate among the 4 favorite groups then press [OK] to make a
favorite mark in the left side of the selected Favorite group.
(3) Select [Disable] and press [OK] key to cancel the existing favorite mark.
(4) After marking, press [Exit] key to go back to “ALL TV”: there will be a favorite mark beside
the marked channel.
5.1.6 Rename
(1) In “ALL TV” menu, press [CH-/CH+] key to move the cursor and press [GO TO] key to
open the “Rename” window.
(2) Use the numeric key on the remote control to set the TV name.
5.2 EPG
(1) Pressing [CH+/CH-] key to move the cursor and press [OK] key to enter the “Program
Guide” and show EPG information.
(2) Press [Exit] to exit “Program Guide” menu.
5.3 Sort
(1) Press [CH+/CH-] key to move the cursor to “Sort” then press [VOL-/VOL+] key to change
the three kinds of sorting type: by “LCN, “service name”, “ONID”.
(2) Press [OK] key to confirm your selection.
5.4 LCN
(1) Press [CH+/CH-] key to move the cursor to “LCN”
(2) Choose to active/deactivate the LCN mode by pressing on/off.
5.5 Games
There are 6 games available on this player to entertain you.
6. Picture
(1) Press [MENU] key to display the main menu and press [VOL-/VOL+] key to select
“Picture “program.
Aspect Ratio
Press [VOL-/VOL+] key to change option item and press [OK] key to confirm the selection.
Resolution
Press [VOL-/VOL+] key to change option item and press [OK] key to confirm the selection.
TV Format
Press [VOL-/VOL+] key to change option item and press [OK] key to confirm the selection.
Video Output
Press [VOL-/VOL+] key to change option item and press [OK] key to confirm the selection.
7. Channel Search
(1) Press [MENU] key to display the main menu.
(2) Press [VOL-/VOL+] key to select the “Channel Search “program.
(3) Press [Exit] key to go back to the main menu.
7.1 Auto Search
(1) Press [CH+/CH-] key to select “Auto Search”.
(2) Press [OK] to enter the “Auto Search” menu and start scanning.
(3) In the “Auto Search” menu, press [Exit] key to cancel the scanning.
7.2 Manual Search
(1) Press [CH+/CH-] key to select “Manual Search”.
(2) Press [OK] to enter the “Manual Search” menu.
(3) Press [VOL-/VOL+] key to select the country.
(4) Press [VOL-/VOL+] key to power on/off the “Antenna Power”.
(a) You can scan channel by adjusting the “Frequency Channel” number and press [OK] key
to start scanning.
(b) If you scan channels by Frequency (MHz), “Frequency” and “Bandwidth” are available to
adjust. Press [OK] key to save your modifications and the scan will start.
(5) Press [Exit] key to exit the scanning.
8. Time
(1) Press [MENU] key to display the main menu.
(2) Press [VOL-/VOL+] key to select the “Time” menu.
(3) Press [Exit] key to exit.
Time Offset
Press [VOL-/VOL+] key to change “AUTO / MANUAL“ type of time offset.
Country Region
Press [VOL-/VOL+] key to change the country region.
Time Zone
When the time offset is “MANUAL“, you can change “GMT+0” value.
Power down after
Press [VOL-/VOL+] key to setup when to power down automatically
9. Option
(1) Press [MENU] key to display the main menu.
(2) Press [VOL-/VOL+] key to select the “Option“ menu and OSD Language.
(3) Press [VOL-/VOL+] key to choose the language.
Subtitles Language
Press [VOL-/VOL+] key to choose TV subtitles language.
Audio Language
Press [VOL-/VOL+] key to choose audio language.
Digital Audio
Press [VOL-/VOL+] key to choose digital audio output.
PCM/RAM
Press [Exit] key to exit the Option
10. System
(1) Press [MENU] key to display the main menu.
(2) Press [VOL-/VOL+] key to select the “System“ menu.
Parental Guidance
(1) Press [CH-/CH+] key to move the cursor and press [OK] key to input the Password
”000000”.
(2) This sets the program parental controlling level.
Set password
(1) Press [CH-/CH+] key to move the cursor and press [OK] key to enter the password
settings sub-menu.
(2) Use the numeric keys of the remote control to set the new password.
Restore Factory Default
(1) Press [OK] key to enter the sub menu and then [OK] to confirm to restore the default.
(2) Press [EXIT] key to cancel the restoring.
Information
Press [OK] key to show the system information (model no., SW version, HW version).
11. USB
The USB menu will be disabled when the USB device is unplugged. The media player list will
not be saved after unplugging the USB device, or in standby or power off mode.
(1) Press [MENU] key to display the main menu.
(2) Press [VOL-/VOL+] key to select the “USB“ menu.
11.1 Multimedia
(1) Press [CH-/CH+] key to enter the “Multimedia” menu.
(2) Press [VOL-/VOL+] key to select “Music, Photo, Movie, or PVR“.
Music
(1) Press [OK] key to enter the “Music” menu.
(2) Press [CH-/CH+] key to select the file and press [OK] key to play the music.
(3) Press [EXIT] key to return to folder.
Photo
(1) Press [OK] key to enter the “Photo” menu.
(2) Press [CH-/CH+] key to select the file and press [OK] key to show the picture.
(3) Press [EXIT] key to return to folder.
Movie
(1) Press [OK] key to enter “Movie” menu.
(2) Press [CH-/CH+] key to select the file and press [OK] key to play the movie.
(3) Press [EXIT] key to return to folder.
PVR
(1) Press [OK] key to enter the “PVR” menu.
(2) Press [CH-/CH+] key to select the PVR file and press [OK] key to play the video.
(3) Press [EXIT] key to return to folder.
11.2 Photo set up
(1) Press [CH-/CH+] key to move the cursor and press [OK] enter the “Photo configure”
menu.
(2) Press [CH-/CH+] and [VOL-/VOL+] key to adjust the slide time.
11.3 Movie set up
(1) Press [CH-/CH+] key to move the cursor and press [OK] to enter the “Movie configure”
menu.
(2) Press [CH-/CH+] and [VOL-/VOL+] key to adjust the aspect ratio.
11.4 PVR / Time shift set up
Press [CH-/CH+] key to move the cursor and press [OK] key to enter the “PVR Configure”
menu.
Recording device
(1) Press [CH-/CH+] key to move the cursor and press [OK] key to enter the “Record
Device” menu.
(2) Then press [VOL-/VOL+] key to choose the DISK.
(3) Press [EXIT] key to return to sub-menu.
Timeshift function
This function is only available when you connect USB storage to the player.
Press [Red] to start the timeshift, then press [Stop] to stop the recording.
Format
(1) Press [CH-/CH+] key to move the cursor and
(2) Press [OK] key to enter the “Format” then
(3) Press [VOL-/VOL+] key to choose the Format
(4) Press [Exit] key to return sub-menu.
12. Firmware upgrade
You will need a USB flashdrive to upgrade the player.
(1) Copy the new firmware to the root directory of a USB stick and connect it to the USB
HOST port of the player.
(2) Input password “666666” on the main menu, the system will update the firmware
automatically.
(3) Please restart STB after the software upgrade is complete.
13. Record function
If you press [ ] key to start recording, the screen will be displayed as below :
Press [ ] key to stop recording.
14. Manage recordings
14.1 Full screen
(1) Press [CH-/CH+] key to choose the file to play.
(2) Press [BLUE] key to make it full screen.
14.2 Delete
(1) Press [YELLOW] key to delete the selected program.
(2) Confirm with [OK] key.
14.3 Rename
(1) Press [GREEN] key to rename the selected program.
(2) Press [OK] key to save the changes.
15. Packing list
PART
N150H player
Power adapter
Remote control
CD with user manuals
QUANTITY
1
1
1
1
16. Troubleshooting
If you encounter problems when using this product, please check the following points before
requesting service.
Problem
No power on
Buttons do not work
The player does not respond to
the remote control
No picture on screen
No sound or distorted sound
Solution
Confirm that you have an appropriate power
source.
Check if all the connections between the wall outlet
and power supply, and the power supply and the
player are correct.
Switch the power button in front of the player to
turn on the power.
To completely reset the player, unplug the AC cord
from the AC outlet for 5-10 seconds.
Point the remote control towards the remote
receiver.
Make sure the signal from the remote control to the
receiver on the player is not blocked by solid
objects.
Reduce the distance to the media player.
Replace the batteries in the remote control.
Re-insert the batteries with their polarities (+/signs) as indicated.
Check if the TV is switched on.
Select the appropriate video input on your TV.
Adjust the volume.
Check that the audio cables are connected
correctly.
Select the audio output supported by your TV.
WARNING
Under no circumstances should you try to repair the system yourself, as this will invalidate
the warranty. Do not open the system as there is a risk of electric shock.