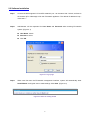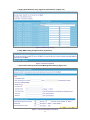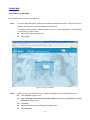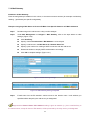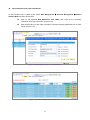
1
ES-4000 v2 Email Server Appliance User’s Manual 1 Declaration of Conformity We, Manufacturer/Importer OvisLink Corp. 5F., NO.6, Lane 130, Min-Chuan Rd., Hsin-Tien City, Taipei County, Taiwan Declare that the product Email Server Appliance AirLive ES-4000 v2 is in conformity with In accordance with 89/336 EEC-EMC Directive and 1999/5 EC-R & TTE Directive Clause Description ■ EN 55022:1998/A1 Limits and methods of measurement of radio disturbance characteristics of information technology equipmen ■ EN 61000-3-2:2000/ Disturbances in supply systems caused by household appliances and similar electrical equipment "Harmonics ■ EN 61000-3-3:1995/ Disturbances in supply systems caused by household appliances and similar electrical equipment "Voltage fluctuations ■ EN 55024:1998/A1 Information Technology equipment-Immunity characteristics-Limit And methods of measurement :2000/A2:2003 A1:2001 A1:2001 :2001/A2:2003 ■ CE marking Manufacturer/Importer Signature : Name : Position/ Title: Albert Yeh Vice President (Stamp) Date: 2007/7/5 AirLive ES-4000 v2 CE Declaration Statement Country cs Česky [Czech] Declaration OvisLink Corp. tímto prohlašuje, že tento AirLive ES-4000 v2 je ve shodě se základními požadavky a dalšími příslušnými ustanoveními směrnice 1999/5/ES. da Dansk [Danish] Undertegnede OvisLink Corp. erklærer herved, at nl følgende udstyr AirLive ES-4000 v2 overholder Nederlands [Dutch de væsentlige krav og øvrige relevante krav i direktiv 1999/5/EF. Hierbij verklaart OvisLink Corp. dat het toestel AirLive ES-4000 v2 in overeenstemming is met de essentiële eisen en de andere relevante bepalingen van richtlijn 1999/5/EG. de Deutsch [German] Hiermit erklärt OvisLink Corp., dass sich das Gerät AirLive ES-4000 v2 in Übereinstimmung mit den grundlegenden Anforderungen und den übrigen einschlägigen Bestimmungen der Richtlinie 1999/5/EG befindet. mt Malti [Maltese] Hawnhekk, OvisLink Corp, jiddikjara li dan AirLive ES-4000 v2 jikkonforma mal-ħtiġijiet essenzjali u ma provvedimenti oħrajn relevanti li hemm fid-Dirrettiva 1999/5/EC. et Eesti [Estonian] Käesolevaga kinnitab OvisLink Corp. seadme AirLive ES-4000 v2 vastavust direktiivi 1999/5/EÜ põhinõuetele ja nimetatud direktiivist tulenevatele teistele asjakohastele sätetele. hu Magyar [Hungarian] Az OvisLink Corporation kijelenti, hogy az AirLive ES-4000 v2 megfelel az 1999/05/CE irányelv alapvető követelményeinek és egyéb vonatkozó rendelkezéseinek. en English Hereby, OvisLink Corp., declares that this AirLive pl ES-4000 v2 is in compliance with the essential Polski [Polish] requirements and other relevant provisions of Directive 1999/5/EC. Niniejszym OvisLink Corp oświadcza, że AirLive ES-4000 v2 jest zgodny z zasadniczymi wymogami oraz pozostałymi stosownymi postanowieniami Dyrektywy 1999/5/EC. es Español [Spanish] Por medio de la presente OvisLink Corp. declara pt que el AirLive ES-4000 v2 cumple con los Português requisitos esenciales y cualesquiera otras [Portuguese] disposiciones aplicables o exigibles de la Directiva 1999/5/CE. OvisLink Corp declara que este AirLive ES-4000 v2 está conforme com os requisitos essenciais e outras disposições da Directiva 1999/5/CE. el ΜΕ ΤΗΝ ΠΑΡΟΥΣΑ OvisLink Corp. ΔΗΛΩΝΕΙ Ελληνική [Greek] ΟΤΙ AirLive ES-4000 v2 ΣΥΜΜΟΡΦΩΝΕΤΑΙ ΠΡΟΣ ΤΙΣ ΟΥΣΙΩΔΕΙΣ ΑΠΑΙΤΗΣΕΙΣ ΚΑΙ ΤΙΣ ΛΟΙΠΕΣ ΣΧΕΤΙΚΕΣ ΔΙΑΤΑΞΕΙΣ ΤΗΣ ΟΔΗΓΙΑΣ 1999/5/ΕΚ. Country lt Lietuvių [Lithuanian] sl Slovensko [Slovenian] Declaration Šiuo OvisLink Corp. deklaruoja, kad šis AirLive ES-4000 v2 atitinka esminius reikalavimus ir kitas 1999/5/EB Direktyvos nuostatas. OvisLink Corp izjavlja, da je ta AirLive ES-4000 v2 v skladu z bistvenimi zahtevami in ostalimi relevantnimi določili direktive 1999/5/ES. fr Par la présente OvisLink Corp. déclare que sk OvisLink Corp týmto vyhlasuje, že AirLive ES-4000 v2 Français [French] l'appareil AirLive ES-4000 v2 est conforme aux Slovensky [Slovak] spĺňa základné požiadavky a všetky príslušné exigences essentielles et aux autres dispositions ustanovenia Smernice 1999/5/ES. pertinentes de la directive 1999/5/CE it Italiano [Italian] Con la presente OvisLink Corp. dichiara che fi questo AirLive ES-4000 v2 è conforme ai requisiti Suomi [Finnish] essenziali ed alle altre disposizioni pertinenti stabilite dalla direttiva 1999/5/CE. OvisLink Corp vakuuttaa täten että AirLive ES-4000 v2 tyyppinen laite on direktiivin 1999/5/EY oleellisten vaatimusten ja sitä koskevien direktiivin muiden ehtojen mukainen lv Ar šo OvisLink Corp. deklarē, ka AirLive ES-4000 Hér með lýsir OvisLink Corp yfir því að AirLive Latviski [Latvian] v2 atbilst Direktīvas 1999/5/EK būtiskajām Íslenska [Icelandic] ES-4000 v2 er í samræmi við grunnkröfur og aðrar prasībām un citiem ar to saistītajiem kröfur, sem gerðar eru í tilskipun 1999/5/EC. noteikumiem. sv Svenska [Swedish] Härmed intygar OvisLink Corp. att denna AirLive no OvisLink Corp erklærer herved at utstyret AirLive ES-4000 v2 står I överensstämmelse med de Norsk [Norwegian] ES-4000 v2 er i samsvar med de grunnleggende krav väsentliga egenskapskrav och övriga relevanta og øvrige relevante krav i direktiv 1999/5/EF. bestämmelser som framgår av direktiv 1999/5/EG. A copy of the full CE report can be obtained from the following address: OvisLink Corp. 5F, No.6 Lane 130, Min-Chuan Rd, Hsin-Tien City, Taipei, Taiwan, R.O.C. This equipment may be used in AT, BE, CY, CZ, DK, EE, FI, FR, DE, GR, HU, IE, IT, LV, LT, LU, MT, NL, PL, PT, SK, SI, ES, SE, GB, IS, LI, NO, CH, BG, RO, TR This device uses software which is partly or completely licensed under the terms of the GNU General Public License. The author of the software does not provide any warranty. This does not affect the warranty for the product itself. To get source codes please contact: OvisLink Corp., 5F, No. 96, Min-Chuan Rd, Hsin-Tien City, Taipei, Taiwan, R.O.C. A fee will be charged for production and shipment for each copy of the source code. GNU GENERAL PUBLIC LICENSE Version 2, June 1991 Copyright (C) 1989, 1991 Free Software Foundation, Inc. 51 Franklin Street, Fifth Floor, Boston, MA 02110-1301, USA Everyone is permitted to copy and distribute verbatim copies of this license document, but changing it is not allowed. Preamble The licenses for most software are designed to take away your freedom to share and change it. By contrast, the GNU General Public License is intended to guarantee your freedom to share and change free software--to make sure the software is free for all its users. This General Public License applies to most of the Free Software Foundation's software and to any other program whose authors commit to using it. (Some other Free Software Foundation software is covered by the GNU Lesser General Public License instead.) You can apply it to your programs, too. When we speak of free software, we are referring to freedom, not price. Our General Public Licenses are designed to make sure that you have the freedom to distribute copies of free software (and charge for this service if you wish), that you receive source code or can get it if you want it, that you can change the software or use pieces of it in new free programs; and that you know you can do these things. To protect your rights, we need to make restrictions that forbid anyone to deny you these rights or to ask you to surrender the rights. These restrictions translate to certain responsibilities for you if you distribute copies of the software, or if you modify it. For example, if you distribute copies of such a program, whether gratis or for a fee, you must give the recipients all the rights that you have. You must make sure that they, too, receive or can get the source code. And you must show them these terms so they know their rights. 5. You are not required to accept this License, since you have not signed it. However, nothing else grants you permission to modify or distribute the Program or its derivative works. These actions are prohibited by law if you do not accept this License. Therefore, by modifying or distributing the Program (or any work based on the Program), you indicate your acceptance of this License to do so, and all its terms and conditions for copying, distributing or modifying the Program or works based on it. 6. Each time you redistribute the Program (or any work based on the Program), the recipient automatically receives a license from the original licensor to copy, distribute or modify the Program subject to these terms and conditions. You may not impose any further restrictions on the recipients' exercise of the rights granted herein. You are not responsible for enforcing compliance by third parties to this License. 7. If, as a consequence of a court judgment or allegation of patent infringement or for any other reason (not limited to patent issues), conditions are imposed on you (whether by court order, agreement or otherwise) that contradict the conditions of this License, they do not excuse you from the conditions of this License. If you cannot distribute so as to satisfy simultaneously your obligations under this License and any other pertinent obligations, then as a consequence you may not distribute the Program at all. For example, if a patent license would not permit royalty-free redistribution of the Program by all those who receive copies directly or indirectly through you, then the only way you could satisfy both it and this License would be to refrain entirely from distribution of the Program. If any portion of this section is held invalid or unenforceable under any particular circumstance, the balance of the section is intended to apply and the section as a whole is intended to apply in other circumstances. It is not the purpose of this section to induce you to infringe any patents or other property right claims or to contest validity of any such claims; this section has the sole purpose of protecting the integrity of the free software distribution system, which is implemented by public license practices. Many people have made generous contributions to the wide range of software distributed through that system in reliance on consistent application of that system; it is up to the author/donor to decide if he or she is willing to distribute software through any other system and a licensee cannot impose that choice. This section is intended to make thoroughly clear what is believed to be a consequence of the rest of this License. We protect your rights with two steps: (1) copyright the software, and (2) offer you this license which gives you legal permission to copy, distribute and/or modify the software. Also, for each author's protection and ours, we want to make certain that everyone understands that there is no warranty for this free software. If the software is modified by someone else and passed on, we want its recipients to know that what they have is not the original, so that any problems introduced by others will not reflect on the original authors' reputations. Finally, any free program is threatened constantly by software patents. We wish to avoid the danger that redistributors of a free program will individually obtain patent licenses, in effect making the program proprietary. To prevent this, we have made it clear that any patent must be licensed for everyone's free use or not licensed at all. The precise terms and conditions for copying, distribution and modification follow. TERMS AND CONDITIONS FOR COPYING, DISTRIBUTION AND MODIFICATION 0. This License applies to any program or other work which contains a notice placed by the copyright holder saying it may be distributed under the terms of this General Public License. The "Program", below, refers to any such program or work, and a "work based on the Program" means either the Program or any derivative work under copyright law: that is to say, a work containing the Program or a portion of it, either verbatim or with modifications and/or translated into another language. (Hereinafter, translation is included without limitation in the term "modification".) Each licensee is addressed as "you". 8. If the distribution and/or use of the Program is restricted in certain countries either by patents or by copyrighted interfaces, the original copyright holder who places the Program under this License may add an explicit geographical distribution limitation excluding those countries, so that distribution is permitted only in or among countries not thus excluded. In such case, this License incorporates the limitation as if written in the body of this License. 9. The Free Software Foundation may publish revised and/or new versions of the General Public License from time to time. Such new versions will be similar in spirit to the present version, but may differ in detail to address new problems or concerns. Each version is given a distinguishing version number. If the Program specifies a version number of this License which applies to it and "any later version", you have the option of following the terms and conditions either of that version or of any later version published by the Free Software Foundation. If the Program does not specify a version number of this License, you may choose any version ever published by the Free Software Foundation. 10. If you wish to incorporate parts of the Program into other free programs whose distribution conditions are different, write to the author to ask for permission. For software which is copyrighted by the Free Software Foundation, write to the Free Software Foundation; we sometimes make exceptions for this. Our decision will be guided by the two goals of preserving the free status of all derivatives of our free software and of promoting the sharing and reuse of software generally. NO WARRANTY Activities other than copying, distribution and modification are not covered by this License; they are outside its scope. The act of running the Program is not restricted, and the output from the Program is covered only if its contents constitute a work based on the Program (independent of having been made by running the Program). Whether that is true depends on what the Program does. 1. You may copy and distribute verbatim copies of the Program's source code as you receive it, in any medium, provided that you conspicuously and appropriately publish on each copy an appropriate copyright notice and disclaimer of warranty; keep intact all the notices that refer to this License and to the absence of any warranty; and give any other recipients of the Program a copy of this License along with the Program. You may charge a fee for the physical act of transferring a copy, and you may at your option offer warranty protection in exchange for a fee. 2. You may modify your copy or copies of the Program or any portion of it, thus forming a work based on the Program, and copy and distribute such modifications or work under the terms of Section 1 above, provided that you also meet all of these conditions: a) You must cause the modified files to carry prominent notices stating that you changed the files and the date of any change. b) You must cause any work that you distribute or publish, that in whole or in part contains or is derived from the Program or any part thereof, to be licensed as a whole at no charge to all third parties under the terms of this License. c) If the modified program normally reads commands interactively when run, you must cause it, when started running for such interactive use in the most ordinary way, to print or display an announcement including an appropriate copyright notice and a notice that there is no warranty (or else, saying that you provide a warranty) and that users may redistribute the program under these conditions, and telling the user how to view a copy of this License. (Exception: if the Program itself is interactive but does not normally print such an announcement, your work based on the Program is not required to print an announcement.) 11. BECAUSE THE PROGRAM IS LICENSED FREE OF CHARGE, THERE IS NO WARRANTY FOR THE PROGRAM, TO THE EXTENT PERMITTED BY APPLICABLE LAW. EXCEPT WHEN OTHERWISE STATED IN WRITING THE COPYRIGHT HOLDERS AND/OR OTHER PARTIES PROVIDE THE PROGRAM "AS IS" WITHOUT WARRANTY OF ANY KIND, EITHER EXPRESSED OR IMPLIED, INCLUDING, BUT NOT LIMITED TO, THE IMPLIED WARRANTIES OF MERCHANTABILITY AND FITNESS FOR A PARTICULAR PURPOSE. THE ENTIRE RISK AS TO THE QUALITY AND PERFORMANCE OF THE PROGRAM IS WITH YOU. SHOULD THE PROGRAM PROVE DEFECTIVE, YOU ASSUME THE COST OF ALL NECESSARY SERVICING, REPAIR OR CORRECTION. 12. IN NO EVENT UNLESS REQUIRED BY APPLICABLE LAW OR AGREED TO IN WRITING WILL ANY COPYRIGHT HOLDER, OR ANY OTHER PARTY WHO MAY MODIFY AND/OR REDISTRIBUTE THE PROGRAM AS PERMITTED ABOVE, BE LIABLE TO YOU FOR DAMAGES, INCLUDING ANY GENERAL, SPECIAL, INCIDENTAL OR CONSEQUENTIAL DAMAGES ARISING OUT OF THE USE OR INABILITY TO USE THE PROGRAM (INCLUDING BUT NOT LIMITED TO LOSS OF DATA OR DATA BEING RENDERED INACCURATE OR LOSSES SUSTAINED BY YOU OR THIRD PARTIES OR A FAILURE OF THE PROGRAM TO OPERATE WITH ANY OTHER PROGRAMS), EVEN IF SUCH HOLDER OR OTHER PARTY HAS BEEN ADVISED OF THE POSSIBILITY OF SUCH DAMAGES. END OF TERMS AND CONDITIONS How to Apply These Terms to Your New Programs If you develop a new program, and you want it to be of the greatest possible use to the public, the best way to achieve this is to make it free software which everyone can redistribute and change under these terms. To do so, attach the following notices to the program. It is safest to attach them to the start of each source file to most effectively convey the exclusion of warranty; and each file should have at least the "copyright" line and a pointer to where the full notice is found. These requirements apply to the modified work as a whole. If identifiable sections of that work are not derived from the Program, and can be reasonably considered independent and separate works in themselves, then this License, and its terms, do not apply to those sections when you distribute them as separate works. But when you distribute the same sections as part of a whole which is a work based on the Program, the distribution of the whole must be on the terms of this License, whose permissions for other licensees extend to the entire whole, and thus to each and every part regardless of who wrote it. one line to give the program's name and an idea of what it does. Copyright (C) yyyy name of author Thus, it is not the intent of this section to claim rights or contest your rights to work written entirely by you; rather, the intent is to exercise the right to control the distribution of derivative or collective works based on the Program. This program is distributed in the hope that it will be useful, but WITHOUT ANY WARRANTY; without even the implied warranty of MERCHANTABILITY or FITNESS FOR A PARTICULAR PURPOSE. See the GNU General Public License for more details. In addition, mere aggregation of another work not based on the Program with the Program (or with a work based on the Program) on a volume of a storage or distribution medium does not bring the other work under the scope of this License. This program is free software; you can redistribute it and/or modify it under the terms of the GNU General Public License as published by the Free Software Foundation; either version 2 of the License, or (at your option) any later version. You should have received a copy of the GNU General Public License along with this program; if not, write to the Free Software Foundation, Inc., 51 Franklin Street, Fifth Floor, Boston, MA 02110-1301, USA. 3. You may copy and distribute the Program (or a work based on it, under Section 2) in object code or executable form under the terms of Sections 1 and 2 above provided that you also do one of the following: a) Accompany it with the complete corresponding machine-readable source code, which must be distributed under the terms of Sections 1 and 2 above on a medium customarily used for software interchange; or, b) Accompany it with a written offer, valid for at least three years, to give any third party, for a charge no more than your cost of physically performing source distribution, a complete machine-readable copy of the corresponding source code, to be distributed under the terms of Sections 1 and 2 above on a medium customarily used for software interchange; or, c) Accompany it with the information you received as to the offer to distribute corresponding source code. (This alternative is allowed only for noncommercial distribution and only if you received the program in object code or executable form with such an offer, in accord with Subsection b above.) Also add information on how to contact you by electronic and paper mail. The source code for a work means the preferred form of the work for making modifications to it. For an executable work, complete source code means all the source code for all modules it contains, plus any associated interface definition files, plus the scripts used to control compilation and installation of the executable. However, as a special exception, the source code distributed need not include anything that is normally distributed (in either source or binary form) with the major components (compiler, kernel, and so on) of the operating system on which the executable runs, unless that component itself accompanies the executable. You should also get your employer (if you work as a programmer) or your school, if any, to sign a "copyright disclaimer" for the program, if necessary. Here is a sample; alter the names: If distribution of executable or object code is made by offering access to copy from a designated place, then offering equivalent access to copy the source code from the same place counts as distribution of the source code, even though third parties are not compelled to copy the source along with the object code. signature of Ty Coon, 1 April 1989 Ty Coon, President of Vice 4. You may not copy, modify, sublicense, or distribute the Program except as expressly provided under this License. Any attempt otherwise to copy, modify, sublicense or distribute the Program is void, and will automatically terminate your rights under this License. However, parties who have received copies, or rights, from you under this License will not have their licenses terminated so long as such parties remain in full compliance. If the program is interactive, make it output a short notice like this when it starts in an interactive mode: Gnomovision version 69, Copyright (C) year name of author Gnomovision comes with ABSOLUTELY NO WARRANTY; for details type `show w'. This is free software, and you are welcome to redistribute it under certain conditions; type `show c' for details. The hypothetical commands `show w' and `show c' should show the appropriate parts of the General Public License. Of course, the commands you use may be called something other than `show w' and `show c'; they could even be mouse-clicks or menu items--whatever suits your program. Yoyodyne, Inc., hereby disclaims all copyright interest in the program `Gnomovision' (which makes passes at compilers) written by James Hacker. This General Public License does not permit incorporating your program into proprietary programs. If your program is a subroutine library, you may consider it more useful to permit linking proprietary applications with the library. If this is what you want to do, use the GNU Lesser General Public License instead of this License. Copyright The contents of this publication may not be reproduced in any part or as a whole, stored, transcribed in an information retrieval system, translated into any language, or transmitted in any form or by any means, mechanical, magnetic, electronic, optical, photocopying, manual, or otherwise, without the prior written permission. Trademarks All products, company, brand names are trademarks or registered trademarks of their respective companies. They are used for identification purpose only. Specifications are subject to be changed without prior notice. FCC Interference Statement The ES-4000V2 has been tested and found to comply with the limits for a Class B digital device pursuant to Part 15 of the FCC Rules. These limits are designed to provide reasonable protection against radio interference in a commercial environment. This equipment can generate, use and radiate radio frequency energy and, if not installed and used in accordance with the instructions in this manual, may cause harmful interference to radio communications. Operation of this equipment in a residential area is likely to cause interference, in which case the user, at his own expense, will be required to take whatever measures are necessary to correct the interference. CE Declaration of Conformity This equipment complies with the requirements relating to electromagnetic compatibility, EN 55022/A1/A2, EN 61000-3-2, EN 61000-3-3/A1, EN 55024/A1/A2, Class B. The specification is subject to change without notice. 1 Table of Contents Chapter 1 Introduction................................................................................................................. 4 1.1 Functions and Features ...................................................................................................................... 4 1.2 Front Panel ......................................................................................................................................... 6 1.3 Packing List......................................................................................................................................... 6 Chapter 2 Product Deployment................................................................................................... 7 2.1 Deployment......................................................................................................................................... 7 2.2 Software Installation............................................................................................................................ 8 Chapter 3 Basic Installation Guide ........................................................................................... 14 3.1 Setup RS-3000 and ES-4000V2 to build up your Mail Server.......................................................... 14 3.2 Web Mail ........................................................................................................................................... 25 3.2.1 How to use Web Mail ............................................................................................................ 25 3.2.2 How to configure Web Mail User Preference ........................................................................ 28 3.2.3 Importing Address Book from Outlook Express .................................................................... 30 3.2.4 Using Web Disk to Transfer Large File ................................................................................. 35 Chapter 4 System ....................................................................................................................... 40 4.1 Admin ................................................................................................................................................ 40 4.2 Interface ............................................................................................................................................ 42 4.3 Setting ............................................................................................................................................... 43 4.4 Date/Time.......................................................................................................................................... 48 4.5 Software Update ............................................................................................................................... 49 Chapter 5 DNS Setting ............................................................................................................... 50 5.1 A (Address) ....................................................................................................................................... 52 5.2 CNAME (Canonical NAME) .............................................................................................................. 53 5.3 MX (eXchanger)................................................................................................................................ 54 5.4 SPF (Sender policy FrameWork) ...................................................................................................... 56 5.5 Example ............................................................................................................................................ 57 Chapter 6 Web Server Setting................................................................................................... 66 6.1 Setting ............................................................................................................................................... 66 6.2 Example ............................................................................................................................................ 67 Chapter 7 Mail Management...................................................................................................... 78 7.1 Configure .......................................................................................................................................... 78 7.1.1 Setting ................................................................................................................................... 78 7.1.2 Web Mail Logo ...................................................................................................................... 83 7.1.3 Domain Alias ......................................................................................................................... 84 7.1.4 Mail Relay.............................................................................................................................. 85 7.1.5 Mail Signatures...................................................................................................................... 87 7.1.6 Mail Gateway......................................................................................................................... 89 7.2 Account Management ....................................................................................................................... 90 2 7.2.1 Setting ................................................................................................................................... 90 7.2.2 Individual ............................................................................................................................... 93 7.2.3 Group .................................................................................................................................... 96 7.2.4 Shared Address Book ........................................................................................................... 97 7.3 Queue ............................................................................................................................................. 109 7.4 Connection Track ............................................................................................................................. 111 7.4.1 Outbound SMTP................................................................................................................... 111 7.4.2 Inbound SMTP .....................................................................................................................113 7.4.3 POP3 / IMAP ........................................................................................................................114 Chapter 8 Mail Security............................................................................................................ 118 8.1 Configure .........................................................................................................................................118 8.1.1 Setting ..................................................................................................................................118 8.1.2 Mail Notice............................................................................................................................119 8.2 Anti-Virus......................................................................................................................................... 126 8.3 Mail Report...................................................................................................................................... 130 8.3.1 Setting ................................................................................................................................. 130 8.3.2 Statistic ................................................................................................................................ 137 8.3.3 Log ...................................................................................................................................... 138 Chapter 9 Remote Backup....................................................................................................... 145 9.1 Backup Setting................................................................................................................................ 145 9.2 Browse Setting................................................................................................................................ 145 9.3 Browse Mail .................................................................................................................................... 146 Chapter 10 HA........................................................................................................................... 152 Chapter 11 Monitor................................................................................................................... 157 11.1 System Info ................................................................................................................................... 157 11.2 Event Log ...................................................................................................................................... 159 Appendix Introduction of Mail System................................................................................... 162 3 C Chhaapptteerr 11 IInnttrroodduuccttiioonn Congratulations on your purchase of this outstanding ES-4000V2 Mail Server Appliance, this product is specifically designed for the office that has the need to install an easy maintained mail server in company. Since email has become the most important communicating tool in the world, the network administrator always looks for a stable, powerful, and easy installed email server system. Now AirLive presents you a hardware-based Email Server Appliance, ES-4000V2, it provides POP3, SMTP, IMAP, Web mail server and Web disk function that make the equipment suitable for most users; with 160GB hard disk ES-4000V2 owns the capacity to handle plenty of users; and advanced managed function to customize each account for better performance. 1.1 Functions and Features z Web Server ES-4000V2 not only provides mail server function, it also offers web server function to allow user creating company’s website on same device. So user will not need to purchase further software or hardware for web service. z Remote Backup ES-4000V2 will record every passing mail as the record, and user can select the schedule to backup the record to NAS or File Server. Those mail records can also be retrieved from NAS or File Server via ES-4000V2. z Shared Address Book ES-4000V2 provides Shared Address for WebMail users; it can also connect to mail client software with LDAP service, such as Outlook Express, to search the destination address within Shared Address Book. z Anti-Virus Built-in with Clam AV scan engine can filter malicious program in mail content, to prevent mail receiver from virus threat. The virus pattern can be updated regularly, and without any license fee. z Mail server transfer It is very possible to lost mail during the period of a new mail server installation. ES-4000V2 provides a mechanism to check new mail from old mail server even in the process of DNS synchronized, and keep on receiving the mail. z Mail account transfer ES-4000V2 provides a feature to transfer mail account from old mail server just in few configured steps. With learning systems, the administrator will not need to re-create all the account one by one. 4 z DNS Built-in with DNS server, administrator can setup the domain name resolution by himself, and will not need to spend money to deposit DNS service at ISP. z Web Mail Sometimes users need to access email in public computer, such as cyber café, and it is not allowed or not properly to download private mail. Web mail function works to provide internet user to check mail via web browser, so users will be able to read or send email in anywhere. z Personal Web Disk Instead of sending mail with attaching large file, user can store the file in Personal web disk and send out the address of hyperlink, and then Internet user will be able to download it without authentication. z Customize mail account Each mail account can be customized based on company’s policy, the contents include Mail size limitation, Mail box Quota, and Personal web disk quota. z HA Built-in with HA (High Availability) function, the stored data can be synchronized with two ES-4000V2 devices, to prevent losing mail in case a mail server crashes. z Embedded with 160G Hard Disk ES-4000V2 embedded with 160GB IDE hard disk to store the mail, and users can replace the hard disk by themselves, it supports to format the hard disk as its original capacity. The maximum size is up to 350GB. z Easy installation and useful mail system Just few steps of installation, a useful mail server with POP3, SMTP, IMAP, Web Mail and Web Disk function can be deployed and ready for use. 5 1.2 Front Panel Figure 1-1 Front Panel LED Color Status Description POWER Green On Hard Disk Green Blinking Data reading / accessing Blinking Sending / Receiving Green Port1 On 100 Mbps Orange On 1000 Mbps - Off 10 Mbps Green Port2 Power on the device Blinking Sending / Receiving On 100 Mbps Orange On 1000 Mbps - Off 10 Mbps Ports: Port AC Power Description Input voltages ranging from 100 ~ 240 VAC, and with a maximum power output of 85 watts. Port 1 Use this port to connect to a router, DSL modem, Cable modem, or Switch. Port 2 Use this port to connect another ES-4000V2 device for HA function Console Port 9-pin serial port connector for checking setting and restore to the factory setting 1.3 Packing List z ES-4000V2 Mail Server Appliance z Installation CD-ROM z Quick Installation Guide z CAT-6 UTP Fast Ethernet cable x 2 z RS-232 cable z Power code z Accessories 6 C Chhaapptteerr 22 P Prroodduucctt D Deeppllooyym meenntt 2.1 Deployment ES-4000V2 features Mail Server function to offer mail service for LAN users. Co-work with RS-3000 Anti-spam function can improve more complete mail security, and save the time and human resource to arrange lots of mal-mails. 7 2.2 Software Installation Step1. Connect the MIS engineer’s PC and ES-4000V2’s port 1 to the same Hub / Switch, and launch the browser (IE or Netscape) to link the ES-4000V2 appliance. The default IP address is http : //192.168.1.1 Step2. Administrator will be requested for User Name and Password when entering ES-4000V2 system. (Figure 2-1) User Name : admin Password : airlive Click OK. Figure 2-1 Login page Step3. When user first uses the ES-4000V2 management interface, system will automatically enter Install Wizard. It will guide user to make settings. Click Next. (Figure 2-2) Figure 2-2 Enter the setting wizard 8 Step4. Select the language and character encoding. (Figure 2-3) Figure 2-3 Select the language and character encoding When system can not identify the data character encoding that is going to be saved into database, it will use the default setting. Step5. Go to System ( Interface, enter the following setting: (Figure 2-4) Provide a valid IP address of the LAN subnet along with its mask, default gateway and DNS sever address. Figure 2-4 Interface setting Please refer to LAN segment setting to set up interface address. For example, if the LAN segment is 172.16.X.X, then any changes made must be within the same segment in order to take effect. The following table lists the standard virtual IP range, all external real IPs are forbidden. 10.0.0.0 ~ 10.255.255.255 172.16.0.0 ~ 172.31.255.255 192.168.0.0 ~ 192.168.255.255 9 Step6. Go to System Æ Synchronize System Clock, enable Synchronize with an Internet Time Server and set up offset hours from GMT to assure the correct time. (Figure 2-5) Figure 2-5 Synchronize time setting If the local area executes the daylight saving time, then enable the Daylight Saving Time Setting. Step7. Enter corresponding domain alias. (Figure 2-6) Figure 2-6 Domain alias setting 10 Step8. Apply permitted mail relay segments and domains. (Figure 2-7) Figure 2-7 Mail relay setting Step9. If resolving domain name is needed, please enable the DNS Setting option. Once the DNS Setting is enabled, the install wizard will take you to a further DNS setting after you click Finish. (Figure 2-8) Figure 2-8 Install completed 11 Step10. Set up account learning approach and default value for new account. (Figure 2-9) Figure 2-9 Setup account learning approach and default value for new account Step11. If necessary, select to enable HA feature and configure the IP address of another ES-4000V2. Both devices will synchronize the database when the connection builds up. (Figure 2-10) Figure 2-10 High Availability setting 12 Step12. Prompt users that the listed ports below should be remaining open on Perimeter Gateway while ES-4000V2 is functioning. (Figure 2-12) Figure 2-12 Attention Step13. Click Finish. 13 C Chhaapptteerr 33 B Baassiicc IInnssttaallllaattiioonn G Guuiiddee 3.1 Setup RS-3000 and ES-4000V2 to build up your Mail Server This example will introduce the procedure about how to set up ES-4000V2 Mail server system, and configure ES-4000V2 Anti-Virus, RS-3000 Anti-Spam to filter out the mal-mail. Environment Definition: RS-3000: WAN IP address – 60.250.158.64, 61.229.45.101 LAN IP address – 192.168.1.1 DMZ IP address – 192.168.3.1 ES-4000V2: IP address: 192.168.3.254, Subnet mask: 255.255.255.0, Default gateway: 192.168.3.1 Domain name: airlive.com Application: 14 Procedure Guide: 1. Apply and register a domain name at Service provider 2. RS-3000: Setup WAN ports 3. ES-4000V2: Follow wizard to setup mail server 4. ES-4000V2: Create mail account 5. ES-4000V2: Enable and Configure Anti-Virus function 6. RS-3000: Policy Object Æ Address Æ DMZ – Create ES-4000V2 LAN IP address at DMZ in order to be configured at RS-3000 policy. 7. RS-3000: Policy Object Æ Services Æ Custom – Create the non-standard port number for Web Mail service, and assign a name as WebMail 8. RS-3000: Policy Object Æ Services Æ Group – Create two service groups as Mail_Incoming and Mail_Outgoing to group the necessary services of ES-4000V2 for RS-3000 configuration 9. RS-3000: Create Virtual Server setting to assign specific WAN IP address, Services, and ES-4000V2 IP 10. RS-3000: Create Outgoing Policy and allow LAN user to access Internet 11. RS-3000: Create DMZ to WAN Policy and allow ES-4000V2 to connect Internet with specific services 12. RS-3000: Create WAN to DMZ Policy and allow mail to reach ES-4000V2 13. RS-3000: Mail Security Æ Configure – Define the relay permission for mail clients 14. RS-3000: Mail Security Æ Anti-Spam – Enable Anti-Spam feature 15. RS-3000: Disable Anti-Virus feature 16. Verify the configuration result Step-by-step Configuration: Step1. Apply and register a domain name at Service provider, for example airlive.com. Step2. Setup ready RS-3000 WAN interface. Step3. Follow the ES-4000V2 wizard to setup mail server. 1. Select the language and character encoding. (Figure 3-1) Figure 3-1 Select the language and character encoding 15 2. Setup ES-4000V2 IP address. (Figure 3-2) Figure 3-2 Interface setting 3. Configure the correct time zone setting. (Figure 3-3) Figure 3-3 Synchronize time setting 4. Enter corresponding domain alias. (Figure 3-4) Figure 3-4 Domain Name setting 16 5. Apply permitted mail relay segments and domains. (Figure 3-5) Figure 3-5 Mail relay setting 6. Skip DNS setting and press Next. (Figure 3-6) Figure 3-6 Install completed 7. Select Not Learning for Account Management Setting. (Figure 3-7) Figure 3-7 Account Management Setting 17 8. Skip High Availability Setting. (Figure 3-8) Figure 3-8 High Availability setting 9. Finish the wizard setting. (Figure 3-9) Figure 3-9 Finish Wizard setting Step4. ES-4000V2 Mail Management Æ Individual: Add a test mail account “jacky” as the example, and enter the password. (Figure 3-10) Figure 3-10 Create mail client account 18 Step5. Configure ES-4000V2 Anti-Virus function. (Figure 3-11) Figure 3-11 Configure Anti-Virus setting Step6. Create ES-4000V2 LAN IP address at DMZ in order to be configured at RS-3000 policy. (Figure 3-12) Figure 3-12 Define Mail Address at RS-3000 DMZ 19 Step7. Create the necessary services of ES-4000V2 on ES-3000 Policy Object Æ Service Æ Custom Define Web Mail protocol with TCP 8080 and TCP 1443 on ES-3000. (Figure 3-13) Figure 3-13 Create Web Mail Service on RS-3000 Step8. Group the necessary services of ES-4000V2 on ES-3000 Policy Object Æ Service Æ Group Group Incoming Services including POP3, SMTP, Web Mail, SSL Web Mail, and DNS. (Figure 3-14) Group Outgoing Services including DNS, SMTP, and HTTP. (Figure 3-15) Figure 3-14 RS-3000 Mail Incoming Services setting 20 Figure 3-15 RS-3000 Mail Outgoing Services setting Step9. Configure RS-3000 Virtual Server function to redirect Incoming Services with dedicated LAN IP address of ES-4000V2, for example 192.168.1.254. (Figure 3-16) Figure 3-16 RS-3000 Virtual Server setting 21 Step10. Create RS-3000 Outgoing Policy to allow LAN user accessing Internet. (Figure 3-17) Figure 3-17 Create RS-3000 Outgoing Policy setting Step11. Create RS-3000 DMZ to WAN Policy and allow ES-4000V2 to connect Internet with specific services. (Figure 3-18) Figure 3-18 Configure DMZ to WAN Policy 22 Step12. Create WAN to DMZ Policy and allow mail to reach ES-4000V2. (Figure 3-19) Figure 3-19 Configure WAN to DMZ Policy Step13. Define the relay permission for mail clients on RS-3000 Mail Security. (Figure 3-20) Figure 3-20 Configure Mail Relay 23 Step14. Enable Anti-Spam feature. (Figure 3-21) Figure 3-21 Configure Anti-Spam Step15. Disable Anti-Virus feature. Figure 3-22 Disable Anti-Virus 24 3.2 Web Mail 3.2.1 How to use Web Mail The example shows you how to use web mail: Step1. To use the web mail service, please type the default IP address 192.168.1.1 with the HTTP port (8080) or HTTPS port (1443) in the address of web browser. For example, http://192.168.1.1:8080 or https://192.168.1.1:1443 (Using 8080 or 1443 depends on protocol type.) (Figure 3-23) Enter user account and password. Click Login. Figure 3-23 Log in web mail Step2. When user first uses web mail service, system will require user to enter basic information. Click Continue. (Figure 3-24) Select language, timezone offset, sender address and edit your signature below User Preference. (Figure 3-25) Click Save. Display preferences successfully saved. (Figure 3-26) Click Continue. 25 Figure 3-24 First use of web mail service Figure 3-25 User Preference 26 Figure 3-26 Preferences successfully saved Step3. Web based mail for easy mail access. (Figure 3-27) Figure 3-27 Web Mail Interface 27 3.2.2 How to configure Web Mail User Preference Click Preference in the web-based mailbox main screen, and then set as below: (Figure 3-28) Click to edit sender name. Click sender name and the original name and mail address will be shown at the column. Rename the original name in Name field. (Figure 3-29) Click Modify to complete modification. (Figure 3-30) Click After finished, click Save. Click Save in the User Preference screen to complete settings. (Figure 3-31) to edit personal information. Figure 3-28 User Preference Figure 3-29 Modifying the Sender Name Figure 3-30 Sender Name Successfully Modified 28 Figure 3-31 Editing Personal Information 29 3.2.3 Importing Address Book from Outlook Express Step1. To export the address book from Outlook Express, follow these steps: On the File menu, point to Export, and then click Address Book. (Figure 3-32) In the Address Book Export Tool dialog box, click Text File (Comma Separated Values), and then click Export. (Figure 3-33) In the CSV Export dialog box, specify the storage path and the file name, and then click Next. (Figure 3-34) Tick the desired fields to export and then click Finish. (Figure 3-35) A dialog box says, “Address book export progress has completed.” Then, click OK. (Figure 3-36) Figure 3-32 Selecting Address Book on the File Menu 30 Figure 3-33 Selecting a File Type to Export Figure 3-34 Specifying the Storage Path and File Name 31 Figure 3-35 Selecting the Desired Fields to Export Figure 3-36 Export Process Completed 32 Step2. To import the address book, follow these steps: Click Address Book. (Figure 3-37) Click Import. (Figure 3-38) Locate the file by clicking Browse. Select “CSV (first line contains field names.csv)” as file format. Select “English Version” for Charset. Click Import. (Figure 3-39, 3-40) Figure 3-37 Clicking into Address Book Figure 3-38 Clicking into Import Screen 33 Figure 3-39 Clicking into Import Screen Figure 3-40 Address Book Successfully Imported 34 3.2.4 Using Web Disk to Transfer Large File Step1. Click Web Disk tab in the web-based mailbox main screen, and then: (Figure 3-41) Locate the file by clicking Browse under the Upload File to Web Disk bar. Click Upload button. (Figure 3-42, Figure 3-43) Figure 3-41 Select Web Disk on the web-based mailbox main screen 35 Figure 3-42 Uploading a File to ES-4000V2’s Built-in Web Disk Figure 3-43 File Uploaded 36 Step2. Click New Mail in the web-based mailbox main screen, and then: (Figure 3-44) In the Attachment column, click Browse corresponding to Web Disk field. Click the desired file and then click OK. (Figure 3-45) Click Add corresponding to Web Disk field. (Figure 3-46) Complete this e-mail with necessary information, such as subject, content and recipient address. Click Send. (Figure 3-47) Figure 3-44 Click Brows on Web Mail main screen Figure 3-45 Adding an Attachment from Web Disk 37 Figure 3-46 Click Add to add hyperlink file to receiver Figure 3-47 Sending out the Message 38 Step3. The recipient opens the attachment and then download the attachment file through a HTML page provided by ES-4000V2 device: (Figure 3-48, Figure 3-49) Figure 3-48 Opening the Attachment Figure 3-49 Opening the Attachment 39 C Chhaapptteerr 44 S Syysstteem m The system administration refers to the competency to manage the ES-4000V2. In this Chapter, it will be defined as the Admin, Interface IP, Setting, Date/ Time, Language, Logout and Software Update. ES-4000V2 is managed by the main system administrator. The main system administrator can add or delete any system settings and monitor the system status. Other sub administrators have no competency to modify the system settings (sub administrators’ names are set by the main system administrator), but only monitor the system status. 4.1 Admin Name The name of system administrator and sub administrator. Admin is the default name of system administrator in ES-4000V2 and it can not be canceled, whereas sub administrators’ names can be changed or canceled. The default system administrator can add or modify other sub administrators, and also can decide whether a sub administrator has the competency to write into system or not. The default system administrator account and password is admin and airlive. Privilege The administrator who has the competency to read / write, can change the system settings, monitor the system status, and to add / delete other administrators. Sub administrators with medium privilege are allowed to modify settings and monitor status, whereas those who are given low privilege can only read. Password / New Password / Confirm Password To add or modify the main /sub administrator password. Adding a Sub Admin Step1. In Admin Setting window, click the New Sub Admin. Step2. In Add New Sub Admin window, enter the following information : (Figure 4-1) Sub Admin : sub_admin Password : 12345 Confirm Password : 12345 Privilege set Low. If a new sub admin was given high privilege, which will make him a main admin. Otherwise, else two options represent sub admin. 40 Step3. Click OK to register a new admin, or click Cancel to cancel. Figure 4-1 Add a sub admin Modifying Admin’s Password Step1. Select an admin that you want to modify, then click Modify in the configure column in cope with that admin. Step2. Step3. In Modify Admin Password window, enter the following information : Password : airlive New Password : 52364 Confirm Password : 52364 (Figure 4-2) Click OK to change the password or click Cancel to cancel the setting. Figure 4-2 To change the admin password 41 4.2 Interface Interface Æ Interface Address The administrator can set the IP login information in ES-4000V2. Interface Address Setting Step1. Go to System Æ Interface, enter the following setting : In IP Address, Netmask and Default Gateway fields, enter a valid IP of the LAN subnet. Enter DNS server 1 or DNS server 2. Click OK. (Figure 4-3) Figure 4-3 The interface address setting 42 4.3 Setting Setting Configuration Allow system administrator to import / export system settings or reset the factory setting or format the built-in hard disk. Backup System Setting to Local System settings can backup to the storage section of built-in hard disk automatically or manually. It can be used for restoring the system settings or downloading system settings as a file onto local computer for archive purpose. Format Hard Disk Allow system administrator to format the built-in hard disk. Device Name Setting System administrator can enter the name of both company and device. Send Mail Alert Notification / Report When user enables this function, operating log or system error will be timely reported to the system administrator via e-mail. Management Port of WebUI ES-4000V2 allows system administrator to perform remote control from everywhere through web browser. The port number for HTTP or HTTPS protocol is alterable. The port number is required for accessing the management interface from external network. User can choose to select HTTP or HTTPS based on the requirement. The port number has to be appended to the management IP address, such as http:// 172.16.1.254:8080 or https://172.16.1.254:1025. Default Character Encoding of Mail The device will use the default character encoding on e-mails with unspecified character encoding. The Maximum Entries to be Displayed Per Page It determines the maximum entries shown per page on each kind of list. Storage Time of Log It decides the storage time of event log, connection track and quarantined e-mails. 43 Exporting System Setting to Client Step1. Go to System Æ Setting Æ Configuration, click next to Export System Setting to Client. Step2. When confirmation dialogue box File Download appears, click Save button, and it will show where the file will be saved. Click Save button again. The system setting file will be copied to the appointed directory. (Figure 4-4) Figure 4-4 Choose a folder to save the export file 44 Importing System Setting to Client Step1. Go to System Æ Setting Æ Configuration; click Browse next to Import System Setting to Client. Step2. In Choose File window, go to the directory where the ES-4000V2 system setting file was stored and select the file, then click Open. (Figure 4-5) Step3. Click the lower right OK, the window will closed. Step4. Click OK on the confirmation dialogue box, the setting will be imported to ES-4000V2. (Figure 4-6) Figure 4-5 Import system setting file Figure 4-6 Confirm to import system setting 45 Resetting Factory Setting & Formatting Built-in Hard Disk Step1. Go to System Æ Setting Æ Configuration, select Reset Factory Setting and Format Hard Disk. Step2. Click OK on the lower right, it will start restoring to the factory setting and formatting the built-in hard disk at the same time. (Figure 4-7) Figure 4-7 Reset factory setting and format hard disk 46 Mail Notice Setting Step1. Enter the name of the company in the blank field next to Company Name. Step2. Enter “ES-4000V2” in the blank field next to Device Name. Step3. Tick Enable Mail Alert Notification / Report. Step4. Enter an internal email address in Internal E-mail Account field. Step5. Click OK on the lower right to set the function of message alarm. (Figure 4-8) Figure 4-8 Enable the instant message alarm Rebooting System Step1. Click Reboot on the right of Reboot Appliance. Step2. A confirmation dialogue box saying “Are you sure to reboot?” appears. Step3. Click OK to reboot, or click Cancel to cancel reboot. (Figure 4-9) Figure 4-9 Reboot Appliance 47 4.4 Date/Time Date / Time Synchronize System Clock This option can synchronize system clock with the administrator’s PC or the external time server. GMT The international standard time (Greenwich Mean Time : GMT) Daylight Saving Time Daylight saving time (also called DST, or Summer Time) is a portion of the year in which a region's local time is advanced by an hour from its standard official time. Date / Time Setting Step1. Select Enable Synchronize with an Internet Time Server. (Figure 4-10) Step2. Click on the Set Offset Hours from GMT pull-down menu, and choose the correct time. Step3. Enter the server IP address in Server IP / Name field. Step4. Enter the frequency of updating time in Update System Clock Every Minutes. Figure 4-10 Time setting Click Sync button, the system time will synchronize with the administrator’s computer. The reference for setting up the Set offset hours from GMT and Server IP is available in Assist. If the local area executes the daylight saving time, then Enable the Daylight Saving Time Setting. 48 4.5 Software Update To update firmware, please go to System Æ Software Update and follow the steps below: Step1. Version Number indicates the current version that is running. Log onto Internet to obtain the latest version of firmware and download it onto the ES-4000V2 built-in hard disk. Step2. Click Browse, then Choose File window pops up, after that, please select the latest firmware from the directory where it was saved earlier. Step3. Click the lower right OK, it will start running the update procedure. (Figure 4-11) Figure 4-11 Software Update It takes about 3 minutes to run through the update process, and will automatically reboot after the system is updated. Please do not turn off the power, disconnect the Internet or close the Web UI while running update. These acts might cause an error in the system. (Running the update in the local area network is strongly recommended.) 49 C Chhaapptteerr 55 D DN NS SS Seettttiinngg Generally speaking, DNS server is either set up by an IT company or set up by oneself. ES-4000V2 has the function of resolving domain name which enables user to set up a DNS server on user’s own without any expanded cost. While setting up DNS, please direct the registered domain name to the ES-4000V2’s IP address beforehand. (All types of domain name need to be resolved by a DNS server, whether it’s an address type or a mail exchanger one.) In this chapter, it will walk you through DNS Setting with detailed utilization description. DNS Setting Domain Name: It refers to a website address that user applies from ISP. An IP address like 198.68.20.78 is not easy for computer users memorizing, therefore, the domain names intend to replace the figure-pattern addresses with meaningful letter-pattern ones, such as www.airlive.com The website address is composed of two parts, host name and domain name. Web browsers type address like www.yahoo.com to log onto its webpage while it’s physical IP is 66.218.71.84. And DNS server is the one who plays the role of mapped domain name and physical IP address together. Enable DNS Zone Allows users to activate DNS and set up the address mapping policies. (Figure 5-1) Figure 5-1 DNS setting 50 DNS Configuration Foremost, register the IP address on IDNs (International Domain Names) official website. 1. Then register airlive.com as domain name 2. Supposed that IP segment are given as follow: 61.11.11.10 ~ 61.11.11.14 211.22.22.18 ~ 211.22.22.30 3. Set up primary host name server as: Host Name: dns1.airlive.com IP Address: 61 .11 .11 .11 Set up secondary host name server as: Host Name: dns2.airlive.com IP Address: 211 .22 .2 2 .22 Select Type: It is divided into three types, namely Address (A), Canonical NAME (CNAME) and Mail eXchanger (MX). 51 5.1 A (Address) This is used to map up IP addresses and domain names. Ex. Build up the mapping between domain names and IP addresses. (Table 5-1) Domain Names Type IP Address host1.airlive.com A 61.11.11.12 host2.airlive.com A 61.11.11.13 host2.airlive.com A 211.22.22.23 Table 5-1 Mapping table of domain name and IP address “A” represents IP address. Each domain name is assigned to a corresponding IP address. The table above indicates that host2 is assigned to two IP addresses, so it lists out two entries corresponding to host2. Every DNS inquiry might have one responding address or above and is sorted in address-sorting style or round-robin style. 52 5.2 CNAME (Canonical NAME) This type allows mapped domain names to have one website address or above available for web browsers at the same time. Type CNAME is capable of mapping a type “A” mapped domain name, yet it is not recommended mapping a type “CNAME” domain name. Ex. Type CNAME as Alias is to map up real domain name. (Table 5-2) Domain Name Type IP Address host23.airlive.com A 61.11.11.14 host5.airlive.com CNAME host23.airlive.com Table 5-2 Mapping table of CNAME The table above indicates that host5.airlive.com (Alias) is mapping to host23.airlive.com (domain name). Thus, pinging host5.airlive.com under DOS mode will have the result of 61.11.11.14. 53 5.3 MX (eXchanger) It served as a mail agent for DNS server and a window to the outside for mail services. In spite of ailing for mail server replacement, the mail server could be back to function in no time just by modifying the DNS address. Ex.1: "MX", also known as "Mail eXchanger", is a type of resource record especially designed for mail service. (Table 5-3) Domain Name Type IP Address host25.airlive.com A 211.22.22.24 mail.airlive.com MX host25.airlive.com Table 5-3 Mapping table of mail eXchanger Under DOS mode, type nslookup -type=MX mail.airlive.com, you will find that mail.airlive.com is mapping to host25.airlive.com (the mail eXchanger) and its IP address 211. 22. 22. 24. 1. “nslookup” is the instruction of locating a DNS server. 2. “-type” defines the DNS type. 3. “mail.airlive.com” is the inquired DNS name. For example, the customer service department of Test company wants to email to [email protected], a mail server (test.com.tw) served as a SMTP server decides where and how to send the mail by inquiring the target DNS server. The MX record of the inquiry of mail.airlive.com is as followed: (Table 5-4) Domain Name Type IP Address host3.airlive.com A 61.11.11.10 mail.airlive.com MX host3.airlive.com Table 5-4 MX Record of the inquiry of mail.airlive.com 54 Therefore, mail will go to host3.airlive.com according to SMTP Protocol. Name: Customize a DNS host name. Reverse: reverse a domain name lookup of its IP address. Domain mapping distinguish into forward mapping and reverse mapping. Forward mapping served as a translator, a translator transforms a letter-pattern address into a figure-pattern address. On the other hand, reverse mapping goes the other way around. Ex.2: Take Ex. 1 for instance, use nslookup instruction to verify if forward mapping and reverse mapping function normally. The processes are as followed. C: \>nslookup host1.airlive.com ----------->forward requiring Server: dns.hinet.net Address: 168.95.1.1 Name: host1.airlive.com Address: 61.11.11.12 C: \>nslookup 61.11.11.12 --------------->reverse inquiring Server: dns.hinet.net Address: 168.95.1.1 Name: host1.airlive.com Address: 61.11.11.12 Result shows that 61.11.11.12 is mapping host1.airlive.com 55 5.4 SPF (Sender policy FrameWork) SPF (Sender Policy Framework) is a type of verification process that is used to prevent fake e-mail addresses by identifying the authenticity of the e-mail sender and filtering out spam. How SPF Works To apply the SPF verification process, two important things must be done to both the sending and receiving end of the e-mail. 1. The DNS server must be added a SPF record at sender end. 2. The Mail server must enable the SPF verification function into order to make SPF working. (Figure 5-2) Figure 5-2 SPF setting For example, suppose someone sends out a spam pretending to be an e-mail from AirLive mail server to your e-mail address. When this spam e-mail is sent to an account with SPF enabled, the account will ask AirLive mail server for the SPF record based on the e-mail’s IP address to check if the IP really came from AirLive. If AirLive mail server confirms the SPF verification, then the e-mail will pass the account’s SPF verification and be sent to the receiver. On the other hand, if the e-mail does not pass the SPF verification it shall be viewed as junk mail. This means that even if the e-mail is really being sent out from AirLive, yet if AirLive mail server doesn’t provide SPF record checking at that time, the e-mail that won’t go through the receiver account’s SPF verification will still be viewed as junk mail. The SPF checking process needs the sender account to set up SPF record to provide verification checking in order to send and receive normally. It works best when more people use this verification process to completely put the set up to use. The number of corporations that currently have SPF record checking is still quite small, thus under this condition the SPF process at the receiving end that filters out any junk mail will provide the sender with a great deal of inconvenience. 56 5.5 Example Further Description: DNS directing indicates by which DNS server is managing and in which DNS has detailed domain name information. Any specific information can be obtained in the DNS server, such as physical address of website or mail server. Thus, continuous Internet connection and accurate DNS record must be assured. According to international practice, DNS system must be directed to 2 DNS servers. It is to ensure domain name inquiry works in case one of them breaks down the other can act as substitute. This promises you a well-functional domain name, apart from that, providing a better domain name inquiring service for global Internet users. 57 Example: Setup a host name server Procedure: 1. Register airlive.com as domain name. 2. Set primary host name server as 61.11.11.11 and domain name as dns1.airlive.com Set secondary host name server as 211 .22 .2 2 .22 and domain name as dns2.airlive.com 3. Required for T1or ADSL Internet connection 4. Servers required for resolving: www.airlive.com (192.168.1.100) Web server mail.airlive.com (192.168.1.101) E-Mail server Step1. Apply to ISP for two fixed IP ADSL or T1. Supposed that the appointed IP addresses are as followed: 61.11.11.10 ~ 61.11.11.14 211.22.22.18 ~ 211.22.22.30 Register the IP address on IDNs (International Domain Names) official website: Primary Host Name Server Host Name: dns1.airlive.com IP Address: 61 .11 .11 .11 Secondary Host Name Server Host Name: dns2.airlive.com IP Address: 211 .22 .2 2 .22 Domain name must map the fixed IP address when registering the IP address on IDNs (International Domain Names) official website. 58 Step2. Set up DNS according to the settings below: (Table 5-5) Domain Name Type IP Address Reverse Priority airlive.com. A 6 1 .11 .11 .11 Enabled -- airlive.com. A 211 .22 .22 .2 2 Enabled -- Table 5-5 Mapping table of domain name and IP address As seen from Table 5-5, verifying forward mapping and reverse mapping for correctness with nslookup instruction are as followed: C: \>nslookup airlive.com Server: dns.hinet.net Address: 168.95.1.1 Name: airlive.com Address: 61.11.11.11, 211.22.22.22------->examine IP for correctness (forward mapping) C: \>nslookup 61.11.11.11 Server: dns.hinet.net Address: 168.95.1.1 Name: airlive.com ----------------->examine domain name for correctness (reverse mapping) Address: 61.11.11.11 Secondary DNS can act as substitute while primary DNS is down, it keeps domain name available for use. 59 Step3. Set up DNS according to the settings below: (Table 5-6) Domain Name Type IP Address Priority web.airlive.com A 6 1 .11 .11 .11 -- web.airlive.com A 211 .22 .22 .2 2 -- www.airlive.com CNAME web.airlive.com -- Table 5-6 CNAME record of www.airlive.com As seen from Table 5-6, verifying forward mapping for correctness with nslookup instruction is as followed: C: \>nslookup Default Server: dns.hinet.net Address: 168.95.1.1 > server 61.11.11.11 ---------------------------------------------->switch to your DNS server Default Server: web.airlive.com Address: 61.11.11.11 > www.airlive.com ---------->lookup for real domain name (forward mapping) Server: web.airlive.com Address: 61.11.11.11 Name: web.airlive.com -----------------------------------> domain name of www.airlive.com Address: 61.11.11.11, 211.22.22.22 ------------------------>mapping IP of web.airlive.com Alias: www.airlive.com ------------------------------------------>CNAME of web.airlive.com 60 According to aforementioned, web.airlive.com is used to map host name and its IP address. And www.airlive.com, a CNAME of web.airlive.com, offers inquiry ability and redirection to web.airlive.com. As seen from Tab. 4-6, it can be inferred that when browsing www.airlive.com visitors enter different server according to the browsing sequence. 1st visitor enter server 61.11.11.11 2nd visitor enter server 211.22.22.22 3rd visitor enter server 61.11.11.11 4th visitor enter server 211.22.22.22 5th visitor enter server 61.11.11.11 6th visitor enter server 211.22.22.22 . . (User are distributed to servers alternatively) As seen from Table 5-7, the smaller figure it is, the higher priority it gets. For example, the user A wants to email to [email protected], a mail server (mail.airlive.com) served as a SMTP server decides where and how to send the mail by inquiring the target DNS server. The MX record of the inquiry of mail.airlive.com is as followed: (Table 5-7) Domain Name Type Address Reverse Priority mail.airlive.com MX smtp1.airlive.com X 1 mail.airlive.com MX smtp2.airlive.com X 2 Table 5-7 MX record of mail.airlive.com For figure 1 has the highest priority, server will try to deliver the mail to smtp1.airlive.com due to its first priority. If delivery failed, then the mail goes to smtp2.airlive.com the secondary priority. 61 Mapping between Servers (Web / FTP / Mail) and Domain Name Preparation 1. Apply to ISP for two fixed IP ADSL Internet connections (The fixed IP of WAN1 is 61.11.11.10 ~ 61.11.11.14) (The fixed IP of WAN2 is 211.22.22.18 ~ 211.22.22.30) 2. Apply to ISP for airlive.com as domain name 3. Register the IP address on IDNs (International Domain Names) official website. Primary Host Name Server Host Name: dns1.airlive.com IP Address: 61.11.11.11 Secondary Host Name Server Host Name: dns2.airlive.com IP Address: 211.22.22.22 Step1. Settings of Web, FTP, Mail Server are as followed : Web server : 61.11.11.12 FTP server : 211.22.22.20 Mail server : 61.11.11.11 and 211.22.22.22 Step2. Go to DNS Setting Æ Setting, click New Entry. Step3. Fill in the blank field with registered domain name airlive.com, then click OK and check Enable DNS Zone, finally click New Entry. (Figure 5-3) Figure 5-3 Add a domain name 62 Step4. In DNS Zone Configuration, add the first entry : Select type: A(Address) Name: airlive.com. (Be aware there is a dot sign “.” behind the domain name.) Address: 61.11.11.11 Click OK. (Figure 5-4) Primary DNS mapping setup completed. Figure 5-4 Primary DNS mapping setup Step5. In DNS Zone Configuration, add the second entry : Select type : A(Address) Name : airlive.com. (Be aware there is a dot sign “.” behind the domain name.) Address : 211.22.22.22 Click OK. (Figure 5-5) Secondary DNS mapping setup completed. Figure 5-5 Secondary DNS mapping setup 63 Step6. In DNS Zone Configuration, add the third entry : Select type : A(Address) Name : www Address : 61.11.11.12 Click OK. (Figure 5-6) Mapping record between web server and IP setup completed. Figure 5-6 Mapping record between web server and IP setup Step7. In DNS Zone Configuration, add the forth entry : Select type : A(Address) Name : FTP Address : 211.22.22.20 Click OK. (Figure 5-7) Mapping record between FTP server and IP setup completed. Figure 5-7 Mapping record between FTP server and IP setup 64 Step8. In DNS Zone Configuration, add the fifth entry : Select type : MX(mail eXchanger) Name : mail Mail server : airlive.com Click OK. (Figure 5-8) Mapping record between mail server and IP setup completed. Figure 5-8 Mapping record between mail server and IP setup Step9. Setup completed. (Figure 5-9) Figure 5-9 Setup completed Step10. The easy memorized addresses facilitate external inquiries. Web server : www.airlive.com FTP server : ftp.airlive.com Mail server : mail.airlive.com 65 C Chhaapptteerr 66 W Weebb S Seerrvveerr S Seettttiinngg The key to a thriving business is to provide your potential customers with a stable, reliable access to your company website. Accordingly, ES-4000V2 makes website building cost effective and expeditious for you by integrating the web server. It meets your demand on building up a company website. 6.1 Setting The main function of ES-4000V2 Web Server is described as following: (Figure 6-1) Figure 6-1 Web Server Setting Domain Name The address of your website. Homepage File Name The default webpage of your website. It is usually named as “index.html” or “index.shtml”. HTTP Port The HTTP port for browsing your website. HTTPS Port The HTTPS port for browsing your website. Root Directory The top-most directory in your website hierarchy where all files of your website are stored. “/docs” is the root directory by default. Web Server File and Folder Setting Allows you to publish the folder index, create alias, enable authentication, etc. Allows you to change the root directory accordingly. Allows you to upload multiple files at once by file compression. You may extract the compressed file after uploaded. Currently, it supports TAR, TAR.GZ, TGZ, TAR.BZ2, ZIP, GZ, and BZ2 files. For the time being, the Web Server supports merely a few computer languages (i.e., JavaScript, HTML, SHTML, XML), excluding those which require execution on the Web Server, such as C, Perl, ASP, and PHP. 66 6.2 Example Using ES-4000V2 to Provide Web Service Step1. DNS Setting Æ Setting: Create DNS entry to define web server address. (Figure 6-2) Figure 6-2 The DNS configuration for Web Server Step2. Navigate to Web Server Setting Æ Setting and then set as below: Click New Entry Tick Enable Web Server Type “airlive.com” in the Domain Name field Type “index.htm” in the Homepage File Name field Enter “888” in the HTTP Port field Enter “333” in the HTTPS Port field Click OK (Figure 6-3) Click OK in the dialogue box to confirm restarting the Web server. (Figure 6-4, 6-5) Figure 6-3 Configure the Web Server Figure 6-4 Confirming to restart the Web server 67 Figure 6-5 Web server setting completed Step3. In the Web Server File and Folder Setting section, upload your website onto the Web server: Select the default root directory “*[docs]” and then click Open on the right. (Figure 6-6) Compress all the content of your website as a ZIP file. Use Browse to locate the ZIP file and then click Upload. (Figure 6-7) Select the ZIP file and then click Extract on the right. (Figure 6-8) Select the ZIP file and then click Remove on the right. (Figure 6-9) Click OK (Figure 6-10) Click OK in the dialogue box to confirm restarting the Web server. (Figure 6-11, 6-12) Now you may visit your website at “http://www.airlive.com.tw:8889” or “https://www.airlive.com.tw:3334”. (Figure 6-13) 68 Figure 6-6 Opening the root directory Figure 6-7 Uploading Your Website onto the Web Server 69 Figure 6-8 Selecting the ZIP File to Extract Figure 6-9 Selecting the ZIP File to Remove 70 Figure 6-10 Website Uploaded Figure 6-11 Confirming to Restart the Web Server Figure 6-12 Web Server Restarted 71 Figure 6-13 Visiting Your Own Website Step4. In the Web Server File and Folder Setting section, set as below: Click Add. (Figure 6-14) Specify the folder name and tick Publish the Folder Index. Specify the alias name (e.g. /download/) and tick Enable Folder Alias. Tick Enable Authentication and configure the related fields accordingly. Click OK. (Figure 6-15) Select “[spec]” and then click Open on the right. (Figure 6-16) Use Browse to locate the desirable file to upload and then click Upload. (Figure 6-17) Click OK. (Figure 6-18) Click OK in the dialogue box to confirm restarting the Web server. (Figure 6-19, 6-20) Now you may access the files stored on the Web server through the folder index at “http://www.airlive.com:8889/download/” or “https://www.airlive.com.tw:3334/download/” upon authentication. (Figure 6-21, 6-22, 6-23) 72 Figure 6-14 Adding a New Folder Figure 6-15 The Related Settings of a Folder 73 Figure 6-16 Opening a Folder Figure 6-17 Uploading a File 74 Figure 6-18 File Uploaded Figure 6-19 Confirming to Restart the Web Server Figure 6-20 Web Server Restarted 75 Figure 6-21 The Authentication Dialogue Window Figure 6-22 Browsing for the Desirable File 76 Figure 6-23 Downloading the Desirable File 77 C Chhaapptteerr 77 M Maaiill M Maannaaggeem meenntt 7.1 Configure Mail configure refers to policies of mail services, it is divided into three parts, namely mail management, domain alias and mail relay. Mail setting: Determines of which cryptographic method and port number will be used in each service Assigns a port exclusively for logging to web mail interface. Apply the physical IP address for sharing files in web disk. Determines the maximum amount of simultaneous connection of sending mail. Determines the maximum duration of a mail lifetime in Queue. Restricts mail delivery services with local SMTP authentication. Auditing outgoing mails for security’s sake with mail gateway 7.1.1 Setting Mail Setting Definition: Max. Simultaneous Connections of Send Mail: Define the capacity of ES-4000V2 to handle the mails simultaneously. The available range is from 1 to 9999, and the default setting is 50. Max. Lifetime of a Mail in Queue: What if users’ mails failed the delivery, the mail will save in ES-4000V2 queue and waiting for the next delivery. Users can define the lifetime of mail in queue, when the lifetime is end, the mail will be removed from queue and return a failure notification to sender. Enable Local SMTP Authentication: When SMTP authentication enabled, users must meet one of the requirements listed below to process mail delivery. 1. Either sender's source IP address or recipient's domain name must exist on the Mail Relay list. 2. Sender has to apply the correct user name and password to SMTP authentication. Enable Inbox Quota Auto-Adjustment: When enabled, the device will: 1. Alert both the user and system administrator about the insufficient space upon inbox usage of 80%. 2. Delete older mails until the usage has lowered to 70% as well as alert both the user and system administrator about the insufficient space upon inbox usage of 90%. 78 Default Value of New Account: Allocates the default size of mailbox, Inbox, Web Disk and the maximum size of incoming mails. (The settings here does not apply to those settings made in individual mail management ) Below is an example for your reference : 1. Tick Enable SMTP 2. Select TLS+SSL from the pull-down menu for Security Session 3. Enter “25” for SMTP and “465” for SMTPS 4. Tick Enable POP3 5. Select TLS+SSL from the pull-down menu for Security Session 6. Enter “110” for POP3 and “995” for POPS 7. Tick IMAP 8. Select TLS+SSL from the pull-down menu for Security Session 9. Enter “143” for IMAP and “993” for IMAPS 10. Tick Enable Web Mail 11. Web Mail Port: HTTP set as 8080 and HTTPS set as 1443 12. Apply Public IP Address to Domain Name of Web Mail 13. Maximum Simultaneous Connections of Send Mail : 50 14. Maximum Lifetime of a Mail in Queue : 4 hours 15. Tick Enable Local SMTP Authentication. 16. Tick Enable Inbox Quota Auto-Adjustment. 17. Click OK. (Figure 7-1) Figure 7-1 Mail management configuration 79 Transport Layer Security (TLS) and its predecessor, Secure Sockets Layer (SSL), are cryptographic protocols that provide secure communications on the Internet. There are slight differences between SSL and TLS, but the protocol remains substantially the same. However, TLS used to operate at transport layer, which now has changed into alternations between application layer and transport layer. Once Inbox Quota Auto-Adjustment is enabled, ES-4000V2 will check each built-in mail account for available inbox storage. Both the account user and the system administrator will receive an e-mail notification about inbox usage reaching 80%; when inbox usage reaches 90%, the device will send out an e-mail notification as well as delete the older e-mail messages until the usage has lowered to 70%. For client users using e-mail program, ES-4000V2 device requires the configuration of e-mail protocols and port numbers. Below is an example on how to configure the port numbers in Outlook Express: 1. On the menu bar, click Tools and then Accounts…. (Figure 7-2) Figure 7-2 Opening Internet Accounts 80 2. Click Mail tab and then the desired account to change. Next, click Properties on the right. (Figure 7-3) Figure 7-3 Opening Internet Accounts 3. In the Properties window, click Advanced tab to adjust the port numbers for SMTP and POP3 protocols. When finished, click OK. (Figure 7-4) Figure 7-4 Server Port Number Settings 81 4. Close Internet Accounts window. (Figure 7-5) Figure 7-5 Closing Internet Accounts 82 7.1.2 Web Mail Logo ES-4000V2 allows user to upload a background picture as web mail wallpaper. The image file should be limited as: Max. File Size: 1 Mbytes Resolution: 1022 x 622 pixels File Types: jpg, jpeg, jpe, gif, bmp, png... (Figure 7-6) Figure 7-6 Upload picture as wallpaper If user would like to check the display, click “Preview” and verify the image. (Figure 7-7) Figure 7-7 Homepage of Web Mail 83 7.1.3 Domain Alias Apply Registered Domain Name to Mail Server Step1. After registered domain name from IDNs (International Domain Names), please apply it to ES-4000V2 mail server. Step2. Go to Mail Management Æ Configure Æ Domain Alias, refer to following example to set up : Click New Entry to add first entry. Apply registered domain name. ( airlive.com ) Click OK to complete the first entry. (Figure 7-8, 7-9) Click New Entry to enter second entry. If users need to apply the other registered domain name, they can create the second one. ( airlivesec.com ) Click OK to complete the second entry. (Figure 7-10, 7-11) Figure 7-8 Enter the first entry of domain name Figure 7-9 The first entry setup completed Figure 7-10 Enter the second entry of domain name Figure 7-11 The second entry setup completed Step3. When an external sender sends email to Josh the internal user, whether it goes to [email protected] or [email protected], the mail will be saved in user Josh’s Inbox waiting to be viewed. 84 7.1.4 Mail Relay EX. Setting Up Authentic IP and Domain Name for Mail Relay Preparation Perimeter Firewall set as 192.168.0.0 / 24 ES-4000V2 Virtual IP Address set as 192.168.0.248 ES-4000V2 Physical IP Address set as 60.250.158.64 Map registered domain name “airlive.com” to DNS IP address which is to assign mail server IP to MX record. Step1. Enable internal senders to send mails, please go to Mail Management Æ Configure Æ Mail Relay for settings : Click New Entry to enter the first entry. Check IP Address. (This enables relay to this IP address) IP address set as 192.168.0.0 Netmask set as 255.255.255.0 Click OK to complete the first entry. (Figure 7-12, 7-13) Click New Entry to enter the second entry. IP address set as 60.250.158.64 Netmask set as 255.255.255.255 Click OK to complete the second entry. (Figure 7-14, 7-15) Figure 7-12 Enter the first entry to enable relay Figure 7-13 Complete the first entry 85 Figure 7-14 Enter the second entry to enable relay Figure 7-15 Complete the second entry Step2. Enable external senders to send mails via relay, please go to Mail Management Æ Configure Æ Mail Relay for settings : Click New Entry. Check Domain Name. (This enables relay to this Domain name) Domain Name set as hotmail.com Click OK to complete the setup process. (Figure 7-16, 7-17) Figure 7-16 Enter an domain name to enable relay Figure 7-17 Domain name setup completed When Local SMTP Authentication is activated, internal accounts sending mails off-site does not required setting up the Relay. 86 7.1.5 Mail Signatures Enable Mail Signature function will add the signature on all outgoing mails. Step1. On Mail Management Æ Configure Æ Mail Signature setting, add a new entry. Click Add signatures to all outgoing messages. Fill in the content you want to publish on the message. Press OK to finish the setting. (Figure 7-18) Figure 7-18 Mail Signature setting 87 Step2. User will fine the message on the bottom of mail content for all outgoing mails. (Figure 7-19) Figure 7-19 Recipient receives mail with signature 88 7.1.6 Mail Gateway IP Address of Mail Gateway: Enter the mail gateway IP address in this column, to let users use some services (for example: mail backup, auditing...) provided by the specific mail gateway. Example: Assigning a Mail Server to Process E-Mails from Specific Domains or E-Mail Addresses Step1. Decides using which mail server to relay e-mail messages. Step2. Under Mail Management > Configure > Mail Gateway, refer to the steps below to make settings: (Figure 7-20) Click New Entry. Specify of which Domain Name / Mail Address is to be relayed. Specify a mail server in the Mail Server IP / Domain Name field. Specify a port number for creating a SMTP connection with the mail server. Determine whether to employ SMTP authentication accordingly. Click OK to complete settings. (Figure 7-21) Figure 7-20 Mail Gateway Settings Figure 7-21 Mail Gateway Setting Completed Step3. E-mails sent from the ES-4000V2’s mail accounts to the domain name / mail address you specified will be relayed by the mail server you designated Supposed the Domain Name / Mail Address setting is given an asterisk (*), then e-mail delivery to the mail accounts, except for those of ES-4000V2, will be processed by the relay server you designated. 89 7.2 Account Management The most troublesome step of setting up a mail server is creating e-mail accounts. With approaching like Automatically Adding, Query Old / LDAP mail server, and Import function, e-mail accounts can be created or transferred in just no time. 7.2.1 Setting Learning Account Setting: Once recipient has logged in ES-4000V2, mail account will automatically be created on ES-4000V2 according to the account and password that has logged in; Or via communicating with the old mail server or the LDAP server, mail account will be imported as an internal account when the authentication is specified. Automatically Adding: Check Automatically Adding. Click OK. (Figure 7-22) Once recipient has logged in ES-4000V2, an internal account will be immediately created on ES-4000V2 according to recipient’s account and password. Figure 7-22 Automatically Adding Query Old Mail Server: Check Query Old Mail Server and apply its IP address to the blank field. Click OK. (Figure 7-23) When recipient has logged in ES-4000V2, with the old mail server’s authentication, mail account will automatically be created on ES-4000V2 according to recipient’s account and password. Meanwhile, ES-4000V2 will start to retrieve mails on the old mail server until all mails are all being transferred. 90 Figure 7-23 Transfer accounts and mails from old mail server Not Learning (Manual Setting): Check Not Learning. Click OK. (Figure 7-24) ES-4000V2 will not create any account automatically; the mail account must be created by manually. Figure 7-24 Not Learning 91 Import Account from LDAP server: Check Enable LDAP and apply correlative addresses and settings. Click OK. (Figure 7-25) When recipient has logged in ES-4000V2, with the LDAP mail server’s authentication, mail account will automatically be created on ES-4000V2 according to recipient’s account and password. Figure 7-25 Using LDAP authentication to create new account Default Settings for New Account: Configure Default Value of New Account to define the default setting for each new account. (Figure 7-26) Web Mail, POP3, IMAP, SMTP Inbound, SMTP Outbound: Enable Maximum Mail Box Quota for New Account: 100MB (Inbox set as 50 MB) Maximum Web Disk Quota for New Account : 100MB Maximum Message Size of a Mail : 10MB Figure 7-26 Configure Default Value of New Account 92 7.2.2 Individual Definition: Export Account: To export exist accounts for backup and rearrangement, please go to Mail Management Æ Account Management Æ Individual: Click Download next to Export Account. Click Save in the confirmation dialogue box, then select folder for storage, after that, click Save. (Figure 7-27) Figure 7-27 Export existed accounts Import Account: To use arranged account list, go to Mail Management Æ Account Management Æ Individual: Click Browse to select the folder where the account list file is saved, then click Upload. (Figure 7-28) Choose file type in the Import File Type window, and then click Upload. (Figure 7-29) Click OK in the confirmation dialogue box to complete import. (Figure 7-30) 93 Figure 7-28 Choose account list file to import Figure 7-29 Choose import file type Figure 7-30 Confirm to import accounts 94 Individual Setting: To adjust individual setting, please go to Mail Management Æ Account Management Æ Individual: Click Add to Individual Setting. Enter account information in the Add New Account window. (Figure 7-31) Click OK to complete adding new account. (Figure 7-32) Check unwanted account, and then click Remove next to Individual Setting. Click OK in the confirmation dialogue box. (Figure 7-33) Figure 7-31 Add a new account Figure 7-32 New account is added Figure 7-33 Remove an account Auditing specific account can be achieved by forwarding or duplicating every mail into an assigned mailbox. User can find the user quickly with Classification function. Just click the first letter of name and it will display the account list started with specific letter. 95 7.2.3 Group In the path of Mail Management Æ Account Management Æ Group, set as followed: Click Add next to Group Setting. Name the group and select group member, then click the lower right OK in the Add New Group screen. (Figure 7-34, 7-35) Mails that go to a group account will be distributed to each group member. Figure 7-34 Add new group Figure 7-35 Complete forming a group 96 7.2.4 Shared Address Book User can search the target via Name, E-mail Address, Company Name, Office Name, and Job Title, and find out the matched one in ES-4000V2 Shared Address Book records. Export Address Book: To export the address book, go to Mail Management Æ Account Management Æ Shared Address Book: Click Download next to Export Account Book. Click Save in the confirmation dialogue box, then select folder for storage, after that, click Save. (Figure 7-36) Figure 7-36 Export Address Book System administrator may add detailed information to each contact in Shared Address Book. 97 Import Address Book: To import Address book, go to Mail Management Æ Account Management Æ Shared Address Book: Click Browse to select the folder where the account list file is saved, then click Open. (Figure 7-37) Choose file type in the Import File Type window, and then click Upload. Click OK in the confirmation dialogue box to complete import. (Figure 7-38) Figure 7-37 Choose file to import Address Book Figure 7-38 Confirm to import Address Book 98 Import Address Book from LDAP Server: To add contacts from a LDAP server, select Mail Management Æ Account Management Æ Shared Address Book and then set as below: Click on the hyperlink Add Addresses from LDAP, then enter all the necessary information in the pop-up window. (Figure 7-39) After finishing filling in each field, click OK to complete importing addresses from a LDAP server. (Figure 7-40) Figure 7-39 Importing Contacts from a LDAP Server Figure 7-40 Contacts Imported from LDAP server 99 Modify Address Book from LDAP Server: To add or modify Address books information: Click on New Entry on the bottom. In the Add Contact screen, fill out the contact’s information. (Figure 7-41) Click OK to complete adding new contact. (Figure 7-42) Remove the unwanted contact by clicking Remove button. Click OK in the dialogue box to confirm deletion. (Figure 7-43) Figure 7-41 Adding a Contact 100 Figure 7-42 New Contact Added Figure 7-43 Removing a Contact 101 Search Address Book: Go to Mail Management Æ Account Management Æ Shared Address Book Click the search icon Type keyword in the column of “E-Mail Address”. Press Search button Display the searching result. (Figure 7-44) Figure 7-44 Address Book searching result When you create ES-4000V2 mail account, it will also create a copy in Shared Address Book. User can choose two displayed item in Shared Address Book list, the items include First Name, Middle Name, Last Name, Home Street, Home Phone, Home Fax, Mobile Phone, Company Name, Country, State, City, Postal Code, Company Street, Company Phone, Company Fax, Company Website, Office Name, Department Name, Job Title, Pager, IP Phone, and Netmeeting. Search user mail address via Outlook Express: 102 Shared Address Book is not only co-worked with ES-4000V2 Web Mail, user’s mail address also can be searched by Mail client software. We take Outlook Express as example to demonstrate how to search: Open Outlook Express Address Book. (Figure 7-45) Select Main Identity’s Contacts Æ Tools Æ Accounts… function. (Figure 7-46) Press Add… button and follow the wizard to configure setting. (Figure 7-47, 7-48, 7-49, 7-50) Select the new created Internet account and press Properties… button. (Figure 7-51) Highlight and copy ES-4000V2 Shared Address Book LDAP directory. (Figure 7-52) Paste ES-4000V2 LDAP directory to Advanced setting, click OK and close the setting (Figure 7-53) Press Find People button and the windows will show up to allow user searching target. User can also specify the condition to search the specific target. (Figure 7-54, 7-55) Figure 7-45 Open Outlook Express Address Book 103 Figure 7-46 Open Internet Accounts managed windows Figure 7-47 Create new Internet Account 104 Figure 7-48 Define LDAP server IP address Figure 7-49 Do not check Email Address due to the setting is incomplete 105 Figure 7-50 Click Finish to complete the setting Figure 7-51 Select new created Internet Account and Click Properties for more setting 106 Figure 7-52 Highlight and copy ES-4000V2Shared Address Book LDAP directory Figure 7-53 Configure LDAP server Advanced setting 107 Figure 7-54 Press Find People button to search target Figure 7-55 Select Advanced to define the searching condition and find the target 108 7.3 Queue Detailed delivery status is available for MIS engineer to have a better understanding and be able to react to it on the spot. Monitoring Mail Delivery Status, Responding on the Spot Step1. Go to Mail Management Æ Configure Æ Setting Æ Mail Setting, set as followed: Set Max. Lifetime of a Mail in Queue as 4 hours. (Figure 7-56) When delivery is failed, system will keep trying to resend the mail to recipient periodically in the storage time. Figure 7-56 Maximum lifetime of a mail in queue Step2. Go to Mail Management Æ Queue Æ Unsent Mail, mail status is always obtainable: When delivering a mail, it shows its processing procedure. (Figure 7-57) Factor caused failed delivery is at hand and by clicking Resend Now to resume sending. (Figure 7-58, Figure 7-59) System will keep on resending mail to recipient until mail is successfully delivered in the storage time. A specific mail or all mails in Queue may be removed to terminate the delivery. (Figure 7-60, Figure 7-61) Figure 7-57 E-Mails under Process Figure 7-58 Failed Delivery 109 Figure 7-59 Resuming a Failed Delivery Figure 7-60 Erasing an E-Mail Delivery Figure 7-61 Queue Emptied 110 7.4 Connection Track Whether it is receiving, or sending, or retrieving e-mails from mail server, Connection Track has the detailed log corresponding to each e-mail process. By which system administrator may use as reference to manage and adjust e-mail service. 7.4.1 Outbound SMTP User can use date, IP address, sender, recipient and content as keyword to search matched records stored in ES-4000V2. To use this feature, please follow the steps below: 1. Press icon to enter the web page for searching mail log. (Figure 7-62) Figure 7-62 Outbound SMTP 2. Enable searching duration and assign a period of time. 3. Input a sender as keyword. 4. Select All Types for status. 5. Click Search. 6. Shows results. (Figure 7-63) 111 Figure 7-63 Search for specific record 112 7.4.2 Inbound SMTP User can use date, IP address, sender, recipient and content as keyword to search matched records stored in ES-4000V2. To use this feature, please follow the steps below: 1. Press icon to enter the web page for searching mail log. (Figure 7-64) Figure 7-64 Inbound SMTP 2. Enable searching duration and assign a period of time. 3. Input a sender as keyword. 4. Select All Types for status. 5. Click Search. 6. Shows results. (Figure 7-65) Figure 7-65 Search for specific record 113 7.4.3 POP3 / IMAP User can use date, IP address, sender, recipient and content as keyword to search matched records stored in ES-4000V2. To use this feature, please follow the steps below: 1. Press icon to enter the web page for searching mail log. (Figure 7-66) Figure 7-66 POP3 / IMAP 2. Enable searching duration and assign a period of time. 3. Select All Types for status. 4. Click Search. 5. Shows results. (Figure 7-67) Figure 7-67 Search for specific record Search results will be sorted by day, MIS engineer can use pull-down menu to choose records of specific day. 114 Viewing Mail Log of Outgoing Mail Step1. Go to Mail Management Æ Connection Track Æ Outbound SMTP, there it shows mail log of outgoing mails. (Figure 7-68) Figure 7-68 Mail log of Outbound SMTP Step2. Click Detail for detail information. (Figure 7-69) Figure 7-69 Details of mail log 115 Viewing Mail Log of Incoming Mail Step1. Go to Mail Management Æ Connection Track Æ Inbound SMTP, there it shows mail log of incoming mails. (Figure 7-70) Figure 7-70 Mail log of Inbound SMTP Step2. Click Detail for detail information. (Figure 7-71) Figure 7-71 Details of mail log 116 Viewing Mail Log of Retrieved Mails from ES-4000V2 Step1. Go to Mail Management Æ Connection Track Æ POP3 / IMAP, there it shows mail log of retrieved mails from ES-4000V2. (Figure 7-72) Figure 7-72 Mail log of POP3 Step2. Click Detail for detail information. (Figure 7-73) Figure 7-73 Details of mail log 117 C Chhaapptteerr 88 M Maaiill S Seeccuurriittyy Sending or receiving mails through ES-4000V2 can avoid enterprise from ceasing function due to affected by virus mail. Keep your business always running and money-making. In this chapter, it has detailed instruction about using Anti-Virus. 8.1 Configure Mail Security Configure item is the foundation of ES-4000V2 Anti-Virus engine to filter email; the feature is divided as Setting and Mail Notice. 8.1.1 Setting Definition Scanned Mail Setting: To define virus mail size as the standard, if virus mail size exceeds the definition, the mail will not be scanned. Unscanned Mail Setting: Those mails that skip the scan can be added the message to the subject. Mail Notice Message Setting: Administrator can define the subject and message contents of Mail notice. If leave both column a blank, the notice message will be sent as default contents. Quarantine Setting: Check to disallow user to retrieve mail from quarantine. (Figure 8-1) Figure 8-1 Scanned Mail Setting 118 8.1.2 Mail Notice Mail Notice feature is not just to inform the mail report, administrator can also retrieve the mail from Mail Notice. The example will show you the procedure and demonstrate how to retrieve the mail. Step1. In the path of Mail Security Æ Configure Æ Mail Notice, there you can select notice accounts: (Figure 8-2) Figure 8-2 Notice account list Step2. In the path of Mail Security Æ Configure Æ Mail Notice, select or input setting as below: Check Enable Notice Check Send Mail Notice on Weekend Select 00:00 for 1st time Select 04:00 for 2nd time Select 08:00 for 3rd time Select 12:00 for 4th time Select 16:00 for 5th time Select 20:00 for 6th time Select HTML for Mail Type Sender sets as [email protected] (Default) 119 Choose accounts for mail notice and click Add. The selected accounts list on the right shows result. Enable Add Notice Account Automatically Click OK When a new account is created on ES-4000V2, this account will be automatically created in Selected Accounts and receiving mail notice periodically. (Figure 8-3) Figure 8-3 Mail notice settings 1. When inbound or outbound mails are inspected as virus mails, and those mails happen to be the mails of Selected Account, system will send mail notice to those accounts. Account user can decide whether to retrieve quarantined mails or not. 2. Recipient will not receive any mail notice if there is not any virus mail exist. 3. Administrator can use Select All or Invert to remove accounts from Selected Account, so as to cancel mail notice. 4. If Send Mail Notice on Weekend is disabled, mail notice will be issuing according to the 1st time setting on Monday. 5. If Add Notice Account Automatically is disabled, new created account will not be receiving mail notice. 120 Step3. When receiving mail notice, recipient can: Retrieve incoming mail by clicking Retrieve in the Inbound List. (Figure 8-4) After system resend mail, it shows completed. (Figure 8-5) Resend outgoing mail by clicking Resend in the Outbound List. (Figure 8-6) After system resend mail, it shows completed. (Figure 8-7) Figure 8-4 Check mails to retrieve Figure 8-5 Retrieve completed 121 Figure 8-6 Check mails to resend Figure 8-7 Resend completed To retrieve or resend mails that inspected as virus mail: Method 1: Open the Virus_Notice.html which attached to notice mail. (Figure 8-8) Check Open it and click OK in the Open Attachment Warning window. (Figure 8-9) Check the box next to Sender under the Retrieve button, and click Retrieve to retrieve all mails. (Figure 8-10) Check the box next to Sender under the Resend button, and click Resend to resend all mails. (Figure 8-11) Method 2: When receiving a HTML Mail Notice : By reason of the Java Script feature is set as Restricted Sites Zone by the default setting in Outlook Express, which limits the function of Java Script, thus, user has to : 1. Check boxes one at a time and click Retrieve in the inbound list to retrieve mails. (Figure 8-12) 2. Check boxes one at a time and click Resend in the outbound list to resend mails. (Figure 8-13) 122 To modify Java Script feature setting in Outlook Express, please go to Tools > Options > Security > Virus Protection, check Internet Zone. After doing so, user will be able to check all boxes at once by checking the box next to the Sender under the Retrieve or Resend button. Figure 8-8 Open the attachment of notice mail Figure 8-9 Confirm to open attachment 123 Figure 8-10 Check all mails to retrieve Figure 8-11 Check all mails to resend 124 Figure 8-12 Check all mails to retrieve in a HTML Mail Notice Figure 8-13 Check all mails to resend in a HTML Mail Notice 125 8.2 Anti-Virus Anti-Virus Setting: Scans Inbound and Outbound mails for virus. If a virus infected mail is detected, that mail will be marked as ---virus--- in the subject line. On the contrary, if a mail is clean, there will not be any mark in the subject line. Virus pattern updates automatically every ten minutes or can be updated manually at once. After each update, it will show its virus pattern version and update time. Available virus engine is: Clam ─ a default and free for charge virus scan engine. To assure ES-4000V2 a successful update, use Test to check if the connection to the virus pattern server works or not before running update. 126 Inspection Direction: If an Inbound mail is detected as virus-infected, it can be deleted, deliver to the recipient (deliver the virus mail or a notification mail instead), or stored in the quarantine. If an Outbound mail is detected as virus-infected, it can be deleted, deliver to the recipient (deliver the virus mail or a notification mail instead), or stored in the quarantine. Set as followed : 1. Select Clam for Virus Scan Engine. 2. In Inspection Direction, enable both Inbound and Outbound Action of Infected Mail and check Deliver to the recipient, and then check Deliver a notification mail instead of the original virus mail. 3. Add a virus string ---virus--- to the subject line of a virus infected mail. 4. Click OK. (Figure 8-14) Figure 8-14 Anti-Virus settings 127 Whoever receives a virus mail detected by ES-4000V2 will see a warning tag, such as ---virus---, in the subject line. (Figure 8-15) Figure 8-15 A mail scanned as virus mail 128 Scanning Inbound or Outbound Mails for Virus Step1. In the path of Mail Security Æ Anti-Virus ÆSetting, set as followed: (Figure 8-16) Figure 8-16 The scan and action of infected mail Action of infected mail only allowed one option at a time. If action sets as delete the virus mail, virus mail will be deleted at once when it is detected. Yet, user can still see the correlative details of the virus mail in mail report. Step2. When an external mail account, for instance yahoo, sends a mail to internal mail account, such as [email protected]: A yahoo mail account, [email protected], sends a virus mail, and then it would be stored in the quarantine. A yahoo mail account, [email protected], sends a clean mail, and then [email protected] would receive it. Step3. If an internal mail account, for example [email protected], sends a mail to external accounts, such as yahoo: The mail sent to [email protected] is infected, and then it would be stored in the quarantine. The mail sent to [email protected] is clean, and then it would be sent to the account. 129 8.3 Mail Report ES-4000V2 provides enterprise mail report in statistics and log. With the help of them, enterprise could have a clear view of mail activities. 8.3.1 Setting Periodic Report ■ It can generate and send the periodical report to recipient according to the time setting. History Report ■ It can generate and send the history report to recipient according to the time setting. In System Æ Setting, enable E-mail Alert Notification / Report. Then go to Mail Security Æ Mail Report Æ Setting, set as below. 1. Enable E-mail periodic report, and check Yearly report, Monthly report, Weekly report, and Daily report. 2. Click OK. (Figure 8-17) 3. When the time comes, the ES-4000V2 will send the report to recipient. (Figure 8-18, 8-19, 8-20) 4. In History Report, select an issue date from the calendar icon. 5. Click Mail Report. (Figure 8-21) 6. Reports will be delivered to the recipient on the time setting. (Figure 8-22, 8-23, 8-24) Scheduling for periodic report: 1. Yearly report produces at 24 o’clock on January 1st every year. 2. Monthly report produces at 24 o’clock on the first day of every month. 3. Weekly report produces at 24 o’clock on the first day of every week. 4. Daily report produces at 24 o’clock everyday. 130 Figure 8-17 The periodic report setting Figure 8-18 Receive the periodic report 131 Figure 8-19 The first page in periodic report 132 Figure 8-20 The second page in periodic report 133 Figure 8-21 The history report setting Figure 8-22 Receive the history report 134 Figure 8-23 The first page in history report 135 Figure 8-24 The second page in history report The recipient will be receiving the mail report with an attachment in PDF format. 136 8.3.2 Statistic Step1. In the path of Mail Security Æ Mail Report Æ Statistics, there it shows a full-scale statistics report of scanned result. Step2. In Statistics, on the upper left corner, click Day for daily statistics report; click Week for weekly statistics report; click Month for monthly statistics report; click Year for annual statistics report. Step3. Below it shows scanned mail statistics report. (Figure 8-25) Vertical axis indicates the amount of scanned mail. Horizontal axis indicates time. Figure 8-25 Scanned mail statistics report 137 8.3.3 Log User can use date, sender, sender IP address, recipient, subject, attribute, action, and attachment as keyword to search matched records stored in ES-4000V2. To use this feature, please follow the steps below : 1. Enable searching duration and assign a period of time. 2. Input a sender as keyword. 3. Select All for Attached File. 4. Select All for Attribute. 5. Select All for Action. 6. Click Search. (Figure 8-26) 7. Click Download Report to download the search results as a “.txt” file onto local computer. (Figure 8-27) 8. Click Export Mail to download the search results as a “.mbx” file onto local computer. (Figure 8-28) Figure 8-26 Search for specific record 1. Both Statistics and Log have Inbound and Outbound scanned mail report. 2. In Log, click any sender email address link to show its recipient list (a recipient list is a list of all recipients receiving mails from the email address that you click on); click any recipient email address link to show its sender list (a sender list is a list of all senders sending mails to the email address that you click on). 3. Log can be sorted by time, sender, recipient, subject, attribute and action. So do sender list and recipient list. 138 Figure 8-27 Downloading the Search Results as a “.txt” File Figure 8-27 Exporting the Search Results as a “.mbx” File 139 How to open a “.mbx” file on your local computer: 1. Convert the “.mbx” file into a “.eml” file with a mbx2eml application (e.g., IMAPSize) and then run Outlook Express to open the “.eml” file. Run IMAPSize, navigate to Tools > mbox2eml on the menu bar, and then click it. (Figure 8-28) In the mbox2eml window, click “Select mbox files to convert” button, locate the “.mbx” file, click Open, and then click Convert to start converting the file into “.eml” file. (Figure 8-29, Figure 8-30, Figure 8-31) Run Outlook Express to open the “.eml” file. (Figure 8-32) Figure 8-28 Navigating to Tools > Mbox2eml on the Menu Bar 140 Figure 8-29 Specifying the “.mbx” File to be Converted Figure 8-30 Converting the “.mbx” File into a “.eml” File 2. 141 Figure 8-31 File Conversion Completed Figure 8-32 Clicking and Dragging the “.eml” File into Outlook Express to Open It 142 Step1. In the path of Mail Security Æ Mail Report Æ Log, there it shows actions of mails. (Figure 8-33) Figure 8-33 Scanned mail log In Log, quarantined spam and virus mails can be retrieved by assigned recipient or viewed its content simply by clicking its subject. (Figure 8-34, 8-35) Figure 8-34 Retrieve quarantined virus mail 143 Figure 8-35 View a quarantined virus mail Log icon descriptions: 1. Attribute: Icon Definition Allowed Spam Virus Unscan Delete Deliver Store Retrieve 2. Action: Icon Definition 3. Attached File: 144 Invalid Recipient C Chhaapptteerr 99 R Reem moottee B Baacckkuupp The archived E-mails can be periodically (according to the time setting) transferred to the assigned location to solve the storage space limit and audit time limitation. 9.1 Backup Setting Connection Status of Remote Hard Disk The remote hard disk status has the information of connection status, disk space for backup, and hard disk utilization. E-mail Setting Sending E-mail to inform the recipient of backup completion. Backup Setting The setting for assigning the backup location and the executing time. Backup Immediately This can calculate how much disk space the data in a specific duration will take up and provide a real-time backup. 9.2 Browse Setting Connection Status of Remote Hard Disk The remote hard disk has the information of connection status. (e.g. read / write access) Browse Setting The setting for assigning the backup location. The Browse Mail function will not be available unless the Browse Setting has been configured at first. 145 9.3 Browse Mail Available search criteria are date, sender, recipient, subject, content, action, attached, and non-attached. Set as below : 1. Recipient, enter the keywords or phrases. ( For example, Jacky, [email protected]) 2. Enable to select the date setting. 3. Action, select All. 4. Attached File, select all. 5. Click Search. (Figure 9-1) Figure 9-1 Search for the specific mail 146 Example: Transfer Archived E-mails to the Assigned Backup Location and Provide Mail Browsing Service Step1. In Remote Backup Æ Backup Setting, please refer to the figure below to set up. (Figure 9-2) Figure 9-2 The remote backup setting It is easy to create remote backup server. Just to share a folder of internal PC with read/write access right, and define a specific user name and password for the access right. If the folder can be found in My Network Places, it can also be the remote backup server to store ES-4000V2 mails record. 147 Step2. Check up the backup path and available disk capacity. (Figure 9-3) Figure 9-3 Check up the available disk capacity for backup 148 The archived E-mails of a specific duration can be exported. (Figure 9-4) Figure 9-4 The setting of backup immediately 149 Step3. In Remote Backup Æ Browse Setting, set as below. (Figure 9-5) Figure 9-5 The browse setting Step4. Check up the connection status. (Figure 9-6) Figure 9-6 Check up the connection status Step5. When the mails are archived, they will be transferred to a NAS or file server according the remote backup setting. A mail report shown in Remote Backup Æ Browse Mail. (Figure 9-7) To retrieve, check the box corresponding to the E-mails to be retrieved and click the retrieve icon on the upper left. Then a Retrieve window appears. Next, apply both the sender and recipient E-mail address and click OK. (Figure 9-8) To remove, check the box corresponding to the E-mails to be deleted and click the remove icon on the upper left. Click OK in the confirmation window to confirm the deletion of selected E-mails. (Figure 9-9) 150 Figure 9-7 Browsing the remote backup e-mails Figure 9-8 The retrieve window Figure 9-9 Confirm to delete backup E-mails 151 C Chhaapptteerr 1100 H HA A ES-4000V2 features High Availability function. While there are two ES-4000V2 devices available onsite, High Availability enables them not only to synchronize to each other but also to substitute for the malfunction one in just no time. It ensures the enterprise an always connecting Internet access. Definition High Availability Setting: This can synchronize the system configuration and firmware version between Master and Backup devices. Master / Backup Status: It shows the connection and synchronizing status of Master and Backup devices. 152 Example: To Deploy a High Availability Environment Step1 Power off and deploy Master and Backup ES-4000V2, connect both port1 to switch. (Figure 10-1) Step2 Connect Master ES-4000V2 port 2 (HA port) to Backup ES-4000V2 port 2. Step3 Don’t power on Backup ES-4000V2 before you finish the configuration of Master ES-4000V2. Step4 Change interface IP address of Master ES-4000V2 to differ with default IP 192.168.1.1, ex. 192.168.1.2 (Figure 10-2) Step5 Change Management IP of Master ES-4000V2 to differ with default IP 192.168.2.1, ex. 192.168.2.2. (Figure 10-3) Step6 Make sure the Master ES-4000V2 and Backup ES-4000V2 port 1 and port 2 are connected properly. Step7 Power on the Backup ES-4000V2, then both ES-4000V2 will synchronize data and setting. (Figure 10-4, 10-5) Step8 It needs to take 10 hours to synchronize the data and setting. (Figure 10-6) Port 1(Mail Port) Port 1(Mail Port) ES-4000 Master IP:192.168.1.2 HA IP:192.168.2.2 ES-4000 Backup IP:192.168.1.1 HA IP:192.168.2.1 Port 2(HA Port) Figure 10-1 The Master device deployment under High Availability mode 153 Figure 10-2 Change interface IP of Master ES-4000V2 Figure 10-3 Change Management IP of Master ES-4000V2 Figure 10-4 Change Management IP of Master ES-4000V2 154 Figure 10-5 Under the process to synchronize both ES-4000V2’s data Figure 10-6 Complete High Availability function To avoid synchronizing error, please make sure the Master device functions properly, which means the machine is functioning and the management interface is accessible, before turning on the Backup device. The device build-in hard disk is replaceable. However the replacement must be equal to or larger than 160GB or else anomalous data losing may occur as a result. 155 Notes: 1. After the deployment finished, the Backup device will substitute for Master device once it breaks down. (The two devices detect each other for status through Port1 and Port 2 connection.) 2. When there is any data or firmware version variation between the two devices, the synchronization will immediately function through the Port 2. (Figure 10-7) Fig. 10-7 An illustration of how High Availability works When the Port 2 is broken or the connector is loosened, it only ceases the function of synchronization instead of triggering it off. 156 C Chhaapptteerr 1111 M Moonniittoorr MIS engineer could view the system information and every event log in Monitor. 1. System Info indicates the utilization of CPU, Hard Disk, Memory, and Ram Disk. 2. Event Log records every activity in ES-4000V2, such as modify and remove setting. 11.1 System Info Step1. In the path of Monitor Æ System Info, it shows system utilization information: (Figure 11-1) CPU Utilization indicates the CPU usage percentage. Hard Disk Utilization indicates the hard disk usage percentage. Memory Utilization indicates the memory usage percentage. Ram Disk Utilization indicates the ram disk usage percentage 157 Figure 11-1 Display system info 158 11.2 Event Log Step1. In the path of Monitor Æ Event Log, it shows records of every activity in ES-4000V2, such as modify and remove setting. (Figure 11-2) Click to search event log. (Figure 11-3) Click to view log detail. (Figure 11-4) Figure 11-2 Event log 159 Figure 11-3 Search results 160 Figure 11-4 Event log details 161 A Appppeennddiixx IInnttrroodduuccttiioonn ooff M m Maaiill S Syysstteem A mail server acts as an intermediate between the Internet and users when sending or receiving mails. The format of email address looks like [email protected]. Info on the left side of at sign (@) indicates an account name, the other side stands for the host name. For instance, you are sending a mail to [email protected], your email software will go to your DNS server for the IP address and mail exchanger record that corresponding to mail server. Mails will go to mail exchanger before sending to the host server, in this case, it is yahoo.com.tw. If the DNS server has more than one MX, then mails will be sent to the MX with the highest priority. Provided that there is no MX, mails will not be delivered until the corresponding IP has found. When mails have been delivered to yahoo.com.tw, mails will be distributed to the user according to its account name which shows on the left side of at sign (@). Process of an email transmission: The transmissions are divided into three parts, namely MUA, MTA and MDA. MUA (Mail User Agent): Whether sending or receiving mail, the end-user client must account on the MUA which provided by the OS, for end-user client can not send mail directly. Outlook Express is a kind of the MUA. It serves as a mail deliver and recipient, and enables user to view and edit mails. MTA (Mail Transfer Agent): Outgoing and incoming mails are all done by MTA. It allows user to: 1. Receive mails from other host. As long as user has a account under MTA, then the user will be able to receive mail. 2. Sent out mails. On condition that the user has the authority, he will be able to send out mails. 3. Receive personal mails. User can retrieve and view mails that saved on the mail server. Usually, MTA refers to a mail server. MDA (Mail Delivery Agent): distributes incoming mails of MTA to local mail accounts according to their account names or sends them to the next MTA. 162 Take sending and receiving mail for example to illustrate the process of mail transmission. When user wants to send a mail: Send mails to MTA via MUA. While composing email with MUA, make sure to follow steps below : 1. Enter the sender email address and outgoing mail server (namely the sender MTA ) 2. Enter the recipient email address and incoming mail server (namely the recipient MTA for receiving mails from external host server) After user finished composing a mail with MUA, such as Outlook Express, mail can deliver to the appointed MTA by clicking on Send. When MTA receives mails from itself, MDA will distribute received mails to each mailbox according to account names. When receiving mails of recipients from other MTA, it will automatically forward these mails to that MTA. This function is called Relay. A distant MTA is able to receive mails from local MTA. The distant MDA will take over the received mails and store them waiting for user to log in to download them. The process of receiving mails: A remote user inquires his MTA for checking new incoming mails, if MDA detects new mails, mails will be sent to user’s MUA. Meanwhile, MTA will clear up the mailbox or keep those mails according to the MUA settings. Email Protocols: SMTP & POP3 1. Sending Mails: signifies mails transferred from MUA to MTA and from MTA to MTA. Nowadays most mail servers use SMTP (Simple Mail Transfer Protocol) for outgoing mails. And the port 25 is assigned to SMTP protocol. 2. Receiving Mails: signifies MUA using POP (Post Office Protocol) to communicate with MTA so as to read or download mails in user’s mailbox. Currently, POP3 (Post Office Protocol version 3) is the most popular protocol for incoming mails. And the port 110 is assigned to POP3 protocol. Usually MTA needs at least two protocols, namely SMTP and POP3, to receive and send mails. As long as both MUA and MTA support SMTP and POP3 protocols, mail servers will be able to interact with each other. 163 Relay, a function that MTA transfers mails to another MTA, functions when MTA has learned that mail recipient does not exist on itself will transfer mails to another MTA. A mail server which could be used to transfer mails by anyone is called Open Relay. To avoid this, presently most of mail servers set Relay as disabled. Only local host can utilize relay to receive mails that specified for this MTA accounts form Internet. Basically, there is no doubt that relay enables MTA to receive mails, yet there is a drawback in it. Since MTA normally allows certain trusted mail servers with specified IPs and segments to relay, so that client user could use mail services without limitation while other unspecified users been blocked. Thus, SMTP Authentication is invented to solve this problem. SMTP Authentication, a mechanism that MTA inspects sender account and password from MUA, happens when mails transfer from MUA to MTA. It has a benefit of enabling relay function to authentic MTA accounts rather than certain trusted domain name or IP. Because of SMTP Authentication, MTA will neither accept incoming mails nor provide mail delivery service unless the sender is authentic. 164