1
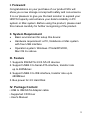
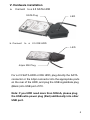
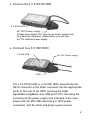
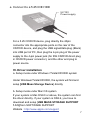
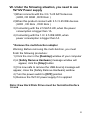
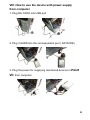
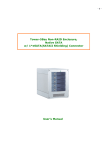
User Manual
USB2.0 to IDE and SATA Adapter Cable
Model: DA-70202
I. Foreword
Congratulations on your purchase of our product! We will
show you a new storage concept with safety and convenience.
It is our pleasure to give you the best solution to expand your
HDD'S Capacity and enhance your data's reliability in PC
system or Mac system. Before using the product, please read
this manual carefully for further recognizing of the product.
II. System Requirement
•
•
•
Basic environment for setup this device:
Hardware requirement: a PC, Notebook or Mac system
with free USB interface
Operation system: Windows 7/Vista/XP/2000,
Mac OS 9.x above
III. Feature
1. Supports IDE/SATA 2.5/3.5/5.25 devices
2. Support USB2.0 to Serial ATA interface, transfer rate
up to 480Mb/sec
2. Support USB2.0 to IDE interface, transfer rate up to
480Mb/sec
3. Bus power for 2.5 Hard Disk
IV. Package Content
• USB to IDE/SATA Adapter cable
• Supported CD Driver
• User's Manual
3
4pin Power
C
USB2.0 Power Plug(red)
Power/Activity-LED
(blue & red)
USB2.0 Plug
SATA Plug for
SATA device
44-pin IDE plug for
1.8/2.5 IDE HDD
40-pin IDE plug for
3.5/5.25 IDE device
Note: For 3.5/5.25 IDE devices, please plug in a 5V/12V power
supply (not included) to appropriate port on the back side of
HDD or DVD, so that the PC power switch (on/off) can’t control
the current to HDD or DVD. If you want to cut off the current to
HDD or DVD, then you need to plug out the power plug from
3.5” IDE HDD or 5.25 DVD devices.
Both IDE and SATA plug are protected against polarity
reversal and should be easily connected to the device. If not,
Pease check if you use the plug in the right way. Please be
sure, that your IDE device is configured as MASTER.
4
V. Hardware installation
a.
Connect to a 2.5 SATA HDD
SATA Plug
b. Connect
to a
LED
2.5 IDE HDD
LED
44pin IDE Plug
For a 2.5 SATA HDD or IDE HDD, plug directly the SATA
connector or the 44pin connector into the appropriate ports
on the rear of the HDD, and plug the USB signal/data plug
(Black) into USB port of PC.
Note: If you HDD need more than 500mA, please plug
the USB extra power plug (Red) additionally into other
USB port.
5
c. Connect to a 3.5 SATA HDD
3.5 SATA HDD
5V/12V Power supply
(Please see chapter VIII. How to use power supply from
your desktop computer). Alternatively, you can use
5V/12V external power supply
d.
Connect to a 3.5 IDE HDD
3.5 IDE HDD
5V/12V Power supply
LED
For a 3.5 SATA HDD or a 3.5 IDE HDD, plug directly the
SATA connector or the 40pin connector into the appropriate
ports on the rear of the HDD, and plug the USB
signal/data plug(Black) into USB port of PC, then plug the
4-pin plug of the power supply (not included) to the 4-pin
power jack (for IDE HDD direct plug in HDD power
connector), and the other end plug to power source.
6
e. Connect to a 5.25 IDE HDD
5V/12V
Power supply
For a 5.25 CD/DVD device, plug directly the 40pin
connector into the appropriate ports on the rear of the
CD/DVD device, and plug the USB signal/data plug (Black)
into USB port of PC, then plug the 4-pin plug of the power
supply to the 4-pin power jack (for IDE CD/DVD direct plug
in CD/DVD power connector), and the other end plug to
power source.
VI. Driver installation
a. Setup mode under Windows 7/Vista/XP/2000 system
Under Windows7/Vista/XP/2000, the system will find and
setup [USB Mass Storage Device] directly
b. Setup mode under Mac OS system
If your system is Mac OS9.0 or above, the system can find
the driver directly. If your system is OS8.6, you have to
download and setup [USB MASS STORAGE SUPPORT
1.3.5] from SOFTWARE SUPPORT
Website : http://www.apple.com/support
7
VII. Under the following situation, you need to use
5V/12V Power supply
1) When connects with the 3.5 / 5.25 SATA devices
( HDD, CD ROM , DVD Rom )
2) When this product connect with 3.5 / 5.25 IDE devices
( HDD , CD Rom , DVD Rom )
3) Connecting with the 2.5 SATA HD, when the power
consumption is bigger than 1A
4) Connecting with the 1.8 / 2.5 IDE HDD, when
power consumption is bigger than 1A
* Remove the multi-function adapter
Warning: Before removing the multi-function, you must
finish the following procedure:
1) Click the icon in the [Desktop] window of your computer
2) A [Safely Remove Hardware] message window will
appear, click the [Stop] button
3) [It is now safe to remove the USB device] message will
appear, close the [Safely Remove Hardware] window
4) Turn the power switch to [OFF] position
5) Remove the 5V/12V power supply if it is applied
Note: New Hard Disk Drive must be formatted before
in use
8
VIII. How to use the device with power supply
from computer
1. Plug DA-70202 into USB port
2. Plug 3,5HDD into the correspondent port ( SATA/IDE)
3. Plug the power for supplying mentioned devices in Point
VII. from computer
9
8
Also, for 5,25 devices
Connect from the 4 pin power connector of the
power supply to DA-70202 (4Pin DC)
Power supply
10
Disclaimer
All the information in this document is
subject to change without prior notice. The
manufacturer makes no representations or
any warranties regarding the Contents of
this manual. The information contained in this
manual is provided for the general use by the
customers. No part of this document may be
reproduced or transmitted in any form by any
means without the express written
permission of The manufacturer. All brand
names and product names used in this
document are trademarks or registered
trademarks of their respective holders.
Manufactured in P.R.C