1
featuring
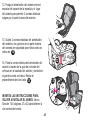
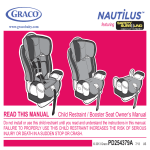
READ THIS MANUAL
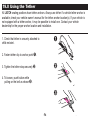
Child Restraint / Booster Seat Owner’s Manual
Do not install or use this child restraint until you read and understand the instructions in this manual.
FAILURE TO PROPERLY USE THIS CHILD RESTRAINT INCREASES THE RISK OF SERIOUS
INJURY OR DEATH IN A SUDDEN STOP OR CRASH.
© 2014 Graco
PD265372C
7/14
US
Table of Contents
1.0 Warnings to Parents and
Other Users . . . . . . . . . . . . . . . . . . . . 4-5
2.0 Registration Information . . . . . . . . . . . . . 6
2.1 Register Your Child Restraint . . . . . 6
2.2 For Recall Information . . . . . . . . . . 6
2.3 If You Need Help . . . . . . . . . . . . . . 7
3.0 Useful Information . . . . . . . . . . . . . . . . . 7
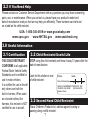
3.1 Certification . . . . . . . . . . . . . . . . . . . 7
3.2 Child Restraint Useful Life. . . . . . . . 7
3.3 Second Hand Child Restraint . . . . . 7
4.0 Features . . . . . . . . . . . . . . . . . . . . . . . 8-9
5.0 Assembling the Head Support . . . . 10-11
6.0 WARNINGS . . . . . . . . . . . . . . . . . . 12-13
7.0 Height and Weight Limitations . . . . . . . 14
7.1 WITH Built-in Harness. . . . . . . . . . 14
7.2 WITHOUT Built-in Harness . . . . . . 15
7.3 WITHOUT Back Support. . . . . . . . 16
8.0 Choosing an Appropriate Vehicle
Seat Location . . . . . . . . . . . .17
8.1 Vehicle Seat Location
Requirements . . . . . . . . . . . .17
8.2 Vehicle Seat Belt
Requirements . . . . . . . . . . .18
8.3 SAFE Vehicle Seat Belt
Systems . . . . . . . . . . . . . . . .18
8.4 For Built-in Harness Only . .19
8.5 WITH or WITHOUT Built-in
Harness . . . . . . . . . . . . . . . .20
8.6 To Install Locking Clip . . . . . .21
8.7 UNSAFE Vehicle Belt
Systems.. . . . . . . . . . . . . 22-23
9.0 LATCH. . . . . . . . . . . . . . . . . . . . . .24
9.1 What is LATCH? . . . . . . . . . .24
9.2 LATCH System . . . . . . . . . . .26
10.0 Using Child Restraint WITH Built-in
Harness . . . . . . . . . . . . . . . . . 27-32
2
Table of Contents (cont.)
11.0 Securing the Child Restraint in Your
Vehicle . . . . . . . . . . . . . . . . . . . . .33
11.1 Using a Child Restraint WITH a
Built-in Harness . . . . . . . . . .33
11.2 With a Vehicle Lap or
Lap/shoulder belt . . . . . . 33-34
11.3 With LATCH . . . . . . . . . . 35-36
12.0 Securing Your Child in the
Child Restraint . . . . . . . . . . . . 37-38
13.0 Harness Removal or
Re-attaching Harness . . . . . . 39-43
14.0 Using Your Child Restraint
WITHOUT Built-in Harness . 44-46
15.0 Securing Child & Booster Seat in
Vehicle. . . . . . . . . . . . . . . . . . . . .47
16.0 Adjusting Head Support. . . . . . . .48
17.0 Removing or
Re-attaching Back Support . . 49-51
18.0 Securing Child in Vehicle Belt with
Shoulder Belt Positioning Clip..... 52-55
19.0 Using the Tether . . . . . . . . . . . . . . . . . . . 56
19.1 Storing Lower Anchors and Tether . . . . 57
20.0 Airplane Use . . . . . . . . . . . . . . . . . . . . . . 58
21.0 Accessories . . . . . . . . . . . . . . . . . . . . . . . 59
21.1 Body Support and Harness Covers . . . 59
22.0 Recline Foot . . . . . . . . . . . . . . . . . . . . . . 60
23.0 Care and Maintenance . . . . . . . . . . . . . . 61
23.1 Buckle Cleaning Process . . . . . . . . . . . ..62
24.0 To Remove or Re-attach Seat Cover . . . . 63
25.0 Owners Manual Storage . . . . . . . . . . . . . 64
26.0 Replacement Parts and Warranty . . . . . . 64
3
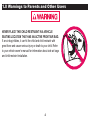
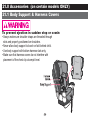
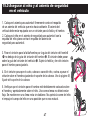
1.0 Warnings to Parents and Other Users
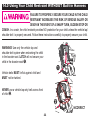
NEVER PLACE THIS CHILD RESTRAINT IN A VEHICLE
SEATING LOCATION THAT HAS AN ACTIVE FRONT AIR BAG.
,IDQDLUEDJLQÀDWHVLWFDQKLWWKHFKLOGDQGFKLOGUHVWUDLQWZLWK
great force and cause serious injury or death to your child. Refer
to your vehicle owner’s manual for information about side air bags
and child restraint installation.
4
Failure to properly use this child restraint increases the risk of serious injury or death in a sharp
WXUQVXGGHQVWRSRUFUDVK<RXUFKLOG¶VVDIHW\GHSHQGVRQ\RXLQVWDOOLQJDQGXVLQJWKLVFKLOG
restraint correctly.
(YHQLIXVLQJWKLVFKLOGUHVWUDLQWVHHPVHDV\WR¿JXUHRXWRQ\RXURZQLWLVYHU\LPSRUWDQWWR5($'
THE OWNER’S MANUAL and the vehicle owner’s manual.
Your child’s safety depends on:
1. Choosing the correct mode of use for the child restraint depending on your child’s size.
2. Inserting the harness straps (if needed) in the proper slots for your child.
3. Selecting a suitable location for the child restraint in your vehicle.
4. Properly routing the vehicle seat belt or LATCH.
5. Properly securing the child restraint in the vehicle using a seat belt designed to restrain
both the child restraint and your child or by using LATCH. Many seat belts are NOT safe to use
with this child restraintHYHQWKRXJKWKH\FDQHDVLO\EHWKUHDGHGWKURXJKRUDURXQGWKHchild
restraint!
6. Properly securing your child in the child restraint.
5
2.0 Registration Information
Model Number:
Date of manufacture:
Purchase Date:
2.1 Register Your Child Restraint
3OHDVH¿OOLQWKHDERYHLQIRUPDWLRQ7KHPRGHOQXPEHUDQGGDWHRIPDQXIDFWXUHFDQEHIRXQGRQD
label on the child restraint. Fill out the prepaid registration postcard attached to the harness and
mail it today.
Child restraints could be recalled for safety reasons. You must register this restraint to be reached
in a recall. 6HQG\RXUQDPHDGGUHVVDQGWKHUHVWUDLQW¶VPRGHOQXPEHUDQGPDQXIDFWXULQJGDWHWR
Graco Children’s Products Inc.
Attn: Customer Service
3 Glenlake Parkway
Atlanta, GA 30328
or call 1-800-345-4109 or register online at:
http://www.gracobaby.com/carseatregistration
2.2 For Recall Information
Call the U.S. Government’s Vehicle Safety Hotline at: 1-888-327-4236
(TTY:1-800-424-9153), or go to http://www.NHTSA.gov or contact Graco:
1-800-345-4109 or www.gracobaby.com
6
2.3 If You Need Help
Please contact our Customer Service Department with any questions you may have concerning
SDUWVXVHRUPDLQWHQDQFH:KHQ\RXFRQWDFWXVSOHDVHKDYH\RXUSURGXFW¶VPRGHODQG
GDWHRIPDQXIDFWXUHUHDG\VRWKDWZHPD\KHOS\RXHI¿FLHQWO\7KHVHQXPEHUVFDQEHIRXQG
on a label on the child restraint.
USA: 1-800-345-4109 or www.gracobaby.com
www.cpsc.gov
www.NHTSA.gov www.seatcheck.org
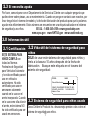
3.0 Useful Information
THIS CHILD RESTRAINT
CONFORMS to all applicable
Federal Motor Vehicle Safety
6WDQGDUGVDQGLVFHUWL¿HGIRU
use in motor vehicles.
,WLVFHUWL¿HGIRUXVHLQ$LUFUDIW
only when used with the
built-in harness. When used
as a booster without the
KDUQHVVWKLVUHVWUDLQWLV127
FHUWL¿HGIRUXVHLQDLUFUDIW
3.2 Child Restraint Useful Life
STOP using this child restraint and throw it away 10 years after the
date of manufacture.
Look for this sticker on rear
of child restraint:
MODEL
Date of Manufacture
NAME
year
month
day
GRACO CHILDREN'S PRODUCTS, INC.
ATLANTA, GA 30328
1-800-345-4109
Made in China
3.3 Second Hand Child Restraint
Graco Children’s Products Inc. advises against loaning or
passing along a child restraint.
7
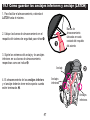
PD206938A
3.1&HUWLÀFDWLRQ
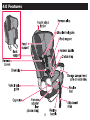
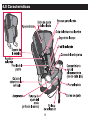
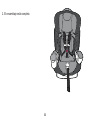
4.0 Features
8
The locking clip is stored
on the back of the child
restraint. You will need to
use it with certain types
of vehicle seat belts.
United States Federal
Motor Vehicle Safety
6WDQGDUGVKDYHGH¿QHGD
system for installing child
restraints in vehicles.
The system is called
LATCH (Lower
Anchorage and Tether for
CHildren). LATCH may
ONLY be used IN PLACE
of vehicle belt if vehicle is
equipped with LATCH
anchor points. Please
refer to vehicle owners
manual for LATCH
locations in vehicles.
9
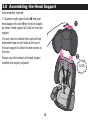
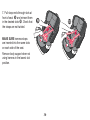
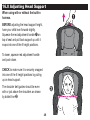
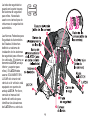
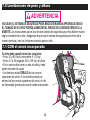
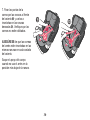
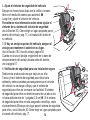
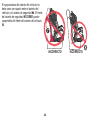
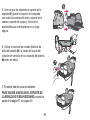
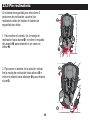
5.0 Assembling the Head Support
Adult assembly required.
1. Squeeze height adjust button and push
head support into slots on the back support
as shown. Head support will click into the back
support.
You may need to unfasten the hook and loop
attachment tape on both sides at the top of
the back support to allow for easier access to
the slots.
Always use child restraint with head support
installed and properly adjusted.
CLICK!
10
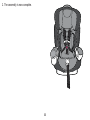
2. The assembly is now complete.
11
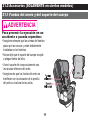
6.0 WARNINGS
• NO CHILD RESTRAINT CAN GUARANTEE
PROTECTION FROM INJURY. +RZHYHU
proper use of this child restraint reduces the
risk of serious injury or death to your child.
• DO NOT INSTALL OR USE THIS CHILD
RESTRAINT UNTIL YOU READ AND
UNDERSTAND THE INSTRUCTIONS IN THIS
MANUAL AND IN YOUR VEHICLE OWNER’S
MANUAL. DO NOT let others install or use the
child restraint unless they understand how to
use it.
• DO NOT use locking clip in booster mode.
$FFRUGLQJWRDFFLGHQWVWDWLVWLFV
CHILDREN ARE SAFER WHEN PROPERLY
RESTRAINED IN REAR VEHICLE
SEATING POSITIONS, RATHER THAN
FRONT SEATING POSITIONS. For a
YHKLFOHZLWKDIURQWSDVVHQJHUDLUEDJUHIHUWR
your vehicle owner’s manual as well as these
instructions for child restraint installation.
• NEVER LEAVE YOUR CHILD
• FAILURE TO PROPERLY USE THIS CHILD
UNATTENDED.
RESTRAINT INCREASES THE RISK OF
SERIOUS INJURY OR DEATH IN A SHARP
TURN, SUDDEN STOP OR CRASH. Your child
can be injured in a vehicle even if you are not
in a crash. Sudden braking and sharp turns
can injure your child if the child restraint is not
properly installed or if your child is not properly
secured in the child restraint.
12
• NEVER LEAVE A CHILD RESTRAINT
UNSECURED IN YOUR VEHICLE. An
unsecured child restraint can be thrown around
DQGPD\LQMXUHRFFXSDQWVLQDVKDUSWXUQ
sudden stop or crash. Remove it or make sure
that it is securely belted in the vehicle. If not
using LATCH and tether, make sure LATCH
and tether connectors are properly stored on
back of seat.
• NEVER USE CHILD RESTRAINT IF IT HAS
DAMAGED OR MISSING PARTS. Do not use
DFXWIUD\HGRUGDPDJHGFKLOGUHVWUDLQW
KDUQHVVLATCH belt or vehicle seat belt.
• THE CHILD RESTRAINT CAN BECOME
VERY HOT IF LEFT IN THE SUN. Contact with
these parts can burn your child’s skin. Always
touch the surface of any metal or plastic parts
before putting your child in the child restraint.
• REPLACE THE CHILD RESTRAINT AFTER
AN ACCIDENT OF ANY KIND. An accident
can cause damage to the child restraint that
you cannot see.
• NEVER GIVE THIS CHILD RESTRAINT to
someone else without also giving them this
manual.
• DO NOT MODIFY YOUR CHILD
RESTRAINT or use any accessories or parts
supplied by other manufacturers.
• NEVER USE A SECOND-HAND CHILD
RESTRAINT or a child restraint whose history
you do not know.
DO NOT USE THIS child restraint without
properly assembling it.
13
7.0 Height and Weight Limitations
FAILURE TO USE CHILD RESTRAINT IN A MANNER APPROPRIATE FOR YOUR CHILD’S
SIZE MAY INCREASE THE RISK OF SERIOUS INJURY OR DEATH. Instructions for the use of
this child restraint differ greatly depending on the size of your child. Be sure you are using the child
restraint in the correct mode and with the correct features for your child.
7.1 WITH Built-In Harness
Your child must meet all requirements:
• Weight: 20 to 65 lb (mass between 9 and 30 kg)
• Height: 27 to 49 in. (69 and 125 cm) in height
• At least one year old and can sit upright unassisted
• Shoulders are BELOW top harness slots.
,IVKRXOGHUVDUHDERYHWRSKDUQHVVVORWVFKLOG
is too large for built-in harness.
14
7.2 WITHOUT Built-in Harness
Your child must meet all requirements:
• Weight: 30 to 100 lb
(14 to 45 kg)
• Height: 38 to 57 in.
(96 and 145 cm) in height
• approximately 3-10 years of age
• the shoulder belt MUST lie across child’s
shoulder as shown and the lap portion of the
belt is positionned low on the child’s hips.
• Child’s ears are BELOW top of booster seat.
,IWRSVRIHDUVDUHDERYHWRSRIVHDWFKLOGLVWRR
large for booster seat.
If child is between 30 and 65 lb (13-30 kg)
and shoulders are below the upper harness
slots, we highly recommend use of the
built-in harness for as long as possible
(up to 65 lb (30 kg).
15
7.3 WITHOUT Back Support
Your child must meet all requirements:
• weigh between 40 and 100 lb
DQGNJ
• and are between 40 and 57 in.
DQGFPLQKHLJKW
• approximately 4-10 years of age
• the shoulder belt MUST lie across child’s
shoulder as shown and the lap portion of the
belt is positionned low on the child’s hips.
:KHQVLWWLQJRQWKHERRVWHUVHDW\RXUFKLOG¶V
ears should be below the top of the vehicle seat
cushion / head rest.
Your Graco booster seat can be used with or
without the back support as long as all
requirements are met.
16
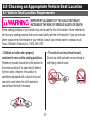
8.0 Choosing an Appropriate Vehicle Seat Location
8.1 Vehicle Seat Location Requirements
IMPROPER PLACEMENT OF THE CHILD RESTRAINT
INCREASES THE RISK OF SERIOUS INJURY OR DEATH.
Some seating positions in your vehicle may not be safe for this child restraint. Some vehicles do
not have any seating positions that can be used safely with the child restraint. If you are not sure
ZKHUHWRSODFHWKHFKLOGUHVWUDLQWLQ\RXUYHKLFOHFRQVXOW\RXUYHKLFOHRZQHU¶VPDQXDORUFDOO
*UDFR&KLOGUHQ¶V3URGXFWV,QF
• Children are safer when properly
restrained in rear vehicle seating positions.
Whenever possible secure the child restraint in
the center position of the seat directly behind
WKHIURQWVHDWV+RZHYHUWKLVSRVLWLRQLV
sometimes equipped with a lap belt only and
cannot be used when this child restraint is
used without the built-in harness.
• The vehicle seat must face forward.
Do not use child restraints on rear-facing or
side-facing vehicle seats.
17
8.2 Vehicle Seat Belt Requirements
MANY SEAT BELT SYSTEMS ARE NOT SAFE TO USE
WITH THE CHILD RESTRAINT. THE VEHICLE SEAT BELT
MUST BE DESIGNED TO HOLD THE CHILD RESTRAINT
TIGHTLY AT ALL TIMES. Pay careful attention to these systems; some of the seat belts that
DUHQRWVDIHWRXVHORRNYHU\PXFKOLNHVHDWEHOWVWKDWDUHVDIHWRXVH,I\RXDUHXQVXUH
FRQVXOW\RXUYHKLFOHRZQHU¶VPDQXDORUFDOO*UDFR&KLOGUHQ¶V3URGXFWV,QF
8.3 SAFE Vehicle Seat Belt Systems
THE FOLLOWING BELT SYSTEMS CAN BE USED WITH YOUR CHILD RESTRAINT, IF the
seat location meets all other requirements of these instructions and those in your vehicle owner's
manual. LATCH can be used in place of the following vehicle belt systems if your vehicle is
equipped with LATCH anchor points. Please refer to vehicle owners manual for LATCH locations.
18
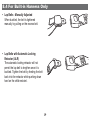
8.4 For Built-in Harness Only
• Lap Belts - Manually Adjusted
:KHQEXFNOHGWKHEHOWLVWLJKWHQHG manually by pulling on the excess belt.
• Lap Belts with Automatic Locking
Retractor (ALR)
The automatic locking retractor will not
permit the lap belt to lengthen once it is
buckled. Tighten the belt by feeding the belt
back into the retractor while pushing down
hard on the child restraint.
19
8.5 With OR Without Built-in Harness
• Combination Lap/Shoulder Belt with
Locking Latch Plate
2QFHLWLVEXFNOHGWKLVW\SHRIEHOWKDVD
latchplate that will not allow the lap portion
of the belt to loosen. Belt is tightened by
pulling hard on the shoulder portion of the
vehicle belt while pushing down hard on
the child restraint.
• Combination Lap/Shoulder Belt with
Sliding Latch PlateThis belt has a
latchplate that slides freely along the belt.
• This belt MUST be converted to prevent
movement of the lap portion of the belt. You
must use the locking clip provided with the
FKLOGUHVWUDLQWXQOHVV\RXUYHKLFOH
VVHDW
belt can be converted in another way as
described in your vehicle owner's manual.
Locking clip
When using booster seat WITHOUT the
EXLOWLQKDUQHVVORFNLQJFOLSLVNOT
to be used.
20
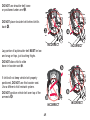
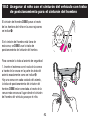
8.6 To Install Locking Clip
1. Tighten the buckled belt by pushing down hard on the child restraint and pulling hard on the
shoulder belt.
:KLOHSXVKLQJGRZQRQVHDWSLQFKWKHWZRVWUDSVWRJHWKHUEHKLQGWKHEXFNOHWRQJXH8QEXFNOH
the belt without allowing it to slip.
3. Attach locking clip to lap and shoulder belts as shown .
4. Rebuckle belt. Check that lap belt does not move
E\SXOOLQJKDUG,IEHOWORRVHQVRUOHQJWKHQVUHSHDW
procedure.
Remove locking clip when not using child restraint. Store
under it’s tab on the rear of seat.
Test installation to see if child restraint is secure.
,IQRWVHFXUHDGGLWLRQDOEHOWWLJKWHQLQJPD\EHUHTXLUHG
• Unbuckle vehicle seat belt.
• Hold belts together and remove locking clip.
• Shorten length of lap belt portion slightly by pulling belt
through latch plate. Re-attach locking clip.
• Buckle vehicle seat belt. Press child restraint further down
into vehicle seat cushion to help buckle vehicle seat belt. Test
LQVWDOODWLRQWRVHHLIFKLOGUHVWUDLQWLVVHFXUH,IQRWVHFXUH
repeat above steps until secure.
21
1” (2.5 cm)
8.7 UNSAFE Vehicle Belt Systems
DO NOT USE ANY OF THE FOLLOWING SYSTEMS TO SECURE THE CHILD RESTRAINT.
LATCH can be used IN PLACE OF the following unsafe belt systems if your vehicle is equipped
with LATCH anchor points. Please refer to the vehicle owners manual for LATCH locations.
NEVER USE unsafe belt systems.
• Lap Belts with Emergency
Locking Retractor (ELR)
This lap belt stays loose and can move
until it locks in a crash or sudden stop.
• Combination Lap/Shoulder Belt with
Retractor
Each strap has a retractor at one end and
is attached to the latch plate at the other
end.
• Passive Restraint - Lap or Shoulder Belt
Mounted on Door
22
• Passive Restraint Lap Belt with Motorized Shoulder Belt
DO NOT use vehicle belts that are
attached to the door in any way or that
move along a track to automatically
surround the passenger when the door is
closed.
• Lap Belts Forward of Seat Crease
Vehicle seat belts located forward of
seat crease may not securely hold child
restraint. Check vehicle owner’s manual or
see vehicle dealer for car seat installation
requirements.
• If approved for use with child restraint,
install child restraint and check for secure
installation by pulling child restraint front
to back. If child restraint slides forward,
DO NOT use these seat belts.
23
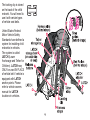
9.0 LATCH
9.1 What is LATCH?
United States Federal Motor Vehicle Safety Standards have defined a
system for installing child restraints in vehicles. The system is called LATCH.
LATCH stands for:
Lower Anchors and Tethers for CHildren.
LATCH in the vehicle consists of a top tether anchor point and two lower anchor
points.
Some vehicle owner manuals use the term ISOFIX to identify the new child
restraint anchor system. This child restraint with LATCH can also be used in
vehicle seating positions equipped with ISOFIX.
Newer vehicles have one or more seating positions with LATCH anchor points.
If vehicle is equipped with LATCH, the vehicle lower anchor points may be
visible at the vehicle seat crease. If not visible, they may be marked with this
symbol
.
CHECK vehicle owner’s manual for vehicle top tether anchor locations. They
may be identified using one of the anchor symbols as shown
.
ONLY use LATCH on a child restraint in a seating position recommended by
vehicle manufacturer.
24
See your vehicle
owner’s manual for
exact locations, anchor
identification, and
requirements for use
with a child restraint.
Vehicle Top Tether
Anchor Points
Vehicle Lower
Anchor Points
Typical seat in a
passenger vehicle.
Other vehicle types
may have different
LATCH locations.
Vehicle
Seat Crease
25
9.2 LATCH System
LATCH consists of a permanently
attached lower anchor belt and a top
tether strap.
ONLY use LATCH in a seating
position recommended by vehicle
manufacturer.
LATCH lower vehicle anchor points
are defined as 11 in. (28 cm) from the
center of one LATCH anchor to the
center of another LATCH anchor.
If allowed by your Vehicle Owners
Manual, the center seating position
maybe used if the anchor spacing is
11 in. (28 cm) or greater.
Child Restraint
Top Tether
Vehicle Top Tether
Anchor Point
Vehicle Lower
Anchor Points
26
Lower
Anchor Belt
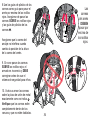
10.0 Using Child Restraint WITH Built-in Harness
FAILURE TO PROPERLY ADJUST THE HARNESS STRAPS
FOR YOUR CHILD INCREASES THE RISK OF SERIOUS
INJURY OR DEATH IN THE EVENT OF A SHARP TURN,
SUDDEN STOP OR CRASH. Snugly adjust the belts provided with this child restraint around your
child. A snug strap should not allow any slack. It lies in a relatively straight line without sagging. It
does not press on the child’s flesh or push the child’s body into an unnatural position.
1. Loosen the harness straps by lifting the
harness adjuster lever at front of seat near
the adjustment strap and pulling the straps
toward you .
2. Open chest clip .
27
3. Unbuckle harness straps .
4a
4. Check the crotch strap: Choose the
position that is closest to but not under
your child.
7RFKDQJHFURWFKVWUDSSRVLWLRQSXVKFURWFK
belt up through the bottom of the child
restraint and grab it from the top to pull out .
Reinsert crotch strap in the desired position.
Make sure crotch strap is not twisted when
reinserting into slot. Pull up on it to make sure
it is secure.
28
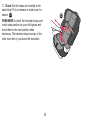
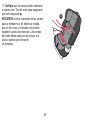
5. The harness straps must go into the slots
even with or just above the shoulders .
If straps are in proper slots go to page 33.
6. To adjust harness straps:
D7XUQVHDWDURXQGVR\RXZLOOKDYHDFFHVVWR
the rear of the seat.
b) From the rear of the seat remove straps
from metal junction plate .
29
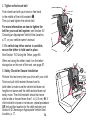
7. Pull strap ends through slots at
front of seat ¡and reinsert them
in the desired slots ¢. Check that
the straps are not twisted.
¡
¢
MAKE SURE harness straps
are inserted into the same slots
on each side of the seat.
Remove body support when not
using harness in the lowest slot
position.
30
8. Use plastic strap guides as a
guide to feed the harness up over
the red rollers. Make sure to feed
straps OVER red rollers and
plastic strap guides 11 .
11 Harness
straps
MUST
go over
red
rollers.
Make sure that the tether strap
does not interfere when changing
the harness strap height positions.
9. If the straps are not fed OVER
WKHUHGUROOHUVWKHDVVHPEO\LV
incorrect and MUST be corrected
before using child restraint.
12
10. Reassemble straps onto
metal junction plate exactly as
shown 12 .
Check that straps are
completely within the slots
and that they are not twisted.
31
11. Check that the straps are inserted at the
same level. Pull on harness to make sure it is
secure 13 .
13
REMEMBER to check the shoulder straps and
crotch strap position as your child grows and
move them to the next position when
necessary. The harness straps must go in the
slots even with or just above the shoulders.
32
11.0 Securing the Child Restraint in Your Vehicle
FAILURE TO PROPERLY SECURE THE CHILD RESTRAINT IN
THE VEHICLE INCREASES THE CHILD’S RISK OF
SERIOUS INJURY OR DEATH IN THE EVENT OF A SHARP
TURN, SUDDEN STOP OR CRASH. Carefully follow these instructions and those in your vehicle
owner’s manual to be sure your child restraint is properly positioned and held tightly at all times.
11.1 Using a Child Restraint WITH a Built-in Harness
11.2 With a Vehicle Lap or Lap/shoulder Belt:
Lower anchors must be stored when using vehicle belt.
See Section 19.1, Storing LATCH, page 57.
1. Place the child restraint firmly against the back of a
forward-facing vehicle seat.
2. Thread the seat belt through the belt slot openings:
For Lap/Shoulder belt
For Lap-only belt
3. Buckle the vehicle belt. The vehicle belt should not be
twisted.
33
4. Tighten vehicle seat belt
Push down hard with your knee or free hand
in the middle of the child restraint .
Then pull and tighten the vehicle belt.
For more information on how to tighten the
belt for your seat belt systemVHHSection 8.0
&KRRVLQJDQ$SSURSULDWH9HKLFOH6HDW/RFDWLRQ
SRU\RXUYHKLFOHRZQHU¶VPDQXDO
5. If a vehicle top tether anchor is available,
secure the tether to hold seat in place.
6HH6HFWLRQ8VLQJWKH7HWKHUSDJH
:KHQQRWXVLQJWKHWHWKHUKRRNLWRQWKHWHWKHU
VWRUDJHEDURQWKHUHDURIWKHVHDWVHHSDJH
6. Safety Check for Secure Installation
Perform this test every time you drive with your child.
Twist and pull child restraint forward and to
both sides to make sure the vehicle belt does not
lengthen or loosen and the child restraint does not
easily move. The child restraint should not move
side to side or forward more than 1 in. (2.5 cm). . If
FKLOGUHVWUDLQWLVORRVHRUQRWVHFXUHUHSHDWSURFHGXUH
ORILQGDQRWKHUORFDWLRQIRUWKHFKLOGUHVWUDLQWVHH
Section 8.0 Choosing an Appropriate Vehicle Seat
/RFDWLRQS
34
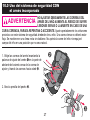
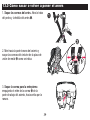
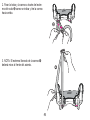
11.3 With LATCH
NOTE: Some vehicle manufacturers have lower
maximum weight ratings for LATCHDQFKRUVVR\RX
must consult your vehicle owner’s manual or call the
vehicle manufacturer to confirm the limits on your
vehicle’s LATCH anchors.
1. Unhook LATCH from storage bars on the sides of
WKHVHDW)RUHDVHRILQVWDOODWLRQH[WHQGLATCH to its
maximum length.
2. Place the child restraint firmly against
the back of a forward-facing vehicle seat.
Do not install by this method for a child
3. Hook LATCH Connectors to vehicle
weighing more than 45 lb (20 kg).
lower anchors . Pull firmly on Connectors
to be sure they are attached. Belt must
lay flat and not be twisted.
4. Tighten LATCH by pushing down hard on
child restraint and pulling the adjustment
belt .
5. If you need to remove LATCHWRUHDGMXVW
push button on LATCH buckle
to loosen strap.
35
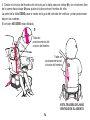
6. NEVER put two LATCH connectors on
one vehicle LATCH anchor unless specifically
allowed by the vehicle manufacturer .
7. All LATCH seating positions have
tether anchors. Secure the top of the seat
using the tether strap. See Section 19.0 Using
WKH7HWKHUSDJH
8. Safety Check for Secure Installation
Perform this test every time you drive with
your child.
Twist and pull child restraint forward and to
both sides to make sure the LATCH belt does
not lengthen or loosen and the child restraint
does not easily move. The child restraint
should not move side to side or forward more
than 1 in. (2.5 cm). .If child restraint is loose
RUQRWVHFXUHUHSHDWSURFHGXUHOR find anRWKHUORFDWLRQIRUWKHFKLOGUHVWUDLQWVHH
Section 8.0 Choosing an Appropriate Vehicle
6HDW/RFDWLRQS
36
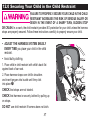
12.0 Securing Your Child in the Child Restraint
FAILURE TO PROPERLY SECURE YOUR CHILD IN THE CHILD
RESTRAINT INCREASES THE RISK OF SERIOUS INJURY OR
DEATH IN THE EVENT OF A SHARP TURN, SUDDEN STOP
OR CRASH. ,QDFUDVKWKHFKLOGUHVWUDLQWSURYLGHV12SURWHFWLRQIRU\RXUFKLOGXQOHVVWKHKDUQHVV
straps are properly secured. Follow these instructions carefully to properly secure your child.
• ADJUST THE HARNESS SYSTEM SNUGLY
EVERY TIME you place your child in the child
restraint.
• Avoid bulky clothing.
1. Place child in child restraint with child’s back flat
against back of car seat.
2. Place harness straps over child’s shoulders
and insert tongues into buckle until they click
into place .
CHECK that straps are not twisted.
CHECK that harness is securely latched by pulling up
on straps.
DO NOT use child restraint if harness does not latch.
37
CLICK!
3. Fasten chest clip . Position chest clip at
PLGGOHRIFKLOG¶VFKHVWOHYHOZLWK
armpits.
4. Tighten the harness straps by pulling the
adjustment strap on the front of the seat .
5. Make sure straps are flat and snug
against child’s shoulders and thighs.
You should not be able to pinch the
harness straps. A snug strap should not
allow any slack. It lies in a relatively straight
line without sagging. It does not press on
the child’s flesh or push the child’s body into
an unnatural position.
38
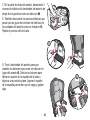
13.0 Harness Removal or Re-attaching Harness
1. Remove harness straps.
Open chest clip and harness buckle .
2. Face the rear of the seat and remove the
belt straps from metal junction plate as
shown .
3. Remove crotch strap by pushing the strap
retainer RQERWWRPRIVHDWXSWKURXJKVORW
39
4. Grab the crotch strap buckle and pull it
completely out .
5. Pull on the adjustment strap on the front
of the seat to lock the metal junction plate into
place.
6. Grab hold of the shoulder straps and pull
them out of their respective slots on the seat
pad.
Remove body support and crotch pad.
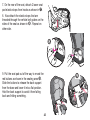
40
2QWKHUHDURIWKHVHDWGHWDFKORZHUVHDW
pad elastic straps from hooks as shown in .
8. Also detach the elastic straps that are
threaded through the vehicle belt guides on the
sides of the seat as shown in . Repeat on
other side.
9. Pull the seat pad out of the way to reveal the
red buttons as shown in the seating area ¡ .
Slide the buttons to release the back support
from the base and lower it into a flat position.
Hold the back support to avoid it from falling
back and hitting something.
¡
41
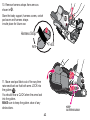
10. Remove harness straps from arms as
shown in ¢.
6WRUHWKHERG\VXSSRUWKDUQHVVFRYHUVFURWFK
pad cover and harness straps
in safe place for future use.
¢
Harness Strap
T-slot
Arm
11. Move seat pad fabric out of the way then
raise seat back so that both arms LOCK into
the gutters 11 .
You should hear a CLICK when the arms lock
into the gutters.
MAKE sure to keep the gutters clear of any
obstructions.
11
KEEP
GUTTERS CLEAR
42
12. Tuck seat pad in between the gap of the
back support and seat area of the booster seat
to allow 2 elastic straps to show at the rear of
the seat.
13. Attach 2 seat pad elastic straps onto the
hooks on the rear of the child restraint as
shown in 12 .
12
14. Pull elastic strap on the seat pad through
the vehicle belt guide on side of seat and
attach to hook as shown.
Repeat on other side 13 .
13
REVERSE INSTRUCTIONS TO REINSTALL
HARNESS.
6HH6HFWLRQSDJHIRUWKHFRUUHFW
path for the harness.
43
14.0 Using Your Child Restraint WITHOUT Built-in Harness
FAILURE TO PROPERLY SECURE YOUR CHILD IN THE CHILD
RESTRAINT INCREASES THE RISK OF SERIOUS INJURY OR
DEATH IN THE EVENT OF A SHARP TURN, SUDDEN STOP OR
CRASH. InDFUDVKWKHFKLOGUHVWUDLQWSURYLGHV12SURWHFWLRQIRU\RXUFKLOGXQOHVVWKHYHKLFOHODS
shoulder belt is properly secured. Follow these instructions carefully to properly secure your child.
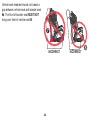
WARNING! Use only the vehicle lap and
shoulder belt system when restraining the child
in the booster seat. LATCH will not secure your
child in the booster seat .
Vehicle belts MUST lie flat against child and
MUST not be twisted.
NEVER use a vehicle lap-only belt across front
of child .
44
INCORRECT
DO NOT use shoulder belt loose
or positioned under arm .
DO NOT place shoulder belt behind child’s
back .
INCORRECT
INCORRECT
Lap portion of lap/shoulder belt MUST be low
DQGVQXJRQKLSVMXVWWRXFKLQJWKLJKV
DO NOT allow child to slide
down in booster seat .
If child will not keep vehicle belt properly
SRVLWLRQHGDO NOT use this booster seat.
Use a different child restraint system.
DO NOT position vehicle belt over top of the
armrests .
INCORRECT
45
INCORRECT
Vehicle seat headrest should not create a
gap between vehicle seat and booster seat
. The front of booster seat MUST NOT
hang over front of vehicle seat .
INCORRECT
46
INCORRECT
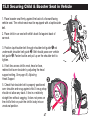
15.0 Securing Child & Booster Seat in Vehicle
1. Place booster seat firmly against the back of a forward-facing
vehicle seat. The vehicle seat must be equipped with a lap/shoulder
belt.
2. Place child in car seat with child’s back flat against back of
car seat.
3. Position lap/shoulder belt through shoulder belt guide not
underneath shoulder belt guide . Belt should pass over vehicle
belt guide . Fasten buckle and pull up on the shoulder belt to
tighten.
4. IfEHOWOLHVDFURVVFKLOG¶VQHFNKHDGRUIDFH
redirect belt over shoulder by adjusting the head
VXSSRUWVHWWLQJSee page 48, Adjusting
Head Support.
5. Check that shoulder belt is properly positioned
over shoulder and snug against child. A snug strap
should not allow any slack. It lies in a relatively
straight line without sagging. It does not press on
the child’s flesh or push the child’s body into an
unnatural position.
47
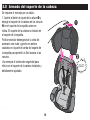
16.0 Adjusting Head Support
When using with or without the built-in
harness.
BEFOREDGMXVWLQJWKHKHDGVXSSRUWKHLJKW
have your child lean forward slightly.
Squeeze the red adjustment handle on
top of seat and pull back support up until it
snaps into one of the 5 height positions.
7RORZHUVTXHH]HUHGDGMXVWPHQWKDQGOH
and push down.
CHECK to make sure it is securely snapped
into one of the 5 height positions by pulling
up on head support.
The shoulder belt guides should be even
with or just above the shoulders as shown
by dotted line .
48
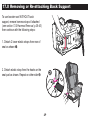
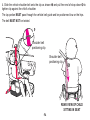
17.0 Removing or Re-attaching Back Support
To use booster seat WITHOUT back
VXSSRUWUHPRYHKDUQHVVVWUDSVLIDWWDFKHG
(see section 13.0 Harness Removal, p.39-43)
then continue with the following steps:
1. Detach 2 lower elastic straps from rear of
seat as shown .
2. Detach elastic strap from the hooks on the
seat pad as shown. Repeat on other side .
49
3. Pull the seat pad out of the way to reveal
red buttons as shown in . Slide the buttons
to release the back support from the base and
lower it into a flat position.
:KHQUHPRYLQJEDFNVXSSRUW\RXPXVW
support the back support when sliding the red
buttons that disengage the back support from
WKHEDVH0DNHVXUHDOOKDQGVILQJHUVDQG
other objects are not behind the back support
when removing it.
4. Move seat pad fabric out of the way and
squeeze red buttons together to release back
support from seat. Pull seat and back support
apart .
50
5. Once back support is separated VWRUH
EDFNVXSSRUWZLWKDOOWKHKDUQHVVVWUDSVKHDG
VXSSRUWERG\VXSSRUWDQGFURWFKSDGFRYHULQ
safe place.
6. Reattach the elastic straps at the back of the
seat and through the vehicle belt guide on
the sides of seat as shown.
7. Seat is ready to install.
TO REATTACH BACK SUPPORT IF NEEDED,
reverse steps from p. 51 to p. 49.
51
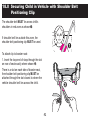
18.0 Securing Child in Vehicle with Shoulder Belt
Positioning Clip
The shoulder belt MUST lie across child’s
shoulders in red zone as shown .
,IVKRXOGHUEHOWOLHVRXWVLGHWKLV]RQHWKH
shoulder belt positioning clip MUST be used.
To attach clip to booster seat:
1. Insert the loop end of strap through the slot
on rear of seat exactly where shown .
7KHUHLVDVORWRQHDFKVLGHRIERRVWHUVHDW
the shoulder belt positioning clip MUST be
attached through the slot closest to where the
vehicle shoulder belt lies across the child.
52
2. Pass the clip and the strap through the loop
end as shown and pull strap up.
3. NOTE: Free end of strap should face
front of seat.
53
4. Slide the vehicle shoulder belt onto the clip as shown and pull free end of strap down to
tighten clip against the child’s shoulder.
The lap portion MUST pass through the vehicle belt guide and be positionned low on the hips.
The belt MUST NOT be twisted.
Shoulder belt
positioning clip
Shoulder belt
positioning clip
REAR VIEW OF CHILD
SITTING IN SEAT
54
5. Lap portion of lap/shoulder belt MUST be low and
VQXJRQKLSVMXVWWRXFKLQJWKLJKV
DO NOT allow child to slide down in booster seat .
CORRECT
55
19.0 Using the Tether
All LATCH seating positions have tether anchors. Always use tether if a vehicle tether anchor is
DYDLODEOHFKHFN\RXUYHKLFOHRZQHU¶VPDQXDOIRUWKHWHWKHUDQFKRUORFDWLRQV,I\RXUYHKLFOHLV
QRWHTXLSSHGZLWKDWHWKHUDQFKRULWPD\EHSRVVLEOHWRLQVWDOORQH&RQWDFW\RXUYHKLFOH
dealership for the proper anchor location and installation.
1. Check that tether is securely attached to
child restraint.
2. Fasten tether clip to anchor point .
3. Tighten the tether strap securely .
7RORRVHQSXVKEXWWRQZKLOH
pulling on the belt as shown .
56
19.1 Storing Lower Anchors and Tether (LATCH)
)RUHDVHRIVWRULQJH[WHQGLATCH to its
maximum length.
2. Locate the storage bars on back of
child restraint .
3. Fasten ends of tether and lower anchors
onto their respective storage bars as shown
.
Tether
Storage bars located
on each side at the
back of the seat
Lower
anchors
4. Tether and lower anchors storage should
look like this when complete .
Lower
anchors
57
20.0 Airplane Use
This restraint is certified for use in Motor Vehicles.
It is certified for use in Aircraft ONLY when used with the built-in harness.
When used as a booster WITHOUTWKHKDUQHVVWKLVUHVWUDLQWLV127&(57,),('IRUDLUFUDIWXVH
because aircraft seats do not have a shoulder belt.
Important points to remember:
1. Airlines have some restrictions about the use of child restraints.
2. Install your car seat on an airplane in the same way it is installed in an automobile with a lap
EHOWVHH6HFWLRQ8VLQJ&KLOG5HVWUDLQW:,7+%XLOWLQKDUQHVVSS
3. Check that the airplane seat belt holds the child restraint securely in place at all times.
58
21.0 Accessories (on certain models ONLY)
21.1 Body Support & Harness Covers
To prevent ejection in sudden stop or crash:
• Always make sure shoulder straps are threaded through
slots and properly positioned on shoulders.
• Never allow body support to bunch or fold behind child.
• Use body support with bottom harness slots only.
• Make sure that harness covers do not interfere with
placement of the chest clip at armpit level.
59
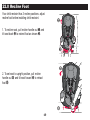
22.0 Recline Foot
Your child restraint has 3 recline positions: adjust
recline foot before installing child restraint.
7RUHFOLQHVHDWSXOOUHFOLQHKDQGOHRXW and
tilt seat back to extend foot as shown .
7RVHWVHDWWRXSULJKWSRVLWLRQSXOOUHFOLQH
handle out and tilt seat foward to retract
foot .
60
23.0 Care and Maintenance
&RQWLQXRXVXVHRIFKLOGUHVWUDLQWPD\FDXVHGDPDJHWRYHKLFOHVHDW8VHDFKLOGUHVWUDLQWPDW
towel or thin blanket to protect upholstery.
• Metal and plastic parts: clean with mild soap and cool water. No bleach or detergents.
• Harness straps and LATCH straps: spot clean or replace. Do not immerse the straps in water.
Doing so may weaken the straps.
,IEXFNOHRUKDUQHVVDGMXVWHUVWLFNVRUZLOOQRWUHPDLQWLJKWFKHFNIRUIRUHLJQREMHFWVVXFKDV
IRRGGLUWHWF5HPRYHREMHFWVZLWKWZHH]HUVDQGRUFOHDQZLWKDFRWWRQVZDE,I\RXFDQQRWJHW
WKHKDUQHVVWRUHPDLQWLJKWZLWKWKHEXFNOHVHFXUHO\ORFNHGGRQRWXVHWKLVFKLOGUHVWUDLQW&DOO
Graco at 1-800-345-4109 to purchase a replacement harness or buckle.
61
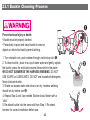
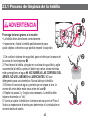
23.1 Buckle Cleaning Process
Prevent serious injury or death:
• Buckle must be properly latched.
• Periodically inspect and clean buckle to remove
objects or debris that could prevent latching.
7XUQUHVWUDLQWRYHUSXVKUHWDLQHUWKURXJKFURWFKVWUDSVORW.
2. To clean buckle - place in a cup of warm water and gently agitate
WKHEXFNOHSUHVVWKHUHGEXWWRQVHYHUDOWLPHVZKLOHLQWKHZDWHU
. DO NOT SUBMERGE THE HARNESS WEBBING. DO NOT
USE SOAPS or LUBRICANTS. DO NOT use household detergents.
Never lubricate buckle.
6KDNHRXWH[FHVVZDWHUDQGDOORZWRDLUGU\KDUQHVVZHEELQJ
should be dry before use .
4. Repeat Step 2 and 3 as needed. Buckle should fasten with a
“click”.
5. Re-attach buckle into the same slot from Step 1. Re-check
harness for correct installation before use.
62
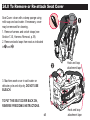
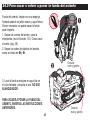
24.0 To Remove or Re-attach Seat Cover
Seat Cover: clean with a damp sponge using
PLOGVRDSDQGFRROZDWHU,IQHFHVVDU\FRYHU
may be removed for cleaning.
1. Remove harness and crotch straps (see
6HFWLRQ+DUQHVV5HPRYDOS
2. Remove elastic loops from seat as indicated
in and .
Hook and loop
attachment tape
3. Machine wash cover in cold water on
delicate cycle and drip-dry. DO NOT USE
BLEACH.
TO PUT THE SEAT COVER BACK ON,
REVERSE PRECEDING INSTRUCTIONS.
63
Hook and loop
attachment tape
25.0 Owners Manual Storage
Your Owner’s Manual can be stored on
the bottom of the seat inside the slot in the
footrest as shown.
26.0 Replacement Parts and Warranty
To purchase parts or accessories or for warranty information in the United States,
please contact us at the following:
www.gracobaby.com
or
1-800-345-4109
64
con
LEA ESTE MANUAL
Sistema de seguridad / Asiento para niños Manual del dueño
No instale ni use este sistema de seguridad para niños hasta que haya leído y entendido las
instrucciones en este manual. NO USAR DEBIDAMENTE ESTE SISTEMA DE SEGURIDAD
PARA NIÑOS AUMENTA EL RIESGO DE LESIONES SERIAS O FATALES EN UN ACCIDENTE
O AL DETENERSE DE REPENTE.
© 2014 Graco
PD265373B
7/14 SP
Índice de materias
1.0 Advertencias a padres y otros usuarios
. . . . . . . . . . . . . . . . . . . . . . . . . . . . .4-5
2.0 Información sobre el registro . . . . . . . . . . . 6
2.1 Registro de su sistema de
seguridad para niños . . . . . . . . . . . . . 6
2.2 Para obtener información sobre el retiro
de productos del mercado . . . . . . . . . 6
2.3 Si necesita ayuda . . . . . . . . . . . . . . . . 7
3.0 Información útil . . . . . . . . . . . . . . . . . . . . . . 7
3.1 Certificación. . . . . . . . . . . . . . . . . . . . . 7
3.2 Vida útil del sistema de
seguridad para niños . . . . . . . . . . . . . 7
3.3 Sistema de seguridad
para niños usado . . . . . . . . . . . . . . . . 7
4.0 Características . . . . . . . . . . . . . . . . . . . . 8-9
5.0 Armado del soporte de la
cabeza . . . . . . . . . . . . . . . . . . . . . . . . .10-11
6.0 ADVERTENCIA . . . . . . . . . . . . . . . . . 12-13
7.0 Limitaciones de peso y altura. . . . . . . . . 14
7.1 CON el arnés incorporado . . . . . . . 14
7.2 SIN el arnés incorporado . . . . . . . . 15
7.3 SIN el soporte de la espalda . . . . . 16 2
8.0 Cómo elegir un lugar apropiado para
el asiento del vehículo . . . . . . . . .17
8.1 Requisitos del lugar del asiento
del vehículo . . . . . . . . . . . . .17
8.2 Requisitos del cinturón de
seguridad del vehículo . . . . .18
8.3 Sistemas SEGUROS del cinturón
de seguridad del vehículo . . .18
8.4 Para el arnés incorporado
solamente . . . . . . . . . . . . . . .19
8.5 CON o SIN el arnés
incorporado . . . . . . . . . . . . . .20
8.6 Para instalar la traba
de seguridad . . . . . . . . . . . . .21
8.7 Sistemas PELIGROSOS de
cinturones de vehículos . 22-23
9.0 LATCH. . . . . . . . . . . . . . . . . . . . . .24
9.1 ¿Qué es LATCH? . . . . . . . . .24
9.2 Sistema LATCH . . . . . . . . . .26
10.0 Uso del sistema de seguridad CON
el arnés incorporado. . . . . . . . 27-32
Índice de materias (cont.)
11.0 Asegurar el sistema de seguridad para
niños en su vehículo. . . . . . . . . . .33
11.1 Uso de un sistema de seguridad
CON el arnés incorporado . .33
11.2 Con un cinturón para la falda o
falda/hombro del vehículo.....33-34
11.3 Con LATCH. . . . . . . . . . . 35-36
12.0 Asegurar a su niño al sistema
de seguridad. . . . . . . . . . . . . . 37-38
13.0 Cómo sacar o volver a poner
el arnés. . . . . . . . . . . . . . . . . . 39-43
14.0 Uso del sistema de seguridad
SIN el arnés incorporado . . . . 44-46
15.0 Asegurar al niño y al asiento
de seguridad en el vehículo . . . . .47
16.0 Ajuste del soporte de la cabeza. .48
17.0 Eliminar o volver a instalar el . . . . .
soporte de la espalda. . . . . . . 49-51
18.0 Asegurar al niño con el cinturón del
vehículo con traba de posicionamiento
para el cinturón del hombro......52-55
19.0 Uso del anclaje . . . . . . . . . . . . . .56
19.1 Cómo guardar los anclajes
inferiores y anclaje . . . . . . .57
20.0 Uso en aeronaves . . . . . . . . . . . .58
21.0 Accesorios . . . . . . . . . . . . . . . . . .59
21.1 Fundas del arnés y
del soporte del cuerpo . . . . .59
22.0 Pie reclinatorio . . . . . . . . . . . . . . .60
23.0 Atención y mantenimiento . . . . . .61
23.1 Proceso de limpieza de la
hebilla . . . . . . . . . . . . . . . . .62
24.0 Para sacar o volver a poner la funda
del asiento . . . . . . . . . . . . . . . . . .63
25.0 Cómo guardar el manual
del dueño.. . . . . . . . . . . . . . . . . . .64
26.0 Piezas de repuesto y garantía . . .64
3
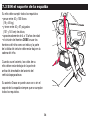
1.0 Advertencias a padres y otros usuarios
ADVERTENCIA
NUNCA PONGA ESTE SISTEMA DE SEGURIDAD PARA NIÑOS
EN UN ASIENTO DEL VEHÍCULO EQUIPADO CON UNA
BOLSA DE AIRE DELANTERA. 6LODEROVDGHDLUHVHLQÀDSXHGH
golpear al niño y al sistema de seguridad para niños con mucha
fuerza y causar lesiones serias o la muerte de su niño. Consulte
el manual del dueño del vehículo para obtener información sobre
la instalación de las bolsas de aire laterales y del sistema de
seguridad para niños.
4
ADVERTENCIA
No usar debidamente este sistema de seguridad para niños aumenta el riesgo de lesiones serias
RODPXHUWHHQXQDFXUYDFHUUDGDSDUDGDUHSHQWLQDRDFFLGHQWH/DVHJXULGDGGHVXQLxRGHSHQGH
de que usted instale y use este sistema de seguridad para niños correctamente.
$SHVDUGHTXHHOXVRGHHVWHVLVWHPDGHVHJXULGDGSDUDQLxRVSDUH]FDIiFLOGHGHVFLIUDUHVPX\
importante LEER EL MANUAL DEL USUARIO y el manual del usuario del vehículo.
La seguridad de su niño depende de que:
1. Elija el modo correcto de uso del sistema de seguridad para niños según el tamaño
de su niño.
2. Inserte las correas del arnés (si fuera necesario) en las ranuras adecuadas para su niño.
3. Seleccione un lugar adecuado para el sistema de seguridad para niños en su vehículo.
4. Pase debidamente el cinturón de seguridad del vehículo o LATCH.
5. Asegure debidamente el sistema de seguridad para niños en el vehículo usando un
cinturón del asiento diseñado para sujetar a ambos el sistema de seguridad para niños y su
niño o usando el LATCH. Muchos cinturones de seguridad NO son seguros para usar con
HVWHVLVWHPDGHVHJXULGDGSDUDQLxRVDSHVDUGHTXHVHSXHGHQFRORFDUIiFLOPHQWHDWUDYpVR
alrededor del sistema de seguridad para niños.
6. Asegure debidamente a su niño en el sistema de seguridad para niños.
5
2.0 Información sobre el registro
Número de modelo:
Fecha de fabricación:
Fecha de compra:
2.1 Registro de su sistema de seguridad para niños
3RUIDYRUFRPSOHWHODLQIRUPDFLyQTXHVHVROLFLWDPiVDUULED(OQ~PHURGHPRGHOR\ODIHFKDGH
fabricación pueden encontrarse en una etiqueta ubicada debajo del sistema de seguridad para
niños. Llene la tarjeta postal de registro prepagada que se encuentra en el arnés y envíela hoy
mismo.
Los sistemas de seguridad para niños podrán ser retirados del mercado por problemas de
seguridad. Debe registrar este sistema para que lo podamos contactar en dicho caso. Envíe su
QRPEUHGLUHFFLyQ\HOQ~PHURGHOPRGHORGHOVLVWHPD\ODIHFKDGHIDEULFDFLyQD
Graco Children’s Products Inc.
Attn: Customer Service, 3 Glenlake Parkway, Atlanta, GA 30328
o llame al 1-800-345-4109
o regístrelo en línea en:
http://www. gracobaby.com/carseatregistration
2.2 Para obtener información sobre el retiro de productos
del mercado
Llame a la Línea telefónica de seguridad del vehículo del gobierno de EE.UU.
al:1-888-327-4236 (TTY: 1-800-424-9153), o visite http://www.NHTSA.gov o
llame a Graco al: 1-800-345-4109 o www.gracobaby.com
6
2.3 Si necesita ayuda
3RUIDYRUFRPXQtTXHVHFRQHO'HSDUWDPHQWRGH6HUYLFLRDO&OLHQWHFRQFXDOTXLHUSUHJXQWDTXH
SXGLHUDWHQHUVREUHSLH]DVXVRRPDQWHQLPLHQWR&XDQGRVHSRQJDHQFRQWDFWRFRQQRVRWURVSRU
favor tenga listo el número de modelo y la fecha de fabricación del producto para que lo podamos
D\XGDUPiVH¿FLHQWHPHQWH(VWRVQ~PHURVVHHQFXHQWUDQHQXQDHWLTXHWDXELFDGDHQHOVLVWHPD
de seguridad p ara niños.
EE.UU.: 1-800-345-4109 o www.gracobaby.com
www.cpsc.gov www.NHTSA.gov www.seatcheck.org
3.0 Información útil
ESTE SISTEMA PARA
NIÑOS CUMPLE con
todas las Normas
Federales de Seguridad
para Vehículos Automotor
\KDVLGRFHUWL¿FDGRSDUDHO
uso en vehículos
automotores. Ha sido
FHUWL¿FDGRSDUDXVRHQ
aeronaves solamente
cuando se lo usa con el
arnés incorporado. Cuando
se lo usa como silla alta sin
HODUQpVHVWHVLVWHPD12
KDVLGRFHUWL¿FDGRSDUDVHU
usado en aeronaves.
3.2 Vida útil del sistema de seguridad para
niños
DEJE de usar este sistema de seguridad para niños y
tírelo a la basura 10 años después de la fecha de
fabricación. Busque este etiqueta en el trasero del
asiento de seguridad:
MODEL
Date of Manufacture
NAME
year
month
day
GRACO CHILDREN'S PRODUCTS, INC.
ATLANTA, GA 30328
1-800-345-4109
Made in China
PD206938A
3.1&HUWLÀFDFLyQ
3.3 Sistema de seguridad para niños usado
Graco Children’s Products Inc. desaconseja prestar o dar a otros el
sistema de seguridad para niños.
7
4.0 Características
8
La traba de seguridad se
guarda en la parte trasera
del sistema de seguridad
para niños. Necesitará
usarlo con ciertos tipos de
cinturones de seguridad de
automóviles.
Las Normas Federales para
Seguridad de Automóviles
de Estados Unidos han
GH¿QLGRXQVLVWHPDGH
instalación de los sistemas
de seguridad para niños en
los vehículos. El sistema se
denomina LATCH (anclaje
inferior y superior para
niños). El LATCH debe
usarse SOLAMENTE EN
LUGAR del cinturón del
vehículo si el vehículo está
equipado con puntos de
anclaje LATCH3RUIDYRU
consulte el manual del
dueño del vehículo para
LGHQWL¿FDUODVXELFDFLRQHV
del LATCH en su vehículo.
9
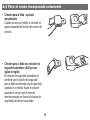
5.0 Armado del soporte de la cabeza
Se requiere el montaje por un adulto.
1. Apriete el botón de ajuste de la altura y
empuje el soporte de la cabeza en las ranuras
en el soporte de la espalda como se
indica. El soporte de la cabeza se trabará en
el soporte de la espalda.
Podría necesitar desenganchar la cinta del
accesorio con nudo y gancho en ambos
costados en la parte de arriba del soporte de
la espalda para permitir un fácil acceso a las
ranuras.
Use siempre el sistema de seguridad para
niños con el soporte de la cabeza instalado y
debidamente ajustado.
¡CLIC!
.
10
2. El ensamblaje está completo.
11
6.0 ADVERTENCIA
• NINGÚN SISTEMA DE SEGURIDAD PARA
NIÑOS PUEDE GARANTIZAR UNA
PROTECCIÓN CONTRA LESIONES. Sin
HPEDUJRHOXVRDSURSLDGRGHHVWHVLVWHPD
de seguridad para niños reduce el riesgo de
lesiones serias o la muerte a su niño.
• NO INSTALE NI USE ESTE SISTEMA DE
SEGURIDAD PARA NIÑOS HASTA QUE HAYA
LEÍDO Y ENTIENDA LAS INSTRUCCIONES
EN ESTE MANUAL Y EN EL MANUAL DEL
DUEÑO DE SU VEHÍCULO. NO deje que otros
instalen o usen el sistema de seguridad para
niños a menos que entiendan cómo usarlo.
• NO use la traba de seguridad en el modo
asiento.
6HJ~QODVHVWDGtVWLFDVGHDFFLGHQWHVLOS
NIÑOS ESTÁN MÁS SEGUROS CUANDO
ESTÁN DEBIDAMENTE SUJETADOS EN
LOS ASIENTOS TRASEROS DEL
VEHÍCULO EN LUGAR DE A LOS
ASIENTOS DELANTEROS. En el caso de
un vehículo con una bolsa de aire para el
SDVDMHURGHODQWHURFRQVXOWHHOPDQXDOGHO
dueño de su vehículo así como estas
instrucciones para la instalación del sistema
de seguridad para niños.
• NO USAR DEBIDAMENTE ESTE SISTEMA
• NUNCA DEJE A SU NIÑO SOLO.
DE SEGURIDAD PARA NIÑOS AUMENTA EL
RIESGO DE LESIONES SERIAS O LA
MUERTE EN UNA CURVA CERRADA,
PARADA REPENTINA O ACCIDENTE. Su niño
puede sufrir una lesión en un vehículo aunque
no sufra un accidente. Una parada repentina o
una curva cerrada puede lesionar a su niño si el
sistema de seguridad para niños no
está debidamente instalado o si el niño no está
debidamente sujetado en el sistema de
seguridad para niños.
12
• NUNCA DEJE UN SISTEMA DE
SEGURIDAD PARA NIÑOS SIN SUJETAR EN
SU VEHÍCULO. Un sistema sin sujetar puede
ser arrojado y podría lesionar a los ocupantes
HQXQDFXUYDFHUUDGDSDUDGDUHSHQWLQDR
accidente. Sáquelo o asegúrese de que esté
debidamente sujetado en el vehículo. Si no
usa el LATCH\DQFODMHDVHJ~UHVHTXHODV
conexiones del LATCH estén debidamente
almacenadas en la parte de atrás del asiento.
• CAMBIE EL SISTEMA DE SEGURIDAD
PARA NIÑOS DESPUÉS DE UN ACCIDENTE
DE CUALQUIER TIPO. Un accidente puede
causar daño invisible al sistema de seguridad
para niños.
• NO MODIFIQUE EL SISTEMA DE
SEGURIDAD PARA NIÑOS ni use accesorios
o piezas suministradas por otros fabricantes.
• NUNCA USE EL SISTEMA DE SEGURIDAD
PARA NIÑOS SI ESTÁ DAÑADO O TIENE
PIEZAS QUE FALTAN. No use un arnés del
sistema de seguridad para niños o cinturón del
asiento del vehículo o cinturón del LATCHURWR
deshilachado o dañado.
13
• EL SISTEMA DE SEGURIDAD PARA NIÑOS
PUEDE ALCANZAR ALTAS TEMPERATURAS
SI QUEDA EN EL SOL. El contacto con estas
partes puede quemar la piel de su niño. Toque
VLHPSUHODVXSHU¿FLHGHFXDOTXLHUSLH]DGH
metal o de plástico antes de poner a su niño
en el sistema de seguridad para niños.
• NUNCA LE ENTREGUE ESTE SISTEMA DE
SEGURIDAD PARA NIÑOS a otra persona si
no les entrega también este manual.
• NUNCA USE UN SISTEMA DE SEGURIDAD
PARA NIÑOS USADO o un sistema de
seguridad cuya historia no conoce.
NO USE ESTE sistema de seguridad para
niños sin armarlo correctamente.
7.0 Limitaciones de peso y altura
ADVERTENCIA
NO USAR EL SISTEMA DE SEGURIDAD PARA NIÑOS DE MANERA APROPIADA SEGÚN
EL TAMAÑO DE SU NIÑO PODRÍA AUMENTAR EL RIESGO DE LESIONES SERIAS O LA
MUERTE. /DVLQVWUXFFLRQHVSDUDHOXVRGHHVWHVLVWHPDGHVHJXULGDGSDUDQLxRVGL¿HUHQPXFKR
según el tamaño de su niño. Asegúrese de que usa el sistema de seguridad para niños de la
manera correcta y con las funciones correctas para su niño.
7.1 CON el arnés incorporado
Su niño debe cumplir todos los requisitos:
• Peso: 20 a 65 libras (masa entre 9 y 30 kg)
• Altura: 27 a 49 pulgadas (69 a 125 cm) de altura
• Por lo menos debe tener un año de edad y debe
poder sentarse sin ayuda
• Los hombros están DEBAJO de las ranuras
superiores del arnés. Si los hombros están por
HQFLPDGHODVUDQXUDVVXSHULRUHVGHODUQpVHOQLxR
es demasiado grande para usar el arnés incorporado.
14
7.2 SIN el arnés incorporado
Su niño debe cumplir todos los requisitos:
• Peso: 30 a 100 libras (masa entre 14 y 45 kg)
• Altura: 38 a 57 pulgadas (96 a 145 cm) de altura
• aproximadamente de 3 a 10 años de edad
• el cinturón del hombro DEBE cruzar los
hombros del niño como se indica y la parte
de la falda del cinturón debe estar baja en la
cadera del niño.
• Los oídos del niño están DEBAJO de la parte
superior del asiento. Si la parte de arriba de los
oídos se encuentran arriba de la parte superior
GHODVLHQWRHOQLxRHVGHPDVLDGRJUDQGHSDUD
el asiento.
Si el niño pesa entre 30 y 65 libras (13 y 30 kg)
y los hombros se encuentran por debajo de las
ranuras superiores del arnés, recomendamos
enfáticamente el uso del arnés incorporado
mientras sea posible (hasta las 65 libras (30 kg)).
15
7.3 SIN el soporte de la espalda
Su niño debe cumplir todos los requisitos:
• pesar entre 40 y 100 libras
\NJ
• y tener entre 40 y 57 pulgadas
\FPGHDOWXUD
• aproximadamente de 4 a 10 años de edad
• el cinturón del hombro DEBE cruzar los
hombros del niño como se indica y la parte
de la falda del cinturón debe estar baja en la
cadera del niño.
&XDQGRXVDHODVLHQWRORVRtGRVGHVX
niño deben estar debajo de la parte de
arriba del almohadón del asiento del
vehículo/apoyacabeza.
Su asiento Graco se puede usar con o sin el
soporte de la espalda siempre que se cumplan
todos los requisitos.
16
8.0 Cómo elegir un lugar apropiado para el asiento
del vehículo
8.1 Requisitos del lugar del asiento del vehículo
LA COLOCACIÓN INADECUADA DEL SISTEMA DE
SEGURIDAD PARA NIÑOS AUMENTA EL RIESGO DE
SUFRIR LESIONES SERIAS O LA MUERTE.
Algunas posiciones del asiento en su vehículo podrían no ser seguras para este sistema de seguridad para niños. Algunos vehículos no tienen posiciones del asiento que puedan usarse sin peligro
con el sistema de seguridad para niños. Si no está seguro dónde colocar el sistema de seguridad
SDUDQLxRVHQVXYHKtFXORFRQVXOWHHOPDQXDOGHOGXHxRGHOYHKtFXORROODPHD*UDFR&KLOGUHQ¶V
3URGXFWV,QFDO
ADVERTENCIA
• El asiento del vehículo debe mirar hacia
adelante. No use sistemas de seguridad para
niños en los asientos del vehículo orientados
hacia atrás o hacia un lado.
• Los niños están más seguros cuando
están debidamente sujetados en las posiciones de sentado en el asiento trasero
del vehículo. &XDQGRVHDSRVLEOHDVHJXUH
el sistema de seguridad para niños en la
posición central de sentado directamente
DWUiVGHORVDVLHQWRVGHODQWHURV6LQHPEDUJR
esta posición está algunas veces equipada
solamente con un cinturón para la falda y no
puede usarse con este sistema de seguridad
para niños sin el arnés incorporado.
17
8.2 Requisitos del cinturón de seguridad del vehículo
MUCHOS SISTEMAS DE CINTURONES DE
SEGURIDAD NO SON SEGUROS PARA USAR CON
ESTE SISTEMA DE SEGURIDAD PARA NIÑOS.
EL CINTURÓN DE SEGURIDAD DEL VEHÍCULO DEBE HABER SIDO DISEÑADO PARA
RETENER AL SISTEMA DE SEGURIDAD PARA NIÑOS DE MODO AJUSTADO EN TODO
MOMENTO. Preste mucha atención a estos sistemas ya que muchos de los sistemas de
cinturones de seguridad que no son seguros se parecen mucho a los que no presentan peligro.
6LQRHVWiVHJXURFRQVXOWHHOPDQXDOGHOGXHxRGHOYHKtFXORROODPHD*UDFR&KLOGUHQ¶V
3URGXFWV,QFDO
ADVERTENCIA
8.3 Sistemas SEGUROS del cinturón de seguridad
del vehículo
LOS SIGUIENTES SISTEMAS PUEDEN USARSE CON SU SISTEMA DE SEGURIDAD PARA
NIÑOS, SI la ubicación del asiento cumple todos los otros requisitos de estas instrucciones y las
del manual del dueño del vehículo. El LATCH puede usarse en lugar de los siguientes sistemas
de seguridad del vehículo si su vehículo está equipado con puntos de anclaje LATCH3RUIDYRU
consulte el manual del dueño del vehículo para identificar las ubicaciones del LATCH.
18
8.4 Para el arnés incorporado solamente
• Cinturón para la falda - ajustado
manualmente
&XDQGRVHDFWLYDODKHELOODHOFLQWXUyQVH
ajusta manualmente tirando del exceso del
cinturón.
• Cinturón para la falda con retractor de
seguridad automático (ALR por sus
siglas en inglés)
El retractor de seguridad automático no
permitirá que el cinturón de seguridad
para la falda se extienda una vez que está
sujetado en la hebilla. Ajuste el cinturón
pasando el cinturón por el retractor
mientras empuja con fuerza el sistema de
seguridad para niños hacia abajo.
19
8.5 Con O sin el arnés incorporado
• Combinación cinturón para la falda y el
hombro con placa de seguridad con traba
8QDYH]TXHHVWpWUDEDGRHQODKHELOODHVWHWLSR
de cinturón tiene una placa de seguridad que
no permitirá que la parte del cinturón para la
falda se afloje. El cinturón se ajusta tirando con
fuerza de la parte del hombro del cinturón del
vehículo mientras empuja con fuerza el sistema
de seguridad para niños hacia abajo.
• Combinación cinturón para la falda y el
hombro con placa de seguridad con traba
móvil Este cinturón tiene una placa de
seguridad que se mueve libremente a lo largo
del cinturón.
• Este cinturón DEBE convertirse para prevenir el
movimiento de la parte de la falda del cinturón.
Debe usar la traba de seguridad provista con el
VLVWHPDGHVHJXULGDGSDUDQLxRVDPHQRVTXH
el cinturón de seguridad del asiento de su vehículo pueda convertirse de otra manera como se
describe en el manual del dueño del vehículo.
Cuando usa el asiento SIN el arnés
LQFRUSRUDGRNO debe usar la traba
de seguridad.
20
Traba de seguridad
8.6 Para instalar la traba de seguridad
1. Ajuste el cinturón trabado empujando con fuerza el sistema de seguridad para niños hacia
abajo y tirando con fuerza el cinturón para el hombro.
0LHQWUDVHPSXMDHODVLHQWRKDFLDDEDMRDSULHWHODVGRVFRUUHDVMXQWDVGHWUiVGHODOHQJXDGH
la hebilla. Destrabe el cinturón sin permitir que se mueva.
3. Sujete la traba de seguridad a los cinturones para el
hombro y la falda como se indica .
4. Vuelva a poner el cinturón en la hebilla. Verifique que el
cinturón para la falda no se mueve tirando con fuerza. Si el
FLQWXUyQVHDIORMDRVHDODUJDUHSLWDHOSURFHGLPLHQWR6DTXHOD
traba de seguridad cuando no usa el sistema de seguridad para
niños. Guárdelo debajo de la lengüeta detrás del asiento.
Pruebe la instalación para ver si el sistema de seguridad para
niños ha quedado bien sujetado. Si no ha quedado bien
VXMHWDGRTXL]iVHDQHFHVDULRDMXVWDUPiVHOFLQWXUyQ
• Desabroche el cinturón de seguridad del vehículo.
• Sujete los cinturones y saque la traba de seguridad.
$FRUWHODORQJLWXGGHODSDUWHGHOFLQWXUyQSDUDODIDOGDWLUiQGROR
1 pulg. (2.5 cm)
de la placa de cierre. Vuelva a colocar la traba de seguridad.
• Abroche el cinturón de seguridad del vehículo. Oprima el
sistema de seguridad para niños hacia más abajo sobre el
almohadón del asiento del vehículo para poder abrochar el
cinturón de seguridad del vehículo. Pruebe la instalación
para ver si el sistema de seguridad para niños ha quedado bien
VXMHWDGR6LQRUHSLWDORVSDVRVDQWHULRUHVKDVWDTXHTXHGHELHQ
sujetado.
21
8.7 Sistemas PELIGROSOS de cinturones de vehículos
NO USE NINGUNO DE LOS SIGUIENTES SISTEMAS PARA SUJETAR EL SISTEMA DE
SEGURIDAD PARA NIÑOS. El LATCH puede usarse EN LUGAR de los siguientes sistemas de
cinturón peligrosos si su vehículo está equipado con puntos de anclaje LATCH3RUIDYRUFRQVXOWH
el manual del dueño del vehículo para identificar las ubicaciones donde debe instalarse el LATCH.
NUNCA USE sistemas de cinturones peligrosos.
• Cinturón para la falda con retractor de
traba de emergencia (ELR por sus siglas
en inglés)
Este cinturón de seguridad para la falda se
mantiene flojo y puede moverse hasta que se
trabe en un accidente o parada repentina.
• Combinación de cinturón para la falda y el
hombro con retractor
Cada correa tiene un retractor en una punta y
está conectada a la placa de
seguridad en la otra punta.
• Cinturón pasivo - Cinturón para el hombro o
falda montado en la puerta
22
• Cinturón pasivo - Cinturón para la falda
con cinturón para el hombro motorizado
NO use los cinturones del vehículo que estén
conectados a la puerta de manera alguna
o que se muevan a través de un carril para
rodear automáticamente al pasajero cuando
se cierra la puerta
• Cinturón para la falda que está más
adelante del pliegue del asiento
Los cinturones de seguridad del vehículo
ubicados delante del pliegue del asiento
quizá nosujeten bien el sistema de
seguridad para niños. Consulte el manual
del propietario del vehículo o visite el
concesionario del vehículo para informarse
sobre los requisitos de instalación de los
asientos de automóvil.
• Si están aprobados para su uso con el
sistema de seguridad para niños, instálelo y
compruebe si está perfectamente instalado
tirando del sistema de seguridad para niños
de atrás hacia delante. Si el asiento de
seguridad para niños se desplaza hacia
delante, NO use estos cinturones de
seguridad.
23
9.0 LATCH
9.1 ¿Qué es el LATCH?
Las Normas Federales de Seguridad para Vehículos Automotor de Estados Unidos han
definido un sistema de instalación de los sistemas de seguridad para niños en los vehículos.
El sistema se denomina LATCH.
LATCH quiere decir: Anclaje inferior y superior para niños (Lower Anchors and Tethers for
CHildren).
El sistema LATCH del vehículo consta de un punto de anclaje superior y dos puntos de
anclaje inferiores.
Los manuales del propietario de algunos vehículos emplean el término ISOFIX para definir al
nuevo sistema de anclaje para sistemas de seguridad para niños. Este sistema de seguridad
para niños con sistema LATCH también se puede usar en los asientos del vehículo equipados
con ISOFIX.
Los vehículos nuevos tienen uno o más asientos equipados con sistemas de anclaje LATCH.
Si el vehículo viene equipado con el sistema LATCHVHSXHGHQYHUORVSXQWRVGHDQFODMH
LQIHULRUHVHQHOSOLHJXHGHODVLHQWRGHOYHKtFXOR6LQRHVWiQYLVLEOHVSXHGHQHVWDUPDUFDGRV
con este símbolo
.
COMPRUEBE la ubicación de los puntos de anclaje superiores del vehículo en el manual del
propietario del vehículo. Se podrían haber identificado usando uno de los símbolos de anclaje
como se indica
.
Utilice SOLAMENTE el LATCH en un sistema de seguridad para niños en el asiento
recomendado por el fabricante del vehículo.
24
Vea el manual del propietario
de su vehículo para informarse
sobre las ubicaciones exactas,
la identificación de los
anclajes y los requisitos
para su uso con un
sistema de seguridad
Puntos de anclaje
para niños.
inferiores del vehículo
Pliegue del asiento
del vehículo
25
Puntos de anclaje
superiores del vehículo
Un asiento típico de
un vehículo de pasajeros. Otros
tipos de vehículos podría tener
el sistema LATCH en otros
lugares.
9.2 Sistema LATCH
El sistema LATCH consiste en un
cinturón deanclaje inferior
permanente y una correa deanclaje
superior.
Utilice el sistema LATCH
ÚNICAMENTE en la posición del
asiento recomendado por el
fabricante del vehículo.
Los puntos de anclaje LATCH
inferiores del vehículo se definen
como a 11 pulgadas (28 cm) desde el
centro de un anclaje LATCH al centro
de otro anclaje LATCH.
Si lo permite el manual del propietario
de su vehículo, la posición de sentado
en el centro se puede usar si el espacio del anclaje es 11 pulgadas (28 cm)
o más.
Punto de anclaje
superior del
vehículo
Anclaje superior
del sistema de
seguridad para niños
Puntos de
anclaje inferiores
del vehículos
26
Cinturón de
anclaje inferior
10.0 Uso del sistema de seguridad CON
el arnés incorporado
NO AJUSTAR DEBIDAMENTE LAS CORREAS DEL
ARNÉS DEL NIÑO AUMENTA EL RIESGO DE SUFRIR
LESIONES SERIAS O LA MUERTE EN CASO DE UNA
CURVA CERRADA, PARADA REPENTINA O ACCIDENTE. Ajuste apretadamente los cinturones
provistos con este sistema de seguridad alrededor de su niño. Una correa tensa no deberá estar
floja. Se mantiene en una línea recta sin doblarse. No aprieta la carne del niño ni empuja el
cuerpo del niño en una posición que no sea natural.
ADVERTENCIA
1. Afloje las correas del arnés levantando la
palanca de ajuste del arnés en la parte de
adelante del asiento cerca de la correa de
ajuste y tirando las correas hacia usted .
2. Abra la presilla del pecho .
27
3. Destrabe las correas del arnés .
4a
4. Verifique la correa para la entrepierna:
Elija la posición que esté más cercana pero
no debajo de su niño.
Para cambiar la posición de la correa para
ODHQWUHSLHUQDHPSXMHODFRUUHDSDUDOD
entrepierna por la parte de abajo del
sistema de seguridad para niños y agárrela
desde arriba para tirarla .
Vuelva a insertar la correa para la entrepierna
en la posición deseada. Asegúrese de que la
correa para la entrepierna no esté doblada
cuando la inserta en la ranura. Tire de ella para
asegurarse de que esté bien instalada.
28
5. Las correas del arnés deben pasar por
las ranuras a la altura o apenas por encima
de los hombros .
6LODVFRUUHDVHVWiQHQODVUDQXUDVFRUUHFWDV
pase a la página 33.
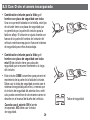
6. Para ajustar las correas del arnés:
a) De vuelta el asiento para poder acceder a la
parte trasera del asiento.
b) Desde atrás del asiento saque las correas
de la placa de metal .
29
7. Pase las puntas de la
correa por las ranuras al frente
del asiento ¡y vuelva a
insertarlas en las ranuras
deseadas ¢. Verifique que las
correas no estén dobladas.
¡
¢
ASEGÚRESE de que las correas
del arnés estén insertadas en las
mismas ranuras en cada costado
del asiento.
Saque el apoyo del cuerpo
cuando no usa el arnés en la
posición más baja de la ranura.
30
8.Use las guías de plástico de las
correas como guía para pasar el
arnés por encima de los rodillos
rojos. Asegúrese de pasar las
correas SOBRE los rodillos rojos
y las guías de plástico de las
correas 11 .
11
Asegúrese que la correa del
anclaje no interfiera cuando
cambia la posición de la altura
de la correa del arnés.
12
9. Si no se pasan las correas
SOBREORVURGLOORVURMRVHO
armado es incorrecto y DEBE
corregirse antes de usar el
sistema de seguridad para niños.
10. Vuelva a armar las correas
sobre la placa de unión de metal
exactamente como se indica 12 .
Verifique que las correas estén
completamente dentro de las
ranuras y que no estén dobladas.
Las
correas
del arnés
DEBEN
pasar por
encima de
los rodillos
rojos.
31
11. Verifique que las correas estén insertadas
al mismo nivel. Tire del arnés para asegurarse
que esté asegurado 13 .
RECUERDE verificar la posición de las correas
para la entrepierna y del hombro a medida
que su niño crece y muévalas a la posición
siguiente cuando sea necesario. Las correas
del arnés deben pasar por las ranuras a la
altura o apenas por encima de
los hombros.
13
32
11.0 Asegurar el sistema de seguridad para niños
en su vehículo
NO USAR DEBIDAMENTE ESTE SISTEMA DE
SEGURIDAD PARA NIÑOS EN EL VEHÍCULO
AUMENTA EL RIESGO DE LESIONES SERIAS O
LA MUERTE DEL NIÑO EN UNA CURVA CERRADA, PARADA REPENTINA O ACCIDENTE.
Cumpla detenidamente estas instrucciones y las del manual del dueño de su vehículo para
asegurarse que el sistema de seguridad para niños esté debidamente ubicado y asegurado
apretadamente en todo momento.
ADVERTENCIA
11.1 Uso del sistema de seguridad CON el
arnés incorporado
11.2 Con un cinturón para la falda o falda/hombro
del vehículo:
Los anclajes inferiores deben estar guardados cuando usa el cinturón del vehículo.
9HUOD6HFFLyQ&yPRJXDUGDUHO/$7&+SiJLQD
1. Coloque el sistema de seguridad para niños firmemente contra el
respaldo del asiento del vehículo que mire hacia adelante.
2. Pase el cinturón del asiento a través de las aberturas de la
ranura del cinturón:
Para el cinturón del hombro/falda
Para el cinturón para la falda solamente
3. Trabe el cinturón de vehículo. El cinturón del vehículo no debe
estar doblado.
33
4. Ajuste el cinturón de seguridad del vehículo
Empuje con fuerza hacia abajo con la rodilla o la mano
libre en el medio del asiento para automóvil .
Luego tire y ajuste el cinturón del vehículo.
Para obtener más información sobre cómo ajustar el
cinturón de su sistema del cinturón de seguridad
YHDOD6HFFLyQ&yPRHOHJLUXQOXJDUDSURSLDGRSDUDHO
DVLHQWRGHOYHKtFXORSiJRHOPDQXDOGHOGXHxRGH
su vehículo.
5. Si hay un anclaje superior del vehículo, asegure el
anclaje para mantener el asiento en su lugar.
9HDOD6HFFLyQ8VRGHODQFODMHSiJLQD
&XDQGRQRVHXVDHODQFODMHHQJiQFKHORHQODEDUUDGH
DOPDFHQDPLHQWRGHODQFODMHXELFDGDDWUiVGHODVLHQWR
vea la página 57.
6. Verificación de seguridad para una instalación segura
Realice esta prueba cada vez que viaja con su niño.
Tuerza y tire el sistema de seguridad para niños hacia
adelante y ambos costados para asegurarse que el cinturón
del vehículo no se alarga o afloja y que el sistema de
seguridad para niños no se mueve con facilidad. El sistema
de seguridad para niños no deberá moverse de un lado a otro
QLKDFLDDGHODQWHPiVGHSXOJDGDFP. Si el sistema
GHVHJXULGDGSDUDQLxRVQRHVWiDVHJXUDGRRHVWiIORMRUHSLWD
el procedimiento O busque otro lugar para el sistema de seguridad
SDUDQLxRVYHDOD6HFFLyQ&yPRHOHJLUXQOXJDUDSURSLDGRSDUD
HODVLHQWRGHOYHKtFXORSiJ
34
11.3 Con LATCH
NOTA: Algunos fabricantes de vehículos usan calificaciones más
bajas del peso para los conectores LATCHGHPDQHUDTXHGHEH
consultar el manual del dueño del vehículo o llamar al fabricante
del vehículo para confirmar los límites de los conectores
LATCH de su vehículo.
1. Desenganche el LATCH de las barras de almacenamiento
HQORVFRVWDGRVGHODVLHQWR3DUDIDFLOLWDUODLQVWDODFLyQ
extienda el LATCH hasta el máximo.
2. Coloque el sistema de seguridad para niños firmemente
contra el respaldo del asiento del vehículo que mire hacia
adelante.
No instale usando este método
3. Enganche los conectores LATCH en los anclajes
para un niño que pesa más de
inferiores del vehículo . Tire con firmeza de las
45 libras (20 kg).
conexiones para estar seguro de que estén
sujetadas. El cinturón debe mantenerse en
posición plana sin doblarse.
4. Tensione el LATCH empujando con fuerza hacia
abajo sobre el sistema de seguridad para niños y
tirando el cinturón de ajuste .
5. Si necesita sacar el LATCHSDUDYROYHUDDMXVWDUOR
empuje el botón en la hebilla del LATCH para
aflojar la correa.
35
6. NUNCA sujete dos conectores LATCH en un solo
punto de anclaje LATCH del vehículo a menos que el
fabricante lo haya permitido específicamente .
7. Todas las posiciones del asiento LATCH tienen
puntos de anclaje. Asegure la parte de arriba del
asiento usando la correa de anclaje. Vea la Sección
8VRGHODQFODMHSiJLQD
8. Verificación de seguridad para una
instalación segura
Realice esta prueba cada vez que viaja con su niño.
Tuerza y tire el sistema de seguridad para niños hacia
adelante y ambos costados para asegurarse que el
cinturón del LATCHQRVHDODUJDRDÀRMD\TXHHO
sistema de seguridad para niños no se mueve con
facilidad. El sistema de seguridad para niños no
deberá moverse de un lado a otro ni hacia adelante
PiVGHSXOJDGDFP. Si el sistema de
VHJXULGDGSDUDQLxRVQRHVWiDVHJXUDGRRHVWiIORMR
repita el procedimiento O busque otro lugar para el
VLVWHPDGHVHJXULGDGSDUDQLxRVYHDOD6HFFLyQ
Cómo elegir un lugar apropiado para el asiento del
YHKtFXORSiJ
36
12.0 Asegurar a su niño al sistema de seguridad
NO USAR DEBIDAMENTE ESTE SISTEMA DE
SEGURIDAD PARA NIÑOS EN EL VEHÍCULO
AUMENTA EL RIESGO DE LESIONES SERIAS O LA
MUERTE DEL NIÑO EN UNA CURVA CERRADA, PARADA REPENTINA O ACCIDENTE. En
XQDFFLGHQWHHOVLVWHPDGHVHJXULGDGSDUDQLxRV12RIUHFHSURWHFFLyQDVXQLxRDPHQRVTXH
las correas del arnés estén debidamente aseguradas. Cumpla estas instrucciones detenidamente
para asegurar debidamente a su niño.
ADVERTENCIA
• AJUSTE EL SISTEMA DE ARNÉS APRETADAMENTE
CADA VEZ que coloca a su niño en el sistema de
seguridad para niños.
• Evite usar ropas abultadas.
1. Coloque al niño en el sistema de seguridad para niños con
la espalda del niño plana contra el respaldo del asiento para
automóvil.
2. Coloque las correas del arnés sobre los hombros del niño
e inserte las lengüetas en la hebilla hasta que se traben en su
lugar con un “clic”.
VERIFIQUE que las correas no estén dobladas.
VERIFIQUE que el arnés esté debidamente apretado tirando
de las correas.
NO use el sistema de seguridad para niños si el arnés no
se traba.
37
¡CLIC!
3. Asegure la presilla del pecho . Coloque la
presilla del pecho en el medio del pecho del
QLxRQLYHODGRFRQODVD[LODV
4. Tense las correas del arnés tirando de la
correa de ajuste adelante del asiento .
5. Asegúrese que las correas estén planas y
ajustadas contra los hombros y muslos del
niño. No debería poder apretar las
correas del arnés. Una correa tensa no deberá
estar floja. Se mantiene en una línea recta sin
doblarse. No aprieta la carne del niño ni empuja
el cuerpo del niño en una posición que no sea
natural.
38
13.0 Cómo sacar o volver a poner el arnés
1. Saque las correas del arnés. Abra la traba
del pecho y la hebilla del arnés .
2. Mire hacia la parte trasera del asiento y
saque las correas del cinturón de la placa de
unión de metal como se indica.
3. Saque la correa para la entrepierna
empujando el retén de la correa de la
SDUWHGHDEDMRGHODVLHQWRKDFLDDUULEDSRUOD
ranura.
39
4. Agarre la hebilla de la correa para la entrepierna
y tírela completamente hacia afuera .
5. Tire de la correa de ajuste del frente del
asiento para trabar la placa de unión de metal en
su lugar.
6. Agarre las correas para el hombro y tírelas
hacia afuera de sus ranuras respectivas del
almohadón del asiento.
Saque el soporte del cuerpo y la almohadilla para
la entrepierna.
40
(QODSDUWHGHDWUiVGHODVLHQWRGHVFRQHFWH
correas de elástico del almohadón del asiento de
abajo de los ganchos como se indica en .
8. También desconecte las correas elásticas que
pasan por las guías del cinturón del vehículo en
los costados del asiento como se indica en .
Repita el proceso del otro lado.
9. Tire el almohadón del asiento para que
muestre los botones rojos como se indica en el
lugar del asiento ¡. Deslice los botones para
liberar el soporte de la espalda de la base y
bájela a una posición plana. Agarre el soporte
de la espalda para evitar que se caiga y golpee
algo.
¡
41
10. Saque las correas del arnés de los brazos
como se indica en ¢.
*XDUGHHOVRSRUWHGHOFXHUSRIXQGDVGHO
DUQpVIXQGDGHODDOPRKDGLOODSDUDOD
entrepierna y correas del arnés en un lugar
seguro para uso futuro.
¢
Correa del arnés
Ranura en T
Brazo
11. Saque la tela del almohadón del asiento
y luego levante el respaldo del asiento para
que ambos brazos SE TRABEN en las
11
canaletas.
Deberá escuchar un CLIC cuando se traben
los brazos en las canaletas.
ASEGÚRESE de que las canaletas no tengan
obstrucciones.
11
MANTENGA LAS CANALETAS
SIN OBSTRUCCIONES
42
12. Ponga el almohadón del asiento entre el
espacio del soporte de la espalda y el lugar
del asiento para permitir 2 correas elásticas
salgan por la parte trasera del asiento.
13. Sujete 2 correas elásticas del almohadón
del asiento a los ganchos en la parte trasera
del sistema de seguridad para niños como se
indica en 12 .
12
14. Pase la correa elástica del almohadón del
asiento a través de la guía del cinturón del
vehículo en el costado del asiento y conéctela
al gancho como se indica. Repita el
procedimiento del otro lado 13 .
13
INVIERTA LAS INSTRUCCIONES PARA
VOLVER A INSTALAR EL ARNÉS. Vea la
Sección 10.0 páginas 27 a 32 para obtener la
vía correcta del arnés.
43
14.0 Uso del sistema de seguridad SIN el arnés incorporado
NO USAR DEBIDAMENTE ESTE SISTEMA DE
SEGURIDAD PARA NIÑOS EN EL VEHÍCULO AUMENTA
EL RIESGO DE LESIONES SERIAS O LA MUERTE DEL
NIÑO EN UNA CURVA CERRADA, PARADA REPENTINA O ACCIDENTE. (QXQDFFLGHQWHHO
sistema de seguridad para niños NO ofrece protección a su niño a menos que las correas del
arnés estén debidamente aseguradas. Cumpla estas instrucciones detenidamente para asegurar
debidamente a su niño.
ADVERTENCIA
ADVERTENCIA! Use solamente el sistema de
cinturón del vehículo para el hombro y la falda
cuando sujeta a su niño en el asiento. El LATCH
no asegurará su niño al asiento. Use solamente el
sistema de cinturón del vehículo para el hombro y
la falda cuando sujeta a su niño en el asiento .
Los cinturones del vehículo DEBEN estar planos
contra el niño y no DEBEN estar doblados.
NUNCA use un cinturón del vehículo para la falda
a través del frente de su niño .
44
INCORRECTO
NO use el cinturón del hombro flojo o puesto
debajo del brazo .
NO ponga el cinturón de seguridad para el
hombro detrás de la espalda del niño .
INCORRECTO
La parte de la falda del cinturón para la falda
y el hombro DEBE estar bajo y apretado en la
FDGHUDDSHQDVWRFDQGRORVPXVORV
NO deje que su niño salga por abajo
del asiento .
INCORRECTO
Si el niño no puede mantener el cinturón de
VHJXULGDGGHOYHKtFXORGHELGDPHQWHFRORFDGR
NO use este asiento. Use un sistema de
seguridad para niños diferente.
NO ponga el cinturón del vehículo sobre la
parte de arriba de los apoyabrazos .
INCORRECTO
45
INCORRECTO
El apoyacabeza del asiento del vehículo no
debe crear un espacio entre el asiento del
vehículo y el asiento de seguridad . El frente
del asiento de seguridad NO DEBE quedar
suspendido del frente del asiento del vehículo
.
INCORRECTO
46
INCORRECTO
15.0 Asegurar al niño y al asiento de seguridad
en el vehículo
1. Coloque el asiento para automóvil firmemente contra el respaldo
de un asiento del vehículo que mira hacia adelante. El asiento del
vehículo debe estar equipado con un cinturón para la falda y el hombro.
2. Coloque al niño en el asiento de seguridad para automóvil con la
espalda del niño plana contra el respaldo del asiento de
seguridad para automóvil.
3. Pase el cinturón para la falda/hombro por la guía del cinturón del hombro
no debajo de la guía del cinturón del hombro . El cinturón debe pasar
sobre la guía del cinturón del vehículo . Sujete la hebilla y tire del cinturón
para el hombro para ajustarlo.
6LHOFLQWXUyQSDVDSRUHOFXHORFDEH]DRFDUDGHOQLxRYXHOYDDSDVDUHO
cinturón sobre el hombro ajustando el soporte de la cabeza. Vea la página 48,
Ajuste del soporte de la cabeza.
5. Verifique que el cinturón para el hombro esté debidamente colocado sobre
el hombro y apretadamente sobre el niño. Una correa tensa no deberá estar
floja. Se mantiene en una línea recta sin doblarse. No aprieta la carne del niño
ni empuja el cuerpo del niño en una posición que no sea natural.
47
16.0 Ajuste del soporte de la cabeza
Cuando se usa con o sin el arnés incorporado.
ANTES de ajustar la altura del soporte de la
FDEH]DSLGDDVXQLxRTXHVHPXHYDXQSRFR
hacia adelante.
Apriete la manija roja de ajuste de arriba del
asiento y tire el soporte de la espalda hacia arriba
hasta que se trabe en una de las 5 posiciones de
la altura.
3DUDEDMDUORDSULHWHODPDQLMDURMDGHDMXVWH\
empuje hacia abajo.
VERIFIQUE para asegurarse de que esté
debidamente trabado en una de las 5 posiciones
de la altura tirando hacia arriba del soporte
de la cabeza.
Las guías del cinturón del hombro deben estar
parejas o apenas por encima de los hombros como
lo indica la línea de puntos .
48
17.0 Eliminar o volver a instalar el soporte de la espalda
Para usar el asiento SIN el soporte de la
HVSDOGDVDTXHODVFRUUHDVGHODUQpVVLHVWiQ
colocadas (vea la sección 13.0 Cómo sacar el
arnés, pág. 39 a 43) y luego continúe con los
pasos siguientes:
1. Desenganche 2 correas elásticas inferiores de
la parte de atrás del asiento como se indica .
2. Desenganche la correa elástica de los
ganchos del almohadón del asiento como se
indica. Repita el procedimiento del otro lado .
49
3. Tire el almohadón del asiento para que
muestre los botones rojos como se indica en
. Deslice los botones para liberar el
soporte de la espalda de la base y bájelo
a una posición plana.
&XDQGRVDFDHOVRSRUWHGHODHVSDOGDGHEH
apoyarlo cuando desliza los botones rojos para
desenganchar el soporte de la espalda de la
EDVH$VHJ~UHVHGHTXHODVPDQRVGHGRV\
otros objetos no estén detrás del soporte de la
espalda cuando lo saca.
4. Saque la tela del almohadón del asiento del
medio y apriete los botones rojos para liberar
el soporte de la espalda del asiento. Separe el
asiento y el soporte de la espalda .
50
5. Una vez que ha separado el soporte de la
espalda JXDUGHHOVRSRUWHGHODHVSDOGD
FRQWRGDVODVFRUUHDVGHODUQpVVRSRUWHGHOD
FDEH]DVRSRUWHGHOFXHUSR\IXQGDGHOD
almohadilla para la entrepierna en un lugar
seguro.
6. Vuelva a conectar las correas elásticas de
atrás del asiento y a través de la guía del
cinturón del vehículo en los costados del asiento
como se indica.
7. El asiento está listo para la instalación.
PARA VOLVER A INSTALAR EL SOPORTE DE
LA ESPALDA SI FUERA NECESARIO, invierta los
pasos de la página 51 a la página 49.
51
18.0 Asegurar al niño con el cinturón del vehículo con traba
de posicionamiento para el cinturón del hombro
El cinturón del hombro DEBE pasar a través
de los hombros del niño en la zona roja como
se indica .
Si el cinturón del hombro está fuera de
HVWD]RQDVHDEBE usar la traba de
posicionamiento del cinturón del hombro.
Para conectar la traba al asiento de seguridad:
1. Inserte el extremo con el nudo de la correa
a través de la ranura en la parte de atrás del
asiento exactamente como se indica .
+D\XQDUDQXUDHQFDGDFRVWDGRGHODVLHQWR
la traba de posicionamiento del cinturón del
hombro DEBE estar conectada a través de la
ranura más cercana al lugar donde el cinturón
del hombro del vehículo pasa por el niño.
52
2. Pase la traba y la correa a través del extremo del nudo como se indica y tire la correa
hacia arriba.
3. NOTA: El extremo liberado de la correa
deberá mirar al frente del asiento.
53
4. Deslice el cinturón del hombro del vehículo por la traba como se indica y tire el extremo libre
de la correa hacia abajo para ajustar la traba contra el hombro del niño.
La parte de la falda DEBE pasar a través de la guía del cinturón del vehículo y estar posicionada
baja en las caderas.
El cinturón NO DEBE estar doblado.
Traba de
posicionamiento del
cinturón del hombro
Traba de
posicionamiento del
cinturón del hombro
VISTA TRASERA DEL NIÑO
SENTADO EN EL ASIENTO
54
5. La parte de la falda del cinturón para la falda y el
hombro DEBEHVWDUEDMR\DSUHWDGRHQODFDGHUD
apenas tocando los muslos.
NO deje que su niño salga por abajo del asiento .
CORRECTO
55
19.0 Uso del anclaje
Todas las posiciones del asiento LATCH tienen puntos de anclaje. Use siempre el anclaje si hay
XQVXMHWDGRUGHODQFODMHHQHOYHKtFXORFRQVXOWHHOPDQXDOGHOGXHxRGHOYHKtFXORSDUDGHWHUPLQDU
los lugares de los sujetadores de anclaje. Si su vehículo no está equipado con un sujetador del
DQFODMHSRGUtDVHUSRVLEOHLQVWDODUXQR&RQWDFWHDOFRQFHVLRQDULRGHVXYHKtFXORSDUDGHWHUPLQDU
el lugar correcto del sujetador y su instalación.
1. Verifique que el anclaje esté apretadamente
sujetado al sistema de seguridad para niños.
2. Sujete la presilla del anclaje al punto
de agarre .
3. Ajuste la correa del anclaje apretadamente
.
3DUDDIORMDUORRSULPDHOERWyQPLHQWUDVWLUD
del cinturón como se indica .
56
19.1 Cómo guardar los anclajes inferiores y anclaje (LATCH)
3DUDIDFLOLWDUHODOPDFHQDPLHQWRH[WLHQGDHO
LATCH hasta el máximo.
2. Ubique las barras de almacenamiento en el
respaldo del sistema de seguridad para niños .
Barras de
almacenamiento
ubicadas en cada
costado del respaldo
del asiento
3. Sujete los extremos del anclaje y los anclajes
inferiores en sus barras de almacenamiento
respectivas como se indica .
Anclaje
4. El almacenamiento de los anclajes inferiors
y el anclaje deberían tener este aspecto cuando
estén terminados .
Anclajes
inferiores
Anclajes
inferiores
57
20.0 Uso en aeronaves
Este sistema de seguridad ha sido certificado para ser usado en vehículos automotor. Ha sido
certificado para uso en aeronaves SOLAMENTE cuando se lo usa con el arnés incorporado.
Cuando se lo usa como asiento SINHODUQpVHVWHVLVWHPDGHVHJXULGDG12+$6,'2
CERTIFICADO para ser usado en aeronaves porque las aeronaves no disponen de cinturones
de hombro.
Puntos importantes que recordar:
1. Las aerolíneas tienen ciertas restricciones sobre el uso de los sistemas de seguridad para
niños.
2. Instale el asiento para automóvil en una aeronave de la misma manera en que se instala en un
DXWRPyYLOFRQXQFLQWXUyQSDUDODIDOGDYHUOD6HFFLyQ&yPRXVDUHOVLVWHPDGHVHJXULGDG
SDUDQLxRV&21HODUQpVLQFRUSRUDGRSiJLQDV
3. Verifique que el cinturón del asiento de la aeronave sujeta seguramente al sistema de
seguridad para niños en todo momento.
58
21.0 Accesorios (SOLAMENTE en ciertos modelos)
21.1 Fundas del arnés y del soporte del cuerpo
ADVERTENCIA
Para prevenir la eyección en un
accidente o parada repentina:
• Asegúrese siempre que las correas del hombro
pasan por las ranuras y están debidamente
instaladas en los hombros.
• Nunca deje que el soporte del cuerpo se apile
o pliegue detrás del niño.
• Use el soporte del cuerpo solamente con
las ranuras inferiores del arnés.
• Asegúrese de que las fundas del arnés no
interfieran con la colocación de la presilla
del pecho a la altura de las axilas.
59
22.0 Pie reclinatorio
Su sistema de seguridad para niños tiene 3
posiciones de reclinación: ajuste el pie
reclinatorio antes de instalar el sistema de
seguridad para niños.
3DUDUHFOLQDUHODVLHQWRWLUHODPDQLMDGH
reclinación hacia afuera e incline el respaldo
del asiento para extender el pie como se
indica .
3DUDSRQHUHODVLHQWRHQODSRVLFLyQYHUWLFDO
tire la manija de reclinación hacia afuera e
incline el asiento hacia adelante para retractar
el pie .
60
23.0 Atención y mantenimiento
• El uso continuo del sistema de seguridad para niños podría causar daño al asiento del vehículo.
8VHXQDHVWHUDWRDOODRIUD]DGDILQDFRQHOVLVWHPDGHVHJXULGDGSDUDQLxRVSDUDSURWHJHUHO
tapizado.
• Piezas de metal y de plástico: limpiar con un jabón suave y agua fresca. No use blanqueador ni
detergente.
• Correas del arnés y correas LATCH: limpie el lugar sucio. No sumerja las correas en agua.
Hacerlo podría debilitar las correas.
6LODKHELOODRHODMXVWDGRUGHODUQpVVHSHJDQRQRVHPDQWLHQHQDSUHWDGRVYHULILTXHTXHQR
KD\DQLQJ~QREMHWRH[WUDxRWDOFRPRFRPLGDVXFLHGDGHWF6DTXHORVREMHWRVFRQSLQ]DV\R
límpielas con una escobilla de algodón. Si no puede lograr que el arnés se mantenga apretado
FRQODKHELOODWUDEDGDFRQVHJXULGDGQRXVHHVWHVLVWHPDGHVHJXULGDGSDUDQLxRV/ODPHD
Graco al 1-800-345-4109 para comprar un arnés o hebilla de repuesto.
61
23.1 Proceso de limpieza de la hebilla
ADVERTENCIA
Prevenga lesiones graves o la muerte:
• La hebilla debe abrocharse correctamente.
• Inspeccione y limpie la hebilla periódicamente para
quitar objetos o desechos que podrían impedir la sujeción.
'HYXHOWDHOVLVWHPDGHVHJXULGDGSDVHHOUHWpQSRUODUDQXUDGH
la correa de la entrepierna .
3DUDOLPSLDUODKHELOODSyQJDOHHQXQDWD]DGHDJXDWLELD\DJLWH
VXDYHPHQWHODKHELOODRSULPDHOERWyQURMRYDULDVYHFHVPLHQWUDV
esté sumergida en el agua . NO SUMERJA LAS CORREAS DEL
ARNÉS. NO USE JABONES ni LUBRICANTES. NO use
detergentes para uso doméstico. Nunca lubrique la hebilla.
(OLPLQHHOH[FHVRGHDJXD\SHUPLWDTXHVHVHTXHDODLUHOD
correa del arnés debe estar seca antes del uso .
4. Repita los pasos 2 y 3 según sea necesario. La hebilla debe
trabarse haciendo un “clic”.
5. Vuelva a sujetar la hebilla en la misma ranura que en el Paso 1.
Vuelva a inspeccionar el arnés para determinar si la instalación es
correcta antes de usarlo.
62
24.0 Para sacar o volver a poner la funda del asiento
Funda del asiento: limpiar con una esponja
húmeda usando un jabón suave y agua fresca.
'HVHUQHFHVDULRVHSXHGHVDFDUODIXQGD
para limpiarla.
1. Saque las correas del arnés y para la
HQWUHSLHUQDYHDOD6HFFLyQ&yPRVDFDU
el arnés. pág. 39).
2. Saque los nudos de plástico del asiento
como se indica en y .
Cinta de
nudo y gancho
3. Lave la funda a máquina en agua fría en
el ciclo delicado y séquela al aire. NO USE
BLANQUEADOR.
PARA VOLVER A PONER LA FUNDA DEL
ASIENTO, INVIERTA LAS INSTRUCCIONES
ANTERIORES.
63
Cinta de
nudo y gancho
25.0 Cómo guardar el manual del dueño
El Manual del dueño puede guardarse abajo
del asiento en el interior de la ranura en el
apoyapie como se indica.
26.0 Piezas de repuesto y garantía
Para comprar piezas o accesorios o para obtener información sobre la garantía en los
Estados Unidos, por favor comuníquese con nosotros en:
www.gracobaby.com
o
1-800-345-4109
64