1
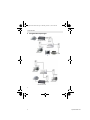
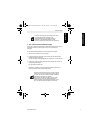
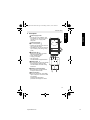
HL_Topcom PL 6420.book Page 1 Thursday, October 7, 2010 4:04 PM
POWERLAN 6420
SNELSTARTGIDS
GUIDE D’INSTALLATION RAPIDE
QUICK INSTALLATION GUIDE
V1.0 - 09/10
HL_Topcom PL 6420.book Page 2 Thursday, October 7, 2010 4:04 PM
NL
F
UK
De in deze handleiding beschreven mogelijkheden worden
gepubliceerd onder voorbehoud van wijzigingen.
Les possibilités décrites dans ce manuel sont publiées sous réserve
de modifications.
The features described in this manual are published with reservation to
modifications.
This product is in compliance with the essential requirements and other
relevant provisions of the R&TTE directive.
This is confirmed by the CE-mark.The Declaration of conformity can be
found on:
http://www.topcom.be/cedeclarations.asp
NL
FR
UK
Het toestel voldoet aan de basiseisen van de R&TTE-richtlijn. Dit
wordt bevestigd door de CE-markering.
La conformité de l’appareil avec les exigences fondamentales de la
directive européenne R&TTE relative aux terminaux, est confirmée
par le label CE.
The CE symbol indicates that the unit complies with the essential
requirements of the R&TTE directive.
HL_Topcom PL 6420.book Page 3 Thursday, October 7, 2010 4:04 PM
Inleiding
Met deze Powerline stekkers PowerLan 6420 kan je een netwerk verbinding
maken tussen je modem, PC, Settopbox, Spelconsole, ...
De PowerLan 6420 stekkers zijn standaard niet verbonden. Volg de procedure
beschreven in hoofdstuk 6 om ze te verbinden.
NEDERLANDS
1
NEDERLANDS
PowerLan 6420
Beperkingen
Onder optimale omstandigheden bedraagt de maximale kabelafstand tussen
twee Powerline apparaten 200 meter.
De kwaliteit van de verbinding wordt echter beïnvloed door:
– slechte kwaliteit van elektriciteitskabels
– zekeringen
– bliksem-/overspanningsbeveiligingen
– multifasespanning: sommige huizen worden voorzien van 3fasespanning. De kwaliteit van de Powerline verbinding zal dramatisch
afnemen wanneer de apparaten op verschillende fasen worden
aangesloten. In sommige gevallen zal er helemaal geen communicatie
mogelijk zijn !
– Sommige elektrische apparaten, zoals magnetrons, stofzuigers, oudere
laders voor laptops/mobiele telefoons, kunnen tijdens het gebruik ruis op
het elektriciteitsnet veroorzaken.
2
CE-markering
De CE-markering op het toestel, de handleiding en de verpakking geeft aan
dat het toestel voldoet aan de basiseisen van de R&TTE-richtlijn 1995/5/EG.
3
Veiligheidsinstructies
Voor uw eigen veiligheid dient u alle waarschuwingen en instructies te lezen
en op te volgen.
– Open het apparaat niet. Door het openen of verwijderen van de behuizing
kunt u worden blootgesteld aan gevaarlijke hoogspanningspunten en
andere gevaren. Servicewerkzaamheden aan het apparaat mogen
uitsluitend worden uitgevoerd door bevoegd onderhoudspersoneel. Neem
contact op met uw leverancier voor meer informatie.
– Gebruik het apparaat niet tijdens een onweersbui. Er bestaat gevaar op
elektrische schokken als gevolg van blikseminslag.
– Stel het apparaat niet bloot aan stof of agressieve vloeistoffen.
– Gebruik dit product niet in de buurt van waterbronnen.
– Zorg dat u de kabels op de juiste poorten aansluit.
– Bedek de ventilatiegaten op het apparaat niet.
3
Topcom Butler xxxx
3
HL_Topcom PL 6420.book Page 4 Thursday, October 7, 2010 4:04 PM
PowerLan 6420
4
Veelgebruikte toepassingen
4
4
Topcom Butler xxxx
HL_Topcom PL 6420.book Page 5 Thursday, October 7, 2010 4:04 PM
PowerLan 6420
Omschrijving
1 Doorvoer stopcontact
– Hier kan je toestellen zoals een modem,
PC, Settopbox, spelconsole, TV, ...
inpluggen om te voorzien van stroom.
1
2 Voedings-LED:
– Aan: normale werking
– Knipperen (0,5 seconde aan/0,5
seconde uit): in verbindingsmodus
– Traag knipperen (1 seconde aan/4
seconden uit): in stand-bymodus
(energiespaarfunctie)
2
4
3 Powerline-LED:
Geeft de kwaliteit weer van de
verbinding met andere Powerline
stekkers.
– Groen: uitstekende kwaliteit
– Oranje: goede kwaliteit
– Rood: slechte kwaliteit
De LED knippert tijdens de
gegevensoverdracht.
NEDERLANDS
NEDERLANDS
5
7
6
3
5
4 Ethernet-LED:
– Aan : succesvolle verbinding met een
andere toestel via een Ethernet-kabel.
De LED knippert tijdens de
gegevensoverdracht.
5 Ethernet-verbinding (RJ45):
Voor de verbinding met een extern
toestel via een Ethernet-kabel.
6 Volledige Reset knop :
– Druk deze reset-knop in met
bijvoorbeeld een paper-clip gedurende
3 seconden om de Powerline volledig te
resetten.
Na deze reset zal het standaard
wachtwoord "HomePlugAV" ingeladen
worden.
5
Topcom Butler xxxx
5
HL_Topcom PL 6420.book Page 6 Thursday, October 7, 2010 4:04 PM
PowerLan 6420
7 Knop voor reset/eenvoudige verbinding
– Druk gedurende 2 seconden om de verbindingssequentie
te starten.
– Druk gedurende 12 seconden om de fabrieksinstellingen te herstellen.
Hierbij wordt het netwerk wachtwoord volledig gewist.
De Powerline-stekker schakelt over op de
stand-bymodus (energiespaarfunctie)
wanneer hij gedurende 15 minuten niet via
een Ethernet-kabel op een toestel is
aangesloten.
6
De PowerLan 6420 -stekkers verbinden
De PowerLan 6420 -stekkers zijn standaard niet verbonden.
Volg de onderstaande procedure om ze met mekaar te verbinden:
1. Steek alle Powerlines in het stopcontact.
De gemakkelijkste manier is om ze naast
elkaar in dezelfde ruimte in te steken. Zodra
ze met succes zijn verbonden, kunt u ze op
de gewenste plaats installeren.
2. Druk gedurende twee seconden op de toets (reset/eenvoudige verbinding)
van de eerste Powerline-stekker.
De voedings-LED zal traag knipperen (0,5 seconde aan / 0,5 seconde uit).
3. Druk binnen de twee minuten gedurende twee seconden op de toets van
de tweede stekker. De verbindingssequentie start.
Er zal een willekeurig wachtwoord uitgewisseld worden tussen de
Powerlines.
Wanneer de verbinding is voltooid, starten beide stekkers opnieuw op en
gaan de Powerline- LED’s op beide stekkers aan.
6
6
Topcom Butler xxxx
HL_Topcom PL 6420.book Page 7 Thursday, October 7, 2010 4:04 PM
Druk gedurende minstens 12 seconden op de toets
voor reset/eenvoudige verbinding om de
fabrieksinstellingen van de PowerLan 6420 te
herstellen. In de fabrieksinstellingen moet de
PowerLan 6420 stekker opnieuw worden verbonden!
7
NEDERLANDS
NEDERLANDS
PowerLan 6420
Een extra PowerLan 6420 toevoegen
Je kan een Powerline netwerk maken tot maximaal acht Powerlines. Indien je
reeds twee Powerlines in werking hebt, kan je er nog maximum zes
toevoegen.
Volg de onderstaande procedure om een Powerline toe te voegen:
1. Steek de extra Powerline in het stopcontact.
2. Druk gedurende twee seconden op de toets van één van de Powerline
stekkers die reeds in werking is.
Het aan/uit-lampje zal traag knipperen (0,5 seconde aan / 0,5 seconde uit).
3. Druk binnen de twee minuten gedurende twee seconden op de toets van
de extra Powerline stekker.
De verbindingssequentie start.
Wanneer de verbinding is voltooid, starten de stekkers opnieuw op en
gaan de Powerline-LED’s op beide stekkers aan.
Alvorens de nieuwe Powerline toe te voegen is het aan
te raden om het netwerk wachtwoord van deze stekker
te wissen door de knop “reset/eenvoudige verbinding"
gedurende 12 seconden in te drukken.
Een Powerline die reeds werd gebruikt in een ander
netwerk zal nog steeds een netwerk wachtwoord
hebben waardoor het verbindingsmechanisme met de
knop “reset/eenvoudige verbinding" niet zal werken.
7
Topcom Butler xxxx
7
HL_Topcom PL 6420.book Page 8 Thursday, October 7, 2010 4:04 PM
PowerLan 6420
8
PC Hulpprogramma (Utility)
De Powerline stekkers kunnen ook geconfigureerd worden via de
meegeleverde PC software.
Gelieve hiervoor de handleiding op de meegeleverde CD-ROM te raadplegen.
8
8
Topcom Butler xxxx
HL_Topcom PL 6420.book Page 9 Thursday, October 7, 2010 4:04 PM
PowerLan 6420
Garantieperiode
Op de Topcom-toestellen wordt een garantie van 24 maanden verleend. De
garantieperiode gaat in op de dag waarop het nieuwe toestel wordt gekocht.
Er is geen garantie op standaard of oplaadbare batterijen (type AA/AAA).
Kleine onderdelen of defecten die een verwaarloosbaar effect hebben op de
werking of waarde van het toestel zijn niet gedekt door de garantie.
De garantie moet worden bewezen door voorlegging van het originele
aankoopbewijs of kopie waarop de datum van aankoop en het toesteltype
staat.
9.2
NEDERLANDS
9.1
Topcom-garantie
NEDERLANDS
9
Afwikkeling van garantieclaims
Een defect toestel moet, samen met een geldig aankoopbewijs, worden
teruggestuurd naar een Topcom-hersteldienst.
Als het toestel tijdens de garantieperiode een defect vertoont, zal Topcom of
diens officieel erkende hersteldienst eventuele defecten te wijten aan
materiaal- of productiefouten gratis herstellen, door defecte toestellen of
onderdelen van defecte toestellen ofwel te herstellen ofwel te vervangen. In
het geval dat het toestel wordt vervangen, kan de kleur en het model
verschillend zijn van het oorspronkelijk gekochte toestel.
De oorspronkelijke aankoopdatum is bepalend voor het begin van de
garantieperiode. De garantieperiode wordt niet verlengd als het toestel wordt
vervangen of hersteld door Topcom of diens officieel erkende hersteldienst.
9.3
Garantiebeperkingen
Schade of defecten te wijten aan onoordeelkundig gebruik of bediening en
schade te wijten aan het gebruik van niet-originele onderdelen of accessoires
worden niet gedekt door de garantie.
De garantie dekt geen schade te wijten aan externe factoren, zoals bliksem,
water en brand, noch enige transportschade.
Er kan geen garantie worden ingeroepen als het serienummer op het toestel is
gewijzigd, verwijderd of onleesbaar gemaakt.
Garantieclaims zijn ongeldig indien het toestel hersteld, gewijzigd of
aangepast werd door de koper.
9
Topcom Butler xxxx
9
HL_Topcom PL 6420.book Page 10 Thursday, October 7, 2010 4:04 PM
PowerLan 6420
1
Introduction
Avec ces prises Powerline PowerLan 6420, vous pouvez établir une
connexion réseau entre votre modem, votre PC, votre Settopbox, votre
console de jeu...
Les prises PowerLan 6420 ne sont pas connectées par défaut. Suivez la
procédure décrite dans le chapitre 6 pour les connecter.
Limitations
Dans des conditions optimales, la distance câblée maximale entre deux
appareils Powerline est de 200 mètres.
La qualité de la connexion est influencée par :
– la mauvaise qualité des câbles électriques
– les fusibles
– les protections contre la foudre / les surtensions
– Tension multiphases : certaines maisons sont équipées d'une tension
triphasée. La qualité de la connexion Powerline diminuera fortement si les
appareils sont connectés sur des phases différentes. Dans certains cas,
aucune communication ne sera possible.
– Certains appareils électriques, comme les fours à micro-ondes, les
aspirateurs, les anciens chargeurs pour ordinateurs portables / gsm,
peuvent causer des parasites sur le réseau électrique
pendant l'utilisation.
2
Marquage CE
Le marquage CE sur l'appareil, le mode d'emploi et l'emballage indiquent
que cet appareil est conforme aux exigences de base de la directive
R&TTE 1995/5/CE.
3
Instructions de sécurité
Pour votre sécurité, prenez connaissance de tous les avertissements
et respectez-les.
– N'ouvrez pas l'appareil. En ouvrant l'appareil ou en enlevant le boîtier,
vous pouvez être exposé à des pics de tension et d'autres dangers.
L'appareil ne peut être entretenu et réparé que par du personnel
d'entretien compétent. Contactez votre fournisseur pour en savoir plus.
– N'utilisez pas cet appareil pendant un orage. Il existe un risque de chocs
électriques causés par la foudre.
– N'exposez pas l'appareil à de la poussière ou à des liquides agressifs.
– N'utilisez pas ce produit à proximité de sources d'eau.
– Veillez à connecter les câbles sur les bons ports.
– Ne recouvrez pas les trous de ventilation de l'appareil.
10
10
Topcom Butler xxxx
HL_Topcom PL 6420.book Page 11 Thursday, October 7, 2010 4:04 PM
PowerLan 6420
Applications courantes
NEDERLANDS
FRANÇAIS
4
11
Topcom Butler xxxx
11
HL_Topcom PL 6420.book Page 12 Thursday, October 7, 2010 4:04 PM
PowerLan 6420
5
Description
1 Passage de la prise
– Branchez ici des appareils tels que
modem, PC, settopbox, console de
jeu, téléviseur, ... pour les alimenter.
1
2 LED d'alimentation :
– Allumée : fonctionnement normal
– Clignotement (0,5 seconde
allumée / 0,5 seconde éteinte) :
en mode connexion.
– Clignotement lent
(1 seconde allumée / 4 secondes
éteinte) : en mode veille
(économie d'énergie).
2
4
3
3 LED Powerline :
Indique la qualité de la connexion
avec les autres prises Powerline.
– Vert : très bonne qualité.
– Orange : bonne qualité.
– Rouge : mauvaise qualité.
La LED clignote pendant le transfert
de données.
7
6
5
4 LED Ethernet :
– Allumée : connexion établie avec un
autre appareil via le câble Ethernet.
La LED clignote pendant le transfert de
données.
5 Connexion Ethernet (RJ45) :
Pour établir une connexion avec un
appareil externe via le câble Ethernet.
6 Bouton de réinitialisation :
– Appuyez sur ce bouton pendant
3 secondes avec une agrafe,
par exemple, pour réinitialiser
complètement le Powerline.
Après cette réinitialisation, le mot
de passe standard "HomePlugAV"
sera chargé.
12
12
Topcom Butler xxxx
HL_Topcom PL 6420.book Page 13 Thursday, October 7, 2010 4:04 PM
7 Bouton de réinitialisation / connexion simple
– Appuyez pendant 2 secondes sur ce bouton pour lancer
la séquence de connexion.
– Appuyez dessus pendant 12 secondes pour rétablir les paramètres
d'usine. Le mot de passe du réseau est alors effacé.
NEDERLANDS
FRANÇAIS
PowerLan 6420
La prise Powerline passe en mode veille
(économie d'énergie) lorsqu'elle n'est pas
connectée pendant 15 minutes à un
appareil par câble Ethernet.
6
Connecter les prises PowerLan 6420
Les prises PowerLan 6420 ne sont pas connectées par défaut.
Suivez la procédure ci-dessous pour les connecter entre eux :
1. Branchez tous les Powerline dans une prise.
Le plus facile, c'est de les brancher les unes
près des autres dans une même pièce. Dès
que la connexion est établie, vous pouvez les
installer où vous le voulez.
2. Appuyez pendant deux secondes sur la touche (réinitialisation/
connexion simple) de la première Powerline.
La LED d'alimentation va clignoter lentement (0,5 seconde allumée /
0,5 seconde éteinte).
3. Dans les deux minutes qui suivent, appuyez pendant deux secondes sur la
touche de la deuxième prise. La séquence de connexion démarre.
Un mot de passe aléatoire sera échangé entre les Powerlines.
Lorsque la connexion est établie, les deux prises s'allument à nouveau
et les diodes Powerline s'allument sur les deux prises.
13
Topcom Butler xxxx
13
HL_Topcom PL 6420.book Page 14 Thursday, October 7, 2010 4:04 PM
PowerLan 6420
Appuyez pendant au moins 12 secondes sur la
touche de réinitialisation/connexion simple pour
rétablir les paramètres d'usine de la PowerLan 6420.
Lorsque les paramètres d'usine sont en vigueur,
la prise PowerLan 6420 doit à nouveau être
connectée.
7
Ajouter une prise PowerLan 6420 supplémentaire
Vous pouvez créer un réseau de huit prises Powerline au maximum.
S'il y a déjà deux Powerlines en fonctionnement, vous pouvez donc en
ajouter 6 au maximum.
Suivez la procédure ci-dessous pour ajouter une prise Powerline :
1. Branchez la Powerline supplémentaire dans la prise.
2. Pendant deux secondes, appuyez sur la touche de l'une des prises
Powerline déjà en fonctionnement.
La LED on/off va clignoter lentement (0,5 seconde allumée /
0,5 seconde éteinte).
3. Dans les deux minutes qui suivent, appuyez pendant deux secondes
sur la touche de la prise supplémentaire.
La séquence de connexion démarre.
Lorsque la connexion est établie, les prises s'allument à nouveau et les
LED Powerline s'allument sur les deux prises.
Avant d'ajouter une nouvelle prise Powerline, il est conseillé
d'effacer le mot de passe réseau de cette prise en appuyant
sur le bouton "réinitialisation/connexion simple" pendant
12 secondes.
Une prise Powerline déjà utilisée dans un autre réseau aura
gardé un mot de passe réseau en mémoire, et le mécanisme
de connexion à l'aide du bouton "réinitialisation/connexion
simple" ne fonctionnera donc pas.
14
14
Topcom Butler xxxx
HL_Topcom PL 6420.book Page 15 Thursday, October 7, 2010 4:04 PM
PowerLan 6420
Programme d'aide PC (utilitaire)
Les prises Powerline peuvent également être configurées à l'aide du
logiciel fourni.
Veuillez pour ce faire consulter le manuel sur le CD-ROM fourni.
NEDERLANDS
FRANÇAIS
8
15
Topcom Butler xxxx
15
HL_Topcom PL 6420.book Page 16 Thursday, October 7, 2010 4:04 PM
PowerLan 6420
9
9.1
Garantie Topcom
Période de garantie
Les appareils Topcom bénéficient d'une période de garantie de 24 mois. La
période de garantie prend effet le jour de l'achat du nouvel appareil. Il n'y a
aucune garantie sur les piles standard ou rechargeables (de type AA/AAA).
Les accessoires et les défauts qui ont un effet nuisible sur le fonctionnement
ou la valeur de l'appareil ne sont pas couverts.
La garantie s'applique uniquement sur présentation du reçu d'achat original ou
une copie de celui-ci sur lequel figurent la date de l'achat et le modèle de
l'appareil.
9.2
Mise en œuvre de la garantie
Tout appareil défectueux doit être retourné à un centre de service après-vente
Topcom, accompagné d'un ticket d'achat valable.
En cas de panne pendant la période de garantie, Topcom ou son centre de
service après-vente officiel réparera gratuitement les dysfonctionnements dus
à un vice de matière ou de fabrication, en réparant ou en remplaçant les
appareils ou les pièces défectueux. En cas de remplacement, la couleur et le
modèle peuvent être différents de ceux de l'appareil acheté initialement.
La date d'achat initiale détermine le début de la période de garantie. La
période de garantie n'est pas prolongée si l'appareil est remplacé ou réparé
par Topcom ou son centre de service après-vente officiel.
9.3
Exclusions de garantie
Les dommages et les pannes causés par un mauvais traitement ou une
utilisation incorrecte et les dommages qui résultent de l'utilisation de pièces et
d'accessoires non originaux ne sont pas couverts par la garantie.
La garantie ne couvre pas les dommages causés par des éléments extérieurs
tels que la foudre, l'eau et le feu, ni les dommages provoqués par le transport.
Aucune garantie ne pourra être invoquée si le numéro de série indiqué sur les
appareils a été modifié, supprimé ou rendu illisible.
Aucune garantie ne peut non plus être invoquée si l'appareil a été réparé ou
modifié par l'acheteur.
16
16
Topcom Butler xxxx
HL_Topcom PL 6420.book Page 17 Thursday, October 7, 2010 4:04 PM
PowerLan 6420
Introduction
By default, the PowerLan 6420 plugs are not connected. To connect them,
follow the procedure given in Chapter 6.
DUTCH
PowerLan 6420 plugs can be used to establish a network connection between
your modem, PC, set-top Box, games console, etc.
ENGLISH
1
Limitations
Ideally, the maximum cable length between two Powerline devices should be
no more than 200 metres.
The connection quality will be impaired by:
– poor-quality electrical cabling.
– fuses.
– lightning/power surge protectors.
– multiphase voltage: some houses have three-phase electricity. The
quality of the Powerline connection will be dramatically impaired if the
devices are connected to different phases. In some cases, there will be
no communication at all.
– Some electrical equipment, such as microwave ovens, vacuum cleaners,
and old laptop/mobile phone chargers, will generate background noise on
the mains network during operation.
2
CE marking
The EC marking on the device, the manual and packaging indicates that the
unit complies with the essential requirements of R&TTE Directive 1995/5/EC.
3
Safety instructions
For your own safety, make sure you read and follow all warning notices
and instructions.
– Do not open the device. Opening or removing the device cover can
expose you to dangerous high-voltage points or other risks. The device
can only be serviced by qualified service staff. Please contact your vendor
for further information.
– Do not use the device during a thunderstorm. There may be a risk of
electric shocks due to lightning.
– Do not expose the device to dust or corrosive liquids.
– Do not use this product near water sources.
– Make sure the cables are connected to the right port.
– Do not obstruct the vents on the device.
17
Topcom Butler xxxx
17
HL_Topcom PL 6420.book Page 18 Thursday, October 7, 2010 4:04 PM
PowerLan 6420
4
Typical applications
18
18
Topcom Butler xxxx
HL_Topcom PL 6420.book Page 19 Thursday, October 7, 2010 4:04 PM
PowerLan 6420
Description
1 Power supply socket
– You can plug in your hardware, such
as a modem, PC, set-top box, games
console, TV, etc., to supply them
with power.
DUTCH
ENGLISH
5
1
2 Power supply LED
– On: normal operation
– Flashing (0.5 seconds on/0.5 seconds
off): in connection mode.
– Slow flashing (1 second on/4 seconds
off): in stand-by mode (energy saving
mode)
2
4
3
3 Powerline LED
Shows the quality of the connection
with other Powerline plugs.
– Green: excellent quality.
– Orange: good quality.
– Red: poor quality.
The LED flashes during data transfer.
7
6
5
4 Ethernet LED:
– On: successful connection with another
device through an Ethernet cable.
The LED flashes when data is being
transferred.
5 Ethernet connection (RJ45):
For connection to an external device
through an Ethernet cable.
6 Full reset button:
– Push in the reset button, with a paper
clip for example, for 3 seconds to reset
the Powerline.
Following reset, the standard
password "HomePlugAV" is loaded.
19
Topcom Butler xxxx
19
HL_Topcom PL 6420.book Page 20 Thursday, October 7, 2010 4:04 PM
PowerLan 6420
7 Reset/simple connect button
– Push down for two seconds to start the connection sequence.
– Push down for 12 seconds to restore the factory settings.
This completely changes the network password.
The Powerline plug switches to stand-by
mode (energy saving function) when it is
not connected to a device through an
Ethernet cable for 15 minutes.
6
Connecting the PowerLan 6420 plugs
By default, the PowerLan 6420 plugs are not connected.
To connect them with each other, follow the procedure set out below.
1. Plug all the Powerlines into the power socket.
The easiest way is to plug them in next to
each other in the same place. Once they
have been successfully connected, you can
put them in the desired location.
2. Push down the (reset/simple connect) key on the first Powerline plug
for two seconds.
The power-supply LED will flash slowly (0.5 seconds on/0.5 seconds off).
3. Within two minutes, push down the key on the second plug.
The connection sequence starts.
A random password will be exchanged between the Powerlines.
Once the connection is complete, restart both plugs and the
Powerline LEDs on both plugs will light up.
20
20
Topcom Butler xxxx
HL_Topcom PL 6420.book Page 21 Thursday, October 7, 2010 4:04 PM
Push down the reset/simple connect key for at least
12 seconds to restore the PowerLan 6420 factory
settings. When the factory settings are restored, the
PowerLan 6420 plug will need to be reconnected!
7
DUTCH
ENGLISH
PowerLan 6420
Adding an additional PowerLan 6420
A Powerline network can be created with up to a maximum of eight
Powerlines. If you already have two Powerlines in operation, you can
add a maximum of six.
To add a Powerline, follow the procedure set out below.
1. Plug the extra Powerline into the power socket.
2. Push down for two seconds on the key on one of the Powerline plugs
that is already in operation.
The on/off light will flash slowly (0.5 seconds on/0.5 seconds off).
3. Within two minutes, push down the key on the extra Powerline plug
for two seconds.
The connection sequence starts.
Once the connection is complete, restart the plugs and the Powerline
LEDs on both plugs will light up.
Before adding the new Powerline, it is recommended that
the network passport for this plug be changed by pushing
down the "reset/simple connect" button for 12 seconds.
A Powerline that has already been used in another
network will still have the password for that network,
which means that the "reset/simple connect" button
mechanism will not operate.
21
Topcom Butler xxxx
21
HL_Topcom PL 6420.book Page 22 Thursday, October 7, 2010 4:04 PM
PowerLan 6420
8
PC help programme (Utility)
The Powerline plugs can also be configured using the PC software provided.
For this, please read the manual for the CD-ROM provided.
22
22
Topcom Butler xxxx
HL_Topcom PL 6420.book Page 23 Thursday, October 7, 2010 4:04 PM
PowerLan 6420
Warranty period
The Topcom units have a 24-month warranty period. The warranty period
starts on the day the new unit is purchased. There is no warranty on standard
or rechargeable batteries (AA/AAA type).
Consumables or defects causing a negligible effect on operation or value of
the equipment are not covered.
The warranty has to be proven by presentation of the original or copy of the
purchase receipt, on which the date of purchase and the unit-model are
indicated.
9.2
DUTCH
9.1
Topcom Warranty
ENGLISH
9
Warranty handling
A faulty unit needs to be returned to a Topcom service centre including a valid
purchase note .
If the unit develops a fault during the warranty period, Topcom or its officially
appointed service center will repair any defects caused by material or
manufacturing faults free of charge, by either repairing or exchanging the
faulty units or parts of the faulty units. In case of replacement, colour and
model can be different from the original purchased unit.
The initial purchase date shall determine the start of the warranty period. The
warranty period is not extended if the unit is exchanged or repaired by Topcom
or its appointed service centre.
9.3
Warranty exclusions
Damage or defects caused by incorrect treatment or operation and damage
resulting from use of non-original parts or accessories are not covered by the
warranty.
The warranty does not cover damage caused by outside factors, such as
lightning, water and fire, nor any damage caused during transportation.
No warranty can be claimed if the serial number on the units has been
changed, removed or rendered illegible.
Any warranty claims will be invalid if the unit has been repaired, altered or
modified by the buyer.
23
Topcom Butler xxxx
23
HL_Topcom PL 6420.book Page 24 Thursday, October 7, 2010 4:04 PM
NL
Het toestel vernietigen (milieu)
Op het einde van de levenscyclus van het product mag u dit product niet
bij het normale huishoudelijke afval gooien, maar moet u het naar een
inzamelpunt brengen voor de recyclage van elektrische en
elektronische apparatuur. Dit wordt aangeduid door het symbool op het
product, in de handleiding en/of op de verpakking.
Sommige materialen van het product kunnen worden hergebruikt als u ze naar
een inzamelpunt brengt. Door onderdelen of grondstoffen van gebruikte
producten te hergebruiken, levert u een belangrijke bijdrage tot de
bescherming van het milieu. Wend u tot uw lokale overheid voor meer
informatie over de inzamelpunten in uw buurt.
FR
Recyclage de l’appareil (environnement)
Au terme du cycle de vie de ce produit, vous ne devez pas jeter le produit dans
les déchets ménagers ordinaires mais le déposer dans un point de collecte
pour le recyclage des équipements électriques et électroniques. Le symbole
sur ce produit, guide d’utilisation et / ou l’emballage indique ceci.
Certains matériaux du produit peuvent être réutilisés si vous les déposez dans
un point de recyclage. En réutilisant certaines pièces ou matières premières
des produits usagés, vous apportez une contribution importante à la protection
de l’environnement. Veuillez contacter vos autorités locales pour toute
information supplémentaire sur les points de collecte dans votre région.
UK
Disposal of the device (environment)
At the end of the product lifecycle, you should not throw this product into the
normal household garbage but bring the product to a collection point for the recycling of electrical and electronic equipments. The symbol on the product, user
guide and/or box indicate this.
Some of the product materials can be re-used if you bring them to a recycling
point. By re-using some parts or raw materials from used products you make
an important contribution to the protection of the environment.
Please contact your local authorities in case you need more information on the
collection points in your area.
HL_Topcom PL 6420.book Page 25 Thursday, October 7, 2010 4:04 PM
Technical Data
Protocol/Standards
• HomePlug AV specification, IEEE 802.3 10/100 Ethernet (100Mbps) and
IEEE 802.3u Fast Ethernet
• 10/100 Mbps AutoMDI/MDIx Support
• Co-exists with existing 14Mbps HomePlug 1.0 and 85Mbps Turbo
HomePlug 1.0
• Compliant to EuP Lot 6
Modulation
• OFDM 1024/256/64/16/8 QAM, QPSK, BPSK and ROBO Modulation
Scheme
Frequency Band
• 2MHz to 30MHz band
Quality of Service
• TDMA channel access with Contention–Free and Contention-Based
(CSMA/CA) period
• Channel Adaptation ensures that signal integrity is maintained even under
harsh noise environment
• Four Level prioritized random access method based on contention access
and multi-segment
• ToS and CoS Packet Classifier
• Supports IGMP managed multicast session
Noise Filtering
• Good filtering at frequency band 2MHz to 30MHz
• Filter characteristics : -25dB to -45dB
Security Support
• 128 bit DES Encryption with key management for secure powerline communications )
Hardware
• Intellon (Atheros) INT6400 + INT1400 chipset
Platform Support
• OS Independent with TCP/IP protocol installed
• Utility software compatible with Windows XP 32bit, Vista 32bit, Window 7
Power Supply
• Switch Mode 240V Supply for Europe
Power consumption
• Maximum 3 Watts
HL_Topcom PL 6420.book Page 26 Thursday, October 7, 2010 4:04 PM
Multicolor LED Indicators
• 1 x Power LED
• 1 x Powerline Link / Activity Status LED
• 1 x Ethernet Link / Activity Status LED
AC Pass Through Socket
• Current Rating: 16A max
Temperature
• Operating : 0° to 40° Celsius
• Non-Operating : -25° to 70° Celsius
Measurements
• Dimension : 105mm (H) x 58mm (W) x 40mm (D)
• Weight : 190g / unit
Humidity
• Operating : 30% to 80% Relative Humidity (Non-Condensing)
• Non-Operating : 30% to 95% Relative Humidity (Non-Condensing)
26
Topcom Butler xxxx
ENGLISH
HL_Topcom PL 6420.book Page 27 Thursday, October 7, 2010 4:04 PM
Topcom Butler xxxx
27
HL_Topcom PL 6420.book Page 28 Thursday, October 7, 2010 4:04 PM
visit our website
www.topcom.net
MD19600373