1
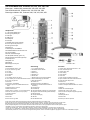
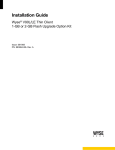
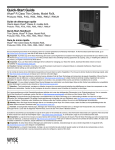
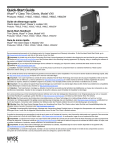
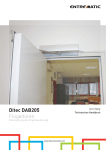
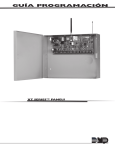
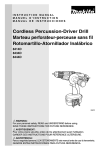
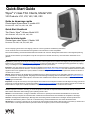
Quick-Start Guide
Wyse® V class Thin Clients, Model VX0
VX0 Products: V00, V30, V50, V90, VR0
Guide de démarrage rapide
Clients légers Wyse® classe V, modèle VX0
Produits VX0 : V00, V30, V50, V90, VR0
Quick-Start Handbuch
Thin Clients, Wyse® V-Klasse, Modell VX0
VXO-Produkte: V00, V30, V50, V90, VR0
Guía de inicio rápido
Clientes ligero clase Wyse® V, Modelo VX0
Productos VX0: V00, V30, V50, V90, VR0
See accompanying documents in the shipping carton for License Agreement and Warranty information.
Voir le contrat de licence et les informations de garantie se trouvant dans le carton d'expédition.
Die Lizenzvereinbarung und die Garantieinformationen befinden sich unter den beiliegenden Dokumenten in der Originalverpackung.
Consulte los documentos que acompañan la caja de envío para ver el Acuerdo de licencia y otra información relacionada con la
garantía.
Important: A printed copy of the Wyse Technology End User License Agreement is included in the shipping box and provided for your
reference only. The license at http://www.wyse.com/license as of the purchase date is the controlling licensing agreement. By copying,
using, or installing the software or the product, you agree to be bound by those terms.
Important : Une copie imprimée du contrat de licence utilisateur final de Wyse Technology est incluse dans le paquet d’expédition. Elle
est fournie uniquement à titre de référence. La licence présente sur http://www.wyse.com/license à la date d’achat du terminal constitue
l’agrément de Licence applicable. En copiant, utilisant ou installant le logiciel ou le produit, vous acceptez d’être soumis aux termes et
conditions de ce contrat.
Wichtig: Die Druckversion des Endbenutzer-Lizenzabkommens von Wyse Technology ist im Lieferumfang enthalten und wird nur zu
Ihrer Information zur Verfügung gestellt. Die gültige Lizenzvereinbarung ist diejenige, die zum Kaufdatum unter http://www.wyse.com/
license veröffentlicht ist. Durch das Kopieren, Verwenden oder Installieren der Software oder des Produkts erklären Sie sich mit den
Bedingungen einverstanden.
Importante: La caja de envío incluye una copia impresa del Contrato de Licencia para el Usuario Final de Wyse Tecnology que sólo se
proporciona a modo de referencia. La licencia incluida en http://www.wyse.com/license el día que se realice la compra es el contrato de
licencia válido. Al copiar, usar o instalar el software o el producto, acepta adherirse a las condiciones del contrato.
Caution: Improper connection, mounting, or use of this product could result in component failure and/or flash memory corruption.
Read Caution Statements before setting up and operating the thin client.
Attention : Tout branchement, montage ou utilisation incorrect de ce produit pourrait entraîner des défaillances au niveau des
composants et/ou la corruption de la mémoire flash. Veuillez lire les avertissements avant d’installer et d’exploiter le client léger.
Vorsicht: Unsachgemäße Verbindungen, Montage oder Verwendung dieses Produkts kann zu Versagen der Komponenten bzw.
Schäden am Flash-Memory führen. Lesen Sie vor der Einrichtung und Inbetriebnahme des Thin Client die Warnhinweise.
Advertencia: La conexión, el montaje o el uso incorrecto de este producto puede causar el fallo de algún componente y/o el daño de la
memoria flash. Lea las siguientes frases de precaución antes de configurar y hacer funcionar el cliente ligero.
Thin Client Model VX0, Products V00, V30, V50, V90, VR0
Client léger - modèle VX0, produits V00, V30, V50, V90, VR0
Thin Client Modell VX0, Produkte V00, V30, V50, V90, VR0
Cliente ligero Modelo VX0, Productos V00, V30, V50, V90, VR0
Components
1 +12V Power adapter input
2 PS/2-type keyboard port
3 Video port
4 USB port (2)
5 Parallel port
6 Serial port
7 Wireless antenna port (optional)
8 Secure clip for DC power cord
9 PS/2-type mouse port
10 Serial port
11 Network port, 10/100Base-T
12 CardBus/PCMCIA card slot with cover
13 Lock receptacle
14 Power on/off button/light
15 LED (amber: standby; green: on)
16 Internal smart card reader (optional)*
17 Microphone in
18 Speaker out
19 USB port
20 PS/2-type mouse port
Connexion
Verbindung
Conexión
1 Entrée adaptateur secteur +12V
2 Port pour clavier de type PS/2
3 Port vidéo
4 Port USB (2)
5 Port parallèle
6 Port série
7 Port wireless antenne (en option)
8 Clic de fixation pour le cordon d'alimentation secteur
9 Port souris de type PS/2
10 Port série
11 Port réseau, 10/100BaseT
12 Logement pour la carte CardBus/PCMCIA avec
cache
13 Emplacement pour le verrou
14 Bouton Marche/Arrêt
15 LED (ambre : en attente ; vert: en fonctionnement)
16 Lecteur de cartes à puce interne (en option)*
17 Entrée microphone
18 Sortie audio
19 Port USB
20 Port souris de type PS/2
1 +12 V Leistungsaufnahme
2 Schnittstelle für PS/2-Tastatur
3 Videoport
4 USB-Port (2)
5 Paralleler port
6 Serieller Port
7 Wireless antenne port (optional erhältlich)
8 Sicherheitsbefestigung für Netzkabel
9 PS/2 Mausanschluss
10 Serieller Port
11 Netzwerk-Anschluss, 10/100Base-T
12 Steckplatz für CardBus-/PCMCIA-Karte mit
Abdeckung
13 Sperranschluss
14 Einschaltknopf
15 LED (bernsteifarben: Standby; grün: eingeschaltet)
16 Integrierter Smartcard-Reader (optional erhältlich)*
17 Mikrofoneingang
18 Lautsprecherausgang
19 USB-Port
20 PS/2 Mausanschluss
1 Conexión para cable de alimentación de +12V
2 Puerto de teclado tipo PS/2
3 Conexión para vídeo
4 Puerto USB (2)
5 Puerto paralelo
6 Puerto serie
7 Puerto de antena inalámbrica (opcional)
8 Fije la abrazadera del cable de alimentación DC
9 Puerto para ratón del tipo PS/2
10 Puerto serie
11 Conexión de red, 10/100Base-T
12 Ranura de tarjeta CardBus/PCMCIA con cubierta
13
14
15
16
17
18
19
20
Bloqueo
Botón de encendido/apagado
LED (ámbar: espera; verde: activo)
Lector interno de tarjetas inteligentes (opcional)*
Micrófono
Salida para altavoz
Puerto USB
Puerto para ratón del tipo PS/2
*Insert smart card with electrical contacts facing outward; red light flashes when card is being read.
*Insérer la carte à puce, les contacts électriques doivent être tournés vers l'extérieur; le voyant rouge clignote lorsque la carte est lue.
*Bitte die Smart Card mit den elektrischen Kontakten nach links einsetzten; Die rote LED blinkt während des lesens der Karte.
*Inserte la tarjeta inteligente con los contactos electrónicos mirando hacia fuera; la luz roja parpadea cuando se está leyendo la tarjeta.
**Supplied for U.S.A.; in other locales, check package contents or contact your Wyse reseller.
**Fourni pour les Etats-Unis ; pour les autres pays, vérifiez le contenu du carton d'expédition ou contactez votre revendeur Wyse.
**Wird in den U.S.A. mitgeliefert. In anderen Ländern: Überprüfen Sie das Paket und wenden Sie sich ggf. an Ihren Wyse-Händler.
**Suministrado para EE.UU.; en el caso de otras configuraciones regionales, revise el contenido del paquete o póngase en contacto con su distribuidor de Wyse.
2
English - Thin Client Installation
Connect
Refer to the figures and proceed as follows:
Refer to the figures and proceed as follows:
Caution Statements
1. Place the thin client on a desk, or use a Wyse-approved
mounting accessory kit.
2. Make all desired connections (video display and keyboard
with mouse are required). Connection to a 10/100 BaseT
Ethernet network is required unless an optional WiFi network
adapter is used for wireless connection to a network.
Additional connections of peripheral devices may be made to
the other ports.
Improper connection, mounting, or use of this product could result
in component failure or undesired interference. Read the following
caution statements before setting up and operating the thin client.
Setup
• Do not connect to AC power until all other connections
(including the power adapter) are made. Connecting or
disconnecting components or equipment on the back panel
when the thin client is receiving AC power can cause power
surges and damage the device.
• Do not force a connector into its socket. If any undue resistance
is encountered, ensure that the connector is correctly oriented
to the receptacle.
3. Connect the power adapter to the thin client power input
before connecting to a 100-240V AC, 50-60 Hz electrical
outlet. Wait until the initialization sequence is completed (the
amber light on the power button will go off), and then press the
power button on the thin client to apply power.
Configure
Orientation and Venting
• Mount the thin client only as shown or in accordance with the
instructions provided with Wyse-approved mounting accessory
kits. Improper orientation could inhibit the dissipation of heat
from the device and damage it.
• Allow sufficient space around the thin client for ventilation; do
not place the device in any enclosure that restricts airflow
around the device; do not place any objects on the device or
block the vent holes under the device. Find environmental
operating specifications in the thin client’s datasheet located at:
Products V30, V50, and V90 - After power-on, the thin client
initially goes through several boot sequence procedures before
the operating system loads. Information about setting up your
server environment is available in the thin client’s documentation.
Products V00 and VR0 - Wyse Streaming Manager software is
required; no other configuration is needed. Information about
setting up your server environment is available in the Wyse
Streaming Manager documentation.
http://www.wyse.com/products/winterm
Need more information?
• For wireless usage and requirements, refer to the regulatory
Wyse Reference Guides (Products V30, V50, and V90) User, Administrator, and related documentation is available at:
notices in the thin client’s documentation.
Power Sources
• To ensure regulatory compliance, use only the power adapter
included in the shipping carton, or a Wyse-approved equivalent,
with the thin client. Refer to the regulatory notices in the thin
client’s documentation (for Products V00 and VR0, refer to any
Model VX0 thin client’s regulatory notices).
• Accidental loss of power can damage the thin client. Avoid
connecting it to any power outlet which can be accidentally
switched off. Do not hard reset the thin client by holding down
the power button during normal operation.
• When turning off the thin client, be sure to perform a complete
shutdown (via the user interface or a light press on the power
button). Do not disconnect the AC power cord, DC power cord,
or shut off power at a circuit breaker (including power strips),
etc., to turn off the device.
• Surge protectors for electrical devices are recommended in
areas of lightning. However, when lightning is occurring, your
equipment should be properly shut down and unplugged from
AC power until the storm has passed.
• Be very careful to not interrupt power while the thin client is
downloading a software update.
http://www.wyse.com/manuals
Wyse-Approved Mounting Accessory Kits - Information about
approved mounting accessory kit options is available at:
http://www.wyse.com/products/accessories/mounting.asp
Wyse Service and Support Web Site - Upgrade software
images for installation on your FTP file server are available at:
http://www.wyse.com/serviceandsupport/support/askwyse.asp
Wyse Device Manager - Information about Wyse remote
management software is available at:
http://www.wyse.com/bundle
Wyse Streaming Manager - Information about Wyse Streaming
Manager software is available at:
http://www.wyse.com/products/software/streamingmanager
Wyse and the Environment - Information about Wyse
compliance with the Waste Electrical and Electronic Equipment
(WEEE) is available at:
http://www.wyse.com/about/environmental
Wyse Warranty Registration - Wyse’s warranty registration*
process is available at:
http://www.wyse.com/serviceandsupport/register.asp
*The standard warranty is three years from the date of purchase.
3
Français - Installation du Client léger
Connexion
Reportez-vous aux figures et procédez comme suit :
Reportez-vous aux figures et procédez comme suit :
Avertissements
1. Placez le client léger sur le bureau (en utilisant le pied fourni),
ou fixez-le avec un kit de montage approuvé par Wyse.
2. Procédez aux connexions nécessaires (écran d'affichage et
clavier avec souris). La connexion à un réseau Ethernet 10/
100BaseT est nécessaire sauf si un adaptateur réseau sans fil
optionnel est utilisé pour se connecter au réseau. Des
périphériques supplémentaires peuvent être connectés sur les
autres ports.
Tout branchement, montage ou utilisation incorrect de ce produit
pourrait entraîner des défaillances au niveau des composants ou
des interférences indésirables. Veuillez lire les avertissements
suivants avant d’installer et d’exploiter le client léger.
Installation
• Ne connectez pas le système au courant alternatif (CA) avant
d'avoir effectué toutes les autres connexions, y compris
l'adaptateur secteur. Connecter ou déconnecter des
composants ou unités au panneau arrière pendant que le client
léger est sous tension peut provoquer des surtensions et
endommager le système.
• Ne forcez pas un connecteur dans son port. Si vous sentez une
résistance quelconque, vérifiez que le connecteur est
correctement orienté.
3. Branchez le l'adaptateur secteur à une prise de courant de
100-240 V AC et 50-60 Hz. Attendez la fin de la séquence
d’initialisation (le voyant ambre du bouton marche/arrêt
s’éteint), puis appuyez légèrement sur le bouton
d’alimentation du client léger pour l’allumer.
Configuration
Produits V30, V50, and V90 - Après la mise sous tension, le
client léger exécute plusieurs séquences de démarrage avant que
le système d'exploitation ne soit chargé. Pour plus d’informations
sur la manière de configurer votre environnement serveur,
reportez-vous à la documentation en ligne du client léger.
Orientation et aération
• Montez le client léger seulement selon les instructions fournies
pour le kit d’accessoires de montage approuvé par Wyse.
L’orientation incorrecte pourrait empêcher la dissipation de la
chaleur par le système et l’endommager.
• Laissez suffisamment d’espace autour du client léger pour la
ventilation ; ne placez pas le système dans un endroit fermé car
cela réduit la circulation de l’air autour de lui ; ne placez aucun
objet sur le système. Les spécifications environnementales du
produit figurent dans sa fiche technique, sur le site Web de
Wyse : http://www.wyse.com/products/winterm
• Pour les conditions d'utilisation du wireless, reportez-vous à la
documentation en ligne du client léger.
Produits V00 and VR0 - Le logiciel Wyse Streaming Manager
est nécessaire ; aucune autre configuration n'est exigée. Les
informations sur l'installation de l'environnement serveur sont
disponibles dans la documentation de Wyse Streaming Manager.
Besoin de plus d’informations ?
Wyse Guides de Référence (Produits V30, V50, and V90) Les documentations utilisateur et administrateur se trouvent à:
http://www.wyse.com/manuals
Sources d'alimentation
• Pour assurer la conformité aux règlements, utilisez uniquement
l’adaptateur secteur inclus dans le paquet d’expédition du client
léger (ou une source équivalente agréée par Wyse). Reportezvous aux avis réglementaires de la documentation du client
léger (pour des produits V00 et VR0, consulter la notice de
normalisation de l'un des clients légers modèle VX0).
• Pour prévenir les pertes de tension accidentelles qui pourraient
endommager le client léger, évitez de le connecter à toute prise
secteur qui peut être accidentellement mise hors tension ou
d’effectuer une réinitialisation matérielle du client léger en
maintenant appuyé le bouton d’allumage.
• L’arrêt du client léger doit être complet : il doit se faire via
l’interface utilisateur ou en appuyant légèrement sur le bouton
d’alimentation. Il est déconseillé d’utiliser les moyens comme
ceux-ci pour arrêter le système : débrancher le cordon
d’alimentation secteur ou arrêter le disjoncteur (y compris le
blocs multiprises).
• Les parasurtenseurs pour appareils électriques sont
recommandés dans les zones d’orage. Cependant, pendant les
orages, il est recommandé d’arrêter complètement votre
système et de le mettre hors tension, le temps que l’orage
passe.
• Veillez à ne pas arrêter l’alimentation pendant que le client léger
télécharge une mise à jour de logiciel.
Kits d’accessoires de montage approuvés par Wyse Des informations sur les différents kits d’accessoires de montage
approuvés par Wyse sont disponibles à:
http://www.wyse.com/products/accessories/mounting.asp
Site Web de services et d’assistance de Wyse - Les images
logicielles de mise à jour pour installation sur votre serveur de
fichiers FTP sont disponibles à:
http://www.wyse.com/serviceandsupport/support/askwyse.asp
Wyse Device Manager - Les informations relatives au logiciel
d'administration à distance de Wyse sont disponible à:
http://www.wyse.fr/bundle
Wyse Streaming Manager - Les informations relatives au logiciel
Wyse Streaming Manager sont disponibles à:
http://www.wyse.com/products/software/streamingmanager
Wyse et l'environnement - Les informations sur la gestion par
Wyse des déchets d'équipements électriques et électroniques
(DEEE) sont disponibles à :
http://www.wyse.com/about/environmental
Enregistrement de la garantie de Wyse - L’enregistrement de la
garantie* de Wyse peut se faire à:
http://www.wyse.com/serviceandsupport/register.asp
*La garantie standard est de trois années à compter de la date de l’achat.
4
Deutsch - Thin Client Installation
Verbindung
Sehen Sie sich die folgenden Zeichnungen an, und gehen Sie wie
folgt vor:
Sehen Sie sich die folgenden Zeichnungen an, und gehen Sie wie
folgt vor:
Warnung
1. Platzieren Sie den Thin Client auf dem Schreibtisch oder
verwenden Sie einen von Wyse Technology genehmigten
Montagesatz.
Unsachgemäße Verbindungen, Montage oder Verwendung dieses
Produkts kann zu Versagen der Komponenten und unerwünschten
Störungen führen. Lesen Sie die folgenden Warnhinweise, bevor
Sie den Thin Client aufstellen und verwenden.
2. Schließen Sie alle notwendigen Verbindungen her (VGA-,
Maus-, Tastatur-Kabel). Für eine Verbindung zu einem 10/100
BaseT Ethernet Netzwerk muß ein Netzwerkkabel oder ein
optionaler WiFi Netzwerkadapter angeschlossen werden.
Weitere Peripheriegeräte können an weiteren Anschlüssen
angeschlossen werden.
Aufstellen
• Schließen Sie das Produkt erst dann an das Stromnetz an, wenn
alle anderen Verbindungen, einschließlich der Verbindung zum
Netzadapter, hergestellt sind. Das Herstellen oder Lösen von
Komponenten- oder Geräteverbindungen bei bereits hergestellter
Netzverbindung kann zu Überspannung und Schäden am Gerät
führen.
• Wenden Sie bei der Verbindung eines Steckers keine Gewalt an.
Sollten Sie einen unerwarteten Widerstand spüren, überzeugen
Sie sich, dass der Stecker korrekt in der Buchse ausgerichtet ist.
3. Verbinden Sie das Netzteil mit einem 100-240 V AC, 50-60 Hz
Wechselstromanschluss. Warten Sie, bis die
Initialisierungssequenz abgeschlossen ist (das gelbe Licht geht
aus). Drücken Sie dann leicht auf den EIN/AUS-Schalter am
Thin Client, um diesen einzuschalten.
Konfigurieren
Produkte V30, V50, and V90 - Nach dem Einschalten durchläuft
der Thin Client zunächst mehrere Boot-Sequenzprozesse, bevor
das Betriebssystem geladen wird. Informationen zur Einrichtung der
Server-Umgebung finden Sie in der Dokumentation des Thin Client.
Ausrichten und Belüften
• Montieren Sie den Thin Client nur wie gezeigt, bzw. in
Übereinstimmung mit den Anweisungen, die in der von Wyse
genehmigten Montagesatz angegeben werden. Inkorrekte
Ausrichtung kann die Wärmeableitung vom Gerät behindern und
es beschädigen.
• Um den Thin Client muss genügend Raum zur Belüftung
vorhanden sein. Stellen Sie das Gerät in keine Umgebung, die die
Luftbewegung um das Gerät herum behindert. Platzieren Sie
keine Objekte auf dem Gerät und blockieren Sie die
Lüftungsöffnungen unter dem Gerät nicht. Die
Umgebungsspezifikationen des Produkts finden Sie im Datenblatt
des Produkts auf der Wyse Website unter:
Produkte V00 and VR0 - Für den Betrieb ist die Software Wyse
Streaming Manager erforderlich; eine weiter gehende Konfiguration
ist nicht notwendig. Hineise zur Einrichtung und Konfiguration der
Server-Umgebung entnehmen Sie bitte der Dokumentation zum
Wyse Streaming Manager.
Sie benötigen weitere Informationen?
Wyse Reference Guides (Produkte V30, V50, and V90) Dokumentation für Benutzer und Verwalter finden Sie unter:
http://www.wyse.com/products/winterm
http://www.wyse.com/manuals
• Zur Verwendung von drahtlosen Verbindungen und die
Von Wyse genehmigte Montagesätze - Informationen über
genehmigte Montagesatzoptionen finden Sie unter:
technischen Anforderungen konsultieren Sie die Vorschriften in
der Dokumentation des Thin Client.
http://www.wyse.com/products/accessories/mounting.asp
Stromquellen
• Verwenden Sie in Übereinstimmung mit bestehenden
Bestimmungen nur dasjenige Stromkabel mit dem Thin Client,
das in der Originalverpackung enthalten ist, bzw. ein von Wyse
genehmigtes Äquivalent. Konformitätshinweise entnehmen Sie
bitte der Dokumentation zum jeweiligen Gerät;
Konformitätshinweise zu Geräten der Modellreihen V00 und VR0
entnehmen Sie bitte der Dokumentation zu den Geräten der
Modellreihe VX0.
• Vermeiden Sie zur Verhinderung von plötzlichem Stromverlust,
was den Thin Client beschädigen könnte, den Anschluss an eine
Netzsteckdose, die versehentlich ausgeschaltet werden kann,
sowie auch das plötzliche Abschalten des Thin Client mit Hilfe des
EIN/AUS-Schalters.
• Überzeugen Sie sich, dass der Thin Client zum Abschalten
vollständig heruntergefahren wird (mit Hilfe der
Benutzeroberfläche oder durch leichten Druck auf den EIN/ AUSSchalter). Lösen Sie zum Abschalten des Geräts nicht das
Netzkabel, unterbrechen Sie den Stromkreis nicht an der
Sicherung oder einer schaltbaren Mehrfachsteckdose, etc.
• In gewittergefährdeten Gebieten wird die Verwendung eines
Überspannungsschutzes für elektrische Geräte empfohlen. Im
Fall eines Gewitters sollten Ihre Geräte jedoch trotzdem korrekt
heruntergefahren und die Verbindung zum Netz getrennt werden,
bis das Gewitter vorüber ist.
• Unterbrechen Sie keinesfalls die Stromversorgung, während der
Thin Client ein Software-Update lädt.
Wyse Service- und Support-Website - Upgrade Software Images
zur Installation auf Ihrem FTP-Dateiserver finden Sie unter:
http://www.wyse.com/serviceandsupport/support/askwyse.asp
Wyse Device Manager - Informationen zur Wyse Device Manager
Management Software finden Sie unter:
http://www.wyse.com/bundle
Wyse Streaming Manager - Informationen zum Wyse Streaming
Manager software are finden Sie unter:
http://www.wyse.com/products/software/streamingmanager
Die Einhaltung von Umweltschutzvorgaben durch Wyse Informationen zur Einhaltung der Vorgaben der WEEE = Waste
Electrical and Electronic Equipment (Entsorgungsvorschriften für
Elektronikschrott wie z.B. der Elektronikschrottverordnung) finden
Sie unter:
http://www.wyse.com/about/environmental
Wyse Garantie-Registrierung - Zugang zur Wyse
Garantieregistrierung* erhalten Sie unter:
http://www.wyse.com/serviceandsupport/register.asp
*Der Standard-Garantiezeitraum beträgt drei Jahre nach Erwerb.
5
Español - Instalación de Cliente ligero
Vea las figuras y tenga presente lo siguiente:
Advertencias
La conexión, el montaje o el uso incorrectos de este producto
puede ocasionar el fallo de los componentes o que se produzcan
interferencias no deseadas. Lea las siguientes frases de
precaución antes de configurar y hacer funcionar el cliente ligero.
Instalación
• No conecte la alimentación de CA hasta que haya realizado todas
las demás conexiones, incluida la del adaptador de alimentación.
Si conecta o desconecta los componentes o equipos del panel
trasero cuando cliente ligero esté recibiendo alimentación de CA,
puede producirse sobretensiones transitorias de energía y dañar
el dispositivo.
• No fuerce ningún conector al introducirlo en su enchufe. Si nota
resistencia no habitual, asegúrese de que el conector esté
correctamente orientado en el receptáculo.
Orientación y circulación del aire
• Monte el cliente ligero de acuerdo con las instrucciones que se
proporcionan con los kits montaje vertical aprobados de Wyse. La
orientación no correcta puede impedir la disipación del calor del
dispositivo y ello puede dañar el dispositivo.
• Deje suficiente espacio alrededor de cliente ligero para que se
ventile; no coloque el dispositivo en ningún recinto cerrado que
impida la circulación del aire alrededor del mismo; no coloque
ningún objeto en el dispositivo ni bloquee los orificios de
ventilación situados debajo del dispositivo. Las especificaciones
medioambientales del producto están disponibles en la hoja de
datos del producto en el sitio Web de Wyse, en la dirección:
http://www.wyse.com/products/winterm
• Para obtener información sobre el uso y los requerimientos del
dispositvo inalábrico, consulte los informes reglamentrios en la
documentación de cliente ligero.
Fuentes de alimentación
• Para estar seguros de que se cumple la normativa reguladora
vigente, utilice sólo el suministro de alimentación incluido en la
caja de envío, o un suministro de alimentación equivalente
aprobado por Wyse, con el cliente ligero. Consulte los avisos
referentes a la regulación en la documentación de cliente ligero
(para los productos V00 y VR0, consulte los avisos reguladores
de cualquier cliente ligero del modelo VX0).
• Para impedir las pérdidas de energía accidentales que pueden
dañar el cliente ligero, evite la conexión a cualquier toma de
corriente que pueda desconectarse de manera accidental o el
reinicio de manera brusca de cliente ligero manteniendo pulsado
el botón de encendido durante el funcionamiento normal.
• Al apagar el cliente ligero, asegúrese de realizar un apagado
completo (mediante la interfaz del usuario o presionando
ligeramente el botón de encendido). No desconecte el cable de
alimentación de CA ni apague la alimentación en un cortacircuito
(incluidos las bases de enchufes), etc. para apagar el dispositivo.
• Se recomienda usar protectores contra sobretensiones en las
áreas propensas a rayos y relámpagos. Sin embargo, cuando se
produzcan rayos y relámpagos, su equipo debe estar
correctamente apagado y desconectado de la alimentación de CA
hasta que pase la tormenta.
• Tenga mucho cuidado de no interrumpir la alimentación mientras
el cliente ligero esté descargando una actualización del software.
Conexión
Realice las conexiones tal y como se muestra y realice lo siguiente:
1. Coloque el cliente ligero en un escritorio, o utilice un kit de
accesorios de montaje aprobado por Wyse.
2. Realice todas las conexiones necesarias (se necesita la
pantalla de vídeo, así como el ratón y el teclado). Se necesita la
conexión a una red Ethernet BaseT 10/100, a no ser que se
utilice un adaptador de red opcional WiFi para la conexión
inalámbrica a una red. Se pueden realizar conexiones
adicionales de dispositivos periféricos a otros puertos.
3. Conecte el adaptador de alimentación de CA/CC a un
receptáculo de 100-240V CA, 50-60 Hz. Espere hasta que se
complete la secuencia de inicialización (la luz ámbar se apaga)
y presione ligeramente el botón de encendido de cliente ligero
para encender el dispositivo.
Configuración
Productos V30, V50, and V90 - Después del encendido
automático, el cliente ligero realiza varios procedimientos de
secuencia de inicio antes que se cargue el sistema operativo. Para
obtener información sobre la configuración del entorno de servidor,
consulte la documentación de cliente ligero.
Productos V00 and VR0 - Se necesita el software Wyse Streaming
Manager; no se necesita ninguna otra configuración. Dispone de
información sobre cómo configurar su entorno de servidor en la
documentación de Wyse Streaming Manager.
¿Necesita más información?
Guías de referencia de Wyse (Productos V30, V50, and V90) El usuario, el administrador y la documentación relacionada están
disponibles en:
http://www.wyse.com/manuals
Kits de accesorios de montaje aprobados por Wyse La información sobre las opciones del kit de accesorios de montaje
aprobados por Wyse se encuentra disponibles en:
http://www.wyse.com/products/accessories/mounting.asp
Sitio Web de servicio y asistencia de Wyse - Las imágenes de
actualización del software para la instalación en su servidor de archivos
FTP se encuentran disponibles en:
http://www.wyse.com/serviceandsupport/support/askwyse.asp
Wyse Device Manager - Dispone de información sobre la administración
remota de Wyse en:
http://www.wyse.com/bundle
Wyse Streaming Manager - La información sobre Wyse Streaming
Manager software se encuentra disponible en:
http://www.wyse.com/products/software/streamingmanager
Wyse y el entorno - Dispone de información sobre la compatibilidad de
Wyse con Waste Electrical and Electronic Equipment (WEEE) en:
http://www.wyse.com/about/environmental
Registro de la garantía de Wyse - El proceso de registro de la garantía
de Wyse* se encuentra disponible en:
http://www.wyse.com/serviceandsupport/register.asp
*La garantía estándar es de tres años a partir de la fecha de la compra.
Wyse Technology Inc.
3471 North First Street
San Jose, CA 95134-1801 U.S.A.
883862-01L Rev. F
August 2006
©2006 Wyse Technology Inc. All rights reserved. This product and/or associated software are
protected by copyright international treaties, and various patents, including the following U.S.
patents: 6,836,885 and 5,918,039.
©2006 Wyse Technology Inc. Tous droits réservés. Ce produit et/ou logiciel associé sont protégés
par la législation relative aux droits d’auteurs, certains traités internationaux et divers brevets, dont
les brevets U.S. 6 836 885 et 5 918 039.
©2006 Wyse Technology Inc. Alle Rechte vorbehalten. Dieses Produkt und/oder die damit
assoziierte Software sind durch das Urheberrecht, internationale Verträge und verschiedene
Patente geschützt, einschließlich folgender US-Patente: 6,836,885 und 5,918,039.
©2006 Wyse Technology Inc. Reservados todos los derechos. Este producto y/o software
asociado están protegidos por derechos de autor, tratados internacionales y diversas patentes,
incluidas las siguientes patentes en los EE.UU.: 6,836,885 y 5,918,039.