1
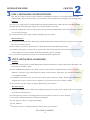
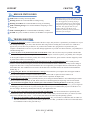
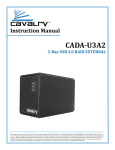
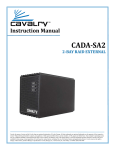
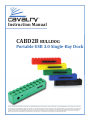
Instruction Manual
CABD2B BULLDOG
Portable USB 3.0 Single-Bay Dock
Cavalry, the names of series and the Cavalry logo are registered trademarks of Cavalry Storage. All other trademarks or registered trademarks are the property of their respective
owners. When referring to hard drive capacity, one gigabyte, or GB, equals one billion bytes, and one terabyte, or TB, equals one trillion bytes. Your computer’s operating system
may use a different standard of measurement and report a lower capacity. In addition, some of the listed capacity is used for formatting and other functions, and thus will not be
available for data storage. Actual quantities will vary based on various factors, including: file size, file format, features and application software. Cavalry reserves the right to
change, without notice, product offerings or specifications. Cavalry Storage, Inc., 555 East Easy St., Simi Valley, CA 93065, (805) 426-1000
Table of Contents
Chapter 1. Getting Started ............................................................................ 1
Features and Application........................................................................................... 1
System Requirements ................................................................................................ 1
Package Content ........................................................................................................ 1
Specifications ............................................................................................................. 1
Product Part Identification ......................................................................................... 2
Your Disk Managment Utility................................................................................... 2
Chapter 2. installation guide ........................................................................ 3
Installation Outline .................................................................................................... 3
Installation Step 1 ..................................................................................................... 3
Installation Step 2 ..................................................................................................... 3
Initialization Step 3 ...................................................................................................... 4
chapter 3. support .................................................................................................. 5
HDD LED Status Codes ........................................................................................... 5
Troubleshooting ..................................................................................................... 5
Warranty Information ................................................................................................. 6
Contact Information ................................................................................................... 6
GETTING STARTED
CHAPTER
1
APPLICATIONS
FEATURES
Thank you for purchasing the Cavalry Bulldog Portable
Single-Bay USB 3.0 Dock. The Bulldog was designed
for portability and ease-of-use. The Plug and Play
design means that there are no bothersome drivers to
install or update. The fun and ultra-light form factor was
designed to fit in your pocket with minimum required
accessories. For users with multiple drives, the Bulldog
is inter-lockable with other Bulldog docks. Try stacking
multiple units in place!
Up to 640MB/S Maximum Transfer Speed (USB 3.0)
USB 2.0 Support for Broad Multi-OS Compatibility
With the price of hard disks falling at ever faster rates, it has
become common for avid computer users to have multiple
disks containing backups of valuable data. The Bulldog
allows you to access your valuable data quickly and accurately,
on multiple operating systems. The convenient pocket-dock
form means you’ll have access to any bare SATA drives
available with the blinding speed of USB 3.0. The hotswappable dock design allows you to cycle through as many
disks as you like, in mere seconds; all without ever restarting
your PC or Mac!
SYSTEM REQUIREMENTS
OS Compatibility:
Windows 7/Vista/XP/2000, Mac OS X 10.3+
Up to 2 TB Total Capacity (Dependant on OS)
Hardware Requirements:
Hot-Swappable
USB 3.0 or USB 2.0 Port
2.5” and 3.5” SATA II Drive Support
Hard Drive Requirements:
Interlocking Designs Allows You to Stack Multiple Drives
Optional Rubber Drive Protector and Power Supply for a
fully Portable 3.5” Drive
3.5” Desktop, or 2.5” Notebook, Internal Hard
Drive with SATA II Interface
Operating Environment with Hard Drive:
Temperature
Operating: 41o - 131o F
Non-Operating: 40o - 149o F
PACKAGE CONTENTS
Relative Humidity Operating: 8% - 90% RH
non-condensing
Bulldog Pocket-Dock
USB 3.0/2.0 Y-Cable
* Note: Hard drives, rubber casings, and power supplies are
not included unless you have purchased a bundle package.
Bundle contents vary. Speed of Bulldog dock is limited to the
maximum speed of the hard drive in use.
Non-Operating:5% - 95% RH
non-condensing
SPECIFICATIONS
Model #:
CABD2B-[BL, G, R, Y, B] aka Bulldog
Interfaces:
Internal: SATA II; External:
1 x USB 3.0 - Up to 640MB/S
Power Supply: 2 x USB Ports via Y-Cable. Additional
Power Supply Sold Separately
Dimensions:
3.2” x .6” x .6”
Weight:
1 oz.
BULLDOG [CABD2B]
1
GETTING STARTED
CHAPTER
PRODUCT PART IDENTIFICATION
1. 2.
1
4.
3.
USB
Use only with the optional
1. DC Power In Cavalry adapter (sold separately)
2. LED-Indicator
3. Mini USB 3.0 Port
4. USB 3.0 Y-Cable
YOUR DISK MANAGEMENT UTILITY
In Windows, they call it “Disk Management”. In Mac, they call it “Disk Utility”. Despite having different names and
appearances, both Windows Disk Management and Mac Disk Utility do basically the same thing: they allow you to create,
modify and delete any storage volume connected to your computer.
In order to get the most out of your Bulldog Pocket-Dock, you will need to become intimately familiar with your disk
management utility. We have included a detailed glossary of the terms, as well as explanations of the functions and procedures
you will need to understand, on our website: http://www.cavalrystorage.com/manuals.aspx. It’s generally a good idea to keep
your disk management utility continuously open while you are setting up your dock and the disks within it.
How to Find Your Disk Management Utility
Windows: Navigate to Disk Management: Start Menu>right-click (My) Computer>select “Manage”>select Disk
Management.
Mac: Click an empty space on your Desktop. Then select (from the top of the screen) Go>Utilities>Disk Utility.
“Seeing” Your New Disk in the Disk Management Utility
In Mac, this is a pretty straight-forward affair. Just look at the left-hand column, and search for a newly added disk with the
term “DMI” or “USB” in it’s title.
Windows arbitrarily assigns a “Disk Number” to every new disk that is connected; even if the disk does NOT show up in
(My) Computer. “Disk 0” is always your system or C: drive. Your Cavalry drive will appear somewhere beneath Disk 0. It
will be given a number, like Disk 1 et al. You will probably only be able to recognize it by its size, which will be a little bit
less than the quoted drive size. If a connected disk does not appear here, the disk is probably defective. See the
troubleshooting FAQ for details.
BULLDOG [CABD2B]
2
INSTALLATION GUIDE
CHAPTER
INSTALLATION OUTLINE
2
Setup Your Dock
Find Your Drive
Initialize and Format Your Drive
1
INSTALLATION STEPS
STEP 1: SET UP YOUR DOCK
A) Connect the USB 3.0 Y-Cable to your Bulldog.
1.
B) Connect both ends of the included USB Y-Cable*
to 2 ports on your computer that you have used
recently and know to work well. Take this time
to temporarily eject and disconnect any other
external storage devices you have. This will
make it easier to find any drives you insert into
your Cavalry dock.
2.
USB
C) Insert the hard drives that you are going to use into the
Bulldog. Check that they are firmly inserted. Be sure that
you never touch any exposed circuitry or data ports on the
drive or the dock. Hard drives are very fragile devices!
D) Proceed to Find Your Drive below.
2
*Note: The Bulldog requires both ends of the Y-cable in order to draw power from 2 USB ports simultaneously. If you do not
have 2 extra USB ports, contact customer support for information on obtaining the accessory power supply.
STEP 2: Find Your Drive
A) Open up the disk management utility of your specific OS. This will be the only control interface for your Bulldog.
For more info on the functions of your specific disk management utility, go to http://www.cavalrystorage.com/
manuals.aspx.
B) Wait for your drive(s) (which you should have just inserted) to appear in your disk management utility. If the drives
are blank, “unallocated” or have been formatted on a different operating system, they will need to be partitioned
and formatted before they can be used.
C1) Windows users will need to check the “disk number” and see if a drive-letter has been assigned for their drive(s).
You can verify your drive by checking that the listed capacity for that disk # is close to that of the quoted drive size.
(i.e. 1 TB drive will appear as 931.51 GB)
C2) Mac users will need to check for their drive(s) in the left-hand column of Disk Utility. Cavalry drives will usually
be listed as a “DMI” drive of a size very close to the quoted capacity. (i.e. 1 TB drive will appear as 931.51 GB)
D) Proceed to Initializing and Formatting Your Disk below.
BULLDOG [CABD2B]
3
INSTALLATION GUIDE
3
CHAPTER
STEP 3: INITIALIZING AN HDD WITH DATA
2
First, look for your drive directly in (My) Computer or the Desktop. If it appears, you can begin using it as normal;
without further setup. If it does not show up, you will need to use the guides below according to your operating system:
Windows:
A) Once you’ve found your drive in Disk Management using the Find Your Drive Guide, take note of the Disk Number.
B) Right-click the white-horizontal rectangle next to the disk number of your drive.
C) Select the “Change Drive Letter or Path” option. Follow the Wizard carefully, and take note of the drive-letter assigned
to your Cavalry enclosure.
D) Look for your drive-letter in (My) Computer and begin using it as normal.
Mac OS X 10.4.0+:
A) Once you have found your disk in Disk Utility using the Find Your Drive Guide, click on the first entry for your Cavalry
drive; the one closest to the top.
B) This will show you what file system the drive contains at the bottom of the Disk Utility window.
C) If the disk is unresponsive, you may need to perform “First Aid” and repair the file system of the disk. You may also
need to “Partition” it for use with Mac. Be careful, partitioning will erase your data!
D) If you still decide to partition your disk, refer to the Mac Initialization guide below.
3
STEP 3: INITIALIZING A BLANK HDD
Windows:
A) Once you’ve found your drive in Disk Management using the Find Your Drive Guide, right-click the disk number, and
then select the “Initialize” option.
B) Select “MBR/Primary Partition” and “NTFS” for XP, or for drives that are smaller than 1TB. For later versions of
Windows (7 and Vista), select “GPT/GUID” and “NTFS” for drives that are larger than 1 TB. Caution! GPT/GUID is
not compatible with XP!
C) Let Windows select a drive letter, as well as the rest of the options. Then press “Finish”. Double-check that Windows
assigned a drive-letter to your new drive(s). Otherwise, you will not see the drive(s) in (My) Computer.
D) Now, look for your drive-letter(s) in (My) Computer. Enjoy your new drive!
Mac OS X 10.4.0+:
A) Once you’ve found your drive in Disk Utility using the Find Your Drive Guide, click on the first entry for your Cavalry
drive; the one closest to the top.
B) On the right, there will be a row listing operations you can perform on your drive. Select “Partition”.
C) Now select “Volume Format>Mac OS Extended (Journaled)”.
D) Click “Options” and select “Apple Partition Map”.
E) Click “Partition”.
F) Check for your drive in Computer and/or the Desktop. Enjoy your new drive!
BULLDOG [CABD2B]
4
SUPPORT
CHAPTER
HDD LED STATUS CODES
Solid Green: A healthy, functioning HDD.
Flashing Green: The connected HDD is reading/writing.
Flashing Green/Red: The connected HDD is writing or formatting.
Solid or Flashing Orange: The connected HDD is attempting to access
the host PC.
Solid or Flashing Red: The connected HDD is unhealthy or offline.
No LED: No power, no HDD is connected, or the HDD is in-operational.
3
WARNING! Always switch USB cables as your
first troubleshooting step for all of the situations
below. We suggest that you simply unplug a
known-working USB 2.0 or 3.0 cable and plug
it straight into your dock, putting your original
cable aside. Then, plug the dock into your
computer USB port. This allows you to
eliminate the possibility of having a defective
cable before you even begin!
TROUBLE SHOOTING
I can’t see my drive(s)! If you have followed all of the above steps, and your drive is operational, you should see it in your
disk management utility. If you can’t, then check the dock using a known-working drive in the same slot. If that drive
appears, the previous drive may be defective. If you don’t have another drive, plug the drive in question into your
computer’s motherboard. Look for it in your disk manager application. If you still can’t find it after this, you probably have
a malfunctioning drive.
I can see my drive on my motherboard, but not in the dock. If this is the case, there may be a problem with the USB
port on your computer. Try connecting the dock to a different computer. If it shows up there, you probably have a bad port
on the original computer. If it doesn’t you may have a faulty dock. In that case, please contact Customer Support by email
or phone in the Contact Us section (Pg. 6).
I see the drive in my disk management application, but not on (My) Computer/Desktop. This is usually because
the drive was not initialized using the procedure described in Installation Outline. Windows users may need to change or
assign a new drive letter. It may also mean that the drive is recognized by your computer but uses a different file system
from another OS. You would then need to remove all the data from it and then format it as described in the Installation
Outline (Pg. 3).
I keep getting the “Device Can Perform Faster” message. This means that your computer does not support USB 3.0.
You will need to purchase an adapter card that allows you to use the USB 3.0 protocol. Please contact us at
[email protected] for more details on how to purchase an adapter card.
My drive doesn’t seem to fit. This is probably because you are using an obsolete IDE drive. Our authorized parts retailer
sells an enclosure made especially for IDE. Please email us at [email protected] for more details.
If my dock is Hot-Swappable, why do I need to power it down before removing the drives? Technically you don’t.
But, if you remove a drive while it is being accessed by an application, or some unseen system process, you run a high risk
of damaging your drive and, at the very least, loosing data. This is why we recommend that you power off the drive. It’s
one more thing to do that may remind you to close any open applications first.
How do I create a drive that can be used on both Mac and Windows? You need to format a drive specifically with
the FAT32 file system. This can most easily be done on a Mac, in Disk Utility. Just select the drive you want to use. Then
select “Erase>MS Dos (Fat)> Erase…” Once created, this disk will be usable by both operating systems!
But I can see my Windows disk on my Mac (or vice versa)! Yes, you can often see a Windows disk on a Mac or a
Mac disk on Windows. You may even be able to pull files off of it. But, you WON’T be able write to that disk unless
it is formatted to FAT32. This goes both ways.
BULLDOG [CABD2B]
5
SUPPORT
CHAPTER
WARRANTY INFORMATION
3
Cavalry Storage Inc. (“Cavalry Storage”) warrants all new equipment manufactured by Cavalry Storage (including any accessories included with its products) and sold by an authorized distributor or authorized reseller against defects in material or workmanship for one (1)
year from the product’s original date of purchase as follows:
• Damaged Goods or Non-functional Products: Upon receipt of Cavalry Storage product, if product is shown to be defective by no fault of
the customer, Cavalry Storage will replace or repair the product at no cost to the customer
• Freight Costs: Customers are responsible for all freight costs to Cavalry Storage’s service centers. Cavalry Storage and its service centers
are not responsible for products lost during shipping to its facilities.
• Data Recovery: Data recovery, defined as the retrieval of data from a damaged or corrupted drive, is not included in Cavalry Storage’s
warranty. Should customers need data recovery, please consult an independent service provider.
• Warranty Disclaimer: This warranty covers only hardware. This warranty does not cover damage due to accident, misuse, abuse, negligence or modification to any part and/or accessory of Cavalry Storage products. This warranty does not cover damage due to improper
operation or maintenance, connection to improper power supply, or attempted repair by person(s) or facilities unauthorized by Cavalry
Storage to service or upgrade the product. This warranty does not cover consumables. Cavalry Storage makes no expressed or implied warranty of any kind for products with regard to performance, merchantability, or fitness for any particular purpose. Further, Cavalry Storage
is not responsible for any defects in products, loss or inaccuracy of data of any kind, or for any direct, indirect, incidental, or consequential
damages resulting there from.
• Packing and Shipping: Any product sent to Cavalry Storage, Inc. for service or repair must be packed and shipped according to the
Cavalry Storage standards and guidelines. Please note that packages received which deviate from Cavalry Storage packing and shipping
standards may be rejected.
Failure to comply with any of the above will result in delays and will ultimately result in a voided warranty. Please contact [email protected] if you have any questions.
REPAIR OR REPLACEMENT AS PROVIDED UNDER THIS WARRANTY IS THE EXCLUSIVE REMEDY OF THE CONSUMER.
CAVALRY STORAGE SHALL NOT BE LIABLE FOR ANY INCIDENTAL OR CONSEQUENTIAL DAMAGES FOR BREACH OF
ANY EXPRESS OR IMPLIED WARRANTY ON THIS LIBRARY. EXCEPT TO THE EXTENT PROHIBITED BY APPLICABLE LAW,
ANY IMPLIED WARRANTY OF MERCHANTABILITY OR FITNESS FOR A PARTICULAR PURPOSE ON THIS LIBRARY IS LIMITED IN DURATION TO THE DURATION OF THIS WARRANTY.
Some states do not allow the exclusion or limitation of incidental or consequential damages, or allow limitations on how long an implied
warranty lasts, therefore, the above limitation or exclusions may not apply. In addition, extended service contracts with Cavalry Storage,
or an authorized Cavalry Storage service facility, will affect the limitation on an implied warranty accordingly. This warranty gives you
specific legal rights, and you may have other rights that vary from state to state.
The information given is a summary of the full Cavalry warranty. Please go to http://www.cavalrystorage.com/rma.aspx
for more warranty details.
CONTACT INFORMATION
Phone: 800.238.4453 (toll-free, USA only)
805.426.1000
Email: [email protected]
Website: www.cavalrystorage.com
BULLDOG [CABD2B]
5