1
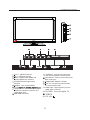
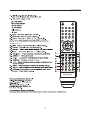
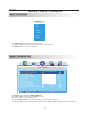
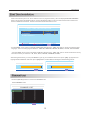
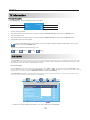
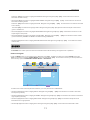
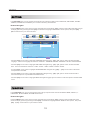
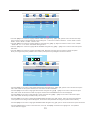
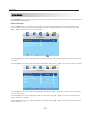
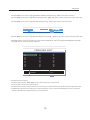
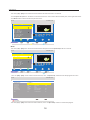
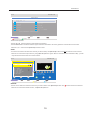
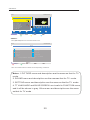
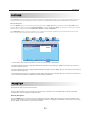
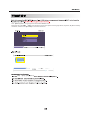
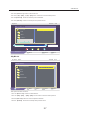
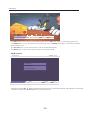
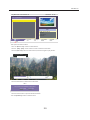
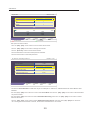
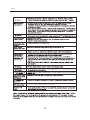
24” LED TV
MODEL NO.: LED-2412
USER MANUAL
For information and support,www.lenco.eu
Content
Content
1-4
Important Safety Precautions
5
Front/Back panel diagram
6-7
Remote Control Functions Manual
8
Input Source & Basic Operation
9
First Time Installation
10
TV Information
10
Picture Menu Options
11
Sound Menu Options
12
Setting Menu Options
12-13
Function Menu Options
14-15
Channel Menu Options
16-20
Channel List Options
21
EPG Manual
21
AUDIO Manual
21
21-22
Subtitle Manual
Fav. List Manual
23
Picture Menu Options
23-24
PC Setup Menu Options
25-31
MULTIMEDIA Menu Options
32
HELP
33
SPECIFICATIONS
Important Safety Precautions
18
1
Important Safety Precautions
2
Important Safety Precautions
3
Important Safety Precautions
4
Front/Back panel diagram
SOURCE
MENU
CH+
-
CH
VOL+
-
VOL
VOL+/-: Adjusting Volume
CH+/-: Selecting channel
MENU: Display main MENU and
confirm MENU item selection
SOURCE:External signal input
selection
POWER: Turn on/off POWER
VGA
SCART: It is a connection for european
standard,it supports composite and
RGB signal input.
USB: USB Instruction.
VIDEO/R/L: external AV signal input
and relevant right/left sound channel.
VGA/AUDIO: VGA input and audio input
when VGA input.
EARPHONE: Earphone Output
ANT 75: Connect the antenna/cadle
TV input(75/VHF/UHF)
13. HDMI Input: Digital signal input from
HDMI video connector
14. CI CARD: It only for digital TV
YPBPR
16. DC 12V
5
Remote control
6
Remote control
16
17
21/22/23/24. RED/GREEN/YELLOW/CYAN:change the
teletext on the Analoge part.Choose the item on DTV menu
and MEDIA menu.
17
7
16
OSD Manual
SELECT INPUT SOURCE
INPUT SOURCE
SOURCE
ATV
DTV
AV
SCART
YPBPR
VGA
HDMI
·Use SOURCE button to display the input source list;
·Use 【▲】 /【▼】 button to select the input source you want to watch;
·Use ENTER button to enter the input source;
BASIC OPERATION
PICTURE
PICTURE MODE
CONTRAST
BRIGHTNESS
COLOR
TINT
SHARPNESS
COLOR TEMP.
NOISE REDUCTION
MOVE
STANDARD
50
50
50
50
6
NORMAL
ON
SELECT
MENU
EXIT
·Use MENU button to display the MAIN OSD MENU;
·Use 【▲】 /【▼】button to select the MENU you want;
·Use 【 ► 】 button to enter the sub menu;
You can use MENU or EXIT button to save and return back to the previous menu .
·Use 【▲】 /【▼】 button to select the option and then press 【◄】 /【 ► 】to adjust the value in the sub menu;
8
OSD Manual
First Time Installation
If this is the first time you turn on the TV and there is no TV programs memory ,there will display First Time Installation
menu on screen just as the following picture. A screen will display asking you to run a Channel Auto Scan to search and
receive available local channels. And the channels will be stored in the TV tuner.
FIRST TIME INSTALLATION
LANGUAGE
ENGLISH
COUNTRY
START SEARCH
OTHER
MOVE
SELECT
MENU
EXIT
· Use down【▼】arrow button to highlight LANGUAGE. Navigate using 【◄】 /【 ► 】arrow button to select the OSD
language. There are 6 language for selection: ENGLISH, GERMAN, FRENCH, SPANISH, ITALIAN, PORTUGUESE.
·Use down【▼】arrow button to highlight COUNTRY. Navigate using 【◄】 /【 ► 】arrow button to select the country.
There are 6 country for selection: UK, ITALY, SPAN, FRANCE, GERMANY, OTHER,.
After setting these items, you can press MENU to give up your installation and exit. Or press 【▼】 /【 ▲】 button to
highlight START SEARCH and then press【►】button, the Auto Search will begin as the following picture:
AUTO SCAN
AUTO SCAN
DTV
ATV
66.00MHZ
554.00MHZ
CH:4
MENU
MENU
EXIT
Channel List
· Use down【ENTER】 button to call out the CHANNEL LIST.
ATV CHANNEL LIST
CHANNEL LIST
01
02
03
04
05
06
07
08
09
10
11
12
13
14
15
16
17
18
19
20
MOVE
21
22
23
24
25
26
27
28
29
30
MENU
CH:20
EXIT
9
EXIT
OSD Manual
TV Information
Program Information
Press 【DISPLAY】 button to display program information.
1
1
Auto
2
No Signal
3
DK
4
5
1. Current Channel Number.
2. The colour system of current program, could be changed on Manual Tuning menu(an option of SETUP menu).
3. Current program name.
4. The sound system of current program, could be changed in Manual Tuning menu(an option of SETUP menu).
5. The NICAM mode of current program.
If the icon of NICAM mode is red, it means the current program supplies multiple NICAM signals, and you can
change it by pressing NICAM button.
Four kinds of NICAM modes and relative icons:
Mono
Stereo
Dual
Dual
PICTURE
The PICTURE menu offers options to enhance and refine the picture displayed on your TV based on ambient room light
and personal prefer-ences. Adjustment options include PICTURE MODE, CONTRAST, BRIGHTNESS, COLOR, TINT,
SHARPNESS, COLOR TEMP. and NOISE REDUCTION.
How to Navigate:
Press the MENU button on the remote control. Navigate using 【◄ 】 /【 ►】 arrow buttons to select PICTURE. Press
the down ▼ arrow button to highlight PICTURE MODE, then press the 【◄ 】 /【 ►】 arrow button to select your viewing
preference from 4 factory options: STANDARD > MOVIE > VIVID > PERSONAL.
The STANDARD setting is recommended for most viewing environments. Depending on the ambient light level in the
room, you may ind one of the other options more pleasing.
PICTURE
PICTURE MODE
CONTRAST
BRIGHTNESS
COLOR
TINT
SHARPNESS
COLOR TEMP.
NOISE REDUCTION
MOVE
STANDARD
SELECT
50
50
50
50
6
NORMAL
ON
MENU
EXIT
To make more critical adjustments based on your own preferences in PERSONAL:
10
OSD Manual
• Use down【▼】arrow button to highlight CONTRAST. Navigate using the【◄ 】 /【 ►】arrow buttons to increase or
decrease contrast intensity.
• Use down【▼】arrow button to highlight BRIGHTNESS. Navigate using the【◄ 】 /【 ►】 arrow buttons to increase or
decrease overall brightness.
• Use down【▼】arrow button to highlight COLOR. Navigate using the【◄ 】 /【 ►】 arrow buttons to increase or decrease
color intensity.
• Use down【▼】arrow button to highlight TINT. Navigate using the【◄ 】 /【 ►】arrow buttons to adjust colors toward
green or reddish tint.
• Use down【▼】arrow button to highlight SHARPNESS. Navigate using the【◄ 】 /【 ►】arrow buttons to soften or view
crisper edges in the picture.
• Use down【▼】arrow button to highlight COLOR TEMP.. Navigate using the【◄ 】 /【 ►】arrow buttons to select COOL
(more bluish tone), NORMAL or WARM. The default setting is NORMAL.
• Use down【▼】arrow button to highlight NOISE REDUCTION. Navigate using the【◄ 】 /【 ►】 arrow buttons to select
it ON or OFF.
SOUND
The SOUND menu offers options to make sound enhancements while listening through the built-in speakers
How to Navigate:
Press the MENU button on the remote control. Navigate using【◄ 】 /【 ►】arrow buttons to select SOUND . Press the
【▼】arrow button to highlight SOUND MODE, then press the 【◄ 】 /【 ►】 arrow button to select your sound preference
from 4 factory options: STANDARD > MOVIE >MUSIC > PERSONAL.
SOUND
SOUND MODE
BASS
TREBLE
BALANCE
AVL
MOVE
STANDARD
50
50
50
ON
SELECT
MENU
EXIT
To make more critical sound adjustments based on your own preferences in PERSONAL:
• Use down【▼】arrow button to highlight Bass. Navigate using the【◄ 】 /【 ►】arrow buttons to increase or decrease
low frequency intensity.
• Use down【▼】arrow button to highlight TREBLE. Navigate using the【◄ 】 /【 ►】arrow buttons to increase or decrease
high frequency intensity.
• Use down【▼】arrow button to highlight BALANCE. Navigate using the【◄ 】 /【 ►】arrow buttons to adjust sound
towards the left or right speaker.
• Use down【▼】arrow button to highlight AVL. Navigate using the【◄ 】 /【 ►】arrow buttons to select it ON or OFF.
11
OSD Manual
SETTING
In the SETTING menu you may change the initial set up of preferences that include LANGUAGE, OSD TIMER, TRANSP-ARENCE, OVERSCAN, and RESET your TV back to its factory default status.
How to Navigate:
Press the MENU button on the remote control. Navigate using arrow【◄ 】 /【 ►】buttons to select SETTING. Gain access
to display options by pressing the down【▼】arrow button to highlight LANGUAGE or other options, then press【◄ 】 /
【 ► arrow buttons on your remote to select.
SETTING
LANGUAGE
OSD TIMER
TRANSPARENCE
OVERSCAN
RESET
MOVE
ENGLISH
15 SEC
80
ON
SELECT
MENU
EXIT
· Use down【▼】arrow button to highlight LANGUAGE. Navigate using 【◄】 /【 ► 】arrow button to select the OSD
language. There are 6 language for selection: ENGLISH > GERMAN> FRENCH> SPANISH> ITALIAN> PORTUGUESE.
· Use down【▼】arrow button to highlight OSD TIMER. Navigate using 【◄】 /【 ► 】arrow button to select the OSD
timer. There are 6 modes for selection: 5 SEC>10 SEC> 15SEC> 20SEC> 25 SEC> 30 SEC.
· Use down【▼】arrow button to highlight TRANSPARENCE. Navigate using 【◄】 /【 ► 】arrow button to select the
transparence of the OSD.
· Use down【▼】arrow button to highlight OVERSCAN. Navigate using 【◄】 /【 ► 】arrow button to select it ON or
OFF. But this option is only available in the HDMI source.
· Use down【▼】arrow button to highlight RESET. Navigate using【 ► 】arrow button to reset the options in the SETTING
menu.
FUNCTION
In the FUNCTION menu you may change the function set up of preferences that include SLEEP TIMER, ASPECT, TT
LANGUAGE , BLUE SCREEN, SYSTEM LOCK and FTI.
How to Navigate:
Press the MENU button on the remote control. Navigate using arrow【◄ 】 /【 ►】buttons to select FUNCTION. Gain
access to display options by pressing the down【▼】arrow button to highlight SLEEP TIMER or other options, then press
【◄ 】 /【 ►】 arrow buttons on your remote to select.
12
OSD Manual
FUNCTION
OFF
FULL
WEST
ON
SLEEP TIMER
ASPECT
TT LANGUAGE
BLUE SCREEN
SYSTEM LOCK
FTI
MOVE
SELECT
MENU
EXIT
· Use down【▼】arrow button to highlight SLEEP TIMER. Navigate using 【◄】 /【 ► 】arrow button to select the sleep
timer, and the TV will turn off automatically in the setting time . There are 9 modse for selection: 15 Min>30 Min> 45 Min>
60 Min> 75 Min> 90 Min> 105 Min> 120 Min> OFF.
· Use down【▼】arrow button to highlight ASPECT. Navigate using 【◄】 /【 ► 】arrow button to select: FULL> ZOOM
> SUBTITLE > 4:3>14:9>AUTO. The default setting is FULL. .
· Use down【▼】arrow button to highlight BLUE SCREEN. Navigate using 【◄】 /【 ► 】arrow button to select this option
ON or OFF.
· Use down【▼】arrow button to highlight SYSTEM LOCK. Navigate using 【 ► 】arrow button to select this option.
Enter your 4 digit code (factory default code is "0000") unless previously changed to enter the submenu.
ENTER PASSWORD
*
FUNCTION
ON
ON
ON
ON
SYSTEM LOCK
CHILD LOCK
KEY LOCK
PARENTAL
CHANGE CODE
MOVE
SELECT
MENU
EXIT
· Use down【▼】arrow button to highlight SYSTEM LOCK. Navigate using 【◄】 /【 ► 】arrow button to select this option
ON or OFF. When set the system lock OFF, the locks below will be unavailable.
· Use down【▼】arrow button to highlight CHILD LOCK. Navigate using 【◄】 /【 ► 】arrow button to select this option
ON or OFF. When set the child lock ON, the program locked in the PROGRAM EDIT can not be displayed.
· Use down【▼】arrow button to highlight KEY LOCK. Navigate using 【◄】 /【 ► 】arrow button to select this option
ON or OFF. When set the key lock ON, the key can not work.
· Use down【▼】arrow button to highlight CHANGE CODE. Navigate using 【 ► 】arrow button to change the password
of the system lock. A dialog as above will appear, the enter the new password can change the password successfully.
· Use down【▼】arrow button to highlight CHANGE CODE. Navigate using 【 ► 】arrow button to select this option ON or OFF.
· Use down MENU button to return to the main menu, then use down【▼】arrow button to highlight FTI. The operation
can be referred to page 9.
13
OSD Manual
CHANNEL
In the CHANNEL menu you may change the channel set up of preferences that include COUNTRY, AUTO SCAN, MANUAL
PROGRAM and PROGRAM EDIT.
How to Navigate:
Press the MENU button on the remote control. Navigate using arrow【◄ 】 /【 ►】buttons to select CHANNEL. Gain
access to display options by pressing the down【▼】arrow button to highlight COUNTRY or other options, then press
【◄ 】 /【 ►】 arrow buttons on your remote to select.
CHANNEL
OTHER
COUNTRY
AUTO SCAN
MANUAL PROGRAM
PROGRAM EDIT
MOVE
SELECT
MENU
EXIT
· Use down【▼】arrow button to highlight COUNTRY and AUTO SCAN. The operation of these two optins can be referred
to page 9.
· Use down【▼】arrow button to highlight MANUAL PROGRAM. Navigate using 【 ► 】arrow button to enter the submenu.
CHANNEL
1
AUTO
AUTO
PROGRAM
COLOR. SYS
SOUND. SYS
MANUAL SEARCH
AFT
FINE
SKIP
MOVE
ON
OFF
SELECT
MENU
EXIT
· Use down【▼】arrow button to highlight PROGRAM. Navigate using 【◄】 /【 ► 】arrow button to select the program
that you want to watch.
· Use down【▼】arrow button to highlight COLOR. SYS. Navigate using 【◄】 /【 ► 】arrow button to select the color
system: AUTO>PAL> SECAM.
· Use down【▼】arrow button to highlight SOUND. SYS. Navigate using 【◄】 /【 ► 】arrow button to select the sound
system: B/G> D/K> L> LL.
14
OSD Manual
· Use down【▼】arrow button to highlight MANUAL SEARCH. Navigate using 【 ► 】arrow button to select it.
· Use down【▼】arrow button to highlight AFT. Navigate using 【◄】 /【 ► 】arrow button to select this option ON or OFF.
· Use down【▼】arrow button to highlight FINE. Navigate using 【 ► 】arrow button to select this option.
73.50MHZ
FINE
MOVE
MENU
EXIT
· Use down【▼】arrow button to highlight SKIP. Navigate using 【◄】 /【 ► 】arrow button to select this option ON or OFF.
· Use MENU button to return to the main menu, then use down【▼】arrow button to highlight PROGRAM EDIT. Navigate
using 【 ► 】arrow button to enter the submenu.
PROGRAM EDIT
01
02
03
04
05
06
07
08
09
10
11
12
13
14
15
16
17
18
19
20
21
22
23
24
25
26
27
28
29
30
NAME
LOCK
INSERT
FAV
MOVE
MENU
EXIT
This option has four functions.
· Use Green button and the 【▲】 /【▼】arrow button to name the current channel.
· Use Yellow button to insert the current channel.
· Use Red button to set the current channel to lock. if the current channel already lock, press blue button again will unlock.
· Use Blue button set the current channel to your favorite channel. if the current channel already be one of your favorite
channel, press Blue button again will set it to a normal channel.
15
OSD Manual
CHANNEL
In the CHANNEL menu you may change the channel set up of preferences in DTV that include COUNTRY, AUTO SCAN,
MANUAL, PROGRAM, PROGRAM EDIT, PARENTAL and CI MENU.
How to Navigate:
Press the MENU button on the remote control. Navigate using arrow【◄ 】 /【 ►】buttons to select CHANNEL. Gain
access to display options by pressing the down【▼】arrow button to highlight COUNTRY or other options, then press
【◄ 】 /【 ►】 arrow buttons on your remote to select.
CHANNEL
UK
ON
COUNTRY
LCN
AUTO SCAN
MANUAL PROGRAM
PROGRAM EDIT
CI MENU
MOVE
SELECT
MENU
EXIT
· Use down【▼】arrow button to highlight COUNTRY and AUTO SCAN. The operation of these two optins can be referred
to page 9.
· Use down【▼】arrow button to highlight MANUAL PROGRAM. Navigate using 【 ► 】arrow button to enter the submenu.
CHANNEL
22
BEGIN
AUTO
PROGRAM
START SEARCH
CHANNEL FOUND
SIG. QUALITY
SIG. STRENGTH
FREQUENCY
MOVE
0
0
474.00
SELECT
MENU
EXIT
· Use down【▼】arrow button to highlight PROGRAM. Navigate using 【◄】 /【 ► 】arrow button to select the program
that you want to watch.
· Use down【▼】arrow button to highlight START SEARCH. Navigate using【 ► 】arrow button to BEGIN searching.
·The other options in this menu are unavailable, as these options just display to show the current signal
situation . The CHANNEL FOUND shows how many channels are found recently. The SIG. QUALITY and SIG. STRENGTH
shows the quality and the strength of the current signal. And the FREQUENCY shows the frequency of the current signal.
16
OSD Manual
· Use down【▼】arrow button to highlight PROGRAM EDIT. Navigate using 【 ► 】arrow button to enter the submenu
as following.
FAV:
TV List
07/05/09 00:45
ALL
No. Program Name
001
002
003
004
005
006
007
008
009
Status
Lock
7 Digital
7 Digital 1
7 Digital 2
7 Digital 3
7 HD Digital
LUXE.TV SD
LUXE.TV UK HD
LUXE.TV HD
BBC ONE
Fav
Ch5 / 177500 Khz
PID: V 1025, A 1026
Tool
CH+/-
1-8: Favorite Group Edit
MENU
Save
Exit
Fav
This option has three functions.
· Use the 【▲】 /【▼】arrow button to select channel.
· Use 【 1-8】 number buttons to set the current channel to your favorite group 1-8. if the current channel already be
one of your favorite gruop 1-8, use 【 1-8】 number buttons again will set it to a normal channel.
· Use Yellow button on the remote, the menu will appear as follows: .
DTV
Save the change?
ENTER
YES
MENU
Exit
· Use the 【ENTER】to save the change or Use the 【Menu】 button to return back the previous menu.
.
· Use Blue button to on the remote, the menu will appear as follows:
TV List
07/05/09 00:45
ALL
No. Program Name
001
002
003
004
005
006
007
008
009
Status
7 Digital
7 Digital 1
7 Digital 2
7 Digital 3
7 HD Digital
LUXE.TV SD
LUXE.TV UK HD
LUXE.TV HD
BBC ONE
Lock
Ch5 / 177500 Khz
PID: V 1025, A 1026
Switch
MENU
Fav
17
Exit
OSD Manual
· Use the 【◄】 /【►】arrow button to switch between all channel and fav 1-8 channel .
· Use the 【ENTER】button to set the current channel to lock. if the current channel already lock, use it again will unlock.
· Use Blue button to return back to the previous menu.
TV List
07/05/09 00:45
ALL
No. Program Name
001
002
003
004
005
006
007
008
009
Status
Lock
7 Digital
7 Digital 1
7 Digital 2
7 Digital 3
7 HD Digital
LUXE.TV SD
LUXE.TV UK HD
LUXE.TV HD
BBC ONE
Lock
CH+/-
Ch5 / 177500 Khz
PID: V 1025, A 1026
Tool
ENTER
Select
MENU
Save
Exit
Fav
EDIT:
· Use the 【◄】 /【►】arrow button to switch between all options and use【ENTER】button to select.
TV List
07/05/09 00:45
ALL
No. Program Name
001
002
003
004
005
006
007
008
009
Status
Lock
7 Digital
7 Digital 1
7 Digital 2
7 Digital 3
7 HD Digital
LUXE.TV SD
LUXE.TV UK HD
LUXE.TV HD
BBC ONE
Edit
CH+/-
Ch5 / 177500 Khz
PID: V 1025, A 1026
Tool
ENTER
Select
MENU
Exit
Fav
· Use the 【▲】 /【▼】arrow button to select channel, then use【ENTER】 button to enter the program info menu.
TV List
07/05/09 00:45
Program Info
Program Name
Program No
Program No.
Frequency
Bandwidth
Constellation
Guard Interval
FFT
Edit
7 Digital 2
003
005
177500
0007
QAM64
1/32
8K
Video PID
Audio PID
Khz
MHZ
Hierarchy Mode
HP Code Rate
LP Code Rate
ENTER
Edit
1025
1026
N/A
7/8
1/ 2
MENU
Exit
Save & Exit
· Use the 【▲】 /【▼】arrow button to select channel, then use【ENTER】 button to rename the program.
18
OSD Manual
TV List
07/05/09 00:45
Program Name
7
D i g i t a l
2
1
1 , . : ; “ ! ? \
6
m n o 6
2
a b c 2
7
p q r s 7
3
d e f 3
8
t u v 8
4
g h i 4
9
w x y z 9
5
j k l 5
0
0 + - * / = $ % &
0-9:key in characters; Press 0-9 to toggle
Edit
Move
Backspace
ENTER
Save
MENU
Exit
Switch
There are two options:
·Use the 【1-9】 number buttons to select different character.
·Use the Green button to Switch between upper and lower case letters.Circularly press the number buttons 2 to select
between a, b, c and 2 and use【ENTER】button to save.
SKIP:
· Use the cursor buttons to select the channel you want to Skip. Use【ENTER】button and
will be shown at the channel
selected. To remove the skip function by using【ENTER】button again. When a channel has been selected to Skip, you still
may select that channel with the numeric buttons.
TV List
07/05/09 00:45
ALL
No. Program Name
001
002
003
004
005
006
007
008
009
Skip
Status
7 Digital
7 Digital 1
7 Digital 2
7 Digital 3
7 HD Digital
LUXE.TV SD
LUXE.TV UK HD
LUXE.TV HD
BBC ONE
CH+/-
Lock
Ch5 / 177500 Khz
PID: V 1025, A 1026
Tool
ENTER
Save
Select
MENU
Exit
Fav
DELETE:
·Use the cursor buttons to select the channel you wish to delete. Use【ENTER】button and × will be shown at the channel
selected. To remove the delete function, use【ENTER】button.
19
OSD Manual
TV List
07/05/09 00:45
ALL
No. Program Name
001
002
003
004
005
006
007
008
009
Status
7 Digital
7 Digital 1
7 Digital 2
7 Digital 3
7 HD Digital
LUXE.TV SD
LUXE.TV UK HD
LUXE.TV HD
BBC ONE
Delete
Lock
×
Ch5 / 177500 Khz
PID: V 1025, A 1026
CH+/-
Tool
ENTER
Select All
Select
Save
MENU
Exit
Fav
SEARCH:
·Use 【ENTER】 button to enter the search menu.
TV List
07/05/09 00:45
Search
1 , . : ; “ ! ? \
6
m n o 6
2
1
a b c 2
7
p q r s 7
3
d e f 3
8
t u v 8
4
g h i 4
9
w x y z 9
5
j k l 5
0
0 + - * / = $ % &
0-9:key in characters; Press 0-9 to toggle
Edit
Backspace
Move
ENTER
Save
MENU
Exit
Switch
·Use the number buttons to select the corresponding characters.
Notes: 1.PICTURE menu and description are the same as that for TV
mode.
2. SOUND menu and description are the sameas that for TV mode.
3. SETTING menu and description are the same as that for TV mode.
4. TT LANGUAGE and BLUE SCREEN are invalid in FUNCTION menu,
and it will be shown in gray. Other menu and description are the same
as that for TV mode .
20
OSD Manual
EPG
An EPG is provided by the programme providers. To access this press the EPG button on the remote control.
The EPG provides programme information for the next number of hours.
·Use the RED button on the remote control, the menu will appear.
TV Guide
16/05/09 14:28
No. Program Name
Date
Thu.
001 LUXE.TV SD
002 LUXE.TV UK HD
2009
003 LUXE.TV HD
05/16
004 CH1_MPEG2_FTA
Today
005 CH2_MPEG2_SC
006 CH3_MPEG4_SC
28
29
30
31
1
2
15:30 Planeta terra - Les Rocalloses
007 CH5_MPEG4_SC
16:28 Secrets de la natura - Els cor
008 TV3
16:30 Planeta terra - Secrets de la n
009 33
16:55 Besties clip - porc senglar
010 3/24
17:00 Besties clip - Les papallones n
EPG+/-
Date
ENTER
Detail
MENU
Exit
Book
AUDIO
·Use the
LANG button on the remote control, the audio menu will appear as follows:
Audio channel
eng
Channel
0702
Audio PID
Sound Mode
Stereo
· Use the 【◄】 /【►】arrow button to select Sound Mode.
· Use the 【◄】 /【►】arrow button to select Stereo/Left/Right, then use 【ENTER】 button to affirm.
SUBTITLE
·Use the SUBTITLE button on the remote control, the subtitle menu will appear as follows:
SUBTITLE
Subtitle Language
eng
OFF
· Use the 【◄】 /【►】arrow button to select language, then press ENTER button to display subtitle .
FAV
·Use the FAV button on the remote control, the TV list menu will appear, for detailed information please refer to page17.
21
OSD Manual
1.PICTURE menu and description are the same as that for TV mode.
2.SOUND menu and description are the same as that for TV mode.
3.SETTING menu and description are the same as that for TV mode.
4.FUNCTION menu and description are the same as that for TV mode .
5.CHANNEL menu and description are invalid in these modes .
22
OSD Manual
PICTURE
The PICTURE menu offers options to enhance and refine the picture displayed on your TV based on ambient room light
and personal preferences. Adjustment options include PICTURE MODE , CONTRAST, BRIGHTNESS and COLOR.
How to Navigate:
Press the MENU button on the remote control. Navigate using 【◄ 】 /【 ►】 arrow buttons to select PICTURE. Press
the down ▼ arrow button to highlight PICTURE MODE, then press the 【◄ 】 /【 ►】 arrow button to select your viewing
preference from 4 factory options: STANDARD > MOVIE > VIVID > PERSONAL.
The STANDARD setting is recommended for most viewing environments. Depending on the ambient light level in the
room, you may ind one of the other options more pleasing.
PICTURE
PICTURE MODE
CONTRAST
BRIGHTNESS
COLOR
MOVE
STANDARD
50
50
50
SELECT
MENU
EXIT
To make more critical adjustments based on your own preferences in PERSONAL:
• Use down【▼】arrow button to highlight CONTRAST. Navigate using the【◄ 】 /【 ►】arrow buttons to increase or
decrease contrast intensity.
• Use down【▼】arrow button to highlight BRIGHTNESS. Navigate using the【◄ 】 /【 ►】 arrow buttons to increase or
decrease overall brightness.
• Use down【▼】arrow button to highlight COLOR TEMP. Navigate using the【◄ 】 /【 ►】 arrow buttons to select cool
(more bluish tone),NORMAL or WARM,The default setting is NORMAL.
PC SETUP
The PC SETUP menu is just for the PC Mode.
In the PC SETUP menu you may change the channel set up of preferences in PC MODE that include H-POSITION ,
H-POSITION, CLOCK, PHASE and AUTO ADJUST.
How to Navigate:
Press the MENU button on the remote control. Navigate using arrow【◄ 】 /【 ►】buttons to select PC SETUO. Gain
access to display options by pressing the down【▼】arrow button to highlight H-POSITION or other options, then press
【◄ 】 /【 ►】 arrow buttons on your remote to select.
23
OSD Manual
PC SETUP
50
100
100
97
H-POSITION
V-POSITION
CLOCK
PHASE
AUTO ADJUST
MOVE
SELECT
MENU
EXIT
· Use down【▼】arrow button to highlight H-POSITION. Navigate using 【◄】 /【 ► 】arrow button to select the
H-POSITION.
· Use down【▼】arrow button to highlight V-POSITION. Navigate using 【◄】 /【 ► 】arrow button to select the
V-POSITION.
· Use down【▼】arrow button to highlight CLOCK. Navigate using 【◄】 /【 ► 】arrow button to select the CLOCK.
· Use down【▼】arrow button to highlight AUTO ADJUST. Using 【 ► 】arrow button to auto adjust the options above.
V-POSITION.
Notes: 1.SOUND menu and description are the sameas that for TV mode.
2. SETTING menu and description are the same as that for TV mode.
3. FUNCTION menuand description are the same as that for TV mode .
24
• Use 【MEDIA】button to highlight call out the MULTIMEDIA menu.
• Navigate using the【▲ 】 /【 ▼】arrow buttons to select the options including My Album, My Music, My Movie and My
Recorder, and then use 【ENTER】to enter the submenus.
】▲】 /】 ▼ 】/】◄ 】 /】 ►】
】
】
】
】
OSD Manual
My Album - Folder
16/05/09 14:28
Photo : 8 photos
2048×1536 2009:05:16
001. IMG_0331.JPG
Root(USB)
002. IMG_0332.JPG
PVR
003. IMG_0333.JPG
004. IMG_0334.JPG
Music
005. IMG_0335.JPG
PHOTO
006. IMG_0336.JPG
007. DSC046042.JPG
008. DSC046043.JPG
i
Device
Move
Move
ENTER
View
MENU
Exit
This option has four functions.
· Use the 【DISPLAY】 button to select device.
· Use the 【▲】 /【▼】/【◄】 /【►】arrow button to move to select picture.
· Use the【ENTER】 button to view the picture selected.
· Use the 【MENU】 button to exit the picture preview menu.
·My Music
My Music
16/05/09 14:28
MUSIC : 2 songs
001. Music_001.mp3
002. Music_002.mp3
Root(USB)
PVR
Music
PHOTO
i
Device
Move
Move
ENTER
Select
MENU
Exit
This option has eight functions.
· Use the Red button to play or pause the song.
· Use the Green button to stop playing songs.
· Use the Yellow button to select the play mode roundly: No Repeat, Repeat All and Repeat Once.
· Use the Blue button to fast play the song.
26
OSD Manual
· Use the 【DISPLAY】 button to select device.
· Use the 【▲】 /【▼】/【◄】 /【►】arrow button to move to select picture.
· Use the【ENTER】 button to view the picture selected.
· Use the 【MENU】 button to exit the picture preview menu.
My Music
16/05/09 14:28
MUSIC : 2 Songs
001. Music_001.mp3
002. Music_002.mp3
Root(USB)
PVR
Music
PHOTO
30%
Repeat All
Move
ENTER
Select
01:25/04:15
MENU
Exit
·My Movie
My Movie - Folder
16/05/09 14:28
MOVIE : 2 Movies
001. Movie_001.AVI
002. When You Are Gone.mpg
Root(Card Reader)
PVR
Music
PHOTO
MYRECORD
i
Device
Move
Move
ENTER
View
MENU
Exit
This option has four functions.
· Use the 【DISPLAY】 button to select device.
· Use the 【▲】 /【▼】/【◄】 /【►】arrow button to move to select picture.
· Use the【ENTER】 button to view the picture selected.
· Use the 【MENU】 button to exit the picture preview menu.
27
OSD Manual
Movie_001.AVI
00:00:08/00:03:18
±
ENTER
View
MENU
Exit
· Use RED button on the remote control to make a pause, and use RED button again to continue playing the movie.
· Use GREEN button on the remote control to one-step-play, and use GREEN button again, you can set slow-forward
speed to see the movie.
· Use YELLOW button on the remote control to set the fast-backward speed.
· Use BLUE button on the remote controlto to set the fast-forward speed.
·My Recorder
My Recorder
16/05/09 14:28
Recorder List
Recording Device
Recording Preference
Move
ENTER
Select
MENU
Exit
• Navigate using the【▲ 】 /【 ▼】arrow buttons to select the options including Recorded List, Recording Device, Recording
Preference, and then use 【ENTER】button to enter the submenus.
28
OSD Manual
My Recorder - Recorded List
16/05/09 14:28
No. Program Name
0001 LUXE.TV SD 090516
0002 Sky Spts News_090608
Info
LUXE.TV SD_090516
09/05/16
13:48~13:49
00:00:’55’’
i
Device
CH+/-
Page
ENTER
Select
MENU
Exit
Del
This option has five functions.
· Use the 【DISPLAY】 button to select device.
· Use the 【▲】 /【▼】arrow button to move to select file recorded.
· Use the【ENTER】 button to select the file, and use it again to play the file.
Sky Spts News_090608
10%
±
00:00:’05’’/00:00:’49’’
MENU
· Use the Red button to delete the file selected.
DTV
Are you sure to delete this program?
ENTER
YES
MENU
Exit
· Use the Green button to preview the file selected.
· Use the【MENU】 button to exit the menu.
29
Exit
OSD Manual
My Recorder
16/05/09 14:28
Device
USB
Slot
1
Partition
1
USB
0%
50%
100%
Free
1.7GB
Used
95MB
Total
1.8GBl
Move
Format Partion
Switch
ENTER
Select
MENU
Exit
Format Disk
This option has five functions.
· Use the 【▲】 /【▼】arrow button to move to select the recorder.
· Use the 【◄】 /【►】arrow button to change the recorder.
· Use the 【ENTER】 button to select the recorders.
· Use the Red button to format the select partition selected.
· Use the Green button to format all partitions.
My Recorder - Recording Preference
16/05/09 14:28
Time Shift Size
1.2GB
Time Shift
OFF
One Button Recording
OFF
Default Recording Period
02:00
Move
Switch
ENTER
Select
MENU
Exit
·This device’s Time Shift Size is1.2GB.This is just an example for reference, different device will have different time
shift size.
· Use the 【▲】 /【▼】arrow button to move to select Time Shift. then Use the 【◄】 /【►】arrow button to select between
off, pause and auto.
· Use the 【▲】 /【▼】arrow button to select One Button Recording, tthen Use the 【◄】 /【►】arrow button to select
between off and on.
· Use the 【▲】 /【▼】arrow button to select Default Recording Period, tthen Use the 【◄】 /【►】arrow button to
set. The longest record duration is 8 hours, the shortest record duration is 15 minutes.
30
OSD Manual
HOTEL MODE
OFF
HOTEL LOCK
VOLUME ON
MAX VOLUME
DEFAULF SOURCE
SOURCE LOCK
CLEAR LOCK
MOVE
30
100
ATV
SELECT
MENU
EXIT
·Press MENU then press 1,2,2,9,show the hotel mode menu.
·Use down【▼】arrow button to highlight HOTEL LOCK. Navigate using 【◄】 /【►】arrow button to select this
option ON or OFF.
·When hotel mode is ON,Use down【▼】arrow button to highlight VOLUME ON. Navigate using 【◄】 /【►】arrow
button to increase or decrease the volume of power on.
·Use down【▼】arrow button to highlight MAX VOLUME. Navigate using 【◄】 /【►】arrow button to increase or
decrease the MAX VOLUME.
·Use down【▼】arrow button to highlight DEFAULF SOURCE. Navigate using 【◄】 /【►】arrow button to select
this option ATV/DTV/AV/SCART/YPBPR/VGA/HDMI.
·Use down【▼】arrow button to highlight SOURCE LOCK. Navigate using 【►】arrow button to lock source is ON or
OFF.the FUNCTION menu is below.
·Use down【▼】 arrow button to highlight CLEAR LOCK. Navigate using 【►】arrow button to clear hotel lock to off.
ON
FUNCTION
ATV
DTV
AV
SCART
YPBPR
VGA
HDMI
MOVE
OFF
OFF
OFF
OFF
OFF
OFF
OFF
SELECT
31
MENU
EXIT
HELP
32
SPECIFICATIONS
Screen Size
TV system
Video system
Preset Channels
Input/Output
Audio output power
24"
PAL/SECAM
PAL/NTSC
99
IN: VGA, VIDEO input,HDMI,YPBPR
PC Audio , ANT 75Ω ,SCART , EARPHONE
3W X 2
Power requirement
AC 100-240V~ 50/60Hz
Power consumption
DC 12V
Accessories
4A
Remote controller
User's manual
Power cord
2 x AAA Batteries
33