1
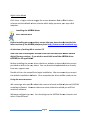
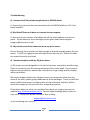
HitecDC Focus
User Manual
http://www.hitecastro.co.uk
[email protected]
Congratulations on your purchase of the ‘Hitecastro’ DC Focus. We hope your
device will provide for many years of happy focusing. HitecDCFocus is a high
quality digital interface between your DC motor based focuser and your PC or
laptop.
VERY IMPORTANT NOTE: The term autofocusing is often used liberally.
‘Autofocusing’ is the process of using a computer to accurately focus a CCD
camera without any intervention from the user. DC motors are not capable of
reliable AUTO FOCUSING. Although you may well get some decent results with
autofocusing using HitecDCFocus, we cannot guarantee this. The reason for this
is that DC motors cannot be used to absolutely position the shaft repeatedly.
HitecDCFocus does however allow you to control your focuser VERY precisely
which will make focusing your CCD much easier and more accurate.
If you require accurate ‘autofocusing’ using software such as MaximDL,
FocusMax etc, we recommend you check out our range of high quality stepper
based focusers which are more than up to this task.
Warranty
Hitecastro warrants that this product will be free from defects for a period of 12
months following purchase. This warranty is in addition to any statutory rights
which may exist in your jurisdiction. This warranty only applies to use as
described in this document and also for use as a telescope focus controller. No
other use is recommended or supported by Hitecastro. Any user repair attempt
other than described in the troubleshooting section of this document or directed
by Hitecastro will invalidate your warranty. Hitecastro and its affiliates disclaim
any responsibility for any consequential damage or injury which may result from
use of this device except as described in this document. Should your product fail
within the first year of ownership we will repair/replace the unit at no cost to you.
Page 2
Connecting the device
The device must be powered using a 12VDC center positive supply. The
controller itself will run on any voltage between 6vDC and 18vDC. However you
MUST check that the voltage used matches the rated voltage of your motor,
Skywatcher or JMI motors are happy to run from the typical 13.8DC output by
many power supplies.
Connect a high quality USB cable to the USB port on the device and connect the
other end to a free USB port on your computer. You may use any USB 2.0 port.
HitecDCFocus is also backwardly compatible with the USB 1.1 standard. No
matter which version of windows you use, the USB guider should be recognised as
a ‘HID device’ without any further input from you. You will now need to connect
your motor to the opposite end of your HitecDCFocus unit.
For best results with HitecDCFocus we recommend you use either the Skywatcher
or JMI focus motor. Depending on whether you are using a ‘Skywatcher’, ‘JMI’ or
your own DC motor the connection procedure will be different.
Let’s first look at connecting a Skywatcher or JMI motor
Skywatcher
Your skywatcher motor will come equipped with a black coiled motor cable with
an ‘RJ’ (Telephone Style) 4 pin plug at both ends. This plug is technically called
‘4P4C’. Connect one end to the skywatcher motor and the other end (doesn’t
matter which end) to the HitecDCFocus 4P4C socket. Connect the other end to
your skywatcher motor
JMI
The JMI motor is equipped with a jack plug connector. Plug this into the socket
on the end of the HitecDCFocus unit.
Page 3
Connecting Your Own Motor
If you choose to connect your own motor to the HitecDCFocus unit, you do this
at YOUR OWN RISK. Hitecastro will not accept responsibility for any
consequence of using a non Skywatcher or JMI motor.
Given the above warning. If you choose to connect your own focus motor you
should keep the following in mind.
You MUST use a geared DC motor for focus operation. Without appropriate
gearing your motor will run too fast for focus operations and will not have enough
torque to turn your focuser. The actual gearing ratio you need will depend on
your focuser. However you will find about 60:1 will be appropriate in most cases.
The unit will output a voltage between 0 and the rated output of the power
supply which drives it. Generally this will be 12VDC. The motor you use MUST be
rated for at least this voltage. Some motors will tolerate being operated at a
slightly higher voltage but this will reduce the service life of that motor.
You can connect a motor to either the 4P4C connector or the jack socket. Most
users will find the jack socket most convenient.
Installing and Using the HitecDCFocus Software Application.
This will be the primary means of operating the focuser. Its installation and use
are now described. Before installing any of our software or ASCOM drivers, you
must ensure that your computer has the following installed.
• Dot Net Framework v4
• ASCOM Platform v5.5.1
See links at the end of this document.
Installing the HitecDCFocus Application.
Download and run the installer application from the Hitecastro website.
Currently the URL for this is;
Page 4
http://www.hitecastro.co.uk/support/DCFocus/HitecDCFocus_v1.2_Setup.exe
http://www.hitecastro.co.uk/support/DCFocus/HitecDCFocus_v1.
However thiss may change after future updates. Always
lways check our support site for
updates.
Run the installer package by double clicking on it. We recommend accepting the
installer defaults. The installer will create a desktop icon which you can doubleclick to run the application.
Using the HitecDCFocus Appl
Application
When the application is run you should be presented with the following screen;
Once you have your power,
power motor, and USB cable plugged
lugged in click the ‘Connect’
(7) Button. If all is well, the text of the button will change to ‘Connected’ and the
focuser will retrieve the current settings from the unit.
All settings are automatically saved to the
he ASCOM profile on your PC.
Page 5
Once you have connected successfully
successfully, you will need to adjust some settings to
gett the best performance from your motor.
For now just accept the defaults and examine the ‘Focus Control’ buttons (1).
Push the ‘Focus In’ or ‘Focus Out’ to move your focus motor. You should see your
focus motor move in the direction which you clicked. We chose these directions
to suit a motor installed on the left hand side of a typical refractor telescope.
However if your motor is mounted in a different orientation then the directions
the motor moves may be incorrect. Click the ‘Swap Directions’ checkbox to
rectify this. Remember this setting is permanently stored until you change it
again.
Note the radio buttons marked
marked ‘Continuous’ and ‘Steps’. With ‘Continuous’
checked when you push the Focus In or Out button the motor will continue to
slew until you release this button.
Note: When operating in continuous mode, the controller will not
update the simulated step position. This
his mode is purely designed to
enable you to slew your motor freely. It is not designed for focus
operations.
For MUCH finer control over your focuser, choose
hoose the ‘Steps’ option. Now when
you press the focus buttons the motor will move only a fixes amount to simulated
steps.. The number of steps moved is determined by the number entered in the
textbox to the right of the ‘Steps’ radio button.
The ‘Steps’ option is a very powerful tool. Used correctly with a small
value in the steps field you can move the focus motor an extremely tiny
amount. Very useful for really fine focusing!
Page 6
2 – Focus Speed
This slider controls the voltage to the motor (from 0% to 100%) of the rated
voltage of your power supply.
supply. The result of this is the speed at which your motor
operates. You may find at very low values your motor does not appear to turn at
all. Choose a value which moves your motor at a suitable speed. You should not
need to continually adjust this once you
you have chosen a speed which works well
for you. Keep in mind that higher speeds also means that each ‘Simulated’ step
the focuser makes will be larger.
DO NOT Overvolt your motor. With Skywatcher and
nd JMI motors are
rated for 12VDC therefore using a regular 12v power supply, you
cannot overvolt these motors. Iff you are using your own motor, they
MUST be rated for at least 12VDC.
3 – Motor Frequency.
This slider adjusts the ‘Pulse Width Modulation’ frequency delivered to your
motor.
or. This ranges from 400Hz (position 1) to 6.4KHz (option 5). A change here
may be required to eliminate vibration in your motor. If you do not experience
vibration in your motor then there is no need to adjust this parameter.
4 – Absolute Positioning.
The value displayed here is the current position of your motor. You can edit this
value if you choose. Click the ‘Set’ button to set the edited value as the new
current position of your focuser. Note: This does not move the focus motor.
Note the box marked ‘New Position’ you can enter any position for your focuser
in this box and then press ‘Slew’ to slew the focus motor to that position.
5. – Presets
These four values can be set by the user. Clicking the numbered button
underneath each preset value box will slew the motor to that simulated step
position. These could be, for example, the focus position of your favourite
eyepieces or CCD cameras.
Page 7
Once again we remind you that a DC motor is not always capable of
repeatable positioning. Therefore the presets are there as a guide. It
may not always be possible to repeat the same focus positions time
after time. The repeatability will be affected by the load and
orientation of your focuser. For example it is much easier for the motor to
lower the load on your focuser than lift it. Therefore expect that when the
focuser is lowering the load it may move a little further than when lifting it. In
our tests
ests we found the repeatability of focus positions to be very good using
both the JMI and Skywatcher motors used to test.
7 - Connect Button
Use this to connect or disconnect from your focuser. Upon connect all stored
values are retrieved from the memory
me
of the focuser.
8 – Firmware Revision
The
he value here is the firmware revision retrieved from your
your controller.
controller Please
note this value should you need to contact support.
9 – Save To Controller.
You will have noticed that our controller comes equipped with In/Out buttons
integrated into the unit. These
These enable focus operations even when the controller
is not connected to a PC. But
ut how does the controller know which motor
frequency/speed
speed to use with these buttons?
buttons Pressing the ‘Save
Save to Controller’
Controller
buttons saves both the frequency and speed value to the controller permanently.
If you plan to use your controller away from a PC you will need to do this
beforehand. You can change use this button as often as you like. Even when the
unit is powered off, it will
ill remember the values sent to it the last time this button
was pressed.
Page 8
Night Vision Mode
Click View ->
> Night vision to toggle the screen between Red on Black colour
scheme and the default colour scheme
sche
which helps preserve your eyes dark
adaption.
Installing the ASCOM driver
VERY IMPORTANT
Before installing our ascom driver ensure that you have already installed the
latest version of the ASCOM platform from http://www.ascom-standards.org
http://www.ascom
At the time of writing this is version 5.5
Also note that installing the ASCOM driver sets the controller values back to
defaulf factory settings. Iff you wish to avoid this install the ASCOM driver
BEFORE the PC application.
Before installing the ascom driver check our website to ensure that the version
provided on disk is the very latest. You can download updated
updated drivers directly
from our support area.
Double click on the setup file to begin installation. We recommend you accept
the default installation defaults. Once complete the driver will be ready to use.
Using the ASCOM Driver.
We cannot go into specifics about the nuances of each individual piece of ASCOM
compliant software. However
wever there are some similarities which you will find
across all software.
Whatever software you use. You should go to the ASCOM focuser chooser
choos and
select ‘HitecDCFocus’
Page 9
Click
lick Properties to display the setup dialog.
Click OK
You are reminded that all settings should be made using our supplied
PC application. You
You can have this open at the same time as the ASCOM
driver so that setting changes can be made ‘On
On the fly
fly’.
Depending
epending on the software you are using, you may need to click ‘Connect’ (e.g.
Maxim DL). However
owever some software applications w
will
ill just connect automatically.
For use of the focuser and general focus operations within your third party
software, consult the
e documentation supplied with that software.
Page
10
Troubleshooting
Q: I cannot install the software application or ASCOM driver.
A: Ensure that you have dot net framework v4 and ASCOM platform v5.5.1 (at
least) installed.
Q: My HitecDCFocus unit does not connect to my computer
A: Ensure that your version of windows has all the latest updates and service
packs. Please note any error message you are given and contact support
([email protected])
Q: My device connects but does not move my focus motor.
Ensure that the focus speed is set high enough to provide enough power for your
motor. Try 50% as a general start and adjust from here to suit. Check all cables
are seated correctly and intact.
Q: I cannot autofocus with my DC focus motor.
A: DC motors are not designed for the kind of accuracy required by autofocusing.
There is no control over the exact positioning of the motor shaft. If you require
high accuracy autofocus, please take a look at our range of high quality stepper
motor controllers.
We cannot support third party software issues, we recommend that you join
some of the many yahoo groups dedicated to these packages. There you will find
many helpful astronomers including some of the Hitecastro staff who will be
more than happy to help you with your autoguiding queries.
If the above does not solve your problem first check our support area on our
website http://www.hitecastro.co.uk We will add knowledge base articles as
they arise. Failing that please contact us by e-mailing
[email protected]
or by contacting your retailer.
Page
11
Links
Requirements for using our software
Dot Net Platform Version 4
http://www.microsoft.com/downloads/
ASCOM Platform
http://www.ascom-standards.org/
Some Software which leverages the ASCOM standard for focusers
CCD Auto Pilot
http://www.ccdware.com/
Maxim DL
http://www.cyanogen.com/
CCD Soft
http://www.bisque.com/sc/shops/store/CCDSoftWin2.aspx
Sharp Cap (Free)
http://sites.google.com/site/rwgastro/sharpcap
EQMOD (Free)
http://eq-mod.sourceforge.net/
FocusMax (Free)
http://users.bsdwebsolutions.com/~larryweber/FocusMaxDownload.htm
Please note that there are many more applications available. Hitecastro has no
connection with any of the above software suppliers. Users should evaluate any
software first to ensure that it meets your needs
Page
12