1
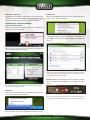
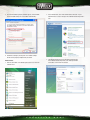
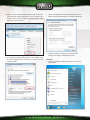
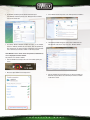
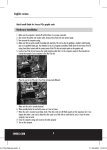
C
O
N
N
E
C
T
E
D
H
O
M
E
Networking made Easy!
Wireless Adapter USB / PCI Card
Thank you for purchasing this Sweex product. Sweex devotes ample attention and care to the quality, reliability, functionality,
durability and user friendliness of all its products. As a result of this, Sweex distinguishes itself in the market and would like you as
a buyer to continue purchasing products of the Sweex brand. We hope you enjoy the Sweex product you have purchased.
An important extra advantage for you is product registration. You can register the product online on www.sweex.com/productregistration.
By registering your product, Sweex offers you a number of important advantages. For example, if you so wish, you will be informed by Sweex of the latest
product developments by our digital newsletter. Where applicable, you automatically receive the latest drivers and/or firmware updates from Sweex for the
product you purchased to preserve or improve the compatibility and the performance. The Sweex support desk can assist you with any question you may have
regarding the product or products.
Precautions
Do not expose the product to extreme temperatures. Do not place the device in direct sunlight or in the direct vicinity of heating elements.
Do not use the product in extremely moist or dusty surroundings. Protect the device against powerful shocks and falls - they may damage
the internal electronics. Never attempt to open the device yourself - it will cause the warranty to lapse.
Package contents
Installation Windows XP, Vista and 7
In this package you will find:
• The product itself
• Quick installation guide
•CD with driver, software and this manual
If you find that any of the package contents are missing,
please return the package to the sales point where it was purchased.
Place the Sweex CD in your CD-ROM drive and wait for the Connected
Home auto run program to appear, click “Drivers and Software” and
follow the instructions on screen.
Note: When asked which components to install, please choose “complete”.
Otherwise some features described in this manual may not be available.
Setting up the wireless network
Terminology list
This manual will contain a number of technical terms. It is important to
know what they mean before you begin installing and configuring the
adapter.
•Wireless network: Wireless networks are based on the Wi-Fi
standard. The adapter enables you to connect to Wi-Fi networks at
a speed of up to 300 Mbps, provided that the network supports this
speed (or higher)
• ( Wireless) Router, modem, access point: These are devices
(amongst others) that can transmit a wireless network signal.
In this manual the term “router” will be used to refer to all
of these devices.
• W ireless security: Wireless security is a form of protection for
wireless networks that allows only authorized devices access
to the network and prevents eavesdropping. There are several
different forms of wireless security, as is explained further on
in this manual.
C
O
N
N
E
C
T
How does it work?
The adapter you have just bought can be seen as a receiver, but for
a functional wireless network you will also need a transmitter. The
transmitter in this case is your wireless router, modem or access point.
You may have purchased it separately or it has been provided to you
by your internet service provider (ISP). Each wireless network also has
a name, also called SSID, that is used to identify the network. You may
have configured the name of your wireless network yourself, or it may
have been preconfigured by the manufacturer of your router, modem or
access point. In some cases, the name of the network is printed on a
label on the device.
Security
A wireless network uses short-range, low power radio signals to transfer
data. Radio signals, by their nature, can penetrate through walls and
objects, and the range of a wireless network indoors can easily be 30
meters or more. This means that not only you, but also your neighbours
can receive your wireless network signal, connect to your network, use
your internet connection, and even eavesdrop.
E
D
H
O
M
E
Connecting and securing with WPS
After activating the WPS function be pressing the WPS button on the router or
via the WPS configuration, you have the computer scan for the automatically
generated network key, the network is secured automatically.
•Ensure you have the Connected Home Utility installed on your computer.
• Push the WPS button on your modem, router or access point.
•If your adapter has a WPS button, press the WPS button for 3 seconds
and wait 30 seconds, the connection will be made automatically.
To prevent this, there are several different forms of wireless security
available. The basic principle of all forms of wireless security is that the
signal is scrambled with a network key, and only those who know the key
can gain access to the network.
There are several different types and combinations of wireless network
security possible:
OpenAn open network is not secured at all, you will mostly find open
networks in public spots such as restaurants, airports or libraries.
WEPWEP is the oldest and currently least secure and least userfriendly form of wireless network security. WEP is deprecated,
not recommended for new networks and only used for legacy
purposes. WEP security is not supported on 150N and 300N
networks. WEP keys have a fixed length of 5 or 16 characters, or
10 or 26 hexadecimal (0-9, a-f) characters.
WPAWPA is an updated form of wireless security designed to address
the flaws of WEP, whilst maintaining compatibility with older
hardware. It is more user friendly, supporting variable key (also
called “passphrase” sizes of 8 – 63 characters or 64 hexadecimal
characters. WPA security comes in two flavours, with TKIP
encryption and with the more secure AES-CCMP encryption. Only
WPA security with AES-CCMP encryption is supported on 150N
and 300N networks. You require at least Windows XP with Service
Pack 2 to connect to a WPA secured network.
WPA2WPA2 is the successor to WPA. It is the most secure standard and
is recommended for all new networks. Functionally it is like WPA.
Only WPA2 security with AES-CCMP encryption is supported on
150N and 300N networks. You require at least Windows XP with
Service Pack 3 to connect to a WPA2 secured network.
For adapters that do not feature a WPS button:
Windows XP:
Right-click the “Connected Home Utility” icon and choose
“Open Utility”.
The Utility will appear. Click on the “WPS Setting” tab,
you should see the following screen:
If your wireless network is secured, you will in some cases have configured
the key yourself. If you have not configured the key, it can often be found on
a label on your router, modem or access point. If you use WPS to connect to
your network, you don’t need to know the key.
WPS (Wi-Fi Protected Setup)
WPS is an alternative method for connecting to a secured network. Instead
of typing the network key manually, the key is securely transferred after
pushing the WPS button on your router, or after entering the correct PIN
number.
Some adapters also feature a WPS button, when you first push the button
on your router and then the WPS button on your adapter for 3 seconds,
the adapter will automatically find the right network and setup a secured
connection to it. This is especially useful when you are unsure what the
name of your network is. Please note that you will need to install the bundled
Connected Home Utility software for this feature to work.
C
O
N
N
E
C
To connect to a WPS secured network, first press the WPS button on your
router, then click the “PBC” button in the Sweex Utility. The utility will
automatically find your network and establish a WPS secured connection to
it. After a WPS connection has been successfully established, you will see it
in the “WPS Profile” table on the right.
T
E
D
H
O
M
E
Windows Vista:
Right click on the Network & Sharing Center icon in the bottom right of your
screen, and click “Connect to a network”:
Windows Vista & Windows 7:
For Windows Vista & Windows 7 simply follow the normal procedure for
connecting to a wireless network. Windows will automatically ask you to
press the WPS button on your router or enter your router’s WPS PIN.
Connecting to a wireless network
Sweex Connected Home Utility:
Right-click on the “Sweex Connected Home Utility” icon at the bottom right
of your screen and click “Open Utility”.
A window titled “Connect to a network” will appear. In this window, select
your network, click the “Connect” button and follow the instructions on
screen:
Click on the “Site Survey” tab, select your network, click the“Connect”
button and follow the instructions on screen:
Note: If you see a red cross near the network and the text: “The settings saved on this
computer for the network do not match the requirements of the network”, please refer
to the troubleshooting section of this manual.
Windows 7: Windows 7 will indicate when wireless networks are available.
You can recognise this by the following icon in the bottom-right of your
screen:
Note: In case the network you’re connecting to is secured, do not forget to enter the
security key in the “Security Setting” tab!
Windows XP:
Right-click on the network adapter’s icon at the bottom right of your screen
and click “View available wireless networks”.
Note: If you see a small red cross through the icon, no networks are in range of your
computer. Please consult the troubleshooting section of this manual if this is the case.
Select your network, click “Connect” and follow the instructions on screen.
C
O
N
N
E
C
T
E
D
H
O
M
E
Click the icon and a list of wireless networks will appear, select your
network, check the “Connect Automatically” checkbox, click “Connect” and
follow the instructions on-screen:
2In the control panel, click “Network and Internet Connections and open
the “Network Connections” icon. If your control panel is in Classic View,
you may open the “Network Connections” icon straightaway.
Note: If you see a red cross next to the network and are unable to connect, please
3Right click the first connected LAN or High-Speed Internet Connection,
in this example the “Local Area Connection”, and click “Properties” from
the context menu. If you have multiple connected connections, repeat
steps 3 to 6 for each connection.
refer to the troubleshooting section of this manual.
Troubleshooting
This chapter of the manual will explain a number of common issues that
you may run into and possible solutions.
•I can connect to a network but I cannot access the internet or other
computers on the network
•This issue may arise from incorrect IP settings on your computer. You
can check and adjust your settings as follows:
Windows XP
1Click the start button at the bottom right of your screen and click
“Control Panel”
C
O
N
N
E
C
4The connection’s property window appears. In this windows, select the
“Internet Protocol” from the list of items and click the “Properties” Button:
T
E
D
H
O
M
E
2In the Control Panel, click “View network status and tasks”. If your
Control Panel is in classic view, open the “Network and Sharing Center”
icon: 5The Internet Protocol’s property window appears. In this window,
ensure that both settings are set to “Obtain automatically”
6Confirm the settings by clicking “OK”. The network settings
for XP are now properly configured for your router.
3The Network and Sharing Center window should now open.
In the Network and Sharing Center, click “Manage network
connections” in the bar on the left side:
Windows Vista
1Click the start button at the bottom right of your screen and click
“Control Panel”
C
O
N
N
E
C
T
E
D
H
O
M
E
6The Internet Protocol Version 4’s property window appears. In this
window, ensure that both settings are set to “Obtain automatically”:
4Right click the first connected LAN or High-Speed Internet Connection,
in this example the “Local Area Connection”, and click “Properties” from
the context menu. If you have multiple connected connections, repeat
steps 4 to 7 for each connection:
7Confirm the settings by clicking “OK”. The network settings
for Vista are now properly configured for your router.
5The connection’s property window appears. In this windows, select
the “Internet Protocol Version 4” from the list of items and click the
“Properties” Button:
C
O
N
N
E
C
Windows 7
1Click the start button at the bottom right of your screen and click
“Control Panel”
T
E
D
H
O
M
E
5The connection’s property window appears. In this windows, select
the “Internet Protocol Version 4” from the list of items and click the
“Properties” Button:
2In the Control Panel, click “View network status and tasks”. If your
Control Panel is in icon view, open the “Network and Sharing Center”
icon:
3The Network and Sharing Center window should now open.
In the Network and Sharing Center, click “Change adapter settings” in
the bar on the left side:
6The Internet Protocol Version 4’s property window appears.
In this window, ensure that both settings are set to “Obtain
automatically”:
4Right click the first connected connection, in this example the “Local
Area Connection”, and click “Properties” from the context menu. If
you have multiple connected connections, repeat steps 4 to 7 for each
connection:
7Confirm the settings by clicking “OK”. The network settings for
Windows 7 are now properly configured for your router.
C
O
N
N
E
C
T
E
D
H
O
M
E
I appear to be connected but Internet Explorer still displays an error
message “Internet Explorer cannot display the webpage” or similar.
4The “LAN Settings” window will now open. Ensure that all checkboxes
are unchecked and confirm the settings by clicking “OK”
This problem may arise from incorrect proxy server settings.
You can adjust these settings as follows:
1In Internet Explorer, click the “Tools” menu or icon and chose “Internet
Options”.
2 The “Internet Options” window will now open.
I have Windows Vista and I get the error message “the settings saved
on this computer for the network do not match the requirements of the
network” when I try to connect. wirelessly.
This problem can be solved as follows:
1In the Control Panel, click “View network status and tasks”.
If your Control Panel is in classic view, open the “Network and Sharing
Center” icon:
3In this window, click the “Connections” tab and in this tab,
the “LAN Settings” button.
C
O
N
N
E
C
T
E
D
H
O
M
E
3In the Network and Sharing Center, click “Manage wireless networks”:
2The Network and Sharing Center window should now open.
In the Network and Sharing Center, click “Manage wireless networks”
in the bar on the left side:
4The following window will appear, right click the network that was
indicated with a red cross in step 2 and click “Remove network”:
3The Manage Wireless Networks window now opens. In this window,
select the conflicting network and click “Delete”. After the network has
been deleted, you can close the window and follow the steps described
in the “Connecting to a wireless network” section of the manual.
I have Windows 7 and I cannot connect to my wireless network. A red
cross is displayed next to the network.
This problem can be solved as follows:
1Click the Network and Sharing Center icon in the bottom right of your
screen:
2 Next click “Open Network and Sharing Center”:
5After the network has been removed, you can close the window and
follow the steps described in the “Connecting to a wireless network”
section of the manual.
C
O
N
N
E
C
T
E
D
H
O
M
E
I get an error message about “limited or no connectivity” (Windows
XP) or a yellow exclamation mark in the network and sharing center
icon in the bottom right of my screen (Windows Vista or Windows 7)
after connecting to a WEP secured network.
Sweex warranty conditions
2-year standard warranty within the EU
• In a standard manner a warranty period of 2 years as from
the purchase date is available for this Sweex product within the EU.
• S hould you wish to invoke this warranty within the first
2 years after the purchase then you can directly apply to the point
of sale where you purchased the product for the conditions and
procedures.
This problem can have a variety of causes, but the most likely cause is that
the WEP key is incorrect. To erase the configured key and try again, delete
the network from the list of preferred networks and connect again.
Note: The above does not apply for networks secured with WPA and WPA2,
because with these newer security mechanisms you normally receive
an error message when the key is incorrect. However under certain
circumstances, this may not happen with Windows XP. In that case this
problem and solution will also apply to a WPA / WPA2 secured network.
10-year manufacturer’s warranty
•However, in addition to the statutory 2-year standard
warranty Sweex offers you an extended quality warranty of
no less than 10 years, if you purchased your product within
the EU.
•For more information, conditions and the registration form go to
www.sweex.com/12yearswarranty and register within 30 days
after the purchase of your product for the extended warranty
period of in total 12 years.
If you experience an issue that is not listed in this manual, please
consult the frequently asked questions section of your product on the
sweex.com website.
Matters that are excluded from the warranty
•The warranty of Sweex only covers manufacturing defects.
Excluded from the warranty are accessories like batteries,
rechargeable batteries and also supplied software, where
applicable.
•The liability of Sweex is limited to the costs of repair and/or
replacement of the product covered by the warranty.
•The standard warranty is null and void if the product has
been opened, changes have been made, physical damage was
caused to the product and if the product is used for another
purpose than for which it is originally meant.
All brand names and associated rights mentioned in this manual
are and remain the sole property of the rightful claimant.
C
O
N
N
E
C
T
E
D
H
O
M
E