1
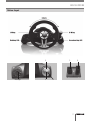
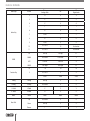
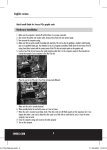
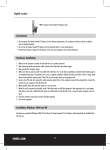
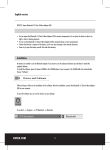
English version
GA310 Vibration Steering Wheel RS-100
Important!
• Do not expose the Vibration Steering Wheel RS-100 to extreme temperatures. Do not place the device in direct sunlight or in the direct vicinity of
heating elements.
• Do not use the Vibration Steering Wheel RS-100 in extremely moist or dusty surroundings.
• Protect the device against powerful shocks and falls – they may damage the internal electronics.
• Never attempt to open the device yourself, there are no serviceable parts inside. Opening the device will cause the warranty to lapse.
Package contents
In this package you will find:
• Vibration Steering Wheel RS-100
• Pedal
• Table clamps
• CD-ROM with manual
If you find that any of the package contents are missing, please return the package to the sales point where it was bought.
Terminology list
•
•
•
•
•
•
T welve input buttons
Three function modes: DIGITAL /ANALOG /NEG
Adjustable steering sensitivity (Low, Middle, High)
Button Relocation feature
270 degree steering angle
Dual vibration feature (If the games support vibration).
2
English version
Buttons Layout
5
Mode Light
6
Y-
Y+
1
3
English version
Mode light
Action Key
D-PAD
Function Key
Button
Blinking
Analog mode
On
Off
Digital mode
3
Y+
3
3
2
2
2
2
4
Y-
4
4
1
1
1
1
8
8
8
8
7
Z axis
7
7
6
8
6
6
5
Z axis
5
5
12
No Function
12
No function
11
No Function
11
No function
UP
POV Up
POV Up
Y+
DOWN
POV Down
POV Down
Y-
LEFT
POV Left
POV Left
X-
RIGHT
POV Right
POV Right
X+
10
10
10
10
9
No Function
9
9
X axis
X axis
X axis
L-Wing
L-Wing
POV Up
5
5
R-Wing
R-Wing
POV Down
6
6
L- Pedal
L-Pedal
Y-
Y-
Y-
R- Pedal
R-Pedal
Y+
Y+
Y+
MODE
MODE
Mode
MODE
Mode
Up
POV Down
6
6
Down
POV Up
5
5
Reverse
1
1
1
Gear Stick
4
English version
Installation
You can press the “Mode” button to select the correct configuration for your game. There are 3 modes: Led on, Led off and Led flashing.
PC
1. Insert the Sweex CD-Rom into your computer
2. Double click the “Install Driver” button
3. Follow the instructions to install the Steering Wheel
4. Connect the Steering Wheel to a USB Port on the PC
5. Select ‘Game Controllers’ in the Control Panel to calibrate the steering wheel properties
Button relocation
The Steering Wheel incorporates a very useful feature called Button Relocation to re-map any control button to the most convenient and useful button
configuration for the user.
1. Press and hold buttons 9 and 10 for 3 seconds till the green led illuminates
2. Press the button that you wish to relocate the function to, the LED starts to flash.
3. Press the button with the function you wish to be relocated, the LED turns OFF, the relocation is complete
4. Repeat the above steps to relocate further control buttons
NOTE.:
a. Once power off, all the program setting will be cleared
b. Please ensure that Button Relocations are deleted before changing to a different driving game, otherwise the controls may not match the
new game being played.
To Clear a Button Relocation (Remap)
1. Press and hold the program button (or start and select) for 3 seconds till the green led illuminates
2. Press the desired button to delete the Button Relocation, the LED starts to flash
3. Re-press the button, the LED is OFF, deletion is complete
4. Repeat the above steps to clear any other Button Relocations
5
English version
Troubleshooting
The Steering Wheel does not locate in the neutral centre:
Do not turn the Wheel when connecting the wheel to your pc or when you are switching on your pc with the wheel connected. If the Wheel is not
at its neutral (centre) position when the console is turned on, then the position that it is held at will be read as the new neutral (centre) position,
and this may cause the unit to operate incorrectly. To reset to the neutral position, unplug the wheel from your pc, leave the Wheel centralized, and
plug the wheel back.
The buttons and wheel do not match my game
Check Steering Wheel “Mode” button. If the game does not support the mode that you have set, try to select another mode to suit the game. And
if needed reset your console.
The gearshift or Pedals do not work
Press the Mode button to ensure the correct mode has been selected.
Or
Check if the buttons have been relocated.
6
English version
Warranty
Thank you for purchasing this Sweex product. Sweex devotes ample attention and care to the quality, reliability, functionality, durability and user
friendliness of all its products. In this way Sweex distinguishes itself in the market and can we convince you as a buyer to continue purchasing
products of the Sweex brand. We wish you a lot of pleasure with your purchase.
An important extra advantage for you is the possibility of product registration.
You can register the product you purchased online on www.sweex.com/productregistration.
By registering your product Sweex offers you a number of important yet equally useful advantages.
For example, if you wish so, you are regularly informed by us of the latest developments in our assortment by means of a digital newsletter.
Where applicable, you also automatically receive the latest drivers and/or firmware from us for the product you purchased to preserve or improve
the compatibility and the performance. Moreover, our support desk can assist you faster in case of possible support questions about the product if you registered the product.
Sweex warranty conditions.
2-year standard warranty within the EU
In a standard manner a warranty period of 2 years as from the purchase date is available for this Sweex product within the EU. Should you wish to invoke this warranty within the first 2 years after the purchase then you can directly apply to the point of sale where you
purchased the product for the conditions and procedures.
Matters that are excluded from the warranty
The warranty of Sweex only covers manufacturing defects. Excluded from the warranty are accessories like batteries, rechargeable batteries and also
supplied software, where applicable.
The liability of Sweex is limited to the costs of repair and/or replacement of the product covered by the warranty.
The standard warranty is null and void if the product has been opened, changes have been made, physical damage was caused to the product and if
the product is used for another purpose than for which it is originally meant.
All brand names and associated rights mentioned in this manual are and remain the sole property of the rightful claimant. 7