1
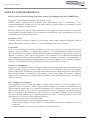
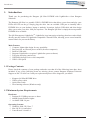
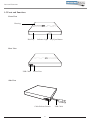
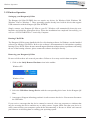
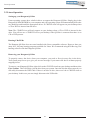
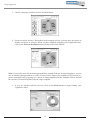
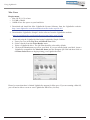
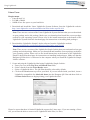
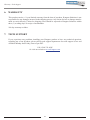
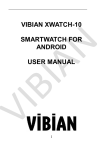
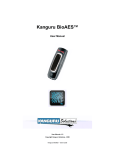
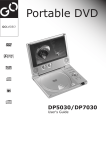
QS
User Guide
Copyright 2009, All Rights Reserved.
Notices and Information
NOTICES AND INFORMATION
Please be aware of the following points before using your Kanguru QS Slim DVDRW Drive
Copyright © 2009 Kanguru Solutions. All rights reserved.
Windows 2000®, Windows ME®, Windows XP®, and Windows VistaTM and Windows 7TM are
registered trademarks of Microsoft Inc. All other brands or product names are trademarks of their
respective companies or organizations.
Kanguru Solutions will not be held responsible for any illegal use of this product nor any losses
incurred while using this product. The user himself is responsible for the copyright laws, and is fully
responsible for any illegal actions taken.
Customer Service
To obtain service or technical support for your system, please contact Kanguru Solutions Technical
Support Department at 508-376-4245, or visit www.Kanguru.com for web support.
Legal notice
In no event shall Kanguru Solutions’ liability exceed the price paid for the product from direct,
indirect, special, incidental, or consequential software, or its documentation. Kanguru Solutions
offers no refunds for its products. Kanguru Solutions makes no warranty or representation, expressed,
implied, or statutory, with respect to its products or the contents or use of this documentation and
all accompanying software, and specifically disclaims its quality, performance, merchantability, or
fitness for any particular purpose. Kanguru Solutions reserves the right to revise or update its products,
software, or documentation without obligation to notify any individual or entity.
Export Law Compliance
Regardless of any disclosure made to Kanguru Solutions pertaining to the ultimate destination of the
specific Kanguru product, you warrant that you will not export, directly or indirectly, any Kanguru
product without first obtaining the approval of Kanguru Solutions and the appropriate export license
from the Department of Commerce or other agency of the United States Government. Kanguru
Solutions has a wide range of products and each product family has different license requirements
relative to exports.
FCC Compliance Statements
This equipment has been tested and found to comply with the limits for a Class B digital device,
pursuant to Part 15 of the FCC Rules. These limits are designed to provide reasonable protection
against harmful interference in a residential installation. This equipment generates, uses and can
radiate radio frequency energy and, if not installed and used in accordance with the instructions,
there is no guarantee that interference will not occur in a particular installation. If this equipment
does cause harmful interference to equipment off and on, the user is encouraged to try to correct the
interference by one or more of the following measures:
• Reorient or relocate the receiving antenna.
• Increase the Distance between the equipment and receiver.
• Connect the equipment into an outlet on a circuit different from that to which the receiver is
connected.
• Consult the dealer or an experienced radio/TV technician for help.
2
Table of Contents
Table of Contents
Notices and Information.......................................................................................... 2
1.
Introduction...................................................................................... 4
2.
Operation.......................................................................................... 7
3.
Using LightScribeTM....................................................................... 11
4.
Cleaning and Maintenance........................................................... 15
5.
FAQ ................................................................................................ 15
1.1 Package Contents....................................................................................... 4
1.2 Minimum System Requirements ............................................................. 4
1.3 Technical Specifications............................................................................. 5
1.4 Compatible Media..................................................................................... 5
1.5 Parts and Functions................................................................................... 6
2.1 Windows Operation................................................................................... 8
2.2 Mac Operation........................................................................................... 9
2.3 Linux Operation....................................................................................... 10
6. Warranty . ...................................................................................... 16
7. Tech Support.................................................................................. 16
3
Introduction
1.
Introduction
Thank you for purchasing the Kanguru QS Slim DVDRW with LightScribeTM from Kanguru
Solutions!
The Kanguru QS Slim is a portable USB 2.0 DVDRW drive that allows you to burn and play your
DVDs and CDs on the go. Simply plug the drive into an available USB port to instantly add a
DVDRW drive to your desktop, laptop or netbook. Its unique, built-in USB cable and slim design
allow you to take your drive with you anywhere. The Kanguru QS Slim is simply the most portable
DVDRW drive available.
The QS Slim supports LightScribeTM. LightScribe is an innovative technology that laser-etches labels
directly onto the surface of LightScribe compatible CDs and DVDs, allowing you to create beautiful,
custom labels for your media library.
Main Features
√√ Compact, lightweight design for easy portability
√√ Bus-powered, no external power needed (for most computers)
√√ Built-in USB cable
√√ Supports LightScribeTM (requires LightScribe system software)
√√ Easy plug and play connectivity
√√ USB Mass Storage Device class compatible
√√ USB 2.0 Hi-Speed
1.1 Package Contents
Please check the contents of your package and make sure that all of the following items have been
included. If any of the following items are missing, please contact Kanguru Solutions Technical
Support at 508-376-4245 ext.2 and your replacement parts will be shipped to you ASAP.
•
•
•
•
Kanguru QS Slim DVDRW drive
USB to power cable
Quick Start Guide
Nero burning software (Windows only)
1.2 Minimum System Requirements
Hardware:
√√ Pentium II 133MHz processor or faster
√√ 64MB System RAM or higher
√√ Available USB 2.0 port
Operating Systems:
√√ Windows 2000, XP, Vista, 7
√√ Mac OS X 10.x and above
√√ Linux Kernel 2.4 and 2.6
4
Technical Specifications
1.3 Technical Specifications
Model Number
U2-DVDRW-SL
Model
QS Slim
Interface
USB 2.0
Format
Dual Format (DVD+/-R/RW)
Burning Speeds
DVD+/-R: 8X
DVD +/-RW: 8X
DVD+/-R DL: 6X
CD-R: 24x
CD-RW: 4x
Supported Formats
DVD-ROM, DVD-R, DVD-RW, DVD+R, DVD+RW,
DVD-RAM, DVD+R DL, DVD-R DL, CD-R, CD-RW,
CD-ROM
LightScribeTM Support
Yes
Buffer Under Run Protection
Yes
Buffer Size
1MB
Access Times
DVD 160ms; CD 140ms
OS Compatibility
Windows 2000, XP, Vista, 7
Mac OS X 10.x and above
Linux Kernel 2.4 and 2.6
Weight
0.7 lbs.
Dimensions
5.5” x 5.25” x 0.75”
1.4 Compatible Media
The QS Slim reads and writes several CD and DVD Recordable formats, including CD-R, CD-RW,
DVD-RW, and DVD-R. The drives write to DVD-R/RW and DVD+/R/RW GENERAL PURPOSE
media. It will not write to DVD-R Authoring media.
Kanguru Solutions recommends the following brands of media:
• DVD+R Verbatim/Mitsubishi Chemical, Taiyo Yuden, Ricoh, Philips
• DVD+RW Verbatim/Mitsubishi Chemical, Ricoh, Philips
• DVD-R Verbatim/Mitsubishi Chemical, Taiyo Yuden, Maxell, TDK, Philips
• DVD-RW Verbatim/Mitsubishi Chemical, TDK, Philips
• CD-R (74 min or 80 min) 40X Verbatim/Mitsubishi Chemical, Taiyo Yuden, Maxell, Philips
• CD-R 4-32X Verbatim/Mitsubishi Chemical, Taiyo Yuden, Ricoh, Maxell, Philips
• CD-RW (74 min) 24X Verbatim/Mitsubishi Chemical, Philips
Please note that even among the media manufacturers listed above, some media may exist that is not
compatible.
5
Parts and Functions
1.5 Parts and Functions
Front View
Housing
DiscTray
Indicator Light Tray Eject Button
Rear View
USB Cable
Power Port
Side View
Cable Release Switch
6
USB Cable
Operation
2.
Operation
Please carefully read the following instructions and make sure you understand them completely.
The Kanguru QS Slim features a built-in USB cable. When not in use, the built-in USB cable can be
stored within the housing to allow for maximum portability.
To release the USB cable:
1. Slide the Cable Release Switch to the right. The USB plug will become exposed.
Gently pull on the USB plug until the cable is released. WARNING! The cable will extend to a
maximum length of 6”. Do not over-extend the cable. Do not allow the QS Slim to hang from the
cable.
Note: Most computers will provide enough power through USB connection. If your QS Slim is not
operating normally, connect the USB to power cable to your computer first and then connect the USB
cable. This will ensure that adequate power is supplied to your drive.
Storing the USB Cable
After you have safely disconnected your Kanguru QS Slim from your computer, you can store the
USB cable inside the drive. Simply feed the cable back into the drive until the cable and USB plug
are stored completely inside the enclosure.
7
Windows Operation
2.1 Windows Operation
Setting up your Kanguru QS Slim
The Kanguru QS Slim DVDRW does not require any drivers for Windows 2000, Windows XP,
Windows Vista or Windows 7. These operating systems already have built-in drivers that support
USB connection with the Kanguru QS Slim DVDRW.
Simply connect your Kanguru QS Slim to your PC. Windows will automatically detect the new
hardware and install the appropriate driver. When the installation has completed successfully, you
will see a “DVD/CD-RW Drive” icon in My Computer.
Burning CDs/DVDs
The Kanguru QS Slim comes bundled with Nero disc burning software for Windows; use the bundled
software for burning CDs/DVDs. Refer to the software’s documentation for information regarding
burning CDs or DVDs. Please do not contact Kanguru Solutions with questions or problems concerning
the use of the burning software; please contact the software developer directly.
Removing your Kanguru QS Slim
Be sure to follow these safe removal procedures. Failure to do so may result in data corruption.
1. Click on the Safely Remove Hardware icon in the taskbar.
Windows XP
Windows Vista
2. Select the USB Mass Storage Device with the corresponding drive letter for the Kanguru QS
Slim.
3. A message will appear informing you that it is safe to remove the device. You can now disconnect
the USB cable.
If you receive a message that the device cannot be removed, close any programs or windows that
may be accessing the device and then try to safely remove it again. Make sure that your device is
safely removed from your computer system before disconnecting it. Be sure to follow safe removal
procedures to avoid losing data or crashing your operating system.
8
Mac Operation
2.2 Mac Operation
Setting up your Kanguru QS Slim
Mac OS X has a built-in driver to support the Kanguru QS Slim. Simply plug in the Kanguru QS Slim
DVDRW to your computer and your operating system will automatically detect the new hardware
and install the appropriate driver. A CD/DVD icon will appear on your desktop when a CD or DVD
is inserted into the drive.
Note: The CD/DVD icon will only appear on your desktop when a CD or DVD is inserted in the
drive. You will not see a CD/DVD icon on your desktop if the QS Slim is connected but there is no
CD or DVD present.
Burning CDs/DVDs
The Kanguru QS Slim does not come bundled with Mac compatible software. However there are
many free, 3rd party burning programs available for Mac. We recommend using Burn! burning
software with the Kanguru QS Slim.
Removing your Kanguru QS Slim
To properly remove the device from your computer, you need to first eject any disc in the drive.
Your system may freeze up or give you an error message if you remove the device without properly
stopping it first.
To remove your Kanguru QS Slim, click and drag the CD/DVD icon from your desktop to the
trashcan . This will safely eject the disc from your system. Once the disc has been removed you can
safely disconnect the USB Cable. If there is no disc in drive, there won’t be a CD/DVD icon on your
desktop. In this case you can simply disconnect the USB cable.
9
Linux Operation
2.3 Linux Operation
Setting up your Kanguru QS Slim
Linux operating systems have a built-in driver to support the Kanguru QS Slim. Simply plug in the
Kanguru QS Slim DVDRW to your computer and your operating system will automatically detect the
new hardware and install the appropriate driver. A CD/DVD icon will appear on your desktop when
a CD or DVD is inserted into the drive.
Note: The CD/DVD icon will only appear on your desktop when a CD or DVD is inserted in the
drive. You will not see a CD/DVD icon on your desktop if the QS Slim is connected but there is no
CD or DVD present.
Burning CDs/DVDs
The Kanguru QS Slim does not come bundled with Linux compatible software. However there are
many free, 3rd party burning programs available for Linux. We recommend using K3B Burning Tool
burning software with the Kanguru QS Slim.
Removing your Kanguru QS Slim
To properly remove the device from your computer, you need to first eject any disc in the drive.
Your system may freeze up or give you an error message if you remove the device without properly
stopping it first.
To remove your Kanguru QS Slim, right-click on the CD/DVD icon from your desktop and then select
Eject Volume. This will safely eject the disc from your system. Once the disc has been removed you
can safely disconnect the USB Cable. If there is no disc in drive, there won’t be a CD/DVD icon on
your desktop. In this case you can simply disconnect the USB cable.
10
Using LightScribe
3.
Using LightScribeTM
Windows Users
Requirements
• Windows Vista / XP / 2000
• 512 MB of RAM
• 10MB of free disc space on your hard drive
1. Download and install the Windows LightScribe System Software from the LightScribe website:
http://www.lightscribe.com/downloadsection/Windows/index.aspx?id=810
2. Download the LightScribe Template Labeler software from the LightScribe website:
http://www.lightscribe.com/downloadSection/windows/index.aspx?id=1524
Note: Make sure that the Kanguru QS Slim drive is connected to the computer when you install
the LightScribe Template Labeler software.
3. Create and print the LightScribe label using LightScribe Template Labeler.
a. Run the LightScribe Template Labeler by double clicking on the desktop icon
or
Go to Start → All Programs → LightScribe Direct Disc Labeling → LightScribe Template
Labeler
b. When prompted, insert a LightScribe compatible disc label-side down into the Kanguru QS
Slim and then click on the OK button.
11
Using LightScribe
c. Choose a template and then click on the Next button.
d. Insert text and/or pictures. Depending on the template chosen, you may have the option to
modify text boxes or pictures. When you have finished designing your LightScribe label,
click on the Preview and Print button to bring up the Print window.
Note: If you prefer more advanced design capabilities instead of the pre-designed templates, you can
use an advanced design software to create a custom label. Export your completed CD artwork as a
picture format like bmp, jpeg, png, etc. Choose an empty template from the Template Labeler and add
the exported CD artwork pictures into the empty template.
e. If you are satisfied with the preview, click on the Print button to begin burning your
LightScribe label.
12
Using LightScribe
Mac Users
Requirements
• Mac OS X 10.3.9 or later
• 512 MB of RAM
• 10MB of free disc space on your hard drive
1. Download and install the Mac LightScribe System Software from the LightScribe website:
http://www.lightscribe.com/downloadsection/mac/index.aspx?id=813
2. Download the LightScribe Simple Labeler software from the LightScribe website:
http://www.lightscribe.com/downloadsection/mac/index.aspx?id=852
3. Create and print the LightScribe label using LightScribe Simple Labeler:
a. Enter your Text in the Top Text and Bottom Text fields.
b. Select a border from the Select Border menu.
c. Select a LightScribe drive. The QS Slim should be selected by default.
d. Click on the Next button to preview your label. If you are satisfied with your label, insert a
LightScribe compatible disc label-side down into the Kanguru QS Slim and then click on
the Burn Label button to begin printing your LightScribe label.
Please be aware that there is limited LightScribe support for Mac users. If you are running a Mac OS,
you will not be able to create or save LightScribe label files (.lsi files).
13
Using LightScribe
Linux Users
Requirements
• Linux Kernel 2.6
• 512 MB of RAM
• 10MB of free disc space on your hard drive
1. Download and install the Linux LightScribe System Software from the LightScribe website:
http://www.lightscribe.com/downloadSection/linux/index.aspx?id=814
Note: There are two versions of the Linux LightScribe System Software that you can download:
an rpm package and a deb package. Make sure you download and install the correct package
needed for your operating system. Please refer to the install instructions at the bottom of the
LightScribe System Software download page for instructions on installing both packages.
2. Download the LightScribe Simple Labeler software from the LightScribe website:
http://www.lightscribe.com/downloadSection/linux/index.aspx?id=815
Note: There are two versions of the LightScribe Simple Labeler that you can download: an rpm
package and a deb package. Make sure you download and install the correct package needed for
your operating system. Please refer to the install instructions at the bottom of the LightScribe
Simple Labeler download page for instructions on installing both packages. Make sure that the
Kanguru QS Slim drive is connected to the computer when you install the LightScribe Simple
Labeler software.
3. Create and print the LightScribe label using LightScribe Simple Labeler:
a. Enter your Text in the Top Text and Bottom Text fields.
b. Select a border from the Select Border menu.
c. Select a LightScribe drive. The QS Slim should be selected by default.
d. Click on the Next button to preview your label. If you are satisfied with your label, insert a
LightScribe compatible disc label-side down into the Kanguru QS Slim and then click on
the Burn Label button to begin printing your LightScribe label.
Please be aware that there is limited LightScribe support for Linux users. If you are running a Linux
OS, you will not be able to create or save LightScribe label files (.lsi files).
14
Cleaning and Maintenance \ FAQ
4.
Cleaning and Maintenance
•
•
•
•
This drive is an electronic device. It needs careful handling and use.
Keep the drive free from dust and other contaminants.
Keep liquid and moisture away from the drive.
Clean the exterior by wiping it with a soft dry cloth. Cleaning agents can damage the surface of
your drive.
• Do not drop or bump the drive. You may damage the internal components.
• Do not try to open the drive to repair it yourself. There are no serviceable parts inside. You might
be exposed to dangerous voltage. You will also break the seal and void the warranty.
5.
FAQ
Q1: Can I use this device with Windows 98 or Windows ME?
No. This device requires Windows 2000 or above. All previous versions of Windows do not provide
adequate level of support for USB. Microsoft has no plan to revise the USB driver support in older
Windows platforms. Please upgrade your version of Windows.
Q2: Should I update my USB driver?
Yes, it is a good idea to always keep your drivers up to date. It is a good idea to check Microsoft’s
Windows Update website at http://windowsupdate.microsoft.com or for USB driver updates.
Q3: The device cannot be detected or is disabled (have yellow exclamation point next to the
device name under the USB section in the Device Manager). What can I do?
Please make sure you are logged in as the Administrator or a user with Administrator privileges in
Windows in order to install new hardware and driver. Unplug the drive and then plug it back into the
system. If you still see the yellow exclamation mark try uninstalling then reinstalling your hardware.
To reinstall your hardware:
1. Open the Computer Management Console by right clicking on My Computer and selecting
Manage.
2. Select Device Manager. A list of your system devices appears.
3. Click on the device with the yellow exclamation point next to it to select it.
4. Click on the Action menu at the top and choose Uninstall. The device will uninstall.
5. Click on Action menu and choose Scan for hardware changes to reload the driver.
Q4: I cannot get the USB cable to retract all the way back into the drive. What can I do?
If your cable does not retract completely back inside of the drive, pull the cable back out, twist the
cable 90 degrees clockwise and then try feeding the twisted cable into the enclosure.
Q5: After following all the troubleshooting tips, the device still does not work. What can I do?
Please check with your computer or motherboard manufacturer for any USB driver fix. Also, please
go to Windows Update to check for any update to the Microsoft USB driver. You should also update
your BIOS to the latest version. Please contact your motherboard’s manufacturer for help with that. If
you still have problem you cannot resolve, please contact Kanguru Technical Support at 1-508-3764245, option 2.
15
Warranty / Tech Support
6. WARRANTY
This product carries a *1-year limited warranty from the date of purchase. Kanguru Solutions is not
responsible for any damages incurred in the shipping process. Any claims for loss or damage must be
made to carrier directly. Claims for shipping errors should be reported to Kanguru Solutions within
three (3) working days of receipt of merchandise.
*90-day warranty on labor.
7. TECH SUPPORT
If you experience any problems installing your Kanguru product or have any technical questions
regarding any of our products, please call our tech support department. Our tech support is free and
available Monday thru Friday, 9am to 5pm EST.
Call 1-508-376-4245
Or visit our website at www.Kanguru.com
16
Kanguru Solutions
1360 Main Street
Millis, MA 02054
www.kanguru.com
12.09.09 v1.1 © 2009 Kanguru Solutions
Legal terms and conditions available at www.kanguru.com. Please review and agree before use. Thank you.