1
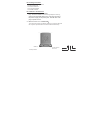
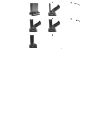
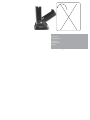
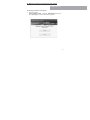
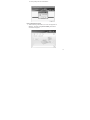
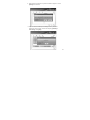
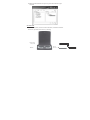
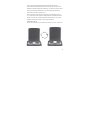
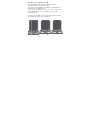
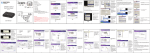
USB3.0
Docking Station
User Manual
(DA-70546)
Foreword
Congratulations on your purchase of our product! We will
show you a new storage concept with safety and convenience
It is our pleasure to give you the best solution
to expand your HDD'S Capacity and enhance your data's
reliability in PC system or Mac system. Before using the
product, please read this manual carefully for further
recognizing of the product.
I. System Requirement
Basic environment for setup this device:
Hardware requirement: a PC, Notebook with free USB
Interface USB 1.1 or 2.0 or 3.0 Equipped System
For USB 3.0 Speeds, the System Must Support USB 3.0
Specifications
II. Key Feature
1. Easy to install and remove the hard disk drive
2. Compliant USB3.0 to Serial ATA interface, transfer rate
max up to 5Gbps/sec
3. Compliant USB2.0 to Serial ATA interface, transfer Rate
max up to 480Mbps/sec
4. Backwards-Compatible with USB 2.0 or 1.1
5. Suitable for 2.5"/3.5" Serial ATA HDD
6. One touch backup function
7. Built in one 8cm cooling fan
8. Power supply: AC100~ 240V input, DC 12V/2A output
1
III. Package Content
one USB3.0 Docking Station
one Supported CD
one User's Manual
one 12V/2A Adapter
one USB3.0 cable
IV. Hardware installation
1. Install a 2.5" or 3. 5" SATA HDD:
Plug the SATA HDD in the docking adapter directly,
and connect the USB cable to PC, then plug the end of
the power supply to the power jack, and the other end
plug to power source.
2. Remove a 2.5" or 3. 5" SATA HDD:
Turn the button with clockwise rotation to remove the disk
drive ( Note: please take care and hold the hard disk)
USB3.0
Backup Button
Power Switch
DC Jack
2
3
Warning:
Don' t shake the hard disk drive when it has been
installed correctly, otherwise it maybe damage your
hard disk drive.
When inserting the hard disk drive in the docking
station, please sure that the SATA port is arm at the
appropriate SATA port of the docking station.
4
V. Driver installation
Under Windows2000/XP/Vista/7, the system can detect
and setup [USB Mass Storage Device] directly
Then an icon will appear on the right-bottom area of the
system toolbar as bellow:
Congratulation, you can enjoy this product now!
5
VI. Backup software installation and usage
Note: The backup software don’ t support MAC OS, just
for Windows.
A. Backup software installation
1. Open the folder
[PCCLONEEX_LITE_1_82_04_JMICRON] and double
Click [Setup], the below window will appear:
6
2. Click [Agree] to accept the license agreement
3. Click [Install] enter next step
7
4. Click [OK] to finish installation
B. Use backup function
1. After finishing installation, an icon will appear on
desktop, double click [PCCloneEX] ,The below
window will appear:
8
2. Press the backup button, program will appear [Please
select file(s)], click [OK]
3. Please select the file(s) which you want to backup in the
left window, then press the button again
9
4. Follow the instruction to press the button again or click
[Start] with mouse
5. System start to backup the file(s) which you have
selected, when finish, there will display [Backup
finished], click [OK]
10
6. Backup file finished now you may check the file on right
window
VII. Set LCD
On the LCD panel, there are three buttons, and the functions
as below, please feel free to try setting:
Temperature
Fan speed
1#°C -
2# Set
3# Enter
The LCD panel will appear HDD temperature and fan
speed. Paste the temperature inductor on the center of the
HDD to activate temperature display. In order to ensure HDD
work fine and avoid data loss, the operating temperature
have been preset as 60°C+/-5%.
The warning buzzer will emit a continuous beeping sound
for 15 seconds if the internal temperature exceeds this level.
When this occurs, please work the cooling fan or have your
HDD to cool down before continuing operation.
Convert °C to °F
Touch the 1# button, which will convert the °C to °F, the value
11
Set the
e preset overh
heating alarm
m
e screen appea
ar the default
Touch 3# [Enter], the
eating alarm te mperature - 60
0Ԩ
overhe
Touch the 2# button [Set],
[
the presset overheating
g alarm
temperrature will disp
play 60Ԩ
→65Ԩ→
→70Ԩ→30Ԩ→
→35Ԩ→40Ԩ→4
45Ԩ→50Ԩ→55
5Ԩ→60Ԩ
Touch [Enter] button to confirm the
e temperature you
y
expectt to preset.
So the buzzer will ala
arm when the sensor
s
detect the
t
HDD
temperrature is highe r than preset value
v
VIII. Remove a external
l
On removing this unit from your computer, suggest to follow the
below steps:
1.
2.
3.
4.
5.
Click the
icon on the [Desktop] window of your
computer
A [Safely Remove Hardware] message window will
appear, click the [Stop] button
[It is now safe to remove the USB device] message will
appear, close the [Safely Remove Hardware] window
Turn off the device and remove USB cable
Remove [power off] the power jack or the 12V/2A power
adapter if it is applied
* Format one new Hard Disk Drive
If new Hard Disk Drive, you need to partition and format it
before using. Please follow the steps below to format new
Hard Disk Drive:
1) Right click [My Computer], and select [Manager]
2) System will display a "Computer Manager" window, and
click [Disk Manager] on left window
3) On right window, the information of the new Hard Disk
Drive will appear under the system disk, [Unallocated....]
4) Right click the new disk drive, and select [New Partition],
and follow the instruction to finish the step
5) The disk information will be shown [ Free Space 78.12GB]
6) Right click the new disk drive, and select [New logical
drive]
7) Follow the instruction to finish the step, then the
information of the new disk drive will be shown: [New
Volume(J:) 78. 12GB Healthy]
The [J:] disk drive will be shown in [My Computer] and now
you can use it!
12
Disclaimer
All the information in this document is
subject to change without prior notice The
manufacturer makes no representations or
any warranties regarding the Contents of this
manual. The information contained in this
manual is provided for the general use by the
customers. No part of this document may be
reproduced or transmitted in any form by any
means without the express written permission
of The manufacturer. All brand names and
product names used in this document are
trademarks or registered trademarks of their
respective holders.
Made In China