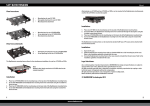
1
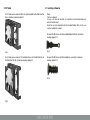
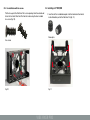
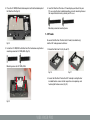
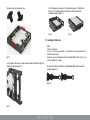
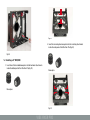
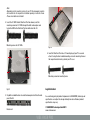
manual
vibe fixer pro
vibe fixer pro
Content
1. Fields of application
2. Package contents
3. Installation
4. 3.5" mode
4.1 Installing a 80 mm fan (3.5" mode)
4.1.1 Fan installation with Rubber Bolts
4.1.2 Fan installation with fan screws
4.2 Installing a 2.5" HDD/SSD
5. 5.25" mode
5.1 Installing a 120 mm fan (5.25" mode)
5.1.1 Fan installation with Rubber Bolts
5.1.2 Fan installation with fan screws
5.2 Installing a 2.5" HDD/SSD
5.3 Installing a 3.5" HDD
Dear customer!
Congratulations for purchasing one premium quality SHARKOON product.
For a long life time and to take full advantage of this product we recommend
you to read this manual completely.
Enjoy our product!
SHARKOON Technologies
1.Fields of application
The Vibe Fixer Pro can be built into standard 3.5" as well as standard 5.25" PC
mounting bays.
2.5" HDDS and SSDs as well as 3.5" HDDs can be installed into the Vibe Fixer
Pro.
Either an 80 mm fan (3.5" mode) or a 120 mm fan (5.25” mode) can be mounted
to the Vibe Fixer Pro.
vibe fixer pro
2.Package contents
3.Installation
A
C
B
D
E
F
G H
When you unpack the Vibe Fixer Pro it is already in 3.5" mode (fig. 1) and
you can instantly insert it into a 3.5” mounting bay of your PC case. Continue
reading chapter 4.
I
fig. 1
J
A – Mounting frame “Vibe Fixer Pro”
B – Fixation rails (2x)
C – Mounting screws for mounting frame (15 mm, fine thread, 4x)
D – Mounting screws for 2.5" HDDs/SSDs (12.5 mm, fine thread, 4x)
E – Mounting screws for 3.5" HDDs (13 mm, coarse thread, 4x)
F – Rubber Bolts for fan mounting
G – Fan screws
H – Fixation screws for mounting frame (3 mm, fine thread, 4x)
I – Manual
J – Decouplers
If you need the Vibe Fixer Pro for a 5.25” mounting bay of your PC case you
may convert the Vibe Fixer Pro into the 5.25” mode (fig. 2). Continue reading
chapter 5.
Note:
If you are missing any of the items listed above, please contact our
fig. 2
customer service via e-mail at [email protected] or call our hotline:
+ 49 (0) 6403 – 775 6100.
vibe fixer pro
4. 3.5" mode
4.1Installing a 80 mm fan
In 3.5" mode you can mount a 80 mm fan (not included!) to the Vibe Fixer Pro
(fig. 3). Continue reading chapter 4.1.
Notes:
The fan is optional!
In case a fan shall be mounted, its installation must be done before any
other installation step!
Some fans are not compatible with the included Rubber Bolts, in this case
use the included fan screws!
To mount the 80 mm fan with the included Rubber Bolts (fig. 5) continue
reading chapter 4.1.1.
fig. 3
fig. 5
In 3.5" mode you can mount a 2.5" hard disk drive or a 2.5" Solid State Disc to
the Vibe Fixer Pro (fig. 4). Continue reading chapter 4.2.
To mount the 80 mm fan with the included fan screws (fig. 6) continue
reading chapter 4.1.2.
fig. 6
fig. 4
vibe fixer pro
4.1.1Fan installation with Rubber Bolts
1. Secure the Vibe Fixer Pro into the 3.5" mode by inserting the four
included fixation screws into the respective screw openings and
fastening the fixation screws (fig. 7).
Fixation screws for mounting frame
fig. 8
3. Hold the fan against the Vibe Fixer Pro from the outside and pull the
Rubber Bolts through the fan’s screw openings until the fan is safely
attached (fig. 9).
fig. 7
2. Pull the four Rubber Bolts through the openings for fan installation inside
the Vibe Fixer Pro (fig. 8).
fig. 9
Rubber Bolts
vibe fixer pro
4.1.2 Fan installation with fan screws
4.2Installing a 2.5" HDD/SSD
Put the fan against the Vibe Fixer Pro’s screw openings from the outside and 1. Insert four of the included decouplers into the horizontal attachments
fasten the fan to the Vibe Fixer Pro from the inside using the four included
inside the bottom part of the Vibe Fixer Pro (fig. 11).
fan screws (fig. 10).
Fan screws
fig. 10
Decouplers
fig. 11
vibe fixer pro
2. Insert the remaining four decouplers into the matching attachments
inside the side panel of the Vibe Fixer Pro (fig. 12).
Note:
Depending on the mounting system of your PC the decouplers need to
be inserted into the respective installation openings inside the frame. Please check before installation!
3. Clip both included fixation rails onto the decouplers built into the side
panel (fig. 13).
Decouplers
Fixation rail
fig. 13
fig. 12
vibe fixer pro
4. Place the 2.5" HDD/SSD onto the decouplers built into the bottom part of
the Vibe Fixer Pro (fig. 14).
6. Insert the Vibe Fixer Pro into a 3.5" mounting bay and attach it to your
PC case using the four included mounting screws for mounting frame or
the respective attachment system of your PC case.
Mounting screws for mounting frame
5. 5.25" mode
fig. 14
To convert the Vibe Fixer Pro from the 3.5" mode (state of delivery)
into the 5.25" mode, proceed as follows:
5. Fasten the 2.5" HDD/SSD to the Vibe Fixer Pro from below using the four
mounting screws for 2.5" HDDs/SSDs (fig. 15).
1. Extend the Vibe Fixer Pro (fig. 16 and 17).
Mounting screws for 2.5" HDDs/SSDs
fig. 16 fig. 17
2. Secure the Vibe Fixer Pro into the 5.25” mode by inserting the four
included fixation screws into the respective screw openings and
fastening the fixation screws (fig. 18).
fig. 15
vibe fixer pro
Fixation screws for mounting frame
In 5.25" mode you can mount a 2.5" hard disk drive or a 2.5" Solid State
Disc or a 3.5” hard disk drive to the Vibe Fixer Pro (fig. 20 and 21).
Continue reading chapter 5.2.
fig. 20 fig. 21
5.1Installing a 120 mm fan
fig. 18
In 5.25" mode a 120 mm fan can be mounted to the Vibe Fixer Pro (fig. 19).
Continue reading chapter 5.1.
Notes:
The fan is optional!
In case a fan shall be mounted, its installation must be done before any
other installation step!
Some fans are not compatible with the included Rubber Bolts, in this case
use the included fan screws!
To mount the 120 mm fan with the included Rubber Bolts (fig. 22) continue
reading chapter 5.1.1.
Abb. 22
fig. 19
vibe fixer pro
To mount the 120 mm fan with the included fan screws (fig. 23) continue
reading chapter 5.1.2.
2. Hold the fan against the Vibe Fixer Pro from the outside and pull the
Rubber Bolts through the fan’s screw openings until the fan is safely
attached (fig. 25).
fig. 23
5.1.1Fan installation with Rubber Bolts
1. Pull the four Rubber Bolts through the openings for fan installation inside
the Vibe Fixer Pro (fig. 24).
fig. 25
Rubber Bolts
5.1.2 Fan installation with fan screws
Put the fan against the Vibe Fixer Pro’s screw openings from the outside
and fasten the fan to the Vibe Fixer Pro from the inside using the four
included fan screws (fig. 26).
Fan screws
fig. 24
vibe fixer pro
fig. 27
2. Insert the remaining four decouplers into the matching attachments
inside the side panel of the Vibe Fixer Pro (fig. 28).
fig. 26
5.2 Installing a 2.5" HDD/SSD
1. Insert four of the included decouplers into the horizontal attachments
inside the bottom part of the Vibe Fixer Pro (fig. 27).
Decouplers
Decouplers
fig. 28
vibe fixer pro
Note:
Depending on the mounting system of your PC the decouplers need to
be inserted into the respective installation openings inside the frame. Please check before installation!
3. Clip both included fixation rails onto the decouplers built into the side
panel (fig. 29).
Fixation rail
fig. 30
5. Fasten the 2.5" HDD/SSD to the Vibe Fixer Pro from below using the four
mounting screws for 2.5" HDDs/SSDs (fig. 31).
Mounting screws for 2.5" HDDs/SSDs
fig. 29
4. Place the 2.5" HDD/SSD onto the decouplers built into the bottom part of
the Vibe Fixer Pro (fig. 30).
fig. 31
vibe fixer pro
6. Insert the Vibe Fixer Pro into a 5.25" mounting bay and attach it to your
PC case using the four included mounting screws for mounting frame or
the respective attachment system of your PC case.
Mounting screws for mounting frame
5.3Installing a 3.5" HDD
fig. 33
1. Remove the metal sleeve from four decouplers by carefully pushing it out
of the rubber shell (fig. 32).
3. Insert the four decouplers with metal sleeve into the matching
attachments of the side panel of the Vibe Fixer Pro (fig. 34).
Decouplers
fig. 32
2. Insert the four decouplers without metal sleeve into the vertical
attachments in the side panel of the Vibe Fixer Pro (fig. 33).
fig. 34
vibe fixer pro
Note:
Depending on the mounting system of your PC the decouplers need to
be inserted into the respective installation openings inside the frame.
Please check before installation!
4. Insert the 3.5" HDD into the Vibe Fixer Pro from above, insert the
mounting screws for 3.5" HDDs through the built-in decouplers and
fasten the HDD to the Vibe Fixer Pro from both sides (fig. 35).
Mounting screws for 3.5" HDDs
fig. 36
6. Insert the Vibe Fixer Pro into a 3.5" mounting bay of your PC case and
attach it using the four included mounting screws for mounting frame or
the respective attachment system of your PC case.
Mounting screws for mounting frame
fig. 35
Legal disclaimer:
5. Clip both included fixation rails onto the decouplers built into the side
panel (fig. 36).
As a continuing policy of product improvement at SHARKOON, the design and
specifications are subject to change without prior notice. National product
specifications may vary.
Fixation rail
© SHARKOON Technologies GmbH 2011
www.sharkoon.com
vibe fixer pro