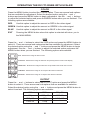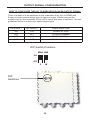
1
®
DVI to RGBS
with Scaler
EXT-DVI-2-RGBSS
User Manual
www.gefen.com
f
ASKING FOR ASSISTANCE
Technical Support:
Telephone
Fax
(818) 772-9100
(800) 545-6900
(818) 772-9120
Technical Support Hours:
8:00 AM to 5:00 PM Monday thru Friday Pacific Time
Write To:
Gefen, LLC
c/o Customer Service
20600 Nordhoff St
Chatsworth, CA 91311
www.gefen.com
[email protected]
Notice
Gefen, LLC reserves the right to make changes in the hardware, packaging and
any accompanying documentation without prior written notice.
DVI to RGBS with Scaler is a trademark of Gefen, LLC
© 2010 Gefen, LLC, All Rights Reserved
All trademarks are the property of their respective companies
Rev A5
6.01
CONTENTS
1
Introduction
2
Operation Notes
3
Features
4
Panel Layout
5
Panel Descriptions
6
Connecting And Operating The DVI To RGBS With Scaler
7
Operating The DVI To RGBS With Scaler
10 Output Signal Configuration
11 Specifications
12 Warranty
INTRODUCTION
Congratulations on your purchase of the DVI to RGBS with Scaler. Your complete
satisfaction is very important to us.
The Gefen DVI to RGBS with Scaler
The DVI to RGBS with Scaler takes your DVI-I computer video card/HDTV video
signal and converts it to analog RGBS formats. Now you can display desktop or
laptop computer and/or HDTV content on your analog RGBS display or projector.
Available and selectable video formats include RGB, RGBS at sync 0.3V, RGBS
at sync 5V, and YPbPr Component video.
How It Works
Connect your analog monitor to the BNC female connector outputs of the DVI to
RGBS with Scaler. Connect the DVI (M-M) cable between the DVI connector on
your computer’s graphic card and the DVI-I input of the DVI to the RGBS Scaler
Box. Power-cycle all connected equipment, and you will see converted DVI video
on your analog display. The Scaler generates all the necessary digital to analog
conversion signals to make the connection between the digital input and the
analog outputs work.
Switching or adjusting the video formats is effortless with the front panel buttons
or an optional IR remote control.
Note: This device does not support HDCP.
VGA video can also be input to this device by using a VGA-to-DVI adapter or
DVI-A cable (sold separately) on the DVI-I input side.
1
OPERATION NOTES
READ THESE NOTES BEFORE INSTALLING OR
OPERATING THE DVI TO RGBS WITH SCALER
•
Output signal types are not configured through the on-screen GUI. To
configure the output signal type of the DVI to RGBS with Scaler use the DIP
switches located on the underside of the unit. Please see page 10 for output
signal types and configuration options.
•
The DVI port is a DVI-I type input port and will accept either a DVI-D (digital),
DVI-A (analog) type signal.
•
This device is DVI 1.0 compliant.
•
This device will not pass a DVI signal that contains HDCP.
2
FEATURES
Features
•
Connects computers with DVI-D/DVI-I connectors to analog RGBS monitors
or projectors
•
The output is either in the form of RGB, RGBS at sync 0.3V, RGBS at sync
5V, or YPbPr Component Video
•
Operates by infrared remote control and friendly On-Screen Display (OSD)
menu
•
The input resolution is automatically detected while the output resolution and
refresh rate can be selected through the OSD menu.
•
Output picture adjustments are possible on brightness, contrast, color, RGB
level and H-V position.
•
High performance scaler that converts and scales DVI-I (digital or analog)
input to analog RGBS outputs
•
Supports HDTV resolution up to 1080p as input and output and computer
resolutions up to 1920x1200 @ 60Hz.
•
The proprietary Advanced Color Engine technology gives: Brilliant and fresh
color, Intensified contrast and details, Vivid skin tone, Sharp edge, Accurate
and independent color control
•
Integrated 8-bit triple-ADC/PLL and high-performance frame rate conversion
engine.
•
Dual 3-D motion video adaptive de-interlacers with smooth low-angle edge.
•
Automatic 3:2 pull-down & 2:2 pull-down detection and recovery.
•
Less then one frame delay allowing for gaming
•
Aspect ratio control for native and full view modes
•
Dual high quality scaling engines
Package Includes
(1) DVI to RGBS with Scaler
(1) 5V DC Power Supply
(1) 6 Foot DVI-D M-M Cable
(1) User’s Manual
3
PANEL LAYOUT
Front Panel
1
2
3
4
Back Panel
5
6
4
7
8
PANEL DESCRIPTIONS
1
IR Receiver
This receiver will receive commands from an optional RMT-SR-IR remote
control. This receiver requires line-of-sight to the IR remote control for successful
operation.
2
DVI-I Input
This receptacle will accept digital and analog signals. When using a analog VGA
source use a VGA to DVI-A type cable. This receptacle will accept DVI-D, DVI-A
or DVI-I cable types.
3
5V DC Power Input
Connect the included 5V DC power supply between this receptacle and an open
wall power socket. Once the power supply is properly connected the power LED
indicator will become active.
4
Power LED Indicator
This LED indicator will become active once the included 5V DC power supply
has been properly connected and is supplying power to the unit.
5
BNC Output Connectors
There are 4 BNC type output connectors. Each output connector is outlined
below:
Output Mode ►
Connector ▼
RGBS
Component
(cable color)
S/Y
Composite Horizontal
and Vertical sync
Luma (Green)*
R/Pr
Red
Red - Luma (Red)
B/Pb
Blue
Blue - Luma (Blue)
G/Y
Green
Luma (Green)*
*Either of these connectors can be used for the luma (green) signal when using component video.
6
Menu Button
This button will open the on-screen GUI and will operate as a confirmation when
changing option from within the GUI.
7
- Button
This button will navigate down through the on-screen GUI menus. While
changing a setting, this button will decrease the effect/setting.
8
+ Button
This button will navigate up through the on-screen GUI menus. While changing
a setting, this button will increase the effect/setting.
5
CONNECTING AND OPERATING THE DVI TO RGBS WITH SCALER
How to Connect the DVI to RGBS with Scaler
1.
Connect the DVI source to the DVI to RGBS with Scaler using the supplied
DVI cable.
NOTE: A VGA source may also be connected using a VGA to DVI-A cable.
2.
Connect either a RGBS or component video device to the BNC output
connectors using user supplied cables.
NOTE: A BNC to RCA adapter/cable can be used for devices that accept RCA
type connectors.
3.
Connect the included 5V DC power supply between the DVI to RGBS with
Scaler and an open wall power socket.
4.
Power on the output and source devices.
5.
Using the DIP switches on the underside of the unit, select the output signal
type. Please see page 10 for more information.
How to Operate the DVI to RGBS with Scaler
The DVI to RGBS with Scaler uses an on-screen GUI (graphical user interface)
to view, manage and change options. This can be accomplished by using the
included RMT-SR-IR remote control or the operation buttons located on the front
panel of the unit.
Using the front panel Operation Buttons
To enter the main menu, press the MENU button located on the front panel.
The - and + buttons are used to navigate up and down the menu system.
Some menu items have sub-menus that can be accessed by pressing the MENU
button. To adjust an option, press the MENU button and use the - and +
buttons to perform the desired adjustments. When the desired adjustment has
been made press the MENU button once more for confirmation and to return
to the previous menu. While in the menu system use the - and + buttons to
highlight the EXIT option to exit the current sub-menu or main menu.
6
OPERATING THE DVI TO RGBS WITH SCALER
MAIN MENU
This portion of the manual will be described using the front panel operation buttons.
The following are the main menu options. Use the - and + buttons to choose your
desired subcategory and press Menu to enter it.
CONTRAST
BRIGHTNESS
FINE TUNE
COLOR
SIZE
OUTPUT
OSD
FACTORY RESET
INFORMATION
CONTRAST
Press the - and + buttons to select the CONTRAST option and press the MENU
button to select it. Use the - and + buttons to adjust the CONTRAST setting. When
you are finished adjusting the CONTRAST press the MENU button to return to the
previous menu.
BRIGHTNESS
Press the - and + buttons to select the BRIGHTNESS option and press the MENU
button to select it.. Use the - and + buttons to adjust the BRIGHTNESS setting.
When you are finished adjusting the BRIGHTNESS press the MENU button to return
to the previous menu.
FINE TUNE
These menu options are ONLY available when the input source is ANALOG.
Press the - and + buttons to select the FINE TUNE option and press the
MENU button to select it.. There are several sub-categories that are available for
adjustment. Select the desired option using the - and + buttons and press the
MENU button to begin adjustment. Use the - and + buttons to adjust the selected
option and press the MENU button when you are finished. The following options are
available:
PHASE
Use this option to adjust the Phase.
CLOCK
Use this option to adjust the Clock.
H-POSITION
Use this option to adjust the image's horizontal position.
V-POSITION
Use this option to adjust the image's vertical position.
EXIT
Pressing the MENU button when this option is selected will return
you to the MAIN MENU.
7
OPERATING THE DVI TO RGBS WITH SCALER
COLOR
Press the MENU button to select the COLOR option. There are several sub-options
that are available for adjustment. Select the desired option using the - and +
buttons and press the MENU button to begin adjustment. Use the - and + buttons
to adjust the selected option and press the MENU button when you are finished. The
following options are available:
RED
Use this option to adjust the amount or RED in the video signal.
GREEN Use this option to adjust the amount or GREEN in the video signal.
BLUE
Use this option to adjust the amount or BLUE in the video signal.
EXIT
Pressing the MENU button when this option is selected will return you to
the MAIN MENU.
SIZE
Press the - and + buttons to select the SIZE option and press the MENU button to
select it.. There are several sub-categories that are available for adjustment. Select
the desired option using the - and + buttons and press the MENU button to begin
adjustment. Use the - and + buttons to adjust the selected option and press the
MENU button when you are finished. The following options are available:
Full - Stretches the image to fill the screen
Overscan - Stretches the image to fullscreen and just beyond the border of the display
Underscan - Stretches the image to fullscreen and just within the border of the screen
Letterbox - Stretches the image to 16:9 aspect ratio without underscan
Pan Scan - Stretches the image to 4:3 aspect ratio without underscan
OUTPUT
Press the - and + buttons to select the OUTPUT option and press the MENU
button to select it.. There are several sub-options that are available for selection.
Select the desired option using the - and + buttons and press the MENU button to
select it and exit. The following options are available:
480i
1080is
720p 50
480p
1080p 60
1080i 50
720p 60
576i
1080p 50
1080i 60
576p
8
OPERATING THE DVI TO RGBS WITH SCALER
OSD
Press the MENU button to select the OSD option. There are several sub-categories
that are available for adjustment. Select the desired option using the - and +
buttons and press the MENU button to begin adjustment. Use the - and + buttons
to adjust the selected option and press the MENU button when you are finished. The
following options are available:
H-POS
Use this option to select the HORIZONTAL POSITION of the onscreen display.
V-POS
Use this option to select the VERTICAL POSITION of the onscreen display.
TIMER
Use this options to adjust how long the on-screen display will
remain on the display, in seconds, when there is no user input.
After this time period the menu will automatically close.
BACKGROUND Use this options to adjust the opacity of the on-screen display’s
background.
EXIT
Pressing the MENU button when this option is selected will return
you to the MAIN MENU.
FACTORY RESET
This option will reset the entire unit to factory settings.
Press the MENU button to select the FACTORY RESET option. Press the MENU
button once and a confirmation will appear with the word YES. Press the MENU
button once more to confirm a FACTORY RESET.
INFORMATION
Press the MENU button to view information on the current status of the unit. The
following categories are displayed:
SOURCE
This will display the currently selected source.
INPUT
This will display the resolution of the currently selected source.
OUTPUT
This will display the current output resolution.
VERSION
This will display the current firmware revision.
Pressing the MENU button will return you to the MAIN MENU.
9
OUTPUT SIGNAL CONFIGURATION
HOW TO CONFIGURE THE DVI TO RGBS WITH SCALER OUTPUT SIGNAL
There is a bank of 2 dip switches on the underside of the DVI to RGBS with
Scaler unit that controls which type of signal is output. Please remove the
metallic tape on the underside of the unit to reveal this bank of switches. Use the
guidelines below to output your desired signal type.
DIP Switch 1
DIP Switch 2
Output Signal Type
ON
ON
R/G/B/S 5V Sync
ON
OFF
R/Gs/B/Gs Default
OFF
ON
R/G/B/S 0.3V Sync
OFF
OFF
Y/Pb/Pr/Y Component
DIP Switch Positions
ON KE
ON
OFF
1
2
DIP
Switches
10
SPECIFICATIONS
Video Amplifier Bandwidth ........................................................................165 MHz
Input Video Signal ...............................................................................1.2 Volts p-p
Input DDC Signal ..........................................................................5 Volts p-p (TTL)
Single Link Range .................................................................................1920x1200
DVI Connector ........................................... DVI-I 29 pin Female (digital or analog)
BNC Connector ........................................ 4 x BNC Female (S/Y, R/Pr, B/Pb, G/Y)
Power Supply ...............................................................................................5V DC
Power Consumption ....................................................................... 10 Watts (max)
Dimensions .............................................................................5.2”W x 1.2"H x 6"D
Shipping Weight ............................................................................................. 2 lbs
11
WARRANTY
Gefen warrants the equipment it manufactures to be free from defects in material
and workmanship.
If equipment fails because of such defects and Gefen is notified within two (2)
years from the date of shipment, Gefen will, at its option, repair or replace the
equipment, provided that the equipment has not been subjected to mechanical,
electrical, or other abuse or modifications. Equipment that fails under conditions
other than those covered will be repaired at the current price of parts and labor in
effect at the time of repair. Such repairs are warranted for ninety (90) days from
the day of reshipment to the Buyer.
This warranty is in lieu of all other warranties expressed or implied, including
without limitation, any implied warranty or merchantability or fitness for any
particular purpose, all of which are expressly disclaimed.
1.
Proof of sale may be required in order to claim warranty.
2.
Customers outside the US are responsible for shipping charges to and from
Gefen.
3.
Copper cables are limited to a 30 day warranty and cables must be in their
original condition.
The information in this manual has been carefully checked and is believed to
be accurate. However, Gefen assumes no responsibility for any inaccuracies
that may be contained in this manual. In no event will Gefen be liable for
direct, indirect, special, incidental, or consequential damages resulting from
any defect or omission in this manual, even if advised of the possibility of such
damages. The technical information contained herein regarding the features and
specifications is subject to change without notice.
For the latest warranty coverage information, please visit Gefen’s Warranty web
page at http://www.gefen.com/kvm/aboutus/warranty.jsp
PRODUCT REGISTRATION
Please register your product online by visiting Gefen’s web site at
http://www.gefen.com/kvm/Registry/Registration.jsp
12
Rev A5
6.01
20600 Nordhoff St., Chatsworth CA 91311
1-800-545-6900
818-772-9100
www.gefen.com
fax: 818-772-9120
[email protected]