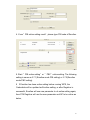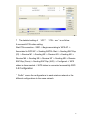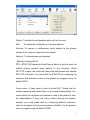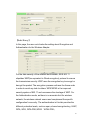
1
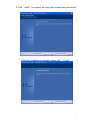
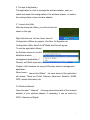
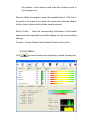
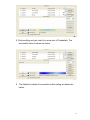
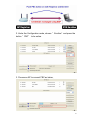
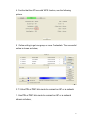
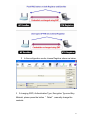
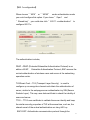
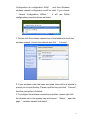
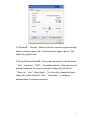
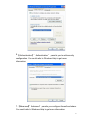
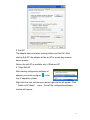
SE-WL-PCI-03-11G
PCI CARD DRIVERS INSTALLATION
Table of Contents
1. Introduction....................................................................2
1.1 System Requirement....................................................2
1.2 Objects Counting..........................................................2
2. Installation.......................................................................2
2.1 Install Wireless PCI Adapter..........................................3
2.2 Install Driver and Application for Wireless Adapter……3
3. The use of Application.....................................................6
3.1 Launch the Utility...........................................................7
3.2 Wireless Network...........................................................7
3.3 Link Status.....................................................................9
3.4 Advanced.......................................................................9
3.5 Statistics......................................................................10
3.6 WMM...........................................................................11
3.7 WPS............................................................................16
3.8 Configuration...............................................................25
4. Zero Configuration…………...……………………………31
5. SOFT AP …..................................................................35
5.1 Start SOFT AP.............................................................35
5.2 Configuration Page......................................................35
5.3 Access Control............................................................36
5.4 MAC List......................................................................37
5.5 Switch to working station mode...................................37
6. Product specification………….......................................38
1
1. Introduction
1.1 System Requirement
Please confirm that you have the following system configuration.
The computer with more than 300MHz Central Processing Unit (CPU)
The system memory should be no less than 32MB
The operation system should be Windows
Vista/XP/2000/ME/98SE
CD-ROM
in order to install the driver
1.2 Objects Counting
Please confirm that the package box of the production you
purchased is intact or not, if the package is damaged or any
accessory shortage, please kindly contact with your vendor
as soon as possible.
Standard Accessories:
1
Wireless Adapter
2
1PCS Antenna
3
CD for Driver and Application
4
Quick Guide and User Manual
2. Installation
This Chapter will introduce how to configure the Wireless Adapter,
2
Diver and Application. The Wireless Adapter is compatible with the
operation system Windows 98/Me/2000/XP/Vista.This guide will
explain the process of the installation through installing hardware and
software on Windows XP.
2.1 Install Wireless PCI Adapter
Turn off your desktop PC and disconnect the power cord, insert the
adapter into the PCI slot of your desktop PC carefully and make sure
that the edge connector is aligned correctly. Connect antenna to the
end of SMA of the adapter. Open your PC’s case
2.2 Install Driver and Application for Wireless Adapter
1. Once you turn on your desktop PC, the system will launch the
“ Found New Hardware”
wizard automatically. Click “ Cancel” .
3
2 Insert the Driver CD-ROM into your CD-ROM drive. The setup
wizard will run automatically. If it does not, browse the CD-ROM by
double-clicking the CD-ROM drive icon, then double-click on the
“ Setup.exe” file to start the installation procedure.
3
The welcome screen will appear, please read the Grant of
License in detail and accept the terms of the license agreement,
click “ next”
to continue.
4. Windows XP uses the “ Windows Zero Configuration Tool”
to set up wireless adapter. You can choose to configure the
card by using the “ Zero Configuration Tool” . Click “ next”
to continue.
4
5. If you need the adapter to operate with better performance, please
choose “ Optimize for Performance Mode”
to enable Tx Burst mode
or select “ Optimize for WiFi Mode” to use the adapter in a standard
wireless network. Click “ next”
to continue.
5
6. Click “ Install” to continue, and copy the corresponding documents.
7. When the installation is complete, please click “ Finish” .
6
3. The use of Application
The application is a tool to manage the wireless adapter, use it can
check and amend the configuration of the wireless adapter, or monitor
the running status of your wireless adapter.
3.1 Launch the Utility
After launching the utilities, you will see the icon
shown in the right.
Right click the icon, the four items: Launch
Configuration Utilities are appear; Use Zero Configuration as
Configuration Utility; Switch to AP Mode and Exit will appear.
To use the application offered
by Windows means to use the
defaulted wireless
management application of
Window, not Ralink application.
Chapter 4 will introduce the using of Windows wireless management
application.
Now choose “ Launch the Utilities” , the main wizard of the application
will appear. There are Profile, Network, Advanced, Statistics, WMM,
WPS, related information, etc.
3.2 Wireless Network
Open the label “ Network” , this page shows the status of the wireless
network of your wireless adapter. If necessary, it can be sorted by
SSID, Channel and Signal.
7
SSID -- Means the adapter is connected or will be connected, the right
figure shows that the adapter is connected, SSID is the default
network.
BSSID -- Means the MAC address of connected AP or the basic
service device ID of Hoc AP.
Channel- Shows the present signal channel of the adapter. As the
signal can scan the usable channel and always change the channel,
this figure is changeable.
Encryption - Means wireless network encryption information. All the
devices in the network have to use the same encryption to ensure the
communication.
There are two network models: Infrastructure and AD Hoc.
Infrastructure-- means to get connection by AP, once
connected, AP will permit you to access wireless network or
LAN network. If the connection is infrastructure, the Channel
will display Auto.
AD Hoc-- Means to get connection not by AP, AD Hoc can be
built conveniently without any plan in advance. For example, all
8
the persons in the meeting could share the meeting record in
the meeting room.
Rescan-- Make the adapter rescan the available device. If the link is
not good or the signal is too weak, the rescan will make the adapter
link to a better device which will take several seconds.
Add to Profile – Save the corresponding information of the usable
equipment which searched by wireless adapter and the corresponding
settings.
Connect-- Choose Network from Network list and click it to link.
3.3 Link Status
Click
, you can browse more information, see the following tab.
9
3.4 Advanced
Click “ Advanced”
and the following figure will appear, we suggest
you not modify any item but keep the default configurations.
3.5 Statistics
Click “ Statistics”
and the following figure appears, which displays
transmitting and receiving statistics. Click “ Reset Counter”
could
reconfigure the statistics to zero
10
3.6 WMM
Click “ WMM” ,you can make the corresponding settings which include
the priority settings of WMM information transmitting, start Power Save
Mode and DLS settings shown as below,
3.6.1 Start WMM: Start Wi-Fi Multi-media
1.Choose“ WMM Enable”
shown as below,
11
2
In the “ Network” page, add the AP which supports WMM
to configuration information. After setting successfully, you will
see the following figure in the function page “ Profile”
12
3.6.2 Start WMM Power Save Mode
1.Choose “ WMM -Power Save Enable”
shown as below,
2. Choose“ AC_BK” ,the settings is successful shown as
below,
3.6.3 Start DLS (Direct Link Setup)
1.Choose“ Direct Link Setup Enable”
shown as below,,
13
2
In the “ Network” page, add the AP which supports WMM to
configuration information. If set successfully, you will see the following
figure in the function page “ Profile”
14
3 The mode of Direct Link Setup is as follow:
Fill the MAC address in a STA, the STA should meet the following two,
A. Can link AP which supports DSL.
B. Have to start DLS function.
3.7 WPS
Click “ WPS” ,you can make corresponding settings. WPS includes
authentication, encryption, network type, channel, Extra info, status,
version, security settings of AP, sole identification code, radio
frequency and so on shown as below,
15
WPS settings--Simplify the program and configuration of the network
(Wi-Fi Protected Setup). The STA of Ralink is Enrollee or Registrar,
use PIN or PBC mode to offer online settings.
WPS wireless network-The system will scan the AP with WPS IE, and
then list every AP information with WPS IE including SSID, BSSID,
Channel, ID, Authentication, Encryption.
Rescan-rescan and update all the AP information.
Information-- Display the AP information with WPS IE, the displayed
information including: authentication, encryption, the way of online
setting, set password ID, registrar, status, version, lock the online
settings of AP, sole macrocosm identifier, radio frequency. The
detailed introduction is same as the WPS information of AP.
16
Pin Code-Under the Registrar online setting mode, when you use
“ PIN online setting mode” , you will be asked to input a set of PIN
code. When the STA of Ralink is Enrollee, you can use “ update”
button to produce a set or PIN code again.
Online Setting Mode- The STA of Ralink plays the part of Enrollee or
Registrar.
The items of controlling Credentials:
1. Contents: Show the selected Credentials, the information about
security and encryption key.
2. Online: Connect the AP which Credentials belonged. Use the
selected Credentials same as the online settings.
3. Rotate: Connect the AP of next Credentials by rotating way.
4. Break off online: Stop WPS, and break off online, then connect the
last selected online settings. If the online setting is blank or the unused
online settings, it will choose to connect an AP which is open.
5. Remitting the online settings: Add all the Credentials to online
setting.
6. Delete: Delete the selected Credentials, and then it will connect the
AP of next Credentials. If the online setting form is in blank, then it will
connect an AP which is open
PIN Use “ PIN online setting mode” to start or add an online setting.
PBC Use“ PBC online setting mode” to start or add an online setting.
When you press PIN or PBC button, please don’ t do any scan in two
minutes. If you want to cancel the setting, please start PIN/PBC again
or press “ break off online” to stop WPS.
WPS link IE--During the period of WPS online settings, transmit an IE
with WPS IE. For STA, it is optional.
17
WPS Probe IE- During the period of WPS online settings, transmit an
probe IE with WPS IE. For STA, it is optional.
Speed list-Show the speed proportion from beginning to online
success.
Status list- Show the present status of WPS.
Automatically select the AP-Choose an AP and start to be online when
use “ PIN online setting mode” .
3.7.1 Connecting settings by Pin link mode
1. Enrollee gets a set of Pin passwords from STA, and types the STA
PIN into AP Registrar. In this setting, both Enrollee and Registrar have
to use PIN link setting mode. The detailed setting method is as below.
2 In the Configuration mode, choose “ Enrollee” and “ Rescan” to
update the usable AP.
18
3. Choose an AP you want to add, and click the button “ PIN” , type
PIN provided by STA into Registrar.
4. If you use shared Internet online as external Registrar, you
have to start “ PIN online” at STA port firstly, then find the device
name and MAC address of WPS from Microsoft’ s Registrar, and then
add a new device to Microsoft’ s Registrar and type Pin code into STA.
The setting is successful shown as below,
19
5. Online setting and get a set of or more sets of Credentials. The
successful online is shown as below.
6 The detailed contents of successful online setting are shown as
below,
20
* If the first Credential is valid and existing, the system will connect AP
of the first Credentials. Contrarily, the system will connect AP of the
next Credentials automatically.
* You can also press the button “ Rotate”
for rotating online next AP
of the Credentials.
3.7.2 Use PBC link mode to make link settings
1.Both Registrar and Enrollee need push PBC button in two
minutes under PBC online setting mode, the two minutes is called
“ roam time” . In the PBC online setting mode, only one Registrar with
ID 0x0004 can be scanned, then Enrollee performs Registrar
agreement immediately.
If Enrollee finds that there are more than two Registrars, it will cancel
this scanning online, and then continue scanning over two minutes.
* Before pressing the button PBC and AP which is going to be online,
please confirm that all the other AP are not PBC online setting mode,
or all the AP which use PBC online setting mode exceed the belonged
“ roam time” .
21
2. Under the Configuration mode, choose “ Enrollee” and press the
button “ PBC”
to be online.
3. Choose an AP to connect PBC as below,
22
4. Confirm that the AP has valid WPS function, see the following
picture.
5 Online setting to get one group or more Credentials. The successful
online is shown as below,
3.7.3 Use PIN or PBC link mode to connect an AP or a network
1. Use PIN or PBC link mode to connect an AP or a network
shown as below,
23
2 In the configuration mode, choose Registrar shown as below,
3 If changing SSID, Authentication Type, Encryption Type and Key
Material, please press the button “ Detail” ,manually change the
contents.
24
4. If use “ PIN online setting mode” , please type PIN code of Enrollee.
5. Start “ PIN online setting” or “ PBC” online setting. The following
setting is same as 3.7.1(Enrollee mode PIN setting) or 3.7.2(Enrollee
mode PBC setting).
6 If Enrollee has done online setting before running WPS, the
Credentials will be updated as Enrollee setting; or after Registrar is
successful, Enrollee will use new parameter to do online setting again,
then STA Registrar will use the new parameter and AP to be online as
below,
25
7 The detailed setting of “ WP ”- “ PIN – xxx ” is as follow:
A successful PIN online setting:
Start PIN connection - SSID -> Begin associating to WPS AP ->
Associated to WPS AP -> Sending EAPOL-Start -> Sending EAP-Rsp
(ID) -> Receive M1 -> Sending M2 -> Receive M3 -> Sending M4 ->
Receive M5 -> Sending M6 -> Receive M7 -> Sending M8 -> Receive
EAP-Rsp (Done) -> Sending EAP Rsp (ACK) -> Configured -> WPS
status is disconnected -> WPS status is connected successfully-SSID
3.8 Configuration
“ Profile” saves the configurations to each wireless network or the
different configurations to the same network.
26
Delete - To delete the configuration which will not be used.
Edit -
To modify the configuration of wireless network.
Activate- To choose a configuration which applies to the present
network from several configuration documents.
Append - To increase new configuration.
【System Configuration】
RTS --RTS/CTS (Request to Send/Clear to Send) is used to lower the
conflict among wireless base stations to the minimum. When
RTC/CTS is open, the router will resend the data frames until another
RTC/CTS is finished. You could start the RTS/CTS by configuring the
minimum and maximum value of the packet, we suggest using the
default (2347).
Frame value ---Frame value is used to divide 802.11 frame into the
smaller segments and transmit them to the target independently. You
could specify the minimum and maximum value of the packet to start
the segmentation. If there are many conflicts among the wireless
network, you could make tests by configuring different maximum
value to strengthen the frame transmission reliability. For the general
use, we suggest using the default (2346)
27
【Auth.\Encry.】
In this page, the user could make the setting about Encryption and
Authentication for the Wireless Adapter.
For the data security of the wireless environment, IEEE 802.11
stipulates WEP(be equivalent to Wired encryption) protocol to ensure
the transmission security. WEP uses the encryption key to encrypt or
decrypt the packet. The encryption process confuses the frame order
in order to avoid any leak to others. WPA/WPA2 is the improved
security system of 802.11 and overcomes the shortage of WEP. For
the Authentication mode, as there is no accurate limit for wireless
network, the wireless network users need complement the specific
configuration for security. The authentication in this tab provides the
different protection levels, such as open, shared encryption key, LEAP,
WPA, WPA, WPA-PSK,WPA2 WPA2-PSK。
28
Open--- This option makes the network run under the open system
mode without any authentication. Open base station and AP could
authenticate with each other even there is WEP encryption key.
Shared encryption key- This option makes the network run under
shared encryption key. Under shared encryption key authentication
system modem, it needs four-step frame switch to ensure if the base
station uses the same WEP encryption key as the AP or not.
LEAP: LEAP (Light Extensible Authentication Protocol) is an edition of
EAP
Extensible Authentication Protocol . EAP ensures the mutual
authentication between the wireless network users and the server at
the networking operation centre.
WPA-PSK/ WPA2-PSK – This option permits the use of WPA
Pre-Shared encryption key under infrastructure mode and permit you
to use the WPA-PSK/WPA2-PSK encryption between users and AP.
WPA/ WPA2 ---The network uses IEEE 802.1x authentication which
can adapt to RADIUS Remote Access Dial-in User Service Telnet 。
RADIUS supports multi EAP including PEAP,TLS/Smart Card, TTLS
and LEAP。
Data encryption
Under the modes of open authentication and shared key
authentication, the options of encryption are FORBID and WEP,
under the modes of WPA, WPA-PSK, WPA2 and WPA2-PSK it
29
supports Temporal Key Integrity Protocol (TKIP) and Advanced
Encryption Standard (AES)
FORBID ---Forbid the encryption function.
WEP -- The shared key performs the encryption before data wireless
transports, you could communicate with the wireless devices which
use the same shared key.
TKIP --TKIP uses the stricter encryption rules than the WEP, and also
use the existing WLAN arithmetic to realize the encryption. TKIP will
verify the security configuration after shared key encryption is realized.
AES --AES is a symmetrical encryption technology with 128 bits, it
could work in the multi-layer at the same time.
WPA shared key.
This option could be started until you choose WPA-PSK or
WPA2-PSK. Choose “ TIKP ” or “ AES ” in the area of “ Data
encryption” to start the encryption process. Notice: 8-64 characters are
needed.
Key configuration
This option could be configured until you choose WEP in the area of
Data encryption. WEP is 64/128 bits data, used encrypt and decrypt
data packet.
Display key
After choosing this option, your configuration key will be displayed.
30
【802.1x configuration】
When choose “ WPA”
or “ WPA2”
under authentication mode
you could configure this option. If you chose “ Open”
and
“ Shared-key” , you could also click “ 802.11 x authentication”
to
configure 802.11x.
The authentication includes,
PEAP --PEAP (Protected Extensible Authentication Protocol) is an
edition of EAP
Extensible Authentication Protocol。EAP assures the
mutual authentication of wireless users and server at the networking
operation center.
TLS/Smart Card -- TLS (Transport Layer Security)
is used to
configure up an encryption channel and obtain the authentication of
server, similar to the webpage server authentication by SSL(Secure
Sockets Layer). This way uses data certificate to check the identity of
users and server.
TTLS -- TTLS uses certificate to validate the server identity and keep
the similar security properties of TLS at the same time, such as, the
shared secret of the mutual authentication and dialog WEP key.
EAP-FAST: Authenticate communication protocol through the
31
extension of security channel. In the extensible function edition 3(CCX
v.3) which is compatible with Cisco, Cisco increases supports for
EAP-FAST, the protocol establishes verified channel between user
port and sever by using PAC. Mutual validation doesn’t need to use
certificate, but use certain method of PAC to achieve it. PAC can
provide allocation to user port with manual operation or automatic
operation. As to Tunnel Authentication, it only offers
“Generic Token
Card “.
LEAP: The extensible verification communication protocol. LEAP is an
EAP authentication type which mainly used to Cisco Aironet WLAN,
which uses WEP encryption to encrypt the data transmission and
supports the common authentication.
MD5-challenge: Message data 5. MD5 is a kind of EAP authentication
type which offers basic level EAP support, it is only adapt to the single
authentication. There isn’ t common authentication between wireless
user port and network.
Session Resumption
After the signal is broke off and reconnected,
you can make setting to reduce the packet when reconnected, and
expedite the reconnection. There are two styles for option,
“Disabled” and “Enabled “.
Tunnel Protocol According to different authentication styles
Tunnel
Authentication includes: “ EAP-MSCHAP v2 “、”EAP-TLS/Smart
card“、” Generic Token Card “、” CHAP”、 “MS-CHAP “、”
MS-CHAP-V2 “、” PAP ”、 “EAP-MD5 “。
4. Zero Configuration
Right click utility of the system tray to choose “ Use Zero
32
Configuration as configuration Utility”
and then Windows
wireless network configuration could be used. If you choose
“
Launch Configuration Utilities ”
, it will use Ralink
configuration procedure shown as below,
1. Double click the wireless network icon in the taskbar to check the
wireless network, choose the network and click “ Connect” .
2. If your wireless router has been encrypted, there will be a window to
prompt you to input the key. Please input the key and click “ Connect” ,
then the connection is finished.
3.To configure the wireless connection properties, please right click
the wireless icon in the system tray and choose “ Status” , open the
page “ wireless network link status” .
33
4.【General】“ General” displays link time, speed and signal strength
which is shown in green line, 5 lines shows the signal is good, 1 line
shows the signal is bad.
5.【View Wireless Network】shows preferred network. Use the button
“ Add”
to add the “ SSID”
of available network, if there are several
available networks, link priority could be configured by the button
“ Move up”
and “ Move down” . The icon with a transmitter tower
shows the current linked AP. Click “ Properties”
to configure
authentication of wireless connection.
34
6.【Authentication】“ Authentication”
permits you to add security
configuration. You could refer to Windows Help to get more
information.
7. 【Advanced】
“ Advanced” permits you configure firewall and share.
You could refer to Windows Help to get more information.
35
5. Soft AP
The adapter has two modes: working station and Soft AP. After
starting Soft AP, the adapter will be an AP to accept any wireless
device access.
Notice: the soft AP is available only in Windows XP.
5.1 Start Soft AP
After starting configuration software of
adapter, you could see figure
in the
tray of operation system.
Right click the icon and the menu as the right picture will appear. Click
“ Switch to AP Mode”
menu the soft Ap configuration software
window will appear.
36
5.2 Configuration Page
As the above picture, you could make some basic configuration, such
as wireless network name, mode, channel, authentication and so on.
Click the button “ Auth. Vs. Security ” to make different security
configuration of wireless communication shown as below. And you
could choose all kinds of authentication types and encryption types,
such as WEP64 Bits and WEP128 Bits encryption.
5.3 Access Control
The picture is shown as below. You could choose this page to start
MAC control function.
MAC control function includes “ Permit all”
and “ Refuse all” . After
editing the MAC address access list, only the MAC in the list “ Permit
all”
could be allowed to access the Soft AP.
37
5.4 MAC
This page shows the information of the wireless devices accessed to
this AP.
5.5 Switch to Working Station mode
As the right picture, under the Soft AP
mode, right click the configuration
38
software tray icon and appear a menu, please choose “ Switch to
Station Mode” , then the adapter is switched to working station mode
together with an interface of working station.
6
Specification:
Standard&
IEEE 802.11g、IEEE 802.11b、CSMA/CA with ACK
protocol
Interface
32-bit PCI 2.1/2.2/2.3
Frequency range 2.4~2.4835GHz
11g 54/48/36/24/18/12/9/6M auto adaptive
Radio data rate
11b 11/5.5/2/1M auto adaptive
Channel
13
Spectrum Spread
DSSS
Technology
BPSK, QPSK, CCK and OFDM
Modulation
(BPSK/QPSK/16-QAM/ 64-QAM)
54M -68dBm@10%PER 11M -84dBm@8% PER
Receive
6M -88dBm@10% PER 1M -90dBm@8% PER
sensitivity
256K -105dBm@8% PER typical
indoor up to 300 meters and outdoor up to 100
Transmit distance meters (standard transmit distance is limited to the
environments)
Transmit power
13-15dBm
11g
18-20dBm 11b
Antenna Gain
2dBi
LED
Status LINK/ACT and AIR
OS
Windows 98SE/ME/2000/XP/Vista
Antenna type
Omni-directional exterior Antenna (removable)
39
Operation Temp.: 0℃ - 45℃
Storage Temp.: -20℃ - 70℃
Environmental
Operation Humidity 10% - 95% RH,
Non-condensing
Safety
CE, FCC
40