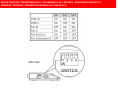
1
USER GUIDE
PC TO TV CONVERTER
BENUTZERHANDBUCH
PC-ZU-TV-KONVERTER
GUIDE D’UTILISATION
CONVERTISSEUR PC A TV
MANUALE DELL’UTENTE
CONVERTITORE PC/TV
HANDLEIDING
PC NAAR TV CONVERTER
GUÍA DEL USUARIO
CONVERSOR DE PC A TV
Modell: 89019
1
TABLE OF CONTENTS
INHALTSVERZEICHNIS
TABLE DES MATIERES
Introduction ............................................................... 2
Features ................................................................... 3
System Requirements............................................... 4
Package Contents..................................................... 5
Device Overview ....................................................... 6
Device Installation..................................................... 9
Technical Specifications.......................................... 12
Cables To Go One Year Warranty........................... 13
Important Safety Information ................................... 14
Einführung ................................................................ 2
Merkmale .................................................................. 3
Systemanforderungen ............................................... 4
Packungsinhalt .......................................................... 5
Geräteübersicht......................................................... 6
Geräteinstallation ...................................................... 9
Technische Daten ................................................... 12
Einjährige Garantie von Cables To Go..................... 13
Wichtige Sicherheitshinweise .................................. 14
Introduction .............................................................. 2
Fonctions ................................................................. 3
Configuration du système ......................................... 4
Contenu du pack ...................................................... 5
Vue générale du périphérique ................................... 6
Installation du périphérique ....................................... 9
Caractéristiques techniques.................................... 12
Garantie d'un an Cables To Go............................... 13
Informations de sécurité importantes ...................... 14
INDICE
INHOUDSOPGAVE
ÍNDICE
Introduzione .............................................................. 2
Caratteristiche .......................................................... 3
Requisiti del sistema ................................................. 4
Contenuto della confezione ....................................... 5
Panoramica del dispositivo........................................ 6
Installazione del dispositivo ....................................... 9
Specifiche tecniche ................................................. 12
Garanzia di un anno Cables to Go .......................... 13
Informazioni di sicurezza importanti ........................ 14
Inleiding .................................................................... 2
Onderdelen ............................................................... 3
Systeemvereisten ...................................................... 4
Inhoud verpakking ..................................................... 5
Overzicht apparaat .................................................... 6
Installatie apparaat .................................................... 9
Technische specificaties.......................................... 12
Cables To Go 1 jaar garantie................................... 13
Belangrijke veiligheidsinformatie.............................. 14
Introducción.............................................................. 2
Características ......................................................... 3
Requisitos del sistema .............................................. 4
Contenidos del paquete ............................................ 5
Descripción general del dispositivo ........................... 6
Instalación del dispositivo ......................................... 9
Especificaciones técnicas ....................................... 12
Garantía de un año de Cables to Go....................... 13
Información importante sobre seguridad ................. 14
1
INTRODUCTION
™
The TruLink PC to TV converter box is a palm sized universal VGA to TV converter box. The converter supports VGA resolution up to 1024 X 768. This
product is designed to convert VGA signal into Composite Video or S-Video TV signals. There is also a VGA output port for loop through applications.
The converter is good for presentations, Web-Browsing, PC online Game, PC pictures and PC Movie viewing. It is recommended that you read this
guide thoroughly before use, and retain for future reference.
EINFÜHRUNG
Die TruLink™ PC-zu-TV-Konverterbox ist eine universelle VGA-zu-TV-Konverterbox in Handflächengröße. Der Konverter unterstützt VGA-Auflösungen
bis zu 1024 x 768. Dieses Produkt ist für die Umwandlung von VGA-Signalen in Composite Video- oder S-Video-Fernsehsignale gedacht. Es hat
außerdem einen VGA-Ausgangsanschluss für Durchschleifanwendungen. Der Konverter ist gut für Präsentationen, Browsen im Internet, PC-OnlineSpiele, Ansehen von PC-Bildern und PC-Filmen geeignet. Bitte lesen Sie dieses Handbuch vor Gebrauch sorgfältig durch und bewahren Sie es
zum zukünftigen Nachschlagen auf.
INTRODUCTION
Le convertisseur PC à TV TruLink™ est un boîtier convertisseur universel VGA à TV qui tient dans la paume de la main. Le convertisseur prend en
charge une résolution allant jusqu'à 1024 X 768. Ce produit est conçu pour convertir un signal VGA en signaux TV vidéo-composite ou S-vidéo. Il existe
également une sortie VGA pour une boucle à travers les applications. Le convertisseur convient pour des présentations, à la navigation sur le Web, les
jeux en ligne sur PC, pour visionner des photos et des films sur PC. Nous recommandons de lire attentivement ce manuel et de le conserver pour
toute référence ultérieure.
INTODUZIONE
Il convertitore da PC a TV TruLink™ è un piccolo convertitore universale da VGA e TV. Il convertitore supporta una risoluzione VGA fino a 1024 x 768.
Questo prodotto è progettato per convertire il segnale VGA in segnali Video compositi o TV S-Video. È inoltre presente una porta di output VGA per il
loop tra le applicazioni. Il convertitore è ideale per le prestazioni, la navigazione sul Web, i giochi online sul PC e la visualizzazione di immagini e filmati
sul PC. Si consiglia di leggere il presente manuale attentamente prima dell’uso e di conservarlo per riferimento futuro.
INLEIDING
De TruLink™ PC naar TV-conversiebox is een in de hand passende VGA-naar-TV-conversiebox. De conversiebox ondersteunt VGA-resoluties tot 1024 x
768. Het product is ontwikkeld om een VGA-signaal om te zetten naar Compositie Video of S-Video-tv-signalen. Er os een ook VGA-uitgangspoort voor
doorlussen naar applicaties. De conversiebox is zeer geschikt voor presentaties, webbrowsen, pc-onlinegames, pc-afbeeldingen en het bekijken van pcfilms. Aanbevolen wordt deze handleiding voor gebruik aandachtig door te lezen en voor toekomstig gebruik te bewaren.
INTRODUCCIÓN
La caja conversora de PC a TV de TruLink™ es una caja conversora de VGA a TV universal que cabe en la palma de la mano. El conversor es
compatible con una resolución de VGA de hasta 1024 x 768. Este producto está diseñado para convertir la señal VGA en una señal compuesta de
vídeo o una señal S-Video para TV. También cuenta con un puerto de salida VGA para aplicaciones de bucle. El conversor es ideal para realizar
presentaciones, navegar por la Web, jugar a juegos de ordenador en línea, y reproducir fotos y películas en el ordenador. Se recomienda leer esta
guía completa antes de utilizar el dispositivo y conservarla para referencias futuras
2
FEATURES
MERKMALE
FONCTIONS
Plug and Play, no software needed
Full scan rate
Supports VGA input
Scan rate up to @ 640 x 480, 85 Hz
Scan rate up to @ 800 x 600, 85 Hz
Scan rate up to @ 1024 x 768, 60 Hz
Anti-flickering
A state-of-art flickering filter is used to ensure high
quality picture
Supports multiple video systems, NTSC/ NTSC-J/ PAL
system.
Powered through USB or through a universal (UK-EU)
power adapter
Full function remote control
Adjustment keypads.
Auto-Save function.
Plug-and-Play, keine Software erforderlich
Volle Abtastrate
Unterstützt VGA-Eingang
Abtastrate bis 640 x 480 bei 85 Hz
Abtastrate bis 800 x 600 bei 85 Hz
Abtastrate bis 1024 x 768 bei 60 Hz
Anti-Flickering
Ein moderner Anti-Flickering-Filter wird verwendet,
um hochwertige Bilder sicherzustellen.
Unterstützt mehrere Videosysteme, NTSC-/ NTSC-J-/
PAL-System.
Über USB oder einen Universal-Netzadapter (UK-EU)
mit Strom versorgt
Fernbedienung mit allen Funktionen
Einstelltasten
Automatische Speicherfunktion
Aucun logiciel nécessaire, il suffit de le brancher
Totale fréquence de balayage
Prend en charge une entrée VGA
Fréquence de balayage jusqu'à 640 x 480, 85 Hz
Fréquence de balayage jusqu'à 800 x 600, 85 Hz
Fréquence de balayage jusqu'à 1024 x 768, 60 Hz
Anti-scintillement
Un filtre anti-scintillement d'avant-garde garantit la
qualité supérieure de l'image
Prend en charge de multiples systèmes vidéo NTSC/
NTSC-J/ PAL
Alimenté par une prise USB ou par un adaptateur
universel (RU – EU)
Télécommande pour toutes les fonctions
Clavier de réglage
Fonction de sauvegarde automatique
FUNZIONI
KENMERKEN
CARACTERÍSTICAS
Plug and Play, nessun software necessario
Tasso di scansione completo
Supporta l’input VGA
Tasso di scansione fino a 640 x 480, 85 Hz
Tasso di scansione fino a 800 x 600, 85 Hz
Tasso di scansione fino a 1024 x 768, 60 Hz
Anti-flicker
Un filtro anti-flicker all’avanguardia è usato per
garantire immagini di qualità elevata
Supporta più sistemi video, sistema NTSC/ NTSC-J/
PAL.
Alimentato tramite USB o un adattatore di
alimentazione universale (UK-UE)
Telecomando con funzioni complete
Tastiere di regolazione
Funzione di salvataggio automatico
Plug ‘n Play, geen software nodig
Volledige scanfrequentie
Ondersteunt VGA-invoer
Scanfrequentie tot @ 640 x 480 85 Hz
Scanfrequentie tot @ 800 x 600 85 Hz
Scanfrequentie tot @ 1024 x 768 60 Hz
Anti-flikkering
Een geavanceerd flikkeringfilter wordt gebruikt om
een beeld van hoge kwaliteit te garanderen
Ondersteunt meerdere videosystemen, NTSC/NTSCJ/PAL-systeem.
Van stroom voorzien door USB of door universele (GBEU) stroomadapter
Volledig functionele afstandsbediening
Toetsenblokken voor afstelling
Automatische opslag-functie
Basta con enchufar el conversor para utilizarlo; no es
necesario ningún software
Resolución completa
Compatible con la señal VGA
Resolución de hasta 640 x 480, 85 Hz
Resolución de hasta 800 x 600, 85 Hz
Resolución de hasta 1024 x 768, 60 Hz
Anti parpadeo
Se utiliza un filtro anti parpadeo de última
generación para garantizar la calidad de la
imagen
Compatible con diversos sistemas de vídeo: NTSC,
NTSC-J/, PAL
Se conecta mediante un puerto USB o un adaptador
de corriente universal (RU-UE)
Control remoto completo
Teclados de ajuste
Función Auto guardar
3
SYSTEM REQUIREMENTS
SYSTEMANFORDERUNGEN
CONFIGURATION DU SYSTEME
Television, Flat screen, or Projector with Composite
or S-Video input.
Desktop or Notebook computer with a VGA output
Fernsehgerät, Flachbildschirm oder Projektor mit
Composite- oder S-Video-Eingang
Desktop- oder Notebook-Computer mit VGAAusgang
Télévision, écran plat ou projecteur avec entrée
vidéo-composite ou S-vidéo
Ordinateur de bureau ou ordinateur portatif avec
sortie VGA
REQUISITI DI SISTEMA
SYSTEEMVEREISTEN
REQUISITOS DEL SISTEMA
Televisione, schermo piatto o proiettore con input
Composito o S-Video.
Computer desktop o notebook con output VGA
Televisie, flatscreen of projector met Composite- of
S-Video-invoer
Desktop of notebookcomputer met VGA-uitgang
4
Televisor, pantalla plana o proyector con entrada de
señal compuesta o señal S-Video
Ordenador de sobremesa o portátil con una salida
VGA
PACKAGE CONTENTS
™
TruLink PC to TV Converter
Remote Control
User Manual
1 m VGA cable
1 m USB power cable
3 m Composite Video cable
1.2 m S-Video Cable
Universal (UK-EU)Power Adapter
CONTENUTO DELLA CONFEZIONE
Convertitore da PC a TV TruLink™
Telecomando
Manuale per l’utente
Cavo VGA da 1 m
Cavo di alimentazione USB da 1 m
Cavo video composito da 3 m
Cavo S-Video da 1,2 m
Adattatore di alimentazione universale (UK-UE)
PACKUNGSINHALT
CONTENU DU PACK
™
TruLink PC-zu-TV-Konverter
Fernbedienung
Benutzerhandbuch
1 m langes VGA-Kabel
1 m langes USB-Netzkabel
3 m langes Composite Video-Kabel
1,2 m langes S-Video-Kabel
Universal-Netzadapter (UK-EU)
INHOUD VERPAKKING
TruLink™ PC-naar-tv-converter
Afstandsbediening
Gebruikershandleiding
1 m VGA-kabel
1 m USB-stroomkabel
3 m composietvideo-kabel
1,2 m S-Video-kabel
Universele (GB-EU) Stroomadapter
5
™
Convertisseur PC à TV TruLink
Télécommande
Manuel d'utilisation
Câble VGA 1 m
Câble d'alimentation USB 1 m
Câble vidéo-composite 3 m
Câble S-vidéo 1,2 m
Adaptateur universel (RU et UE)
CONTENIDO DEL PAQUETE
Conversor de PC a TV de TruLink™
Mando a distancia
Manual del usuario
Cable de VGA de 1 m
Cable de alimentación USB de 1 m
Cable de señal compuesta de vídeo de 3 m
Cable de señal S-Video de 1,2 m
Adaptador de corriente universal (RU-UE)
DEVICE OVERVIEW / GERÄTEÜBERSICHT / VUE GÉNÉRALE DE L’APPAREIL / PANORAMICA DISPOSITVO
OVERZICHT APPARAAT / DESCRIPCIÓN GENERAL DEL DISPOSITIVO /
6
DEVICE OVERVIEW / GERÄTEÜBERSICHT / VUE GÉNÉRALE DE L’APPAREIL / PANORAMICA DISPOSITVO
OVERZICHT APPARAAT / DESCRIPCIÓN GENERAL DEL DISPOSITIVO /
Filter
Use the Filter function to reduce any jitter of the
picture on the display
Power
Power on/off
Section Zoom
Zoom into a specific section of the screen.
Magnification of 9x.
Overscan
89019 has a native resolution of 1024X768.
If your computer is using 640X480 or 800X600
press this key to change to a full screen
Freeze
Freeze the screen
Colorbar
Adjust the color settings of 89019 such as
brightness, color, and tint. Press the button
again to return to the original settings.
Recall
Recall the last setting.
Reset
Reset to factory settings
WidthAdjust the Picture Width
Save
Save all current settings
Arrow Keys for adjusting the screen
Zoom
Press once to zoom in
Press Twice to zoom back out
7
DEVICE OVERVIEW / GERÄTEÜBERSICHT / VUE GÉNÉRALE DE L’APPAREIL / PANORAMICA DISPOSITVO
OVERZICHT APPARAAT / DESCRIPCIÓN GENERAL DEL DISPOSITIVO /
8
DEVICE INSTALLATION
Step 1
Note: Ensure that power is off on the computer and display(s)
before beginning setup. Connect the included VGA cable from
the “VGA Output” of your computer to "VGA IN" on the rear panel
of 89019. Note: If you want to loop out the VGA signal to another
monitor please follow step 2 otherwise, skip to step 3.
Step 2
Connect the VGA cable from “VGA OUT” on the rear panel of the
PC to TV converter to the “VGA Input” of the monitor. Ensure
that dip switch #4 is in the “On” position
Step 3
Connect the included Video RCA cable from the “Video Out” of
the PC to TV converter to the “Video Input” of your display. Note:
For highest quality image it is recommended that you use SVideo input if available on display. See step 4 if display has SVideo Input, otherwise, skip to step 5.
Step 4
Connect included S-Video Cable from the S-VIDEO OUT on the
rear panel of the PC to TV converter to S-Video input of your
display. Caution! The S-Video Connector has special orientation.
Be aware of plug orientation. Damage to unit or cable may occur
if not properly oriented.
Step 5
Set the dip switches to match the format required by your TV.
See page 8 for dip switch settings. Consult your TV’s Owner’s
manual for required format.
Step 6
Connect the 5V DC power supply or the provided USB cable to
the DC In jack on the converter. Note: In order to prevent damage
to the unit never connect both the power adapter and the USB
cable.
Step 7
Power on the computer, the converter, and the TV, then set the
TV to the proper input
Step 8
Use the directional arrow on the unit or the remote to properly
align the picture on your TV if necessary.
GERÄTEINSTALLATION
Schritt 1
Hinweis: Stellen Sie sicher, dass der Computer und die
Anzeigegeräte ausgeschaltet sind, bevor Sie mit dem Einrichten
beginnen. Schließen Sie das mitgelieferte VGA-Kabel an den „VGAAusgang“ des Computers und an den Anschluss „VGA IN“ an der
Rückseite des 89019 an. Hinweis: Wenn Sie das VGA-Signal zu
einem anderen Anzeigegerät durchschleifen möchten, befolgen Sie
bitte Schritt 2, machen Sie sonst mit Schritt 3 weiter.
Schritt 2
Schließen Sie das VGA-Kabel an den Anschluss „VGA OUT“an der
Rückseite des PC-zu-TV-Konverters und an den „VGA-Eingang“ am
Anzeigegerät an. Vergewissern Sie sich, dass der Dipschalter Nr. 4
in der Position „Ein“ ist.
Schritt 3
Schließen Sie das mitgelieferte Video RCA-Kabel an den Anschluss
„Video Out“ am PC-zu-TV-Konverter und an den „VGA-Eingang“ des
Anzeigegeräts an. Hinweis: Für optimale Qualität sollten Sie den SVideo-Eingang verwenden, wenn ein solcher am Anzeigegerät
vorhanden ist. Wenn das Anzeigegerät einen S-Video-Eingang hat,
befolgen Sie bitte Schritt 4, machen Sie sonst mit Schritt 5 weiter.
Schritt 4
Schließen Sie das S-Video-Kabel an den Anschluss „S-VIDEO OUT“
an der Rückseite des PC-zu-TV-Konverters und an den „S-VideoEingang“ am Anzeigegerät an. Achtung! Der S-Video-Stecker hat
eine bestimmte Ausrichtung. Beachten Sie die Ausrichtung des
Steckers. Ansonsten können Schäden am Gerät oder Kabel
auftreten.
Schritt 5
Stellen Sie die Dipschalter so ein, dass sie dem erforderlichen
Format für das Fernsehgerät entsprechen. Dipschalter-Einstellungen
finden Sie auf Seite 8. Sehen Sie wegen des erforderlichen Formats
in der Bedienungsanleitung des Fernsehgeräts nach.
Schritt 6
Schließen Sie das 5-V-Netzteil oder das mitgelieferte USB-Kabel an
die Gleichstromeingangsbuchse am Konverter an. Hinweis: Um
Schäden am Gerät zu verhindern, sollten Sie den Netzadapter und
das USB-Kabel nie gleichzeitig anschließen.
Schritt 7
Schalten Sie den Computer, den Konverter und das Fernsehgerät
ein und stellen Sie das Fernsehgerät auf den richtigen Eingang ein.
Schritt 8
Verwenden Sie die Pfeiltasten am Gerät oder die Fernbedienung,
um das Bild, falls nötig, richtig am Fernsehgerät auszurichten.
9
INSTALLATION DU PERIPHERIQUE
Étape 1
Remarque : s'assurer que l'ordinateur et les écrans ne sont pas
sous tension avant de procéder à l'installation. Brancher le
câble VGA fourni, de la sortie VGA de l'ordinateur à l'entrée
« VGA IN », sur le panneau arrière du convertisseur 89019.
Remarque : pour une sortie bouclée du signal VGA sur un
autre écran, suivre l'étape 2; sinon, passer à l'étape 3.
Étape 2
Brancher le câble VGA de la sortie « VGA OUT » sur le
panneau arrière du convertisseur PC à TV, à l'entrée VGA de
l'écran. S'assurer que le commutateur DIP nº 4 est en position
« On » (marche).
Étape 3
Brancher le câble RCA fourni de la sortie « Video Out » du
convertisseur PC à TV, à l'entrée vidéo de l'écran. Remarque :
pour une meilleure qualité d'image, il est recommandé d'utiliser
une entrée S-vidéo si celle-ci est disponible sur l'écran. Voir
l'étape 4 si l'écran dispose d'une entrée S-vidéo; sinon, passer
à l'étape 5.
Étape 4
Brancher le câble S-vidéo fourni, de la sortie S-VIDEO OUT,
sur le panneau arrière du convertisseur PC à TV, à l'entrée Svidéo de l'écran. Attention! Le connecteur S-vidéo a un sens
particulier. Attention au sens de la prise. Si la prise est
branchée dans le mauvais sens, elle peut endommager
l'appareil ou le câble.
Étape 5
Installer le commutateur DIP conformément à ce qu'exige le
téléviseur. Voir la page 8 pour la manière d'installer le
commutateur DIP. Consulter le manuel d'utilisation du
téléviseur pour connaître le format approprié.
Étape 6
Brancher l'alimentation 5 V CC ou le câble USB fourni à la prise
d'entrée jack CC du convertisseur. Remarque : pour éviter
d'endommager l'appareil, ne jamais connecter ensemble
l'adaptateur et le câble USB.
Étape 7
Remettre l'ordinateur, le convertisseur et le téléviseur sous
tension puis régler le téléviseur pour une entrée appropriée.
Étape 8
Utiliser la flèche directionnelle sur l'appareil ou sur la
télécommande pour aligner correctement l'image sur le
téléviseur, le cas échéant.
DEVICE INSTALLATION
INSTALLAZIONE DISPOSITIVO
Fase 1
Nota: Assicurarsi che l’alimentazione sia disattivata sul computer e
i display prima dell’installazione. Collegare il cavo VGA incluso
dall’”Output VGA” del computer a “VGA IN” sul pannello posteriore
dell’89019. Nota: se si desidera fare un collegamento a cascata
del segnale VGA a un altro monitor, seguire la fase 2; altrimenti,
passare alla fase 3.
Fase 2
Collegare il cavo VGA da “VGA OUT” sul pannello posteriore del
PC o del convertitore TV all’”Input VGA" del monitor. Assicurarsi
che il dip switch n. 4 sia in posizione "On".
Fase 3
Collegare il cavo RCA Video incluso da “Video Out” del PC o del
convertitore TV all’”Input Video" del monitor. Nota: per immagini di
qualità superiore, si raccomanda di usare l’input S-Video se
disponibile sul display. Consultare la fase 4 se il display a un Input
S-Video; altrimenti, passare alla fase 5.
Fase 4
Collegare il cavo S-Video incluso da S-VIDEO OUT sul pannello
posteriore del PC o del convertitore TV all’input S-Video del
monitor. Attenzione! Il connettore S-Video ha un orientamento
particolare. Prestare attenzione all’orientamento della presa. Se
non viene orientata correttamente, potrebbero esserci danni
all’unità o al cavo.
Fase 5
Impostare i dip switch in modo tale che corrispondano al formato
richiesto dalla TV. Vedere pagina 8 per le impostazioni dei dip
switch. Consultare il Manuale per l’utente della TV per il formato
richiesto.
Fase 6
Collegare l’alimentazione CC 5 V o il cavo USB fornito al jack CC In
sul convertitore. Nota: per evitare danni all’unità, mai collegare sia
l’adattatore di alimentazione sia il cavo USB.
Fase 7
Accedere il computer, il convertitore e la TV, quindi impostare la TV
sull’input corretto.
Fase 8
Usare la freccia direzionale sull’unità o sul telecomando per
allineare correttamente l’immagine sulla TV se necessario.
INSTALLATIE APPARATUUR
Stap 1
Opmerking: Zorg ervoor dat de computer van de stroom en de
display(s) is afgekoppeld alvorens met het installeren te
beginnen. Sluit de meegeleverde VGA-kabel van de “VGAuitgang” van uw pc aan op “VGA In” op het achterpaneel van
89019. Opmerking: Als u het VGA-signaal wilt doorlussen naar
een andere monitor, ga dan naar stap 2, ga anders door naar
stap 3.
Stap 2
Sluit de VGA-kabel van “VGA-OUT” op het achterpaneel van de
pc-naar-tv-conversiebox aan op de “VGA-ingang” van de
monitor. Zorg ervoor dat dipschakelaar #4 op “ON” staat.
Stap 3
Sluit de meegeleverde Video RCA-kabel van “Video Out” van de
pc-naar-tv-conversiebox aan op de “VGA-ingang” van de display.
Opmerking: Voor de beste beeldkwaliteit wordt aangeraden de
S-Video-invoer te gebruiken als deze op de display beschikbaar
is. Zie stap 4 als de display S-Video-invoer heeft, ga anders door
naar stap 5.
Stap 4
Sluit de meegeleverde S-Video-kabel van S-VIDEO OUT op het
achterpaneel van de pc-naar-tv-conversiebox aan op de SVideo-ingang van de display. Voorzichtig! De S-Video-connector
heeft een speciale oriëntatie. Let goed op de oriëntatie van de
stekker. Bij een verkeerde richting kan schade aan de unit of de
kabel ontstaan.
Stap 5
Stel de dipschakelaars in zodat ze overeenkomen met de door
uw tv vereiste instelling. Zie pagina 8 voor instellingen van de
dipschakelaars. Raadpleeg de handleiding van de tv voor de
vereiste instelling.
Stap 6
Sluit de DC 5V stroomtoevoer of de meegeleverde USB-kabel
aan op de DC-aansluiting op de conversiebox. Opmerking: Om
schade aan de unit te voorkomen moet u de stroomadapter en
de USB-kabel nooit allebei aansluiten.
Stap 7
Zet de computer, de converter en de televisie aan, schakel de
televisie vervolgens op de juiste ingang
Stap 8
Gebruik de richtingpijl op een apparaat of de afstandsbediening
om het beeld op uw televisie goed uit te lijnen indien nodig.
10
INSTALACIÓN DEL DISPOSITIVO
Paso 1
Nota: asegúrese de que el ordenador y las pantallas estén
apagados antes de comenzar la configuración. Conecte el cable
de VGA a la salida de VGA del ordenador y a la entrada de VGA
del panel posterior del 89019. Nota: si desea hacer llegar la
señal VGA a otro monitor siga el paso 2; de lo contrario, vaya al
paso 3.
Paso 2
Conecte el cable de VGA a la salida de VGA del panel posterior
del conversor de PC a TV y a la entrada de VGA del monitor.
Asegúrese de que el conmutador DIP nº 4 esté en la posición
“On” (encendido).
Paso 3
Conecte el cable RCA de vídeo que se incluye a la salida de
vídeo del conversor de PC a TV y a la entrada de vídeo de la
pantalla. Nota: para obtener una mayor calidad de imagen se
recomienda utilizar la entrada S-Video de la pantalla si está
disponible. Consulte el paso 4 si la pantalla tiene una entrada SVideo; de lo contrario, vaya al paso 5.
Paso 4
Conecte el cable de S-Video que se incluye a la salida de SVideo del panel posterior del conversor de PC a TV y a la entrada
de S-Video de la pantalla. ¡Precaución! El conector de S-Video
debe colocarse en una posición concreta. Tenga en cuenta la
orientación del enchufe. Si no se coloca en la posición correcta,
podrían producirse daños en la unidad o en el cable.
Paso 5
Coloque los conmutadores DIP en la posición requerida por el
televisor. Consulte la página 8 para ver la configuración de los
conmutadores DIP. Consulte el manual del propietario del
televisor para conocer el formato requerido.
Paso 6
Conecte la alimentación de 5 VCA o el cable USB proporcionado
a la entrada de CA del conversor. Nota: para evitar que se
produzcan daños en la unidad, no conecte nunca el adaptador de
corriente y el cable USB a la vez.
Paso 7
Encienda el ordenador, el conversor y el televisor, y configure el
televisor para la entrada adecuada.
Paso 8
Utilice las flechas de dirección de la unidad o del mando a
distancia para alinear correctamente la imagen en el televisor si
fuese necesario.
DEVICE INSTALLATION APPLICATION DIAGRAMS
11
TECHNICAL SPECIFICATIONS
Product No.
89019
Input Signal
VGA
Horizontal Frequency
Vertical Frequency
25 kHz ~ 58.464 kHz
50 ~ 85 Hz
1024 x 768 (60 Hz max)
800 x 600 (85Hz max)
640 x 480 (85Hz max)
Composite Video (RCA)
S-Video
HD15 VGA Loop Through
3 port dip switch selection
5V1A
0.181 kg
Resolution Supported
Output
Output Video Selection
Power
Weight
12
CABLES TO GO® ONE YEAR WARRANTY / EINJÄHRIGE GARANTIE VON CABLES TO GO® / GARANTIE D'UN AN DE
CABLES TO GO® / GARANZIA DI UN ANNO CABLES TO GO® / CABLES TO GO® EÉNJAARSGARANTIE / UN AÑO DE
®
GARANTÍA CABLES TO GO
At Cables To Go, we want you to be totally confident in your purchase. That is why we offer a one year warranty on this device.
If you experience problems due to workmanship or material defect for the duration of this warranty, we will repair or replace this
device. To request a Return Merchandise Authorisation (RMA) number, contact customer service at 0800 328 2916 or
www.cablestogo.co.uk
Wir bei Cables To Go möchten, dass Sie mit Ihrem Kauf vollständig zufrieden sind. Deshalb bieten wir eine einjährige Garantie
auf dieses Gerät. Wenn während dieser Garantie Probleme aufgrund eines Fertigungs- oder Materialfehlers auftreten,
reparieren oder ersetzen wir dieses Gerät. Wenden Sie sich zum Anfordern einer Return Merchandise Authorization (RMA)Nummer an unseren Kundenservice unter 0800 328 2916 oder www.cablestogo.co.uk.
Chez Cables To Go, nous voulons que vous soyez complètement satisfait de votre achat. C'est pourquoi vous bénéficiez d'un
an de garantie sur cet appareil. Si vous rencontrez des problèmes liés à des défauts matériels ou de fabrication pendant la
durée de cette garantie, nous réparerons ou remplacerons cet appareil. Pour demander un numéro d'autorisation de retour de
marchandise (ARM), contactez le service client au 0800.328.2916 ou www.cablestogo.co.uk.
Alla Cables To Go, vogliamo che i nostri clienti abbiano totale fiducia nei loro acquisti. Ecco perché, su questo dispositivo
offriamo una garanzia di un anno. Qualora nel corso del periodo coperto da garanzia dovessero verificarsi problemi legati alla
manodopera o ai materiali utilizzati, sarà nostra cura occuparci della riparazione o della sostituzione del dispositivo. Per
richiedere un numero RMA (Return Merchandise Authorization / autorizzazione alla restituzione della merce), contattare il
Servizio Clienti al numero 0800 328 2916 o visitare il sito www.cablestogo.co.uk.
Bij Cables To Go willen we dat u volledig op uw aankoop kunt vertrouwen. Daarom bieden we een garantie van een jaar op dit
apparaat. Als u problemen ondervindt door slecht vakmanschap of een materieel defect tijdens de garantieperiode, zullen we
het apparaat repareren of vervangen. Als u een RMA-nummer (Return Merchandise Authorization - Toestemming voor retour
van consumentenproducten) wilt, kunt u contact opnemen met klantenservice op 0800 328 2916 of via www.cablestogo.co.uk.
En Cables To Go queremos que confíe completamente en su compra. Esa es la razón por la que ofrecemos un año de
garantía en este dispositivo. Si experimenta problemas debidos a mano de obra o defectos de material durante el periodo de
validez de esta garantía, repararemos o sustituiremos este dispositivo. Para solicitar un número de autorización de devolución
de mercancía, contacte con el servicio de atención al cliente en el número de teléfono 0800 328 2916 o visite
www.cablestogo.co.uk
13
IMPORTANT SAFETY INFORMATION
IMPORTANT SAFETY INFORMATION
WICHTIGE SICHERHEITSHINWEISE
INFORMATIONS DE SECURITE IMPORTANTES
Do not plug the unit in any outlet that does not have enough
current to allow the device to function. Refer to the specifications
in this manual for power level of the unit.
Schließen Sie das Gerät nicht an eine Steckdose an, die nicht
genug Strom für das Gerät liefert. Die entsprechenden Daten für
das Gerät finden Sie in diesem Handbuch.
Pour permettre à l'appareil de fonctionner, ne branchez pas l'unité sur
une prise ne délivrant pas assez de courant. Reportez-vous aux
spécifications de ce manuel pour connaître le niveau d'alimentation de
l'unité.
Liquid: If this unit or its corresponding power adapter has had
liquid spilled on or in it, do not attempt to use the unit. Do not
attempt to use this product in an outdoor environment as
elements such as rain, snow, hail, etc. can damage the product.
Flüssigkeit: Wenn auf dieses Gerät oder den dazugehörigen
Netzadapter Flüssigkeiten geschüttet wurden, darf es/er nicht
verwendet werden. Verwenden Sie dieses Produkt nicht im
Freien, da Regen, Schnee, Hagel usw. das Produkt beschädigen
können. Ziehen Sie bei einem Gewitter den Netzstecker des
Geräts.
Liquide : Si du liquide s'est répandu sur ou à l'intérieur de cette unité
ou son adaptateur d'alimentation correspondant, n'essayez pas
d'utiliser cette unité. N'essayez pas d'utiliser ce produit dans un
environnement extérieur car des éléments tels que la pluie, la neige,
la grêle, etc. peuvent endommager ce produit.
In case of a storm, it is recommended that you unplug this device
from the outlet.
Avoid placing this product next to objects that produce heat such
as portable heaters, space heaters, or heating ducts.
Stellen Sie dieses Produkt nicht in der Nähe von Gegenständen
auf, die Hitze erzeugen, zum Beispiel tragbare Heizgeräte,
Heizöfen oder Heizungsleitungen.
En cas de tempête, il est recommandé de débrancher cet appareil de
la source de courant.
Évitez de placer ce produit près d'objets produisant de la chaleur
comme les appareils de chauffage portables ou non et les conduits de
chauffage
THERE ARE NO USER SERVICEABLE PARTS. Do not attempt
to open this product and expose the internal circuitry. If you feel
that the product is defective, unplug the unit and refer to the
warranty information section of this manual.
ES BEFINDEN SICH KEINE VOM BENUTZER
REPARIERBAREN TEILE IM GERÄT. Versuchen Sie nicht, das
Produkt zu öffnen und den internen Schaltkreis freizulegen. Wenn
das Produkt defekt ist, ziehen Sie den Netzstecker und sehen Sie
im Abschnitt mit den Garantieinformationen in diesem Handbuch
nach.
INFORMATIONS DE SÉCURITÉ IMPORTANTES
BELANGRIJKE VEILIGHEIDSINFORMATIE
INFORMACIÓN DE SEGURIDAD IMPORTANTE
Non collegare l'unità a prese che non dispongono di un quantitativo di
corrente sufficiente a garantire il corretto funzionamento del
dispositivo. Consultare le specifiche tecniche presenti in questo
manuale per maggiori informazioni relative al livello energetico del
dispositivo.
Sluit de unit niet aan op een stopcontact dat niet genoeg spanning
levert om het apparaat te laten functioneren. Raadpleeg de
specificaties in deze handleiding voor het spanningsniveau van de
unit.
No conecte la unidad en una salida que no disponga de suficiente
corriente como para permitir que el dispositivo funcione. Consulte en
este manual las especificaciones sobre nivel de potencia de la
unidad.
Vloeistof:Als op of in deze unit of de bijbehorende stroomadapter
vloeistof is gemorst, moet de unit niet gebruiken.
Gebruik dit product niet buitenshuis aangezien regen, sneeuw, hagel
enz. schade aan het product kunnen toebrengen.
Líquidos: Si se han derramado líquidos sobre la unidad, en la unidad
o en su correspondiente adaptador de potencia, no intente utilizar la
unidad. No intente utilizar este producto en el exterior, ya que
elementos como la lluvia, la nieve, el granizo, etc. pueden dañar el
producto.
Liquidi: Se l'unità o il relativo alimentatore entrano in contatto con dei
liquidi, non cercare di utilizzare il dispositivo. Non cercare di utilizzare
il prodotto in presenza di pioggia, neve, grandine, ecc. Il dispositivo si
potrebbe danneggiare.
In caso di temporale si consiglia di scollegare il dispositivo dalla presa
di corrente.
Evitare di posizionare il dispositivo nelle vicinanze di oggetti che
producono calore come ad esempio stufette portatili, convettori termici
o condotti di riscaldamento.
IL DISPOSITIVO NON CONTIENE PARTI CHE POSSONO ESSERE
RIPARATE DALL’UTENTE. Non cercare di aprire il prodotto fino a
scoprire i circuiti interni. Se si ritiene che il prodotto sia difettoso,
scollegare l'unità e consultare la sezione informativa sulla garanzia
all'interno del presente manuale.
AUCUNE PIÈCE NE NÉCESSITE D'ÊTRE ENTRETENUE PAR
L'UTILISATEUR. N'essayez pas d'ouvrir ce produit et d'exposer sa
circuiterie interne. Si vous pensez que ce produit présente des
défauts, débranchez l'unité et reportez-vous à la section de ce guide
comportant des informations de garantie.
Bij onweer is het aan te bevelen dit product van de stroom af te halen.
Plaats dit product niet bij voorwerpen die hitte afgeven zoals
radiatoren, verwarmingselementen of verwarmingsbuizen.
ER ZIJN GEEN ONDERDELEN DIE DE GEBRUIKER ZELF KAN
HERSTELLEN. Dit product niet te openen en het interne circuit niet
blootstellen. Als u meent dat het product defect is, koppel de unit dan
af en raadpleeg het gedeelte in deze handleiding over de garantieinformatie.
14
En caso de tormenta, se recomienda que desconecte este dispositivo
del enchufe.
Evite situar este producto cerca de objetos que produzcan calor,
como calefacciones portátiles, calefactores o conductos de
calefacción.
NO HAY PIEZAS QUE PUEDA REPARAR EL PROPIO USUARIO.
No intente abrir este producto y exponer la circuitería interna. Si cree
que el producto presenta algún defecto, desconecte la unidad y
consulte la sección de garantía de este manual.
For more information on this product or to check for updated drivers,
manuals or frequently asked questions please visit our website.
Weitere Informationen über dieses Produkt und aktualisierte Treiber,
Handbücher und häufig gestellte Fragen finden Sie auf unserer Website.
Pour plus d'informations concernant ce produit ou pour rechercher des pilotes actualisés,
des manuels ou des questions souvent posées, veuillez visiter notre site web.
Per ulteriori informazioni su questo prodotto oppure per verificare la presenza di aggiornamenti di driver
e manuali o per consultare le domande frequenti, visitare il nostro sito web.
Ga voor meer informatie over dit product of over bijgewerkte stuurprogramma’s,
handleidingen of veel gestelde vragen naar onze website.
Para obtener más información sobre este producto o para comprobar controladores actualizados,
manuales o preguntas frecuentes, visite nuestro sitio web.
www.cablestogo.co.uk
VER. 2.1.07.06.10
15