Transcript
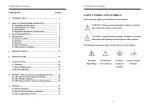
Quick Installation and Setup Guide
MZUST and MZCIM
For MZCIM-U
USB:
1. Attach an MZCIM-USB video (HD15)
connector to the computer's video port.
3
6b
1
4
6c
6a
2
4. If you are not adding more computers
to the User Station, insert a TER-ZCIM terminator in the MZCIM-USB I (In) port.
5. The MZCIM-USB factory name and
serial number appear in the Selection
Menu of the User Console attached to the
MZUST. This represents the connected
computer.
6. To connect additional computers:
Hardware Installation
MasterConsole™ Z User Station (MZUST) Installation requires that a Port Name is assigned to each computer as it is added to the MZCIM chain during installation. Ports are organized alphabetically by assigned
name or by the default name (the MZCIM's serial number), not by order of placement in the MasterConsole
Z chain. Raritan recommends that you assign a port name as you connect a computer instead of connecting all computers first and then assigning port names, as it can be difficult to locate the respective port for
each computer after all are connected.
Install MasterConsole Z
User Station (MZUST)
A. Connect one end of an AC
power cable to the MZUST and
plug the other end of the power
cord into an AC power source.
B. Connect a PS/2 (or USB) keyboard, VGA monitor, and mouse
to the appropriate ports on the
rear panel of the MZUST.
C. Plug in and power ON the
VGA monitor.
D. Power ON the MZUST using
the AC Power switch on the rear
panel.
Connect Computers to
MZUST using MZCIMs
For MZCIM-P
PS2:
1. Attach an MZCIM-PS2 video
(HD15) connector to the computer's video port.
2. Connect
the
MZCIM-USB
keyboard/mouse USB connector to the
computer's USB keyboard/mouse port.
3. Connect one end of a Category 5e
UTP cable to the O (Out) Cat5 port on the
MZCIM-USB. Connect the other end to the
In Cat 5 Port on the rear panel of the
MZUST.
3
Please power OFF the MZUST
unit before connecting MZCIMs.
6d
2. Connect the MZCIM-PS2
keyboard and mouse connectors to the computer's keyboard
and mouse ports.
Category 5e UTP cable to the
MZCIM-PS2 I (In) port from
which the terminator has been
just removed.
3. Connect one end of a
Category 5e UTP cable to the O
(Out) Cat5 port on the MZCIMPS2. Connect the other end of
the cable to the In Cat 5 Port on
the rear panel of the MZUST.
c. Connect the other end
of the Category 5e UTP cable to
the O (Out) port on the next
MZCIM-PS2 being added.
4. If you are not adding more
computers to the User Station,
insert a TER-ZCIM terminator in
the MZCIM-PS2 I (In) port.
5. The MZCIM-PS2 factory
name and serial number
appears on the User Console
attached to the MZUST; this represents the connected computer.
6. To connect additional computers:
a. Remove the TER-ZCIM
terminator from the (last)
MZCIM-PS2 I (In) port and set it
aside.
b.
Connect one end of a
d. If no additional computers are being added, insert the
TER-ZCIM terminator into the
last MZCIM-PS2 I (In) port.
7. Press the default hot key
(Scroll Lock) twice rapidly at the
MZUST User Console to activate
the On-Screen Display (OSD).
8. Press F2 to activate the
Selection Menu.
9. The computer you just connected appears as a new channel in the Selection Menu at the
MZUST User Console. The
MZCIM-PS2 factory name and
serial number appear.
a. Remove the TER-ZCIM terminator
from the (last) MZCIM-USB I (In) port and
set aside.
b. Connect one end of a Category
5e UTP cable to the MZCIM-USB I (In) port
from which the terminator has been just
removed.
c. Connect the other end of the
Category 5e UTP cable to the O (Out) port
on the next MZCIM-USB being added.
d. If no more computers are added,
insert the TER-ZCIM terminator into the
last MZCIM-USB I (In) port.
7. Press the default hot key (Scroll Lock)
twice rapidly at the MZUST User Console
activate the OSD.
8. Press F2 to activate the Selection
Menu.
set it aside.
b. Connect one end of a Category
5e UTP cable to the MZCIM-SUN I (In) port
from which the terminator has been just
removed.
9. The computer you just connected
appears as a new channel in the Selection
Menu at the User Console of the MZUST.
The MZCIM-USB factory name and serial
number appear.
c. Connect the other end of the
Category 5e UTP cable to the O (Out) port
on the next MZCIM-SUN being added.
For MZCIM-S
SUN:
7. Press the default hot key (Scroll Lock)
twice rapidly at the MZUST User Console
to activate the OSD.
1. Attach the MZCIM-SUN video (HD15)
connector to the computer's video port.
2. Connect
the
MZCIM-SUN
keyboard/mouse connector (8-pin miniDIN)
to
the
SUN
computer's
keyboard/mouse port.
3. Connect one end of a Category 5e
UTP cable to the O (Out) Cat5 port on the
MZCIM-SUN. Connect the other end to the
In Cat 5 port on the rear panel of the
MZUST.
4. If you are not adding more computers
to the User Station, insert a TER-ZCIM terminator in the MZCIM-SUN I (In) port.
5. A MZCIM-SUN factory name and serial
number appear in the Selection Menu of
the User Console attached to the MZUST.
This represents the connected computer.
6. To connect additional computers
a. Remove the TER-ZCIM terminator
from the (last) MZCIM-SUN I (In) port and
d. If no more computers are added,
insert the TER-ZCIM terminator into the
last MZCIM-SUN I (In) port.
8. Press F2 to activate the Selection
Menu.
9. The computer you just connected
appears as a new channel in the Selection
Menu at the User Console of the MZUST.
The MZCIM-SUN factory name and serial
number appear.
Note: Installation requires basic operation
of On-Screen Display (OSD) menus. Press
the default Hot Key activator (Scroll Lock)
twice rapidly to activate the OSD. Function
keys F1, F2, and F5 are used to switch
OSD menus. PressF1 (while the OSD is on
screen) to activate the Help Menu, which
lists all available menu options. When the
OSD is onscreen, the user console keyboard's Scroll Lock LED indicator blinks.
Please see Chapter 3: Operation for additional information on OSD usage.
LED Status
The green LED on the MZCIM indicates
the CIM's operational state:
- If the LED blinks rapidly: MZCIM does
not have a confirmed Communication
Address.
- If the LED is primarily off and blinks on
every two (2) seconds: MZCIM has a confirmed Communication Address but is not
switched to that Address.
- If the LED is on and blinks on/off rapidly
when there is KB/MS traffic: CIM has a
confirmed Communication Address and is
switched to that Address.
- If the LED is blinking on and off but at a
regulated, moderate speed (i.e., every
half second): MZCIM is acting as Manager
of the chain.
Note: The MZCIM will blink from time to
time even if there is no keyboard/mouse
traffic; this demonstrates that the MZCIM
is operating normally and not locked.
OSD Functions
The Selection Menu appears automatically upon boot-up. Press F1 to view the Help
menu in the On-Screen Display (OSD), or
use the following function keys:
F2:
View the Selection Menu listing
available channels, serial numbers, and
scan rates. The Selection Menu is used to
switch between selected channels to
access computers.
F7:
Toggle Skip On/Off.
F8:
View System Information.
F5:
F9:
Log Out.
ESC:
Exit the OSD.
View the Administrative Menu.
F6:
Toggle Scan On/Off. The base of
the OSD indicates that the Scan function is
ON when the word "Scan" is highlighted in
yellow.
For more information on OSD commands
and functions, please view Chapter 3 in
the MasterConsole Z User Guide.
For more detailed instructions, please consult the User Manual found on the enclosed CD-ROM or visit www.raritan.com
Rev. C May 2006 255-33-1201