1
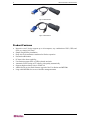
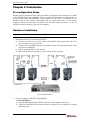
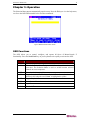
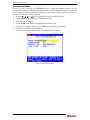
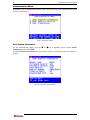
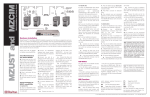
MasterConsole Z ™ User Manual Copyright © 2006 Raritan Computer, Inc. MCZ-0B-E May 2006 255-33-1200 This page intentionally left blank. Copyright and Trademark Information This document contains proprietary information that is protected by copyright. All rights reserved. No part of this document may be photocopied, reproduced, or translated into another language without express prior written consent of Raritan Computer, Inc. © Copyright 2006 Raritan, MasterConsole, Paragon, and the Raritan company logo are trademarks or registered trademarks of Raritan Computer, Inc. All rights reserved. Java is a registered trademark of Sun Microsystems, Inc. Internet Explorer is a registered trademark of Microsoft Corporation. Netscape and Netscape Navigator are registered trademarks of Netscape Communication Corporation. All other marks are the property of their respective owners. FCC Information This equipment has been tested and found to comply with the limits for a Class A digital device, pursuant to Part 15 of the FCC Rules. These limits are designed to provide reasonable protection against harmful interference in a commercial installation. This equipment generates, uses, and can radiate radio frequency energy and if not installed and used in accordance with the instructions, may cause harmful interference to radio communications. Operation of this equipment in a residential environment may cause harmful interference. Japanese Approvals Raritan is not responsible for damage to this product resulting from accident, disaster, misuse, abuse, non-Raritan modification of the product, or other events outside of Raritan’s reasonable control or not arising under normal operating conditions. C UL US LISTED 1F61 I.T.E. For assistance in the North or South America, please contact the Raritan Technical Support Team by telephone (732) 764-8886, by fax (732) 764-8887, or by e-mail [email protected] Ask for Technical Support – Monday through Friday, 8:00am to 8:00pm, Eastern. For assistance around the world, please see the last page of this guide for regional Raritan office contact information. Safety Guidelines To avoid potentially fatal shock hazard and possible damage to Raritan equipment: • Do not use a 2-wire power cord in any product configuration. • Test AC outlets at your computer and monitor for proper polarity and grounding. • Use only with grounded outlets at both the computer and monitor. When using a backup UPS, power the computer, monitor and appliance off the supply. Rack Mount Safety Guidelines In Raritan products which require Rack Mounting, please follow these precautions: • Operation temperature in a closed rack environment may be greater than room temperature. Do not exceed the rated maximum ambient temperature of the appliances (see Appendix A: Specifications). • Ensure sufficient airflow through the rack environment. • Mount equipment in the rack carefully to avoid uneven mechanical loading. • Connect equipment to the supply circuit carefully to avoid overloading circuits. • Ground all equipment properly, especially supply connections, such as power strips (other than direct connections), to the branch circuit. CONTENTS i Contents Chapter 1: Introduction .................................................................. 1 MasterConsole Z Overview ......................................................................................... 1 Product Photos............................................................................................................ 1 Product Features......................................................................................................... 2 User Station (MZUST) Features ................................................................................. 3 Chapter 2: Installation.................................................................... 5 Pre-configuration Notes .............................................................................................. 5 Hardware Installation .................................................................................................. 5 Chapter 3: Operation ...................................................................... 9 OSD Functions............................................................................................................ 9 Help Menu .......................................................................................................................................10 Administration Menu ........................................................................................................................12 Appendix A: Specifications .......................................................... 15 Appendix B: Troubleshooting ....................................................... 17 Appendix C: Glossary ................................................................... 19 Appendix D: FAQs ......................................................................... 21 UTP Cabling FAQs.................................................................................................... 25 ii FIGURES Figures Figure 1 MasterConsole Z User Station (MZUST) ....................................................................................... 1 Figure 2 MasterConsole Z Computer Interface Module (MZCIM-PS2) ........................................................ 1 Figure 3 MZCIM-USB .................................................................................................................................. 2 Figure 4 MZCIM-SUN .................................................................................................................................. 2 Figure 5 MZCIM Installation ........................................................................................................................ 5 Figure 6 On-Screen Display (OSD).............................................................................................................. 7 Figure 7 MZUST Selection Menu Screen .................................................................................................... 9 Figure 8 F1 Help Menu .............................................................................................................................. 10 Figure 9 Selection Menu by Name............................................................................................................. 10 Figure 10 CIM Configuration Menu ........................................................................................................... 11 Figure 11 Administrative Menu .................................................................................................................. 12 Figure 12 User Station Information Menu .................................................................................................. 12 Figure 13 User Security Profile Menu ........................................................................................................ 13 Figure 14 User Preferences Screen........................................................................................................... 13 CHAPTER 1: INTRODUCTION 1 Chapter 1: Introduction MasterConsole Z Overview The MasterConsole Z switchless access system consists of two components – a User Station (MZUST) and an MZ-Computer Interface Module (MZCIM), connected with Enhanced Category 5e UTP cable. The MZCIMs are linked in a chain via Category 5e UTP cable, and servers are connected to each of the MZCIMs. Please note that these MZCIMs are not compatible with P2ZCIMs or ZU4200 CIMs. With a MasterConsole Z system, you can: • Add a computer anywhere in the chain at any time • Hot connect a user console to any server • Hot-swap components with no impact on server operation • Select computers by name from on-screen menus • Locate user up to 700 feet (213m) away with Category 5e UTP cable Product Photos Figure 1 MasterConsole Z User Station (MZUST) Figure 2 MasterConsole Z Computer Interface Module (MZCIM-PS2) 2 MASTERCONSOLE Z USER GUIDE Figure 3 MZCIM-USB Figure 4 MZCIM-SUN Product Features • • • • • • • • • • Innovative zero-U design supports up to 64 computers, any combination of PS/2, USB, and SUN, on a single Cat5 chain Simple Plug and Play installation Keep-alive keyboard/mouse emulation for flawless operation Password authorization PC share/video share capability User Station supports PS/2 or USB keyboards and mice Automatic Video Tuning (AVT) adjusts video quality automatically Supports high-resolution video to 1024X768 Admin Port for on-site flash firmware upgrade of the User Station and MZCIMs Long-cable MZCIMs for servers with cable management arms CHAPTER 1: INTRODUCTION 3 User Station (MZUST) Features Front Panel • Status LED: Indicates power and operational status of MZUST User Station Rear Panel • AC Power: − Connector: for AC power cable (100V – 240 VAC, 47 Hz – 63 Hz) − On/Off Switch: for powering ON or OFF the MZUST User Station • PS/2 Keyboard: Connect PS/2 keyboard to operate MZUST. • PS/2 Mouse: Connect PS/2 Mouse to operate MZUST. • VGA Monitor: Connect multisync VGA monitor to view connected computers. • Cat5 Ports In: Connect up to 64 computers, using Cat5 UTP cable and a chain of MZCIMs. • Cat5 PC Share OUT: Connect (pass through) a second MZUST User Station. • USB K/M: Connect a USB keyboard/mouse to operate the MZUST User Station. • Admin: Proprietary serial port used to upgrade MZUST and MZCIM firmware. When available, new firmware will be posted on Raritan website http://www.raritan.com. 4 MASTERCONSOLE Z USER GUIDE CHAPTER 2: INSTALLATION 5 Chapter 2: Installation Pre-configuration Notes MasterConsole Z installation requires that a Port Name is assigned to each computer as it is added to the MZCIM chain during installation. Ports are organized alphabetically by assigned name or by the default name (the MZCIM’s serial number), not by order of placement in the MasterConsole Z chain. Raritan recommends that you assign port names as you connect computers instead of connecting all computers first and then assign port names – it may be difficult to locate the respective port for each computer. Hardware Installation Important: MZUST must be powered OFF prior to installation. 1. Install MasterConsole Z User Station (MZUST): A. Connect one end of an AC power cable to the MZUST and plug the other end of the power cord into an AC power source. B. Connect a PS/2 (or USB) keyboard, VGA monitor, mouse to the appropriate ports on the rear panel of the MZUST. C. Plug in and power ON the VGA monitor. D. Power ON the MZUST using the AC Power switch on the rear panel. Figure 5 MZCIM Installation 2. Connect Computers to MZUST using MZCIMs 2.1 For MZCIM-PS2: A. Attach an MZCIM-PS2 video (HD15) connector to the computer’s video port. B. Connect the MZCIM-PS2 keyboard and mouse connectors to the computer’s keyboard and mouse ports. 6 MASTERCONSOLE Z USER GUIDE C. Connect one end of a Category 5e UTP cable to the O (Out) Cat5 port on the MZCIMPS2. Connect the other end of the cable to the In Cat 5 Port on the rear panel of the MZUST. D. If you are not adding more computers to the User Station, insert a TER-ZCIM terminator in the MZCIM-PS2 I (In) port. E. The MZCIM-PS2 factory name and serial number appears on the User Console attached to the MZUST; this represents the connected computer. F. To connect additional computers: Remove the TER-ZCIM terminator from the (last) MZCIM-PS2 I (In) port and set it aside. Connect one end of a Category 5e UTP cable to the MZCIM-PS2 I (In) port from which the terminator has been just removed. Connect the other end of the Category 5e UTP cable to the O (Out) port on the next MZCIM-PS2 being added. If no additional computers are being added, insert the TER-ZCIM terminator into the last MZCIM-PS2 I (In) port. G. Press the default hot key (Scroll Lock) twice rapidly at the MZUST User Console to activate the On-Screen Display (OSD). H. Press F2 to activate the Selection Menu. I. The computer you just connected appears as a new channel in the Selection Menu at the MZUST User Console. The MZCIM-PS2 factory name and serial number appear. 2.2 For MZCIM-USB: A. Attach an MZCIM-USB video (HD15) connector to the computer’s video port. B. Connect the MZCIM-USB keyboard/mouse USB connector to the computer’s USB keyboard/mouse port. C. Connect one end of a Category 5e UTP cable to the O (OUT) Cat5 port on the MZCIMUSB. Connect the other end to the Cat 5 Ports In on the User Station (MZUST). D. If you are not adding more computers to the User Station, insert a TER-ZCIM terminator in the MZCIM-USB I (IN) port. E. The MZCIM-USB factory name and serial number appear in the Selection Menu of the User Console attached to the MZUST. This represents the connected computer. F. To connect additional computers: Remove the TER-ZCIM terminator from the (last) MZCIM-USB I (IN) port and set aside. Connect one end of a Category 5e UTP cable to the MZCIM-USB I (IN) port from which the terminator has been just removed. Connect the other end of the Category 5e UTP cable to the O (OUT) port on the next MZCIM-USB being added. If no more computers are added, insert the TER-ZCIM terminator into the last MZCIM-USB I (IN) port. G. Press the default hot key (Scroll Lock) twice rapidly at the MZUST User Console activate the OSD. H. Press the F2 key to activate the Selection Menu. I. The computer you just connected appears as a new channel in the Selection Menu at the User Console of the MZUST. The MZCIM-USB factory name and serial number appear. CHAPTER 2: INSTALLATION 7 2.3. For MZCIM-SUN: A. Attach the MZCIM-SUN video (HD15) connector to the computer’s video port. B. Connect the MZCIM-SUN keyboard/mouse connector (8-pin mini-DIN) to the SUN computer’s keyboard/mouse port. C. Connect one end of a Category 5e UTP cable to the O (OUT) Cat5 port on the MZCIMSUN. Connect the other end to the Cat 5 Ports In on the User Station (MZUST). D. If you are not adding more computers to the User Station, insert a TER-ZCIM terminator in the MZCIM-SUN I (IN) port. E. A MZCIM-SUN factory name and serial number appear in the Selection Menu of the User Console attached to the MZUST. This represents the connected computer. F. To connect additional computers: Remove the TER-ZCIM terminator from the (last) MZCIM-SUN I (IN) port and set it aside. Connect one end of a Category 5e UTP cable to the MZCIM-SUN I (IN) port from which the terminator has been just removed. Connect the other end of the Category 5e UTP cable to the O (OUT) port on the next MZCIM-SUN being added. If no more computers are added, insert the TER-ZCIM terminator into the last MZCIM-SUN I (IN) port. G. Press the default hot key (Scroll Lock) twice rapidly at the MZUST User Console to activate the OSD. H. Press F2 to activate the Selection Menu. I. The computer you just connected appears as a new channel in the Selection Menu at the User Console of the MZUST. The MZCIM-SUN factory name and serial number appear. Note: Installation requires basic operation of On-Screen Display (OSD) menus. Press the default Hot Key activator (Scroll Lock) twice rapidly to activate the OSD. Function keys F1, F2, and F5 are used to switch OSD menus. PressF1 (while the OSD is on screen) to activate the Help Menu, which lists all available menu options. When the OSD is onscreen, the user console keyboard’s Scroll Lock LED indicator blinks. Please see Chapter 3: Operation for additional information on OSD usage. Figure 6 On-Screen Display (OSD) 8 MASTERCONSOLE Z USER GUIDE CHAPTER 3: OPERATION 9 Chapter 3: Operation The Selection Menu appears automatically upon boot-up. Press the F1 key to view the help menu, or refer to the OSD Function table below for other commands. Figure 7 MZUST Selection Menu Screen OSD Functions The OSD allows you to control, configure, and operate all facets of MasterConsole Z functionality. Press the Scroll Lock key on your keyboard twice rapidly to activate the OSD. PRESS F1 F2 F5 F6 F7 F8 F9 ESC WHEN YOU WANT TO View the Help Menu listing all function keys. View the Selection Menu listing available channels, serial numbers, and scan rates. The Selection Menu is used to switch between selected channels to access computers. View the Administrative Menu. Toggle Scan On/Off. The base of the OSD indicates that the Scan function is ON when the word “Scan” is highlighted in yellow. Toggle Skip On/Off. View System Information. Log Out. Exit the OSD. 10 MASTERCONSOLE Z USER GUIDE Help Menu Press F1 to view the Help Menu, which lists all functions keys in a quick and easy reference. Figure 8 F1 Help Menu Selection Menu Press F2 to view the Selection Menu, which lists all port names currently detected by the system, sorted by computer name in alphabetical order. Press the Ç, È, PageUp or PageDown keys on your keyboard to select a channel, and then press ENTER to switch to the selected port and view that port’s Configuration Menu. Figure 9 Selection Menu by Name CHAPTER 3: OPERATION 11 Configuration Menu When you select a port and press ENTER, that port’s Configuration Menu appears. Use this menu to make changes to the computer channel name, scan rate, and the time interval (in seconds) that a channel’s computer remains displayed on the monitor during scanning, as well as to designate a channel as a Home computer. 1. Press the Ç, È, Å, or Æ keys to highlight the field to be edited in yellow. 2. Press ENTER to edit the field; the highlight turns green. 3. Edit name and/or scan time. 4. Press ENTER when finished; the highlight turns yellow again. 5. Press S to save changes and exit, or press ESC to exit without saving changes. 6. Press F2 to return to the Selection Menu. 7. Verify that new channel name appears in the Selection Menu in green. Figure 10 CIM Configuration Menu 12 MASTERCONSOLE Z USER GUIDE Administration Menu Press F5 to view the Administrative Menu, where you can set User Station Information, Security Profile, and Preferences. Figure 11 Administrative Menu User Station Information On the Administration Menu, press the Ç or È key to highlight option 1 User Station Information and press ENTER. The User Station Information menu lists critical firmware and hardware data about the User Station. Figure 12 User Station Information Menu CHAPTER 3: OPERATION 13 User Security Profile On the Administration Menu, press the Ç or È key to highlight option 2 User Security Profile and press ENTER. Note: This feature is currently disabled. Figure 13 User Security Profile Menu User Preferences On the Administration Menu, press the Ç or È key to highlight option 3 User Preferences and press ENTER. The User Preferences Menu lets you set your personal preferences for MasterConsole Z operation. Figure 14 User Preferences Screen 1. Navigate to fields you want to edit using the Ç, È, Å, or Æ keys. 2. When you reach the field you want to edit, it is highlighted in yellow. Press ENTER to begin editing, and the highlight turns green. Use the Ç and È keys to select choices in each field, or make entries as explained below. 3. Press ENTER when finished, and the highlight turns from green to yellow. 4. Press S to save changes, and press ESC to exit System Profile Menu. 5. To exit without saving changes, press ESC and then press N or press ESC again. 14 • • • • • • • MASTERCONSOLE Z USER GUIDE Scan Mode: Press the F6 key to toggle ON scan mode. The user station can scan through all attached computer channels at a specified time interval. Global or Individual scanning is available; default scan setting is Global. When Scan Mode is activated, the word “Scan” at the bottom of the OSUI is highlighted in yellow. − Global: Scans each channel for the same amount of time, as indicated under Global Scan Rate. − Individual: Scans each channel for the specified time set per channel, as shown in Selection Menu. Individual channel scan times can be set between 03 and 30 seconds. Default is 03 seconds. Global Scan Rate: Sets the time duration for which each channel will be scanned. Use Ç and È to set duration from 03 to 30 seconds. Default rate is 03 seconds. ID Display: The ID Display is a small window that shows the computer name when switching or scanning between channels. Two fields control the display: − On/Off: Use Ç and È to toggle between on and off. − Time: Use Ç and È to increase or decrease the time period. A dashed line (- -) indicates the ID window will be shown continuously. Default setting is On/03 seconds. Green Mode (PowerSave Mode): Blackens the screen if the user console is idle for a specified time period. Two fields control Green Mode: − On/Off: Use Ç and È to toggle between on and off. − Time: Use Ç and È to increment or decrement. Default setting is Off/03 minutes. Display Position: Changes the position of the On-Screen Menu and ID Display Window. Select Menu or ID and press Enter. Use Ç, È, Å, and Æ to change the position and press S to save settings. Hot Key: Use Ç and È to select ScrollLock, CapsLock, NumLock or Left-ALT or LeftSHIFT. Default setting is ScrollLock. Pressing the Hot Key twice activates MasterConsole’s On-Screen User Interface (OSUI). Previous Channel Key: Use Ç and È to select ScrollLock, CapsLock, NumLock, LeftALT or Left-SHIFT. Default setting is NumLock. Rapidly pressing the selected Previous Channel key twice enables user to go back to previously selected computer without going through the OSUI. Note: You cannot select the same key for Previous Channel Key and Hot Key. • Scrolling Help: Use Ç and È to toggle between on and off. The message banner on your screen can display in scroll (on) or non-scroll (off) mode. Default setting is On and Scrolling. APPENDIX A: SPECIFICATIONS 15 Appendix A: Specifications MODELS DESCRIPTION MZCIM-PS2 MZCIM-USB MZCIM-SUN TER-ZCIM MODELS MZUST MZCIM for P/S2 MZCIM for USB MZCIM for SUN PRODUCT WEIGHT (LBS; KG) .5 lbs; .22 kg .5 lbs; .22 kg .5 lbs; .22 kg PRODUCT DIMENSIONS (WXDXH) 2"x 4"x 1"; 50 x 101 x 25mm 2"x 4"x 1"; 50 x 101 x 25mm 2"x 4"x 1"; 50 x 101 x 25mm ZCIM Terminator .2 lbs; .12 kg 1"x 1"x .5"; 25 x 25 x 13mm DESCRIPTION MasterConsole Z User Station PRODUCT WEIGHT (LBS; KG) 5 lbs; 2.2 kg PRODUCT DIMENSIONS (WXDXH) POWER 11.5"x 10.5"x 2"; 292 x 266 x 50mm AC Power 100V240V 47Hz-63Hz 2.8A 16 MASTERCONSOLE Z USER GUIDE APPENDIX B: TROUBLESHOOTING 17 Appendix B: Troubleshooting PROBLEM The MasterConsole Z chain is installed, but there is no indication of active computers on the Selection Menu (no green channels). SOLUTION Be sure the computers are powered ON and that the MZUST is plugged in. Ensure that the MZCIM Terminator is in place in the last MZCIM’s UTP I (IN) port. Ensure that the MasterConsole Z chain has been constructed properly with regard to the MZCIM’s I (IN) and O (OUT) UTP ports. A MasterConsole Z chain is Ensure that the MZCIM Terminator is in place in the last directly connected to a MZCIM’s UTP I (IN) port. MZUST, however, there is no indication of active computers on the Selection Menu (no green channels). I have located the second port Computer ports are organized alphabetically by assigned name, on the Selection Menu, but it is rather than in the order of their placement within the not connecting to the second MasterConsole Z chain. The second port on the Selection Menu computer in the MZCIM chain. represents the computer or port name that is second alphabetically, not second physically in the chain. The mouse and/or keyboard do Make sure all UTP cables throughout the MasterConsole Z not respond properly. system are category 5e UTP cable produced by the same cable manufacturer. The video quality that I see is If you are using long cable runs (250 feet or more), or very high blurry, or exhibits color refresh rates, be sure to use Raritan-certified UTP cabling. separation and/or ghosting. 18 MASTERCONSOLE Z USER GUIDE APPENDIX C: GLOSSARY 19 Appendix C: Glossary Active Port Port Computer Name (Port Name) Edit Menu Global Scan Rate Green Mode Hot Key ID Display Individual Scan Rate Menu Menu F Keys PowerSave Scan Scan Mode Scan Rate Selection Menu Terminator User Console A port is active when a connected device is powered on. See also Port. There are up to 64 “ports” in a MasterConsole Z configuration. A port represents the path to a certain computer on the Selection Menu. See also Active Port and Inactive Port. A label of up to 20 characters assigned by an administrator for a device connected to a MasterConsole Z port. For editing computer names and changing channel scan times Scan rate used for all ports when Scan Mode field in System Profile Menu is set to Global. See also Scan Rate. A field in System Profile Menu for toggling Video Monitor PowerSave feature on and off. For activating On-Screen Display (OSD). To activate the OSD, press the Hot Key twice rapidly -default ScrollLock. A single-line display shown on monitor to identify a port that has just been selected. Scan rate specified for each port when Scan Mode field in System Profile Menu is set to Individual. Individual per port scan rates are set in the Edit Menu. See also Scan Rate. A MasterConsole Z On-Screen Display (OSD). Function keys for On-Screen Display (OSD) menus. (F1, F2, …) Allows a properly equipped monitor to operate in energy save mode. See also Green Mode. Toggle Function key F6 for activating AutoScan. Field in System Profile Menu. Can be set to either Global or Individual. Time interval –in seconds- that a port’s computer is to remain displayed on monitor when AutoScan is activated F6. See also Global Scan Rate and Port Specific (Individual) Scan Rate. On-Screen User Display (OSD) Menu used for selecting and accessing a computer or device. RJ45 MZCIM terminating plug. To be inserted in the UTP I (in) port on the last MZCIM in the MasterConsole Z chain. Keyboard, monitor, and mouse plugged into a user port on the MZUST back panel. 20 MASTERCONSOLE Z USER GUIDE APPENDIX D: FAQS 21 Appendix D: FAQs QUESTION What is the MasterConsole Z? ANSWER MasterConsole Z, the next generation Z-Series, replaces the traditional KVM switch box with an innovative chainlike server-to-server arrangement, significantly reducing cable clutter. Small Computer Interface Modules (MZCIMs) connected to the keyboard, video, and mouse ports of each server are linked with standard Category 5e UTP cable and transmit keyboard, video, and mouse signals to a User Station. A keyboard, monitor, and mouse plug into the User Station, enabling the user to select and control up to 64 servers via simple on-screen user interface menus. How is the MasterConsole Z unique? Raritan’s innovative MasterConsole Z offers a switchless solution that enables access and control of multipleplatform servers from a single user console (keyboard, monitor, and mouse), without consuming precious rack space. MasterConsole Z employs Raritan's unique communication technology to control up to 64 servers and eliminate the traditional KVM switch box and all hard-to-manage server-to-switch cable. It is designed to support the most challenging demands of server management where space is at a premium or where systems to be accessed are up to 700 feet away via Category 5 UTP cable. What are the components of a A MasterConsole Z system consists of two components: MasterConsole Z system? the User Station (MZUST) and Computer Interface Modules (MZCIMs). MZCIMs connect to the keyboard, video, and mouse ports of each computer (PS2, USB, or SUN) and provide failsafe computer access with Raritan’s dedicated keyboard/mouse emulation. MZCIMs are linked one to the next with a single Category 5e UTP cable; the last MZCIM in the chain is linked to the User Station (MZUST). User Station – enable a user console (keyboard, mouse, and monitor) to select and control up to 64 servers via a simple, on-screen user interface. 22 QUESTION: How do MZCIMs work? How are MZCIMs designed to grow with a business? How easy is it to add servers with MZCIMs? What interfaces does the MZCIMs support? How can I find out the firmware version of my MZCIM? I connected a powered-on MZCIM to another chain and now the chain size is wrong. What happened? Keyboard and Mouse is sometimes erratic when powering up a computer. Why? How do I configure the MZCIM USB to work with either my Sun USB or PC USB machines? MASTERCONSOLE Z USER GUIDE ANSWER: Using MZCIMs in conjunction with MZUST, you can connect up to 64 MZCIMs in a ‘daisy-chain’ to your server's keyboard, video and mouse ports. These signals are compressed and sent securely over a UTP Cat5 cable. Using the MasterConsole Z User Station, an administrator has the ability to grow the chain and select between target server consoles. MZCIMs can be purchased as easy starter kits as well as individually. A system administrator can purchase only the required amount of modules necessary for their immediate needs. It's simply a matter of connecting additional MZCIMs to the additional server's keyboard, video and mouse port and connecting it into the cable daisy chain. MZCIMs provide access to multiple platforms including Sun, USB and PS2. Open a text editor window such as word pad. Hold the Left Ctrl key and press the Number pad Delete key. The current firmware version will be printed out. The MZCIM-USB will also print out the current USB keyboard settings. Press the ESC key to exit this mode. The MZCIM you added was a Master MZCIM. When it was added to the new chain, it became the Master of that chain as well. The added MZCIM resets the chain to use its’ last known chain size. The user should momentarily power off an MZCIM before adding it to a new chain to prevent this problem. The user can resize the chain to correct this issue. We suggest you do not communicate with the MZCIMs when powering up computers. This is because the powered-up MZCIM(s) are trying to obtain communication addresses from the Master MZCIM. This could increase the chance of data collision. The potential for missed keystrokes and erratic mouse behavior increases as the rate of data collision increases. Generally, you will see slow keyboard/mouse performance instead of dropped keyboard and mouse packets. If the Master MZCIM loses power, the user may be switched off from the MZCIM. There is a toggle switch on the MZCIM-USB. This switch can be changed to support either SUN USB machines or PC USB machines. APPENDIX D: FAQS 23 QUESTION: Can ZU42 CIMs work with MZCIMs? ANSWER: No. MZCIMs use a different protocol, which is not compatible with ZU42. Can MZCIMs be used with ZU42 USTS? No. MZCIMs use a different protocol, which is not compatible with ZU42. I don't want to use the Scroll Lock key as my The hot key can be easily changed to the hot key. What are my options? Num Lock or Caps Lock, or other keys. When in hot-key mode, touch the desired new hot-key activator followed by the enter key. Is there a way to find the Master MZCIM in a Yes, the MZCIMs LED status can be used to chain? detect the MZCIMs states. If the LED is blinking at a regulated, moderate speed (i.e., every half second), the MZCIM is acting as Master of the chain. Please read the LED Status section of the user manual for more information. My MZCIM chain disappeared when I turned The Master MZCIM may have been turned off a computer and it reappeared 20 seconds off. If this is the case then a new MZCIM later. What happened? became the Master and the database had to be rebuilt. This is normal operation. I only see some of my MZCIMs. What is going This can happen for a variety of reasons. on? Below are some common fixes for this issue. 1. Wait a couple of minutes. The Master MZCIM may need some time to react due to Resizing, Communication Address conflicts, Multiple Masters, etc... 2. Make sure that all the MZCIMs in the chain have power. 3. Check all the cables. 4. Make sure the terminator is in place. 5. Are there any MZCIMs in the chain, which do not have Communication Addresses? MZCIMs without Communication addresses will beep once every minute. The LED will flash on and off rapidly. If this is the case, check the Chain Size. Resize if necessary. I can’t see all of the MZCIM names, but the If you wait a few minutes, usually the chain status seems correct. How can I fix this? will fix itself. It took a while for the MZCIM to be reported Due to the occurrence of Data Collision, a as OFF. Why? MZCIM status must be checked 3 times to determine whether or not it is off. The detection can be quicker if the size of the chain is roughly proportional to the number of MZCIMs in the chain. Resize the chain to optimize the performance. 24 QUESTION: I disconnected a complete MZCIM chain from the UMT and added it to the tail of another MZCIM chain. I was finally able to see all the MZCIMs but it took almost a minute. What happened? I have a MZZCIM that is beeping every 30-40 seconds. Also, I noticed that the LED is blinking very rapidly. Why is this happening? The MZCIM beeps when it first receives power. Why? My mouse seems to be erratic and jumps around opening windows. What's happening? MASTERCONSOLE Z USER GUIDE ANSWER: Prior to connecting the chains, you had one Master per chain. There only can be one Master per chain. When you connected the chain, there were suddenly 2 Masters in the chain. It took a while for this condition to clear. This is normal operation. A MZCIM will beep once every minute to notify the user that it did not get a Communication Address. The user should check to make sure that the number of MZCIMs has not exceeded the Chain size. If the size is correct, the problem should disappear after a couple of minutes. If not, check again to make sure the chain size is correct. The beeping MZCIM will increase the Communication Address Request delay to 40-55 seconds. The data collision introduced by continued Communication Address requests should not affect keyboard and mouse functionality, however if there are many units which can not get Communication Addresses it might cause slower keyboard and mouse response. Beeping MZCIMs can also occur if the 2 chains are connected together to make one chain. This is normal operation. The beep notifies the user that the MZCIM has powered up correctly. There is a possibility that the proper mouse driver is not loaded or the mouse is not recognized. Check to make sure the mouse driver is correct for the mouse type you are using. APPENDIX D: FAQS 25 UTP Cabling FAQs Cat5 / Cat5e / Cat6 Cabling FAQ QUESTION: ANSWER: What UTP cable does Raritan certifies the following Category 5e UTP and Category 6 Raritan recommend for use UTP cable products for use with its family of industry-leading data with Paragon, Paragon center solutions Ready, MasterConsole II, Use of non-certified cabling can and will result in video and data and Cat5 Reach products? degradations that users may find unsatisfactory. Certified Raritan cable products listed above are widely available and competitively priced. When using certified cable, users can transmit video signals at distances up to 700 feet at 1024x768 @75Hz; and up to 500 feet at 1600x1200 @75Hz. Can I use plain Cat 5 Yes, however, you may not get the same performance as you would cable, instead of Cat 5e? with Raritan certified Category 5e UTP or Category 6 UTP cables. Standard Category 5 UTP cable may not have the necessary characteristics for transmitting high-quality video over long distances. Can I use standard No. Standard Ethernet cable does not have the necessary bandwidth Ethernet (10BASE-T) characteristics for transmitting high-quality video over long cable? distances. Can I use non-certified Cat Yes, however, you may not get the same performance as you would 5e cable? with Raritan certified Category 5e UTP or Category 6 UTP cables. Using non-certified Category 5e UTP cable with Raritan products results in degraded video performance ranging from mildly irritating to severely unusable. The only occasion when a non-certified cable may be used with Raritan products without negative effects on system usability is when the total cable distance between any user console and any connected device is less than 300 feet. Because cable products certified by Raritan do not cost more than competing cable offerings, Raritan strongly recommends that users utilize Raritan certified cables for maximum performance with Raritan product applications. Can I use Cat 6 cable? Yes. Currently only one Category 6 UTP cable product is Raritan certified for use with Raritan products. Raritan continues to test new Category 6 UTP cabling products as they are released to the market. However, at the present time, no Category 6 standard currently exists; all products currently available in the marketplace claiming to be Category 6 UTP cable actually conform to a proposed standard, not an established one. As a result, great variation in cable types and performance exist. What happens if I do not Cable products that are not specifically certified by Raritan will use Raritan certified cable? likely cause your video to look blurry; in particular if the video signal is of high-resolution, or if the video signal must be transmitted over long distances. Furthermore, LCD monitors can become unusable 26 QUESTION: Cat 5e is standardized. Why can’t I simply use any Cat 5e cable with Raritan products? MASTERCONSOLE Z USER GUIDE ANSWER: Because the intended application of UTP cabling is the transmission of digital data, cable specifications are optimized for that application. However, because video data is by its very nature analog, Raritan’s exclusive technology – which enables such highbandwidth video information to be transmitted over relatively thinly-shielded Category 5 UTP and Category 6 UTP cables – requires even stricter tolerances for certain cable properties. One particular UTP cable characteristic has a large impact on how well your Raritan system performs: delay skew. UTP cabling consists of four “twisted pairs” of wire, each carrying one set of data. In order to minimize cross-interference between the pairs, each pair must be twisted at slightly different rates (twists/foot). Over long lengths of cable, however, slight differences in twist rates results in measurably different rates of data transmission among each twisted pair. The arrival time delta is called “delay skew.” How does this affect your Raritan solution? Raritan products send red, green, and blue video information each over a different twisted pair; if that information does not arrive at the same time, observed video will be blurry. Raritan’s unique algorithms correct for this behavior, but physical limitations create upper limits to the success of any algorithm. The TIA/EIA specification for delay skew tolerance is 45 nanoseconds for Category 5 UTP and Category 5e UTP cable. However, in analog video applications, a delay skew longer than 15 nanoseconds usually results in inadequate video performance at high resolutions (XGA and higher).Raritan-certified cable products happen to surpass the acceptable tolerances of the TIA/EIA’s specification for delay skew, and hence are best suited for connecting Raritan components. Are there special pin out Yes. requirements that I must use? APPENDIX D: FAQS 255-33-1200 27 World Headquarters Raritan Korea European Headquarters Raritan Computer, Inc. 400 Cottontail Lane Somerset, NJ 08873 USA Tel. (732) 764-8886 Fax. (732) 764-8887 Email: [email protected] www.raritan.com Raritan Computer Korea Inc. #3602, Trade Tower, World Trade Center Samsung-dong, Kangnam-gu Seoul, Korea Tel. (82) 2 557-8730 Fax. (82) 2 557-8733 Email: [email protected] http://www.raritan.co.ko Raritan Computer Europe, B.V. Eglantierbaan 16 2908 LV Capelle aan den IJssel The Netherlands Tel. (31) 10-284-4040 Fax. (31) 10-284-4049 Email: [email protected] Raritan OEM Division Raritan Computer Japan, Inc. Peppercon USA, Inc. 111 E. Wacker Dr, Suite 2626 Chicago, IL 60601 Tel. (847) 466-1392 Fax. (312) 729-1375 Email: [email protected] www.peppercon.com 4th Floor, Shinkawa NS Building 1-26-2 Shinkawa, Chuo-ku, Tokyo 1040033 Tel. (81) 03-3523-5991 Fax. (81) 03-3523-5992 Email: [email protected] http://www.raritan.co.jp Asia Pacific Headquarters Raritan Computer Taiwan, Inc. 5F, 121 , Lane 235 , Pao-Chiao Road, Hsin Tien Taipei, Taiwan, ROC Tel. (886) 2 8919-1333 Fax. (886) 2 8919-1338 Email: [email protected] http://www.rcit.com.tw Raritan China Offices Shanghai Representative Office of Raritan Computer, Inc. Rm 17E Cross Region Plaza 899 Lingling Rd., Shanghai, China (200030) Tel. (86) 21 5425-2499 Fax. (86) 21 5425-3992 Email: [email protected] http://www.raritan.china.cn Guangzhou Representative Office of Raritan Computer, Inc. 1205/F, Metro Plaza 183 Tian He Bei Road Guangzhou (510075), China Raritan Tel. (86-20)8755 5581 Fax. (86-20)8755 5571 Email: [email protected] http://www.raritan.com.cn http://www.raritan.fr http://www.raritan.de Raritan Computer Japan Osaka Office Honmachi Phoenix Bldg 8F 1-15-8 Nishihonmachi Nishi-ku Osaka, Japan 550-0005 Tel. (81) (6) 4391-7752 Fax. (81) (6) 4391-7761 http://www.raritan.co.jp Raritan Computer France 120 Rue Jean Jaures 92300 Levallois-Perret, France Tel. (33) 14-756-2039 Fax. (33) 14-756-2061 Email: [email protected] Web: http://www.raritan.fr Raritan Computer Deutschland GmbH Lichtstraße 2 D-45127 Essen, Germany Tel. (49) 201-747-98-0 Fax. (49) 201-747-98-50 Email: [email protected] Web: http://www.raritan.de Raritan Australia Level 2, 448 St Kilda Road, Melbourne, VIC3004 Australia Tel. (61) 3 9866-6887 Fax. (61) 3 9866-7706 Email: [email protected] www.raritan.com Raritan Computer Italia Via dei Piatti 4 20123 Milan Italy Tel. (39) 02-454-76813 Fax. (39) 02-861-749 Email: [email protected] Web: www.raritan.info Raritan Computer Taiwan Inc India Liaison Office 210 2nd Floor Orchid Square Sushant Lok 1, Block B, Mehrauli Gurgaon Rd, Gurgaon 122 002 Haryana, India Tel. (91) 124 510 7881 Fax. (91) 124 510 7880 Email: [email protected] Web: www.raritan.co.in Raritan Canada Raritan Computer Inc. 2085 Hurontario St., Suite 300 Mississauga, Ontario Canada L5A4G1 Tel. (905) 949-3650 Fax. (905) 949-3651 Email: [email protected] Web: www.raritan.com Raritan Computer U.K. Limited Beijing Representative Office of Raritan Computer, Inc. Unit 1310, Air China Plaza No.36 XiaoYun Road, Chaoyang District Beijing China (100027) Tel. (86) 10 8447-5706 Fax. (86) 10 8447-5700 Email: [email protected] Web: www.raritan.com.cn 36 Great St. Helen's London EC3A 6AP, United Kingdom Tel. (44) 20-7614-7700 Fax. (44) 20-7614-7701 Email: [email protected] Web: www.raritan.com