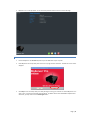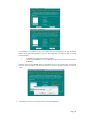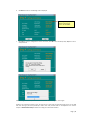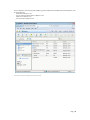
1
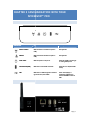
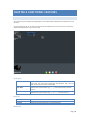
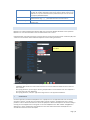
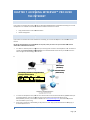
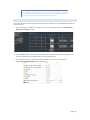
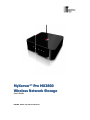
MyXerver™ Pro MX3800 Wireless Network Storage User’s Guide UNIVERSAL TECH PTE. LTD. www.universal-tech.biz TABLE OF CONTENTS Table of Contents........................................................................................................................................................................ 2 Chapter 1 INTRODUCTION .......................................................................................................................................................... 4 A. Overview .................................................................................................................................................................... 4 B. Features...................................................................................................................................................................... 4 C. Box Contents .............................................................................................................................................................. 4 D. System Requirements ................................................................................................................................................ 5 E. Technical Specifications.............................................................................................................................................. 5 F. Safe Handling Instructions.......................................................................................................................................... 5 Chapter 2 FAMILIARIZATION WITH YOUR MYXERVER™ PRO...................................................................................................... 7 A. Front Panel ................................................................................................................................................................. 7 B. Rear Panel .................................................................................................................................................................. 7 Chapter 3 BASIC INSTALLATION .................................................................................................................................................. 9 A. Installation Steps ........................................................................................................................................................ 9 B. Configuring your MyXerver™ Pro ............................................................................................................................... 9 C. Shutdown ................................................................................................................................................................. 14 Chapter 4 BASIC SETUP............................................................................................................................................................. 15 A. Wizard Setup ............................................................................................................................................................ 15 B. Ad USer..................................................................................................................................................................... 16 C. Add group................................................................................................................................................................. 16 D. Add share ................................................................................................................................................................. 16 Chapter 5 ADMINISTRATION .................................................................................................................................................... 18 A. Overview .................................................................................................................................................................. 18 B. Uses and Groups ...................................................................................................................................................... 18 C. File and print ............................................................................................................................................................ 20 D. System ...................................................................................................................................................................... 22 E. Maintenance ............................................................................................................................................................ 24 F. LOG file..................................................................................................................................................................... 25 Chapter 6 ADDITIONAL FEATURES ............................................................................................................................................ 26 A. Bonjour..................................................................................................................................................................... 26 Page | 2 B. Windows Active Directory Support .......................................................................................................................... 27 C. AjaXplorer................................................................................................................................................................. 27 Chapter 7 ACCESSING MYXERVER™ PRO OVER THE INTERNET ................................................................................................ 29 A. Overview .................................................................................................................................................................. 29 B. Making the MyXerver™ Pro available via the Internet............................................................................................. 29 C. Accessing your MyXerver™ Pro using a domain name............................................................................................. 30 Chapter 8 FREQUENTLY ASKED QUESTIONS ............................................................................................................................ 31 Limited Warranty Statement .................................................................................................................................................... 34 Page | 3 CHAPTER 1 INTRODUCTION A. OVERVIEW Thank you for selecting MyXerver™ Pro Wireless Network Storage! MyXerver™ Pro Wireless Network Storage is the ideal multimedia storage hub for your home or small-business network with both LAN cable and wireless connection. MyXerver™ Pro combines the functionality of a file server, together with a host of other value added features such as the Bit Torrent download feature which allows you do continuous download of internet content without turning on the PC, and an embedded media server, which enables streaming of audio or video to a compatible UPnP player. It is also an iTunes server, allowing music files on the network storage to be played on any PC or notebook in the network with iTunes software. Connect a USB printer*, and you are able to use the print server function to share the printer anywhere within your network. MyXerver™ Pro Network Storage is bundled with the NTI Shadow® Continuous Data Protection software for real-time automated backup of your data from your PC or Mac. *Multi-function printer not supported B. FEATURES The following features are available on MyXerver™ Pro Network Storage: Feature Web management interface Wireless Ethernet Bit Torrent Download File Server FTP Server USB Printer Server iTunes Server UPnP Server Web Server USB Direct Copy C. Benefit Access and manage MyXerver™ Pro anywhere via a web browser Share and enjoy Wireless Ethernet connectivity at home or office Do continuous download of internet contents even if your PC is not turned on Share files over the network, define user or group access rights, and disk space quota Setup FTP server, and access it from anywhere Connect a USB printer and share it in your local network Stream music from your iTunes library on MyXerver™ Pro to any notebook or PC in your local network Stream music or video to a compatible UPnP device in your local network Share your files and pictures to friends and relatives Directly copy contents from a USB storage device to MyXerver™ Pro at the touch of a button BOX CONTENTS • • • • • MyXerver™ Pro MX3800 Power Adapter Ethernet Cable Quick Start Guide Setup CD Page | 4 D. SYSTEM REQUIREMENTS Ethernet connection (router, switch) Windows XP/Vista/7 Mac OS X Tiger, Leopard, Snow Leopard Linux Web browser (IE 6.0 SP1 and later on Windows platforms, Safari 2.0 and later on Mac platforms, Firefox 2.0 and later on Windows and Mac platforms) E. TECHNICAL SPECIFICATIONS Hardware CPU Speed 300MHz RAM 128MB Flash Memory 16MB HDD 1*3.5” SATA Network 10/100/1000 Base-T, IEEE 802.11b/g USB Port 2*USB 2.0, support USB printer, disk, digital camera, thumb drive etc. LED Indicators Power, LAN, Wifi, HDD Activity, USB Power Supply External Adapter, 12V-2A Operating Environment Temperature Humidity 5-40°C 5-95% Non-Operating Environment Temperature Humidity 10-70°C 5-95% Product Dimension (mm) 178 x 178 x 50 Retail Box Dimension (mm) 220 (L) x 125 (H) x 220 (W) Software Networking File System System Tools Data Backup Management Additional Software F. TCP/IP, HTTP, FTP, NTP, CIFS/SMB, AFP, DHCP Client FAT32, NTFS, EXT2, EXT3 System firmware upgrade Email alert Backup and restore system settings Event log Continuous Data Protection with NTI Shadow® software Windows Active Directory Support Mediatomb Media Server Ajax Xplorer SAFE HANDLING INSTRUCTIONS MyXerver™ Pro Network Storage is designed to operate normally in the temperature range of 5˚C to 40˚ C, and relative humidity of 5-95%. Do not block the airflow around the drive when the drive is turned on Do not place the product in direct sunlight Incorrect handling such as dropping the drive can cause data loss and invalidates the warranty. Page | 5 Do not move or disconnect the drive while it is operating to avoid hardware damage and potential data loss. Do not stack anything on top of the drive; this can overheat and damage your drive. Do not place the product near any liquid. Liquids can damage the internal electronics. Do not attempt to open the drive’s enclosure. This action voids the warranty. Page | 6 CHAPTER 2 FAMILIARIZATION WITH YOUR MYXERVER™ PRO A. FRONT PANEL LED Indicator B. On Blinking Wireless network When this feature is enabled and system is ready Not applicable Network When connected to network and system is ready Not applicable Power switch When the system is ready to use When the system is in booting-up or shutting down process Hard Disk Drive (HDD) When there is internal HDD connected When there is a read/write HDD activity USB When there is a USB storage device mounted e.g. thumb drive, external HDD When “One Key Copy” is activated to copy data from external USB device to internal HDD REAR PANEL Page | 7 Default USB Port USB Copy Ethernet Port This button has 2 functions: IP Address Reset. If the MYXERVER™ PRO’s IP address is lost, press and hold this button for 2 seconds. The IP address will be reset to the default (DHCP client) and the system will beep once to indicate that reset has occurred. Password Reset. If the MYXERVER™ PRO administrator’s password is lost, press and hold the button for 10 seconds. The password will be cleared, and the MYXERVER™ PRO will beep twice. You can connect 2 different devices here: USB hard drive or flash drive. USB Printer (Multi-function or all-in-one printers are not supported) USB Direct Copy. If you connect a USB storage device to MyXerver™ Pro, and press the button for 2~3 seconds, the contents of the USB storage device will be copied onto MyXerver™ Pro. Use this port to connect the MYXERVER™ PRO to your router/switch/hub. Page | 8 CHAPTER 3 BASIC INSTALLATION A. 1. 2. 3. 4. 5. INSTALLATION STEPS Connect the network cable to the Ethernet port at the rear panel of MX3800. Connect the other end to your hub or switch. Connect the power adapter to a power outlet, and plug the power cord into MX3800’s power input at the rear panel. Press the power button located at front panel of MX3800. MX3800 will start a boot-up process, and the power LED will blink continuously. Boot up time is approximately 3-5 minutes. When the power LED stops blinking and remains on, boot up process is complete. B. CONFIGURING YOUR MYXERVER™ PRO Now that everything is connected and powered on, you are ready to configure your MYXERVER™ PRO so that it is accessible to the users on your network. This procedure only needs to be done ONCE, by the MyXerver™ Pro Server's Administrator. Other LAN users should follow the Client PC Setup procedure described in the following chapter. The initial configuration can be done either by using a web browser, or by Setup CD (Windows only). Use the Setup CD method if you have more than one unit of MyXerver™ Pro on your network. METHOD 1 - USING THE WEB INTERF ACE 1. 2. From web browser, type in: http://MyXerverPro or 192.168.1.100 default IP address. The login screen will be displayed. Enter user name as “admin” with password “admin”. Click on Basic, Quick Setup and follow the Wizard to setup basic configuration of MyXerverPro. There are 6 steps. Step 1: Specify the language Step 2: Set password. Default username is “admin”, password is “admin” Step 3: Set hostname. Server Name Workgroup Name Step 4: Determine Internet Protocol Setting. Obtain an IP address automatically (DHCP Client) Fixed IP Address The default name is MyXerverPro. Change this to your own preferred server name. Normally this name should match the Workgroup name used by PCs on your LAN. Select this only if your LAN has a DHCP Server which can allocate IP address automatically. You need to enter the following data: IP address: The utility will suggest an unused IP address within the address range used on your LAN. If you wish, you can change this, but you must ensure the address is unused. Network Mask: This must match the value used by PCs on your LAN. Gateway: This must match the value used by PCs on your LAN. DNS Server: This must match the value used by PCs on your LAN. Step 5: Time setting. Set the date, time and time zone of your local area. For automatic time setting and calibration, select NTP (Network Time Protocol) option Step 6: Wizard Confirmation. After setting the above parameters, click on “complete” button to implement. Page | 9 3. MyXerver™ Pro is now operational. You can view the System Information on the first screen after login. METHOD 2 - USING THE SETUP CD ( WINDOWS ONLY) 1. Insert the MyXerver™ Pro MX3800 Setup CD into your CD-ROM drive of your computer. 2. Install MyXerver™ Pro Setup Utility from CD and run the program after installation. The Welcome screen will be displayed. 3. Click Setup to start the Setup Utility. The Utility will begin scanning your network for installed MyXerver™ Pro drives, and a screen like the following will be displayed. The default Server Name of MX3800 is “MyXerverPro”. Sometimes, you may need to click on Search Again button. Page | 10 A list of MyXerver™ Pro network storage on your network will show on the left side. The right side displays details of the currently selected MyXerver™ Pro. If the desired MyXerver™ Pro network storage is not listed, check the following: • • The MX3800 has finished the start up and boot process. Your PC and the MX3800 are on the same LAN segment (there is no Router between your PC and the MX3800). Otherwise, select the desired MX3800 (default name of MyXerverPro), and click the "OK" button. The password verification screen will appear. Type the correct password to continue. The default password for admin is “admin” 4. The following screen will then be displayed. Select your desired IP configuration. Page | 11 Select this if your LAN has a DHCP Server, otherwise select “Fixed IP Address” Suggested values are compatible with your LAN. Suggested IP address is currently used. Server Name Obtain an IP address automatically (DHCP Client) Fixed IP Address 5. The default name is MyXerverPro. Change this to your own preferred server name. Select this only if your LAN has a DHCP Server which can allocate IP address automatically. You need to enter the following data: IP address: The utility will suggest an unused IP address within the address range used on your LAN. If you wish, you can change this, but you must ensure the address is unused. Network Mask: This must match the value used by PCs on your LAN. Gateway: This must match the value used by PCs on your LAN. DNS Server: This must match the value used by PCs on your LAN. Click Next to continue. The following screen will then be displayed. Specify the correct time zone, date and time. Page | 12 6. Click Next to continue. The following screen is displayed. All Settings are displayed. Please confirm they are correct, then click Save. 7. Click Save to save your configuration. On the next screen, click OK to close the Setup utility. MyXerver™ Pro is now operational. After the configuration above, all Windows users can access MX3800 with "guest" access rights. However, we recommend creating a "User" for each person on your LAN. This will provide each person on your LAN with their own login (name and password) as well as their own personal folder on the MyXerver™ Pro. See the chapter on Administration Setup for details on creating users via the web interface. Page | 13 C. SHUTDOWN To shut down MX3800, press power button for about 5 seconds. The power button LED will start blinking and wait for all LEDs to turn off. Page | 14 CHAPTER 4 BASIC SETUP A. WIZARD SETUP From web browser, type in: http://MyXerverPro or 192.168.1.100 default IP address. The login screen will be displayed. Enter user name as “admin” with password “admin”. STEPS FOR WIZARD SET UP 1. 2. Specify the language Set password. Default username is “admin”, password is “admin” 3. Set hostname 4. Server Name The default name is MyXerverPro. Change this to your own preferred server name. Workgroup Name Normally this name should match the Workgroup name used by PCs on your LAN. Determine Internet Protocol Setting. Obtain an IP automatically (DHCP Client) Fixed IP Address 5. 6. address Select this only if your LAN has a DHCP Server which can allocate IP address automatically. You need to enter the following data: IP address: The utility will suggest an unused IP address within the address range used on your LAN. If you wish, you can change this, but you must ensure the address is unused. Network Mask: This must match the value used by PCs on your LAN. Gateway: This must match the value used by PCs on your LAN. Time setting. Set the date, time and time zone of your local area. For automatic time setting and calibration, select NTP (Network Time Protocol) option Wizard Confirmation. After setting the above parameters, click on “complete” button to implement. The MyXerver™ Pro is now operational. You can view the System Information on the first screen after login. Page | 15 B. ADD USER ADD USER WIZARD 3-STEP 3 -STEP 1. 2. 3. C. Specify the user name and password. If “Create Private Folder (Share)” is checked, a new folder will be created for security and privacy. Else, if not checked, user will be restricted to public area access. Add user to a certain group and assign the user to group access right Specify the right permission either “Read Only” or “Writable” ADD GROUP This screen allows you to manage the User Groups that exist on the MyXerver™ Pro. ADD GROUP WIZARD 3-STEP 3 -STEP 1. 2. 3. D. Specify the user name and password. If “Create Private Folder (Share)” is checked, a new folder will be created for security and privacy. Else, if not checked, user will be restricted to public area access. Add user to a certain group and assign the user to group access right Specify the right permission either “Read Only” or “Writable” ADD SHARE This screen allows you to manage the Shares that exist on the MyXerver™ Pro. A "Share" is a folder (directory) on the MyXerver™ Pro that a User Group can access. Page | 16 ADD SHARE WIZARD 3-STEP 1. 2. 3. Specify the share name and path Assign user’s right to this directory Specify IP address or Subnet address to the device. If “Allow for all” is checked, there will be no restriction for all users. Page | 17 CHAPTER 5 ADMINISTRATION A. OVERVIEW This section describes the Administration configuration for Users and Groups, File and Print, System, Network Service, Maintenance and Log file. B. USERS AND GROUPS USERS MANAGEMENT Click on the Administration and User Management, all existing users will be shown in this menu. The "admin" and "guest-share" users are pre-defined, and cannot be deleted. A new user is created by filling the form and click “Save” button. To delete a specific user, select the user and click “Delete User” button. Existing Users User List This list shows all existing users. As you scroll through the list of users, details of the selected user are displayed in the "Properties" area. User Name User Name. Note that some special characters (e.g. " / \ [ ] : ; | = . , + * ? < > ' `) and 2-byte characters cannot be used in it. Page | 18 Password Verify password Description (Optional) Create Private Folder (Share) Enter the user's password in these fields. Note that 2-byte characters cannot be used in it. These fields are also used to change an existing user's password, as follows: Select the desired user Clear the existing values in the password fields. Enter the desired password in both the "Password" and "Verify Password" fields. If no password is required, leave both fields blank. Click the "Save" button. When creating a new user, enter the desired password in both of these fields. Enter a description if you wish. Note that some special characters (e.g. " \ : | , ') and 2-byte characters cannot be used in it. If creating a new user: Checking this option will create a Group and a Private Folder (Share) with the same name as the user. Read/Write access will be granted to the Share. If changing an existing user: The checkbox has no effect - it will neither create nor delete. This option is only available when creating a new user. Enable Disk Quota Enable the checkbox if you want to set the disk usage for the user, then enter the maximum amount of disk space this user is allowed to use. Note! Unless the checkbox is checked, the Disk Quota field has no effect. Save as New User Button Clear Form Button Use this Button to create a new user, after entering their data in the Properties fields. Groups Button Clicking this button will display the Groups of which the selected user is a member. You can then add this user to other Groups, or remove existing membership Use this to delete the selected user. When deleting a user, you have the option of deleting the Group and Share with the same name as the user (if they exist). Delete User Button Use this button to clear the form, preparing the form for the entry of a new user. How to modify the properties of an existing user Select the desired user from the list. Their details will be displayed in the Properties fields. Edit the Properties fields as required. Note that you cannot change the Create Private Folder (Share) option when modifying a user. Click the Save button to save your changes. How to define or modify Group membership of a user Click on the Groups button. The following screen will be displayed. This screen also allows you to add or revoke membership. User name Member of Other Groups The name of the user being modified is shown at the top of the screen The Member of column on the left shows the Groups that this user belongs to The Other Groups column on the right shows all the other Groups which may be added to the list of membership. To add membership of a Group, select the Group or Groups in the right-hand column, then click the "<<" Button. Multiple Groups can be selected by holding down the CTRL Key while selecting. To Revoke Membership of a Group. Select the Group or Groups in the left-hand column, then click the ">>" Button. Multiple Groups can be selected by holding down the CTRL Key while selecting. When finished, click the Close button. GROUP MANAGEMENT Click on the Administration and Group Management, all existing group will be shown in this menu. A new group can be created by filling the form and click “Save” button. To delete a specific group, select the user and click “Group” button. Page | 19 New Group Use this area to create a new group. Note that some special characters (e.g. " / \ [ ] : ; | = . , + * ? < > ' ` $ % @) and 2-byte characters cannot be used in Group Name. This shows the list of all Groups. “guest-share” - always exist. This group cannot be deleted. Existing Groups Create Button Use this Button to create a new Group. Enter the desired name for the new Group in the "Name" field, and then click this button. Clicking this will reset selection in Group list Clear Form Button Members Button Delete Group Button C. Clicking this will display the users who are members of the selected Group. You can then add or delete members. Click this Button to Delete the selected Group. Note: The "guest-share" Groups cannot be deleted FILE AND PRINT FILE SERVER File Server Setting Character Set Enable You can change select the language used by FTP and Samba Server To select enable/disable the file server function Description This should match the "Workgroup Name" on your PCs. If the Workgroup name does not match, access to the MYXERVER™ PRO is still possible, but the MYXERVER™ PRO will not appear when you click the "Browse Network" button (for example, when adding a Network Printer) Enter a brief description of the MYXERVER™ PRO (e.g. the location of the MYXERVER™ PRO). Save This button is to save the configurations Workgroup Name Note: Some special characters (e.g. " / \ [ ] : ; | = . , + * ? < > ' ` ( ) # $ %) and 2-byte characters cannot be used in these fields. SHARE MANAGEMENT Click on the Administration and Users and Groups button to reach the following screen. All existing users will be shown in this menu. The "admin" and "guest-share" users are pre-defined, and cannot be deleted. Shares Management Share List All existing shares are listed. When an existing Share is selected in the list of Shares, its details are displayed in the "Share Properties" area. Properties Name Comment (Optional) Location The current name will be displayed. The Share Name can be changed if you wish. This does not change the name of the folder (directory) associated with the Share. Share Name can support up to 20 bytes. If the MYXERVER™ PRO need support Win95/98/NT, the length should be shorter than or equal to 12 bytes. Note that some special characters (e.g. " / \ [ ] : ; | = . , + * ? < > ' ` $ % @) and 2-byte characters cannot be used in it. Change or enter a comment if you wish. Note that some special characters (e.g. " \ : , | ') and 2-byte characters cannot be used in it. The Location associated with the Share. Note that once a Share is created, its location cannot be changed.. Default Folder: If this is selected, the share will be created in the root directory. Specified: If this is selected, you can define the folder where you want the share. If the folder does not exist, it will be created. Note that special characters (e.g. " \ : * ? < > | ' `) cannot be used in it. Page | 20 Access Button Delete Button Save as New Share Button Clear Form Button Save Button Click this Button to view the Groups that have access to the selected Share, and change these access rights as required. Click this Button to Delete the selected Share. Deleting a Share does NOT delete its folder or any data. The folder and its data is still accessible by the "administrators" group. After entering the required data in the "Share Properties" area, use this Button to create a new Share. Clear the form, preparing it for the creation of a new Share. Use this Button change the properties of a Share, as follows: Select the desired Share in the Share list. Its details will be displayed in the "Share Properties" area. Change the Share properties as required. Note that you can NOT change the location. Click the "Save" button to save your changes. SHARES-ACCESS SCREEN The screen is displayed when you click the Access button on the Shares screen. This screen allows you to view and modify the Groups that can access this Share. Note: The administrators group ALWAYS has R/W access to ALL shares. Share Name Groups with Access Other Groups The name of the Share being modified is shown above the 2 lists of Groups. The "Groups with Access" column on the left shows that group can currently access this Share. The type of access is shown in brackets. (R = Read Only, R/W = Read-Write). Note: The "administrators" Group has R/W access to ALL shares. The "Other Groups" column on the right shows all other Groups on the current Disk Drive. These Groups cannot access the current Share. To Add Access Rights: Select the Group or Groups in the right-hand column, and then click the "<< Read Access" to provide Read-Only access, or the "<< R/W Access" Button to provide ReadWrite access. Multiple Groups can be selected by holding down the CTRL Key while selecting. To Remove Access Rights Select the Group or Groups in the left-hand column, then click the "No Access >>" Button. Multiple Groups can be selected by holding down the CTRL Key while selecting. PRINTER SERVER Print Server Enable Print Server Printer Name Description (optional) If enabled, the MyXerver™ Pro can be functioned as Print Server. User can print from any computer either with LAN or wifi connection from any computer connected to the same local network. Multi-function or all-in-one printers are not supported. Specify one name of the printer that is attached to MyXerver™ Pro USB port. After you plug one printer into one USB port, the Printer Name will occur in Network Neighborhood and you can click it to install the Printer Server Enter a description such as the location or the owner Page | 21 D. SYSTEM LAN Setting Obtain IP Address automatically (DHCP Client) Fixed IP Address Save Button Do NOT select this unless you have a DHCP Server on your LAN. A DHCP Server can provide an IP Address to PCs and other devices when they boot. Select this if your LAN does not have a DHCP Server, and enter the following data. IP Address: The IP Address must be unused, and compatible with the PCs on your LAN. Network Mask: Enter the same Network Mask (Subnet Mask) used by PCs on your LAN. Gateway: If your LAN has a Router or Gateway, enter its IP Address here. Otherwise, leave this blank. Click this button to save the settings on the page. Wireless Settings Wireless Enable SSID Hide SSID Country/Region Channel Wireless Mode Transmit Rate Authentication Mode Encryption Type Select this box to enable wireless function Enter the SSID or network name To hide SSID broadcast to other wireless devices Choose the country/region where MyXerver™ Pro is installed Select the channel of your network (1-11) Select one of these choice: IEEE 802.11b, IEEE 802.11g or IEEE 802.11 b/g Select either fixed transmit rate of auto adjust transmit rate MX3800 provides 3 types of wireless authentication: WEP, WPA-PSK, and WPA. Details are below. Select WEP mode to enable the encryption. WEP (Wired Equivalent Privacy) is a method of encrypting data for wireless communication intended to provide the same level of privacy as a wired network. To gain access to a WEP network, user must know the key. The key is a string of characters that you create. MX3800 Wireless Authentication Mode: WEP (Wired Equivalent Privacy) is a method of encrypting data for wireless communication intended to provide the same level of privacy as a wired network. To gain access to a WEP network, you must know the key. The key is a string of characters that you create. When using WEP, you must determine the level of encryption. The type of encryption determines the key length. 128-bit encryption requires a longer key than 64-bit encryption. Keys are a string in HEX (hexadecimal - using characters 0-9, A-F) or ASCII (American Standard Code for Information Interchange – alphanumeric characters) format. ASCII format is provided so you can enter a string that is easier to remember. The ASCII string is converted to HEX for use over the network. Four keys can be provided to accommodate easy changes. Example: 64-bit hexadecimal keys are exactly 10 characters in length. (12345678FA is a valid string of 10 characters for 64-bit encryption) 128-bit hexadecimal keys are exactly 26 characters in length. (456FBCDF123400122225271730 is a valid string of 26 characters for 128-bit encryption) 64-bit ASCII keys are exactly 5 characters in length (DMODE is a valid string of 5 characters for 64-bit encryption) 128-bit ASCII keys are exactly 13 characters in length (2002HALOSWIN1 is a valid string of 13 characters for 128-bit encryption) WPA-PSK (Wi-Fi Protected Access - Pre-Shared Key) is a Wi-Fi standard that was designed to improve upon the security features of WEP (Wired Equivalent Privacy). WPA has improved data encryption through the Temporal Key Integrity Protocol (TKIP). TKIP scrambles the keys using a hashing algorithm and, by adding an integrity checking feature, ensures that the keys haven’t been tampered with. The key or passphrase is an alpha-numeric password between 8 and 63 characters long. The Page | 22 passphrase can include symbols (!?*&_) and spaces. Make sure you enter this key exactly the same as on your access point or wireless router. You may also enter a hexadecimal key (using characters 0-9, A-F). WPA incorporates user authentication, which is generally missing in WEP, through the extensible authentication protocol (EAP). EAP is built on a more secure public key encryption system to ensure that only authorized network users can access the network. Time Settings Time Zone Change System Date and Time as Following Date Time Select the correct time zone for your location. Check this box to update date and time. The date and time setting will not be sent to the server if this box is not checked. Enter the local date. MYXERVER™ PRO will set it own calendar according to the date you provide. Enter the local time at your location. The MYXERVER™ PRO will set its own clock according to the time you provide. Remember that this is not sent to the Server until you click "OK". Turn Off Server User can remotely restart or turn-off the nas via the web interface Disk Usage Displays the status of both the Internal and USB disks. Model Total Space Free Space Partition File System Share Total Size Free Size Model name of the disk, it's provided by the manufacturer. Total amount of the disk space. Amount of the disk space still available to users Partition number of USB disk File system used in the partition Corresponding share of the partition Total size of the partition. Free size of the partition Error Notification Send E-Mail... E-Mail Address From Address (Optional) Subject (Optional) Send Test Mail Use Specified SMTP Mail Server SMTP Mail Server SMTP Port Number Mail Server requires Authentication Account Name Password Check this to enable the sending of e-mail alerts by the MyXerver™ Pro. Alerts will be sent when there is some problem requiring the Administrator's attention. Enter from 1 to 3 E-Mail Addresses. The messages generated by the MyXerver™ Pro will be sent to these destinations. Note that special characters (e.g. " / \ [ ] : ; | = , + * ? < > ' `) cannot be used in them. Specify one E-Mail Address that appear in the "From" field of e-mail alert generated by the MYXERVER™ PRO. Usually it's helpful for e-mail alerts to avoid being filtered as junk mails. Enter the text you wish to appear in the "Subject" field of e-mail alert generated by the MYXERVER™ PRO. Note that special characters (e.g. " / \ [ ] : ; | = . , + * ? < > ' `) cannot be used in it. Send test mail to specified e-mail address to verify whether the e-mail address can be reached. You can specify one SMTP (Simple Mail Transport Protocol) server to be used to send EMail. It's optional. Specify the address of the SMTP Mail Server. Specify the port number used by SMTP server. It's 25 by default. If the SMTP Server requires a "login" in order to send mail, check it and enter your login name and password for the SMTP server. This is usually the same as the POP3 server used to receive e-mail. Meanwhile, you need specify the "From Address" as the E-Mail Address that is correlative with the Account Name. Specify the login name that is used to login the SMTP server. Specify the password that is used to login the SMTP server. Page | 23 E. MAINTENANCE The Maintenance facility allows you to format disk and upgrade the MyXerver™ Pro's firmware. Note that the MyXerver™ Pro is unavailable during the upgrade process, and all connections will be lost. The MyXerver™ Pro will reboot once the upgrade installation is completed. The procedure may take from 5 to 10 minutes . Disk Utility This utility displays device name, file system type, volume mounted, and disk mount status of both internal and external Disk installed in this MyXerver™ Pro. For a new disk, formatting is required before ready for use. Device Name The name of the NAS device Type This part shows the file system of storage device. There are FAT32, EXT2 and EXT3. It is recommended to use EXT3. Status This show if the storage devices are successfully mounted and ready to be used Encrypt Format Button Click on this box to enable 128 bits AES encryption. It required user to key in 20 characters password and format the storage device again Use this button to format the disk. This will partition and quick-format the new disk. WARNING! This will destroy any data on the disk. Once started, this process can NOT be halted or reversed Scan Button Click on this to check the device integrity Detail Button Disk Spin down time If the storage device support S.M.A.R.T, it will report the device health status Specify HDD spin down time if there is no access to this device for some time. Firmware Upgrade This displays the version number of the MyXerver™ Pro's current firmware. Upgrade You will need to locate the Firmware file. Browse Button Click this button to browse the folders on your PC and select the Firmware file (e.g. C:\downloads\ 20091210-UT-12bay-802.11bg-AD.tar.gz). Note: Implementation of this feature is Browser-dependent Other Buttons Upgrade Button Click this button to start the firmware upgrade. Save Configuration Save Button Click this button to save current MyXerver™ Pro configuration to PC. Default file name is “conifg.tar”. Restore Configuration Browse Button Click this button to browse the folders on your PC and select the Firmware file (e.g. C:\downloads\ 20091210-UT-12bay-802.11bg-AD.tar.gz). Note: Implementation of this feature is Browser-dependent Refresh Button Click to start recovering configuration. Factory Reset Factory Reset Button Click this button to restore to Factory default configuration Page | 24 F. LOG FILE This part shows the history of system usage and important events such as disk status, network connectivity, and system booting. Page | 25 CHAPTER 6 ADDITIONAL FEATURES A. BONJOUR This screen allows you to configure the settings Bonjour. Click on Administration, Network Service and Bonjour to reach this screen. If iTunes enabled, then the user can listen music that stored in the MyXerver™ Pro via iTunes client. This iTunes Server supports files with extensions .mp3, .m4a, and .m4p. iTunes Server Enable iTunes Server Server Name Content Directory If enabled, then the user can listen music that stored in the MYXERVER™ PRO via iTunes client. This iTunes Server supports files with extensions .mp3, .m4a, and .m4p. The iTunes Server uses port number 3689. Specify the name of the iTunes Server. Note that some special characters (e.g. " \ : | , ') and 2-byte characters cannot be used in it. Specify the location in which music need be served iTunes Server. Note that some special characters (e.g. " \ : * ? < > | ' `) cannot be used in it. BitTorrent Max bandwidth down Max bandwidth up Torrent file Specify the download speed Specify the upload speed Specify the torrent file with which you need download files. Media Server Page | 26 Enable Media Server Server Name Content Directory B. If enabled, the MyXerver™ Pro can be located by compatible Media Adapters, using the UPnP AV standard developed by Intel and its partners. Media content on the MyXerver™ Pro (in the Content Directories specified below) can then be accessed and played by the Media Adapters. Name of the Media Server that is displayed on client devices. Note that some special characters (e.g. " \ : | , ') and 2-byte characters cannot be used in it. Directories where the Media Server shall scan for media content is under “public/media” WINDOWS ACTIVE DIREC TORY SUPPORT MyXerver™ Pro supports Windows Active Directory (AD). User accounts from Windows AD domain can be imported to MyXerver™ Pro. This saves administrator’s time to create individual user’s account. Click Adminstration, and select File and Print, File Server options to reach the screen below. Select “JoinDomain (AD) under “mode select” to activate this feature. Reboot the MyXerver™ Pro after making this selection. Choose “JoinDomain(AD) to activate this feature Please check the following points before and after joining AD domain: - C. MYXERVER™ PRO and AD server must be with same time zone. The time difference between the two must be less than 5 minutes After joining AD domain, you must login as Domain_Name\UserName to access Network. Local users of MyXerver™ Pro cannot access the server by Network After joining AD domain, “everyone” rights will no longer work. It is not supported in AD Domain. AJAXPLORER One of the applications preisntalled into MyXerver™ Pro is Ajaxplorer 2.5.4. This application allows users to remotely access files in directory in \public from any computer with an internet connection. The default login name is “admin” password is ”admin”. Please note that the user account for AjaXplorer is different from MyXerver™ Pro account. Adding or removing users from AjaXplore will not change the user account in MyXerver™ Pro. Even “admin” in AjaXplorer is different from “admin” in MyXerverPro although both has same name. Details about how to make MyXerver™ Pro accessible from internet are in the next chapter. Page | 27 To access AjaXplorer, go to http://ip_address:8080/ ( ip_address is MyXerverPro’s WAN IP address). With AjaXplorer, users can do the followings: Upload files to MyXerver™ Pro Copy or move files between folders on MyXerver™ Pro Delete files on MyXerver™ Pro Create new files on MyXerver™ Pro * Currently there is a limitation of 16 upload files and individual file size is 2MB Page | 28 CHAPTER 7 ACCESSING MYXERVER™ PRO OVER THE INTERNET A. OVERVIEW If your LAN is connected to the Internet, typically by a Broadband Gateway/Router and Broadband modem, you can make the MyXerver™ Pro available via the Internet. Features available to Internet users include: B. Using a Web browser to view and download files. Remote management MAKING THE MYXERVER™ PRO AVAILABLE VIA THE INTERNET IN TERNET If your LAN is connected to the Internet via a Router or Gateway, you can make the MyXerver™ Pro available from the Internet. No changes to the MyXerver™ Pro configuration are required, unless you wish to use a port number other than the default value of 80 for Web connections. 1 Your Router or Gateway must be configured to pass incoming HTTP connections to the MyXerver™ Pro. This feature is normally called Port Forwarding or Virtual Servers, and is illustrated below. Please refer to your Router manual on how to configure Port Forwarding / Virtual Servers. LAN IP Address (192.168.1.1) MyXerverPro (192.168.1.100) Port Forwarding / Virtual Server settings which need to be configured on Router/Gateway Service Name HTTP 2 3 Protocol TCP Port 80 Internet IP Address (203.70.212.52) LAN IP 192.168.1.100 To connect to the MyXerver™ Pro, Internet users need to know and use the Internet IP address (public IP address) of your Router/Gateway. There are a number of ways to find out what is the Internet IP address of your Router/Gateway. One way is to connect to a website such as http://whatismyip.com/, and it will show you what internet IP address you are using. Finally, from a remote PC on the internet, you will just have to enter http://<internet IP address> from Step (2), to access the MyXerver™ Pro. NOTE ON CHANGING HTT P (WEB BROWSER) PORT NUMBER Page | 29 Default HTTP port number is 80. If you prefer to use a different port number, for example, 8080 for accessing MyXerver™ Pro using AjaXplorer, then you need to C. Specify port number “8080” on the MyXerver™ Pro System screen Specify “8080” port number on your router’s Port Forwarding/Virtual Server settings. Specify “8080” port number in your web URL address when trying to access the MyXerver™ Pro, for example “http://<internet IP address>:8080. ACCESSING YOUR MYXERVER™ PRO USING A DOMAIN NAME You may want to use a host name instead of having to specify the internet IP address, each time you connect to your MyXerver™ Pro. Moreover, most broadband Internet Service Providers (ISP) assign dynamic (changing) IP addresses, so it may not be convenient to track what is the latest internet IP address to use. When you use a Dynamic DNS Server Provider, your friends can enter your host name to connect to the MyXerver™ Pro, even if the internet IP address has been changed. Note: Your Router/Gateway must be able to support Dynamic DNS feature. Please check the router manual for more information. The following section gives a general description on how to configure and use Dynamic DNS feature. 1 Find a Dynamic DNS provider to register your domain name. Some popular Dynamic DNS providers are DynDNS and TZO. You may need to purchase the domain name. 2 Enable Dynamic DNS feature in your Router/Gateway. In a typical router you will need to setup the following: Enable the DDNS feature Specify the DDNS service provider name Enter the host name which you have registered with the dynamic DNS service provider (example: http://myhost.mydomain.net) Enter username and password provided by the DDNS service provider 3 To access the MyXerver™ Pro remotely from the internet, type http://myhost.mydomain.net. Page | 30 CHAPTER 8 FREQUENTLY ASKED QUESTIONS A. I CANNOT FIND MYXERV ER™ PRO ON THE NETWO RK USING THE MYXERVER™ PRO UTILITY B. Check that the MyXerver™ Pro is installed properly, LAN connection is OK, and Power LED is not blinking. Ensure that your PC and the MyXerver™ Pro are on the same network segment (not on different networks across a router) Ensure that your PC has the TCP/IP network protocol loaded. In Windows, this is done by using Control Panel-Network. If an entry for TCP/IP -> Network card is not listed, use Add - Protocol - Microsoft - TCP/IP to add it. You then need to select the new entry (TCP/IP -> Network card), click Properties, and configure the IP Address tab. Ensure MyXerver™ Pro has a valid IP address. If your LAN has a DHCP Server, you can select "Obtain an IP Address automatically" on the MyXerver™ Pro. Otherwise, you must select "Specify an IP Address", and enter values for IP Address and Subnet Mask. The IP Address range commonly used is 192.168.1.1 to 192.168.1.254, with a Subnet Mask of 255.255.255.0. (The MyXerver™ Pro Server's default name is myxerverpro and default IP Address is 192.168.1.100, with a Subnet Mask of 255.255.255.0). Remember that each device needs a unique IP Address, and the same Subnet Mask. An alternative way to find the MYXERVER™ PRO on the network is to use a web browser and type “http//myxerverpro”. This method is works if you have not changed the default host name of the MYXERVER™ PRO. THE MYXERVER™ PRO HAS BEEN CONFIGURED, BUT I CAN'T FIND IT IN WINDOW’S NETWORK NEIGHBORHOOD. Try out the following methods: C. In Windows, click on Start – Run. A window will pop up, asking which file/folder/internet resource to open. Type in for example \\myxerverpro or \\192.168.1.100, depending on what host name or IP address you have assigned to the MYXERVER™ PRO. If you had manually assigned an IP address to the MYXERVER™ PRO (for example, in the case where you do not have a router with DHCP server), check that your IP Address is compatible with the MYXERVER™ PRO's. This means it needs to be from the same address range (e.g. 192.168.1.1 to 192.168.1.254) and using the same Subnet Mask (e.g. 255.255.255.0). If you DO have a router, check that your Gateway IP Address is set correctly. Ask your LAN administrator for the correct value. WHEN I CLICK ON AN M YXERVER™ PRO FOLDER ICON IN NETWORK NEIGHBORHOOD, I GET PROMPTED FOR A PASSWORD. This can happen in the following situations: You have the correct logon name, and the MYXERVER™ PRO is prompting you for the password. In this case, simply enter your MYXERVER™ PRO password, or make your Windows password the same as the MYXERVER™ PRO password. The logon name you used on your PC is NOT recognized by the MYXERVER™ PRO, and was converted to guest, with guest access rights. Ask the MYXERVER™ PRO Administrator to create a user name for you. You do NOT have access permission for this share. In this case, ask the MYXERVER™ PRO Administrator to grant you access. Page | 31 Note: Windows uses the Computer name, as shown on Control Panel - Network Identification, as the default Logon Name. But you can create a new Windows logon name by merely entering a new name and password at the Logon prompt. D. HOW TO DO A DIRECT USB COPY Scenario: Sometimes you may want to quickly transfer contents from a USB flash drive to your MYXERVER™ PRO without using the computer. 1. Plug in the USB device into MyXerver™ Pro USB port. You can see your USB device status under Administration, Maintenance, Disk Utility as follows; 2. Press the COPY button for 2~3 seconds, the contents of the USB storage device will be copied into MyXerver™ Pro. During this copying process, the USB LED icon from front panel will be flashing. 3. After the data are copied over, disconnect the USB device safely. You can find the copied data under \\myxerverpro\public\backup-Date folder as shown below. Page | 32 E. HOW CAN I ADJUST DATE AND TIME SETTING To set date and time, go to Administration, System, and Time Settings If NTP Server is using some NTP sites (eg. time.nist.gov or time.windows.com), choose this default setting as None as shown below. After changing NTP Server’s default value as None, you can change the time setting. F. HOW CAN I RESTORE MYXERVER™ PRO AFTER FORMATTING THE HARD DRIVE To recover MyXerver™ Pro files after formatting the Hard Drive, follow the steps below: 1. 2. 3. 4. 5. G. Reset MyXerver™ Pro by pressing default button located at the back of the unit for 10~12 seconds, then the unit will reboot automatically. Connect MyXerver™ Pro direct to computer using network cable if you have more than 1 unit of MyXerver™ Pro Insert MyXerverPro CD into computer CDROM drive and run MX3800 Setup.exe program. Follow installation steps and select “Restore” option Reboot MyXerver™ Pro after installation HOW TO GET TECHNICAL ASSISTANT If your problem or problems are not included in this FAQ, you can get assistance by sending email to [email protected] Page | 33 LIMITED WARRANTY STATEMENT MyXerver™ Pro MX3800 Wireless Network Storage Warranty Duration Hardware: 3 years Limited Warranty Hardware Limited Warranty Universal Tech warrants that the product that you have purchased from UT is free from defects in materials or workmanship under normal use during the Limited Warranty Period. The Limited Warranty Period starts on the date of purchase. Your dated sales or delivery receipt showing the date of purchase is your proof of purchase date. Limitation of Liability If your UT hardware product fails to work as warranted above, UT’s maximum liability under this limited warranty is expressly limited to the lesser of the price you have paid for the product or the cost of repair or replacement of any hardware components that malfunction in conditions of normal use. Exclusions UT does not warrant that the operation of the product will be uninterrupted or error-free. UT is not responsible for damage that occurs as a result of your failure to follow the instructions intended for the product. This Limited Warranty does not apply to product under the following circumstances: serial number has been removed product enclosure has been opened product has been damaged or defective due to a) transportation, b) accident, misuse, abuse, water, fire, lightning or other acts of nature, c) improper or inadequate site maintenance, d) normal wear and tear, (e) software not supplied by UT. ENSURE THAT YOUR DATA IS BACKED UP PERIODICALLY. UT IS NOT RESPONSIBLE FOR DAMAGE OR LOSS OF DATA, AND IS NOT RESPONSIBLE FOR RECOVERY OF PROGRAMS OR DATA OTHER THAN THE SOFTWARE SUPPLIED BY UT WHEN THE PRODUCT IS MANUFACTURED. Page | 34