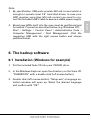
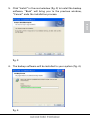
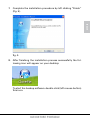
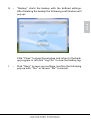
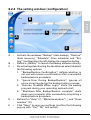
1
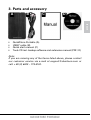
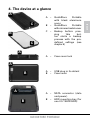
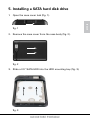
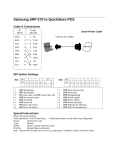
Manual
Content
1. Features
2. Specifications
4. The device at a glance
5. Installing a SATA hard disk drive
6. The backup software
6.1 Installation
6.2 The user interface
6.2.1
6.2.2
6.2.3
6.2.4
The backup window (data backup)
The restore window (data recovery)
The schedule window (time schedule)
The setting window (configuration)
QUICKSTORE PORTABLE
ENGLISH
3. Parts and accessory
Dear customer!
Congratulations for purchasing this premium quality
SHARKOON product.
For a long life time and to take full advantage of this product we
recommend that you read this manual completely.
1. Features
•
•
•
•
•
•
•
Suitable for 2.5" SATA hard disk drives (9.5 mm height)
Compact case in pocket size
Tool free assembly
Fold-out USB connector
“One Click Backup” function (only Windows)
Backup software included
No drivers needed for Windows, Mac and Linux
2. Specifications
•
•
•
•
•
External interface: Internal interface: Data transfer rate: Dimensions: Weight: USB2.0 (compatible to USB1.x)
SATA (Version I and II)
max. 480 Mbit/s
135 x 85 x 14 mm (L x W x H)
~51 g
QUICKSTORE PORTABLE
ENGLISH
Have a good time with our product!
SHARKOON Technologies GmbH
3.Parts and accessory
A
B
C
D
ENGLISH
•
•
•
•
QuickStore Portable (A)
USB Y cable (B)
Quick start manual (C)
Tools CD incl. backup software and extensive manual (PDF / D)
Note:
If you are missing any of the items listed above, please contact
our customer service via e-mail at [email protected] or
call: + 49 (0) 6403 – 775 6100.
QUICKSTORE PORTABLE
4. The device at a glance
A
B
C
QuickStore
Portable
with black aluminum
cover
QuickStore
Portable
with mirrored metal cover
Backup button: pressing
this
button starts a backup
process with the predefined settings (see
chapter 6)
A
A – Case cover lock
A
B
A
B
A – USB plug in its detent
B – Case cover
A –
B –
SATA connector (data
and power)
HDD mounting bay (for
one 2.5"-SATA HDD)
QUICKSTORE PORTABLE
ENGLISH
C
A –
B –
C –
5. Installing a SATA hard disk drive
1. Open the case cover lock (fig. 1).
ENGLISH
fig. 1
2. Remove the case cover from the case body (fig. 2).
fig. 2
3. Slide a 2.5“ SATA HDD into the HDD mounting bay (fig. 3).
fig. 3
QUICKSTORE PORTABLE
4. Place the case cover back onto the case body (fig. 4).
ENGLISH
fig. 4
5. Close the lock (fig. 5).
fig. 5
6. Fold-out the USB plug from its detent (fig. 6) and connect it
to a USB connector of your PC/laptop.
fig. 6
7. The QuickStore Portable will automatically be recognized by
the operating system and all required drivers will be in stalled. The device is now ready.
QUICKSTORE PORTABLE
Note:
1. By specification USB ports provide 500 mA current which is
enough to operate most 2.5" hard disk drives. In case your
HDD requires more than 500 mA current you need to con nect the included USB Y cable to assure a stable power supply.
Brand new HDDs built into the case must be partitioned and
formatted. Proceed as described below (e.g. Windows XP):
Start / Settings / Control Panel / Administrative Tools /
Computer Management / Disk Management. Click the
respective HDD with the right mouse button and choose
partition/format.
6.The backup software
6.1 Installation (Windows for example)
1. Put the included Tools CD into your CD/DVD drive.
2. In the Windows Explorer open the directory on the Tools CD
“SHARKOON” with a double click (left mouse button).
3. Double click (left mouse button) “Setup.exe”, a language se lection window will open up. Select the desired language
and confirm with “OK”.
QUICKSTORE PORTABLE
ENGLISH
2. The installation routine will commence (fig. 1).
fig. 1
ENGLISH
4. Confirm the copyright note in the next window (fig. 2) with
“Next” or “Cancel” the installation process.
fig. 2
QUICKSTORE PORTABLE
5. Click “Install” in the next window (fig. 3) to install the backup
software. “Back” will bring you to the previous window,
“Cancel” ends the installation process.
ENGLISH
fig. 3
6. The backup software will be installed to your system (fig. 4).
fig. 4
QUICKSTORE PORTABLE
7. Complete the installation procedure by left clicking “Finish”
(fig. 5).
ENGLISH
fig. 5
8. After finishing the installation process successfully the fol lowing icon will appear on your desktop:
To start the backup software double click (left mouse button)
this icon.
QUICKSTORE PORTABLE
6.2 The user interface
6.2.1 The backup window (data backup)
D
E
C
A
G
H
A –
B –
C –
D –
E –
F –
G –
ENGLISH
B
F
I
Activate the windows “Backup” (data backup), “Restore”
(data recovery), “Schedule” (time schedule) and “Setting” (configuration) by left clicking the respective button.
Source directory for data backup.
Box displaying the source directory’s content. Activating
the check boxes adds the folder(s) to the backup schedule, deactivating the check boxes will exclude the
folder(s) from the backup schedule.
Buttons for “Help” (?), “Minimize window” (_) and “Close
window” (X).
Target directory for data backup.
Info showing remaining and total size of the backup files.
Backup mode:
“Only backup modified files“ includes only files which
have been changed since the last backup;
“Delete the destination file“ erases files inside the target
directory which are no longer present in the source directory.
QUICKSTORE PORTABLE
H – “Backup“ starts the backup with the defined settings.
After finishing the backup the following confirmation will
pop up:
ENGLISH
Click “Close“ to close this window and return to the backup program or left click “Log File“ to view the backup log.
I – Click “Save“ to save your settings (confirm the following
pop-up with “Yes” or choose “No” to cancel).
QUICKSTORE PORTABLE
6.2.2 The restore window (data recovery)
E
D
B
F
ENGLISH
A
C
G
A –
B –
C –
D –
E – F –
G –
Activate the windows “Backup” (data backup), “Restore”
(data recovery), “Schedule” (time schedule) and “Setting” (configuration) by left clicking the respective button.
Source directory for data recovery.
Box displaying the content of the selected directory. Activating the check boxes adds the folder(s) to the restore
schedule, deactivating the check boxes will exclude the
folder(s) from the restore schedule.
Activate/Deactivate the option „Only restore modified
files“ to only recover files that have been changed in the
meantime.
Buttons for “Help” (?), “Minimize window” (_) and “Close
window” (X).
Select “Restore to original path“ (keeping the original
folder structure) or “Restore to user defined path“ (using
a custom path).
Click „Restore“ to commence the restore procedure or
“Save“ to save your settings (confirm the following popup with “Yes”, “No” to cancel).
QUICKSTORE PORTABLE
6.2.3 The schedule window (time schedule)
C
B
D
ENGLISH
A
E
A –
B –
C –
D –
E –
Activate the windows “Backup” (data backup), “Restore”
(data recovery), “Schedule” (time schedule) and “Setting” (configuration) by left clicking the respective button.
Left clicking the respective calendar date defines a special day to backup your data. Selected calendar dates are
marked in blue, red marks the current day.
Buttons for “Help” (?), “Minimize window” (_) and “Close
window” (X).
Decide whether the backup shall be performed daily,
weekly or monthly. If you do not want to define a recurring date choose “None“.
Click “Save“ to save your settings (confirm the following
pop-up with “Yes”, “No” will cancel).
QUICKSTORE PORTABLE
6.2.4 The setting window (configuration)
D
B
ENGLISH
C
A
E
A – Activate the windows “Backup” (data backup), “Restore”
(data recovery), “Schedule” (time schedule) and “Set ting” (configuration) by left clicking the respective button.
B – Define a „HotKey“ to launch the backup software directly.
C – By activating/deactivating the check boxes select/deselect
the following options:
1. “Backup/Restore Confirmation“: defines whether or
not you will receive a confirmation after a successful
backup/restore procedure;
2. “Ignore Error During Backup/Restore“: ignores all
errors occurring during the backup/restore process;
3. “Autorun CloneMe When Login“ starts the backup
program during your operating system’s start;
4. “Shutdown After Backup/Restore complete“ shuts
down your computer after successfully completing a
backup/restore procedure.
D – Buttons for “Help” (?), “Minimize window” (_) and “Close
window” (X).
E – Click “Save“ to save your settings (confirm the following
pop-up with “Yes”, “No” will cancel).
QUICKSTORE PORTABLE
Warning:
For potential loss of data, especially due to inappropriate handling, SHARKOON assumes no liability.
As a continuing policy of product improvement at SHARKOON, the
design and specifications are subject to change without prior notice.
National product specifications may vary.
The legal rights of the enclosed software belong to the respective
owner. Please observe the license terms of the manufacturer
before using the software.
All rights reserved especially (also in extracts) for translation,
reprinting, reproduction by copying or other technical means.
Infringements will lead to compensation.
All rights reserved especially in case of assignation of patent
or utility patent. Means of delivery and technical modifications
reserved.
QUICKSTORE PORTABLE
ENGLISH
All named products and descriptions are trademarks and/or
registered trademarks of the respective manufacturers and are
accepted as protected.
Disposal of your old product
ENGLISH
Your product is designed and manufactured with high quality
materials and components, which can be recycled and reused.
When this crossed-out wheeled bin symbol is attached to a
product, it means the product is covered by the European Directive 2002/96/EC.
Please be informed about the local separate collection system
for electrical and electronic products.
Please act according to your local rules and do not dispose
of your old products with your normal household waste. The
correct disposal of your old product will help prevent potential
negative consequences to the environment and human health.
© SHARKOON Technologies GmbH 2009
www.sharkoon.com
QUICKSTORE PORTABLE