1
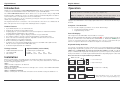
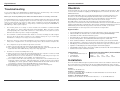
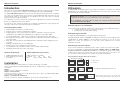
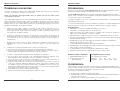
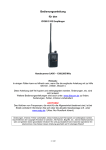
KVM Switch Classic 8
English
Deutsch
Français
Italiano
User Manual
Benutzerhandbuch
Manuel Utilisateur
Manuale d’uso
User Manual................Page 3
Benutzerhandbuch.....Page 6
Manuel Utilisateur.......Page 9
Manuale d’uso.............Page 12
LINDY No. 32519
www.LINDY.com
© LINDY ELECTRONICS LIMITED & LINDY-ELEKTRONIK GMBH - FIRST EDITION (AUG 2006)
2
English Manual
English Manual
Introduction
Operation
Thank you for purchasing the LINDY KVM Switch Classic 8. Please read this manual carefully
so that you can understand the functions and features of your new KVM Switch.
The LINDY KVM Switch Classic 8 allows direct access to up to 8 PCs using a single KVM
(Keyboard, Video, and Mouse) console. Its simple operation and functionality makes it ideal for
use in smaller server rooms with up to 8 servers or workstations.
The connected computers can be selected by pressing the front panel push buttons on the
switch or by using keyboard hotkeys.
The keyboard and mouse connections of all connected PCs and servers are emulated at all
times. This prevents error messages when switching between computers.
8 port KVM switch in a 1U, 19” rackmount size
Supports all commonly used operating systems
Hot plug support – you can add remove connected computers for maintenance without
powering down the KVM switch or the computers
Very high video quality – supports display resolutions of up to 1920x1440
No software required - easy PC selection via push buttons or keyboard hot keys
Auto scan mode for monitoring computers; adjustable scan time from 5~50 seconds
LED port display for easy status monitoring
Buzzer sound for port switching confirmation
Computers are connected via standard keyboard, mouse and VGA cables (with a female
HD-15 connector required on the KVM Switch side)
Permanent keyboard and mouse emulation
LINDY KVM Switch Classic 8
19” rackmount kit
This manual
When a computer is connected to the currently selected port and it is not
switched on, or is in sleep mode, the monitor will not display any signal.
The KVM Switch is powered by the connected servers via their PS/2 ports. A dedicated power
supply for the KVM switch is not usually required but can be connected via the DC 9V port on
the back.
Computer / Port Selection
Product Features
Package contents
Important note: Your monitor will only display one computer signal at any one time. All
keyboard and mouse commands are sent to this computer only.
Optional Cables (not included)
Combined (3-in-1) KVM Cable
Length
1m
2m
3m
5m
LINDY No. 33751 33752 33753 33754
You can select the computer you want to access in two different ways:
Front panel push button selection
Keyboard hotkey selection
Port LED Display
The front panel of the KVM Switch has two LEDs for each port.
When the upper LED labelled “ACTIVE” is illuminated RED, a computer attached to this port is
powered on. When the lower LED labelled “SELECTED” is illuminated GREEN, the KVM
console is connected to this port. If this LED flashes, the console is connected to this port but
either no computer is attached, or the attached computer is not switched on.
Keyboard Hotkey Selection
You can also conveniently select the computer to be accessed and displayed by switching ports
through simple keyboard key sequences. To send commands to the KVM switch, the “SCROLL
LOCK” key or “NUM LOCK” key must be pressed twice within 1 second. You will hear a
beep to confirm that the keyboard is in hotkey mode. If you have not pressed any further key in
hotkey mode within 1 second the keyboard will return back to Operating System control status.
Direct Port Selection / Keyboard Hot Key Commands:
Installation
Within 1 second
Before you start, please check that all parts are included according to the package contents.
If you want to install the KVM Switch in a 19” server rack please attach the 19” rackmount
brackets using the supplied screws.
Step 1
Switch off all the computers to be attached.
Step 2 – Local Console
Connect the keyboard, monitor and mouse directly to the sockets of the LINDY KVM Switch
labelled Console Port.
Step 3 – Computer connection
After the console ports are connected, connect the servers and PCs to the ports labelled 1…8.
Scroll or
Num Lock
Scroll or
Num Lock
+
+
Scroll or
or
Num Lock
Scroll or
Num Lock
+
= Lower numbered port
+
= Higher numbered port
+
key 1~8
= Select Port 1~8 directly
Auto Scan mode:
Scroll or
Num Lock
3
+
+
Scroll or
Num Lock
+
key A~F or S
= Auto Scan with A:5s, B:10s, C:15s, D:20s, E:25s,
F:30s, S:50s. (can be stopped by hitting any key)
4
English Manual
Deutsches Handbuch
Überblick
Troubleshooting
If none of the LEDs on the KVM Switch are illuminated, please check that any of the connected
computers are switched on and not in Power Save / Sleep Mode.
Before you check any further please make sure that all cables are securely connected!
If the KVM Switch reacts to keyboard input from the SCROLL LOCK key with a beep signal but
you get no monitor picture displayed, please check if the currently selected computer is in sleep
mode or powered down. You can try to wake up this computer by pressing the ESCAPE key
several times until the KVM Switch no longer beeps, and then pressing the SPACEBAR or
RETURN key to wake up the computer.
1.
The monitor picture is not sharp or shows shadows: The maximum recommended VGA
cable distance is 5 metres without ghosting and degradation. Make sure that you have
used high quality video cables with coaxial cores. If the diameter of the cable is less then
6mm then the cable may not be of high enough quality.
2.
The maximum recommended PS/2 cable distance is 5 metres. Normally, the cable length is
based on the electronic driver capacity of your computer’s PS/2 ports. If you need longer
PS/2 distances it may be necessary to use a PS/2 extender.
3.
Don’t press any keys on the keyboard while the selected computer is booting up, otherwise
it may cause a keyboard error, or the keyboard may not be detected at the computer side.
4.
The computer boots up fine, but the keyboard doesn’t work:
a) Make sure the keyboard works when directly plugged into the computer.
b) Try a different keyboard, but use standard PS/2 keyboards (some RF keyboards and
keyboards with extra multimedia keys may not be fully supported).
5.
The Mouse is not detected during PC boot up:
a) Make sure the mouse works when directly plugged into the computer. You have to install
the appropriate mouse driver on all connected computers!
b) Make sure the mouse is a true PS/2 mouse. A combo mouse will work just as long as it is
set for PS/2 mode with the correct adapter. Try a different mouse.
c) Some advanced mice like radio frequency mice, 5 button mice and scroll wheel mice use
proprietary signals and drivers. Although LINDY has carefully checked for the highest
compatibility, we cannot guarantee that the KVM Switch will work with all known mice,
especially those developed after this KVM Switch has been produced.
d) Avoid moving the mouse or pressing the mouse buttons when switching ports.
e) Avoid switching ports during the PC shut down process.
Herzlichen Dank dass Sie sich für einen KVM-Switch von LINDY entschieden haben . Bitte
lesen Sie dieses Handbuch sorgfältig um alle Möglichkeiten zu erkennen, die Ihnen dieser
KVM-Switch bietet.
Der LINDY KVM Switch Classic 8 erlaubt den Zugriff auf bis zu 8 direkt angeschlossene
Rechner von einem einzigen Eingabeplatz mit Monitor, Maus und Tastatur. Er ist das
Basismodell für 19“ KVM Systeme und kleine Serverumgebungen. Er ist nicht für die
Kaskadierung mit mehren KVM Switches und mehr als 8 Servern designt.
Die KVM Switches der P/P-XT-Serie unterstützen das Umschalten zwischen den
angeschlossenen Rechnern auf 2 Arten: Auswahl über die Tasten an der Frontblende des KVM
Switch und Auswahl über Tastaturhotkey. Die Tastatur- und Mausverbindungen werden vom
KVM Switch permanent für alle angeschlossenen Rechner emuliert, so dass keine
Fehlermeldungen von den angeschlossenen Rechnern erzeugt werden.
Eigenschaften
8 Port KVM-Switch im kompakten 19” Rackmount-Gehäuse mit nur einer Höheneinheit
Inklusive KVM Cat.5 Extender mit Local und Remote Switch (nur P-XT-Serie)
Unterstützt alle weit verbreiteten Betriebssysteme
Hot Plug Support – Anschließen und Entfernen von Rechnern im laufenden Betrieb
Höchste Videoqualität – Unterstützt Bildschirmauflösungen bis 1920x1440
Keine Softwareinstallation - Auswahl der Rechner via Hotkey oder Tasten am Switch
Auto-Scan-Modus – angeschlossene Rechner durchscannen, Zeit einstellbar 5…50 sec.
LED Displays zur überschaubaren Anzeige des Status der angeschlossenen Rechner
Signalton zur Bestätigung von Hotkey-Eingaben und Schaltvorgängen
Standardkabel zum Anschluss der Rechner (VGA Steckerbuchse HD-15F für KVM Seite!)
Permanente Tastatur- und Mausemulation
Lieferumfang
LINDY KVM Switch Classic 8
19” Einbaukit
Dies Handbuch
Optionale Anschlusskabel (nicht enthalten)
Kombi (3-in-1) KVM Kabel
Länge
1m
2m
3m
5m
LINDY No. 33751 33752 33753 33754
Installation
Bevor Sie mit dem Aufbau beginnen, prüfen Sie bitte ob alle Teile enthalten sind. Siehe hierzu
die vorstehende Liste Lieferumfang. Falls Sie den LINDY KVM Switch in einem 19“ Rack
einbauen wollen befestigen Sie bitte die 19“ Montagewinkel mit den beiliegenden Schrauben.
Schritt 1
Schalten Sie alle Geräte aus.
Schritt 2 – Lokale Konsole
Verbinden Sie Tastatur, Maus und Monitor mit dem KVM Switch an den Ports mit der
Bezeichnung Console Port.
Schritt 3 – Anschluss der Server
Schließen Sie als nächstes die Rechner and die Ports 1…8 des KVM Switch an.
5
6
Deutsches Handbuch
Deutsches Handbuch
Betrieb
Hilfe bei Problemen
Wichtiger Hinweis: Ihr Monitor zeigt immer nur ein Videosignal, das des gerade gewählten
Ports. Alle Tastatur- und Mauskommandos werden nur an den Rechner gesendet, der gerade
ausgewählt ist.
Falls ein PC nicht eingeschaltet ist oder sich in einem Energiesparmodus (Sleep Mode)
befindet, wird der Monitor kein Signal anzeigen!
Bitte beachten Sie, dass dies NICHT ein Zeichen für einen Defekt am KVM Switch ist.
Falls keine der LED Anzeigen an der Frontseite des KVM Switch leuchtet kann das Gerät
komplett defekt sein. Bitte prüfen Sie ob die angeschlossenen Server eingeschaltet und
angeschlossen sind. Schließen Sie ggf. ein Netzteil 9-12V DC an.
Der KVM Switch wird über die PS/2 Schnittstellen der angeschlossenen Server mit Strom
versorgt. Ein optionjales Netzteil DC 9V kann am Switch angeschlossen werden.
Falls der KVM Switch auf das (zweimalige) Drückern der ROLLEN- oder der NUM-Taste mit
einem Signalton reagiert und Sie dennoch kein Monitorbild erhalten, ist dies ein Hinweis darauf,
dass der ausgewählte Rechner sich in einem Energiesparmodus (Sleep Mode) befinden kann!
Versuchen Sie ihn aufzuwecken, wie sie es auch bei direktem Rechneranschluss tun würden.
Zum Beispiel durch mehrfaches Drücken der ESCAPE Taste bis der KVM Switch keine
Signaltöne mehr sendet, und dann durch Drücken der LEERTASTE.
Auswahl des aktiven Computer / Port Auswahl
Die Auswahl des aktiven und angezeigten Rechner kann auf 2 verschiedene Arten erfolgen:
o Per Taster an der Front des KVM Switch
o Über Tastaur-Hotkey-Eingabe
Bevor Sie weitere Punkte prüfen, stellen Sie bitte sicher, dass alle Kabel korrekt
angeschlossen sind und Kontakt haben.
1.
Das Monitorbild ist unscharf oder zeigt Schatten: Beachten Sie bitte die empfohlenen
maximalen Kabellängen für VGA-Anschlüsse von 5m. Stellen Sie sicher, dass Sie nur
hochwertige VGA-Kabel verwenden (haben in aller Regel einen Durchmesser größer als
6mm). Bei Verwendung von hochwertigen Grafikkarten sollten dann in nicht kaskadierten
Systemen auch 10m Kabellänge kein Problem sein. Gegebenenfalss kann ein LINDY VGA
Extender verwendet wreden.
2.
Die empfohlene maximale Kabellänge für PS/2 Anschlüsse beträgt ebenfalls 5m. Die tatsächlich mögliche Kabellänge hängt stark von der Qualität und Treiberleistung der PS/2
Schnittstellen auf dem Mainboards der angeschlossenen Rechner ab. Auch hier sollten bei
hochwertigen Komponenten 10m kein Problem sein. Verwenden Sie andernfalls einen
LINDY PS/2 Extender.
3.
Drücken Sie keine Tasten auf der Tastatur und der Maus während des Bootens der
Rechner.
4.
Der Rechner bootet korrekt, aber die Tastatur funktioniert nicht.
a. Stellen Sie sicher, dass die Tastatur bei direktem Anschluss an den PC korrekt arbeitet.
b. Versuchen Sie es mit einer anderen Standard-Tastatur (ohne Multimediatasten).
5.
Die Maus wird nicht erkannt beim Booten
a. Stellen Sie sicher, dass die Maus bei direktem Anschluss an den Rechner korrekt
arbeitet. Bitte beachten Sie, dass die Maustreiber für die verwendete Maus auf ALLEN
angeschlossenen Rechnern installiert sein müssen!
b. Stellen Sie sicher, dass die Maus eine PS/2 Maus ist. Versuchen Sie es mit einer
anderen PS/2 Standard-Maus.
c. Verschiedene Mäuse, wie manche Funkmäuse, 5-und mehr-Tasten-Mäuse verwenden
ungewöhnliche proprietäre PS/2-Bussignale. LINDY KVM Switch Classic 8 hat eine
erweiterte Kompatibilität zu solchen Nicht-Standard-Mäusen, kann aber natürlich nicht
alle am Markt befindlichen Mäuse und ihre oft proprietären Protokolle unterstützen,
besonders nicht die, die erst nach Herstellung dieses KVM Switches auf den Markt
kamen.
Bedeutung der LED Frontanzeige
Der LINDY KVM Switch Classic 8 hat für jeden Port zwei Anzeige-LEDs.
Falls die obere rote LED “ACTIVE” ROT leuchtet, ist an diesem Port ein Computer
angeschlossen und eingeschaltet. Falls die untere grüne LED “SELECTED” GRÜN leuchtet ist
dieser Port des KVM Switch gerade ausgewählt und mit der Konsole verbunden. Falls diese
LED blinkt, ist dieser Port ist ausgewählt aber entweder kein Rechner angeschlossen oder er ist
nicht eingeschaltet.
Direkte Port-Anwahl / Tastatur HotKey Kommandos:
Sie können bequem von der Tastatur aus die Ports bzw. Rechner anwählen. Dazu drücken Sie
zweimal kurz hintereinander die ROLLEN- oder die NUM LOCK-Taste. Zur Bestätigung sendet
der KVM Switch einen Signalton und versetzt die Tastatur kurzzeitig (ca. 1 Sekunde) in den
KVM-Kommandomodus. Weitere Tasteneingaben müssen dann immer kurzfristig innerhalb
einer Sekunde erfolgen.
innerhalb 1 Sekunde
Rollen
oder Num
Rollen
oder Num
+
+
+
Rollen
or
oder Num
Rollen
oder Num
+
= Nächst niederigerer Port
+
= Nächst höherer Port
+
Taste 1~8
= direkte Portanwahl: 1…..8
Auto Scan mode:
Rollen
oder Num
+
Rollen
oder Num
+
Tasten A~F
oder S
= AutoScan mit A:5s, B:10s, C:15s, D:20s, E:25s,
F:30s, S:50s. (stoppen durch irgendeinen Tastendruck)
7
8
Manuel en Français
Manuel en Français
Introduction
Utilisation
Merci d’avoir choisi le LINDY KVM Switch Classic 8. Veuillez lire soigneusement ce manuel,
pour que vous compreniez les fonctions et caractéristiques du nouveau Switch KVM.
Le LINDY KVM Switch Classic 8 permet de raccorder directement jusqu’à 8 PCs en utilisant
une seule console équipée d’une souris, clavier et écran (KVM :Keyboard, Video, Mouse). Son
fonctionnement simple le rend idéal pour une utilisation dans une salle serveur, contenant
jusqu’à 8 serveurs ou stations de travail.
Les ordinateurs connectés peuvent être sélectionnés en appuyant sur le bouton en façade du
boîtier ou en utilisant des raccourcis claviers.
La connexion souris et clavier de chaque PC est émulée continuellement, ce qui empêche des
messages d’erreurs lors du basculement entre les ordinateurs.
Caractéristiques produit
Switch KVM 8 ports, hauteur: 1U, taille 19” rack
Supporte tous les systèmes d’exploitations existants
Hot plug support – vous pouvez ajouter ou retirer les ordinateurs connectés (pour une
maintenance) sans débrancher l’alimentation des ordinateurs ou du switch KVM
Très haute qualité vidéo – supporte des résolutions d’écran allant jusqu’à 1920x1440
Aucun logiciel n’est nécessaire – sélection facile des ordinateurs via le bouton en façade ou
raccourcis clavier
Mode Auto scan pour détecter automatiquement des ordinateurs; temps réglable de 5 à 50
secondes
Affichage par LED du port en cours d’utilisation
Signal sonore pour la confirmation du basculement
Les ordinateurs sont connectés via clavier, souris et câbles VGA standard
Emulation permanente de la souris et du clavier
Contenu du package
LINDY KVM Switch Classic 8
Kit de montage pour rack 19”
Ce manuel
Câbles optionnels (non inclus)
Câble combiné (3 en 1) KVM
Longueur 1m
2m
3m
5m
Art.
33751 33752 33753 33754
Le Switch KVM est alimenté par les ports PS/2 des ordinateurs connectés. Une alimentation
optionnelle pour le switch KVM n’est généralement pas nécessaire mais peut être connectée
via la prise DC 9V en arrière du KVM.
Remarque importante: votre écran n’affichera qu’un seul afficahge à la fois. Toutes les
commandes du clavier et souris sont transférées à un seul ordinateur.
Si un ordinateur, en mode veille ou éteint, est connecté au port sélectionné,
l’écran n’affichera aucun signal.
Sélection du port / de l’ordinateur
Vous pouvez choisir l’ordinateur, auquel vous voulez avoir accès, par 2 différentes façons:
Sélection via une pression sur le bouton en façade
Sélection par raccourcis clavier (hotkey)
Affichage du port via LED
La façade du Switch KVM dispose de deux LED pour chaque port.
Si la LED “ACTIVE” s’allume en ROUGE, un ordinateur connecté à ce port est allumé. Si la LED
“SELECTED” est allumée VERT, la console KVM est connectée à ce port. Si cette LED
clignote, la console est connectée à ce port mais aucun ordinateur n’est connecté ou
l’ordinateur est éteint.
Sélection par raccourci clavier
Vous pouvez sélectionner l’ordinateur par une simple sequence de touches du clavier. Pour
envoyer les commandes au switch KVM, la touche “SCROLL LOCK” ou “NUM LOCK” doit
être pressée deux fois en moins d’1 seconde. Vous entendrez un signal sonore (un bip) pour
confirmer que le clavier est en mode hotkey. Si vous n’avez pas pressé ces touches en moins
de 1 seconde, le clavier retournera sous contrôle du système d’exploitation.
Sélection directe du port / Raccourcis clavier :
En moins d’1 seconde
Scroll ou
Num Lock
Installation
Avant de commencer, veuillez vérifier si le contenu du package est complet.
Si vous voulez installer le Switch KVM dans un rack 19”, veuillez fixer les supports 19” avec les
vis fournies.
Etape 1
Eteignez tous les ordinateurs à connecter.
Etape 2 –Console locale
Connectez le clavier, l’écran et la souris directement sur les prises du Switch KVM LINDY,
correspondant à: Console Port.
Etape 3 – Connection de l’ordinateur
Connectez ensuite les serveurs et ordinateurs vers les ports correspondant à 1…8.
9
Scroll ou
Num Lock
+
+
+
Scroll ou
or
Num Lock
Scroll ou
Num Lock
+
= Port précédent
+
= Port suivant
+
Touches
1à8
= Sélectionne directement le port 1 à 8
Mode Auto Scan:
Scroll ou
Num Lock
+
Scroll ou
Num Lock
+
Touches
A~F ou S
= Auto Scan avec A:5s, B:10s, C:15s, D:20s, E:25s,
F:30s, S:50s.(peut être arrêter en pressant une touche)
10
Manuel en Français
Manuale Italiano
Problèmes rencontrés
Introduzione
Si aucune des LED n’est allumée sur le Switch KVM, veuillez verifier que tous les ordinateurs
connectés soient allumés, et non pas en mode veille.
Avant une vérification plus approfondie, merci de vérifier que tous les câbles soient
correctement connectés!
Grazie per aver acquistato il LINDY KVM Switch Classic 8. Leggere attentamente questo
manuale per sfruttare al meglio le funzioni del Vostro nuovo Switch.
Il LINDY KVM Switch Classic 8 vi consentirà di controllare 8 PC utilizzando una singola
tastiera, mouse e monitor. La sua semplicità lo rende adatto all’utilizzo in piccolo sale server
con un massimo di 8 server / workstation.
Si le switch KVM réagit à la touche clavier SCROLL LOCK en émettent un signal sonore, mais
qu’aucun affichage n’apparait: veuillez vérifier si l’ordinateur sélectionné est en mode veille ou
éteint. Vous pouvez essayer de désactiver le mode veille en appuyant plusieurs fois la touche
ECHAP jusqu’à ce que le switch KVM n’émette plus aucun bruits, puis appuyer sur la touche
ESPACE ou RETOUR pour réactiver l’ordinateur.
Le connessioni della tastiera e del mouse di tutti i PC collegati sono emulate simultaneamente.
Questo previene messaggi d’errore durante la commutazione tra i computer collegati.
5.
L’image n’est pas claire: la distance maximum de câble VGA recommendée est de 5
mètres (sans dégradation d’image). Soyez certain que vous avez utilise des cables de
haute qualité avec un noyau coaxial. Si le diamètre du câble est inférieur à 6mm, celui-ci
ne peut pas être de qualité suffisante.
Caratteristiche
6.
La distance maximum recommendée en câble PS/2 est de 5 mètres. Normalement, la
distance du cable est basée est basée sur la puissance du signal émis des ports PS/2 de
vos ordinateurs. Si vous avez besoin de plus de distances PS/2, vous devez utiliser un
extender PS/2.
7.
N’appuyer pas sur les touches du clavier pendant que l’ordinateur sélectionné démarre,
autrement cela créera une erreur clavier, ou alors le clavier ne sera pas détecté côté
console.
8.
L’ordinateur a correctement démarré, mais le clavier ne fonctionne pas:
c) Soyez sûr que le clavier fonctionne quand il est relié directement à l’ordinateur.
d) Essayer un clavier différent et standard PS/2 (certains claviers avec liaison radio ou
touches multimédia supplémentaires peuvent ne pas être supportés).
6.
La souris n’est pas détecté pendant pendant le demurrage de l’ordinateur:
f) Soyez sûr que la souris fonctionne en la connectant directement sur l’ordinateur. Vous
devez installer les pilotes appropriés sur tous les ordinateurs connectés!
g) Soyez sûr que la souris est une vraie souris PS/2. Une souris combo fonctionnera en
mode PS/2 tant qu’elle sera raccordée au bon adaptateur PS/2.
h) Certaines souris “avancées”, comme les souris avec liaison radio, souris 5 boutons et
souris avec roulette de défilement, utilisent des signaux et des pilotes propriétaires. Bien
que LINDY a vérifié avec précaution la plus haute compatibilité, nous ne pouvons pas
garantir que le switch KVM fonctionnera avec toutes les souris connues, particulièrement
celles qui ont été développées après le switch KVM.
i) Evitez d’utiliser la souris lors du basculement de ports.
j) Evitez le basculement de ports pendant que l’ordinateur s’éteint.
I computer collegati possono essere selezionati con i pulsanti frontali o con combinazioni di tasti
inviati da tastiera (Hot Keys).
KVM Switch con 8 porte, possibilità di montaggio a rack 19”, 1U
Compatibile con la maggior parte dei sistemi operativi
Supporto Hot Plug – E’ possibile collegare e scollegare i PC senza dover spegnere il KVM
switch e di conseguenza tutti i PC ad esso collegati
Alta qualità Video – Supporta risoluzioni video fino a 1920x1440 per la console locale.
Non necessita di Software d’installazione - Selezione PC facile tramite i tasti sullo swicth o
da tastiera tramite Hot Keys
Modalità Auto Scan per il monitoraggio dei computer, possibilità di configurazione
dell’intervallo di switch da 5~50 secondi
Lo stato della tastiera è ripristinato dopo ogni commutazione
LED Display per un monitoraggio più semplice e rapido dei computer collegati e selezionati
Suono acustico ad ogni commutazione
Lo Switch utilizza solo cavi di collegamento standard (PS/2 e VGA)
Emulazione permanente del segnale tastiera e mouse su tutte le porte
Contenuto della confezione
LINDY KVM Switch Classic 8
Kit montaggio a rack 19”
Questo manuale
Cavi Opzionali (non inclusi)
Cavi combinati (3-in-1) KVM:
Lunghezza
1m
2m
3m
5m
Art. LINDY
33751 33752 33753 33754
Installazione
Prima di iniziare controllate che nella confezione siano presenti tutti le parti indicate nella
sezione “Contenuto della confezione”. Se volete installare il KVM Switch in un armadio rack 19”
montate le staffe in dotazione utilizzando le viti fornite a corredo.
Procedete poi seguendo questi passi:
a. Spegnete tutti i computer da collegare allo switch
b. Collegate tastiera, mouse e monitor direttamente alle porte del KVM Switch indicate sul
retro come “Console Port”
c. Collegate i PC e i Server alle porte indicate con i numeri da 1 a 8.
11
12
Manuale Italiano
Manuale Italiano
Utilizzo
Risoluzione dei Problemi
IMPORTANTE: Il Vostro monitor visualizzerà solo il segnale di un computer alla volta.
Tutti i comandi inviati da mouse e tastiera verranno inoltrati unicamente a quell PC.
Quando un computer è connesso alla porta attiva dello switch ma non è acceso o
è in modalità “Sospensione” sul monitor non apparirà alcun segnale.
Lo Switch è alimentato dalle porte PS/2 dei computer connessi. Normalmente non è necessario
utilizzare alcun alimentatore dedicato anche se è possibile collegarne uno alla presa a 9V
presente sul retro dello switch stesso.
Selezione della Porta / Computer
Potete seleziare il computer su cui lavorare in due differenti modi:
• Utilizzando i pulsanti sul pannello frontale dello switch
• Inviando una combinazione di tasti da tastiera (Hot Keys)
Se nessuno dei LED sul pannello frontale dello switch è illuminato controllare che almeno uno
dei PC connessi allo switch sia acceso e non in modalità Stand-by o Sospensione
Prima di procedere controllate sempre che tutti i cavi siano correttamente connessi!
Se il KVM switch reagisce alla doppia pressione del tasto BLOC SCORR sulla tastiera
emettendo un segnale acustico ma non viene visualizzato alcun segnale video controllate che il
computer attualmente selezionato non sia spento o in modalità sleep. Potete provare a
ripristinare le funzionalità del PC premendo il tasto ESC più volte fino a quando il KVM Switch
smette di emettere il beep di conferma e premendo poi la barra spaziatrice o il tasto RETURN.
1.
L’immagine a video non è nitida o presenta effetti ombra: La distanza massima
raccomandata per evitare questi difetti di visualizzazione raggiungibile con un singolo cavo
VGA è di 5m. Controllate che il cavo utilizzato sia di buona qualità: se il diametro del cavo è
minore di 6mm potrebbe essere di qualità non sufficiente a garantire una buona
trasmissione del segnale video.
2.
La distanza massima raccomandata raggiungibile con un singolo cavo PS2 è 5 metri.
Normalmente la lunghezza del cavo è data dalla capacità di pilotaggio delle porte PS/2 da
parte della scheda madre utilizzata. Se necessitate di raggiungere distanze più elevate
potrebbe essere necessario utilizzare un PS/2 Extender
3.
Non premete alcun tasto mentre il computer selezionato si sta avviando. In caso contrario
potreste incorrere in errori di tastiera che potrebbero impedire il corretto avvio del computer
stesso.
4.
Il computer si avvia correttamente ma la tastiera non funziona:
a) Controllate che la tastiera funzioni se connessa direttamente al PC.
b) Provate ad utilizzare una tastiera PS/2 differente (alcune tastiere con tasti multimediali
potrebbero non essere supportate).
5.
Il mouse non viene riconosciuto in fase avvio:
a) Controllate che il mouse funzioni se connesso direttamente al PC. Dovete installare il
driver appropriato su ciascun computer.
b) Controllate che il mouse sia un PS/2 nativo. Molti combo mouse funzionano solo se
connessi in modalità PS/2 con il proprio adattatore specifico. Provate ad utilizzare un
altro mouse.
c) Alcuni mouse con funzionalità avanzate come radio-mouse, mouse a 5 pulsanti e
particolari mouse con rotella utilizzano segnali proprietari non riconosciuti e
riproducibili dal KVM Switch. Nonostante LINDY testi la compatibilità della maggior
parte dei mouse con i propri prodotti non è possibile garantire il corretto funzionamento
di tutti i mouse presenti sul mercato (soprattutto quelli rilasciati dopo lo sviluppo dei
KVM Switch della serie P e PXT).
d) Evitare di muovere il mouse o premere i tasti del mouse stesso durante le
commutazioni dello switch.
e) Evitate di commutare durante il processo di spegnimento dei PC.
Pannello Frontale
Il pannello frontale del KVM Switch ha due LED per ogni porta.
Quando il LED superiore di colore ROSSO denominato “ACTIVE” è illuminato indica che un
computer è collegato alla porta corrispondente ed è acceso.
Quando il LED inferiore di colore VERDE denominato “SELECTED” è acceso indica che la
consolle KVM è collegata a questa porta. Se il LED lampeggia significa che la consolle è
collegata a questa porta ma nessun c’è nessun PC è collegato o acceso sulla medesima porta.
Selezione tramite tasti Hot Keys
E’ possibile selezionare velocemente il PC da utilizzare tramite una semplice sequenza di tasti
da premere sulla tastiera. Per inviare comandi al KVM Switch premere il tasto “Bloc Scorr” o
“Bloc Num” per due volte in un tempo massimo di 1 secondo. Sentirete un segnale
acustico di conferma dell’ingresso in modalità comandi. Se non premerete alcun tasto nel
secondo successivo lo switch lascerà automaticamente la modalità comandi e restituirà il
controllo della tastiera al sistema operativo del PC selezionato.
Selezione diretta della Porta / Sequenza di tasti Hot Key :
Entro 1 secondo
Bloc Num
o Scorr
Bloc Num
o Scorr
+
Bloc Num
or
o Scorr
+
+
Bloc Num
o Scorr
+
= Numero di porta precedente
+
= Numero di porta successivo
+
Tasti 1~8
= Seleziona direttamente la porta 1~8
Modalità Auto Scan:
Bloc Num
o Scorr
+
Bloc Num
o Scorr
Tasti
A~F o S
+
= Auto Scan con intervalll di A:5s, B:10s, C:15s, D:20s
E:25s F:30s, S:50s.(si interrompe premendo un tasto
qualsiasi)
13
14
Technical Data and Radio Frequency Energy
Model
KVM Switch Classic 8, No. 32519
Console (User) / Server
Ports
1/8
Console / User Ports
VGA (HD-15 female) + 2x PS/2 (MD-6 female)
PC / Server Ports
VGA (HD-15 male) + 2x PS/2 (MD-6 female)
External Power Supply
9-12VDC 0.2A min.
Operating Temperature
+5°C ... 40°C, for indoor use only
Humidity
5 bis 85% rel.H. non condensing, for indoor use only
Measurements (HXWXD),
Weight
19” 1U // 46 x 410 x 140 mm approx.
1.8kg approx.
GERMANY : WEEE / ElektroG Hinweis Deutschland:
Dies ist ein B2B Produkt. Entsprechend dem deutschen ElektroG hat der gewerbliche Endverwender dieses Gerät
zum Zweck der Verschrottung entweder der LINDY-Elektronik GmbH zum Recycling zurück zu geben (kostenlose
Rücknahme) oder es auf eigene Kosten einem geordneten Recycling zuzuführen.
Shielded cables must be used with this equipment to maintain compliance
with radio frequency energy emission regulations and ensure a suitably high
level of immunity to electromagnetic disturbances.
This device complies with EN Standards EN55022 and EN55024 according to the relevant EC EMC
Directive.
This device complies with part 15 of the FCC Rules.
Operation is subject to the following two conditions:
1.
This device may not cause harmful interference, and
2.
This device must accept any interference received, including interference that may cause
undesired operation
For Home and Office Use
Tested to comply
with FCC Standards
15
© LINDY ELECTRONICS LIMITED & LINDY-ELEKTRONIK GMBH - FIRST EDITION (AUG 2006)