1
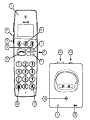
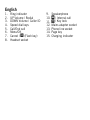
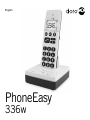
English
PhoneEasy
336w
1
6
2
3
7
4
12
8
5
13
9
10
11
14
1
15
English
.
2.
3.
.
5.
6.
7.
8.
Ring indicator
UP Volume / Redial
DOWN Volume / Caller ID
Speed dial keys
Call/End call
Menu/OK
Cancel / R (Flash key)
Headset socket
9.
0.
.
2.
3.
.
5.
Speakerphone
* / Internal call
# / Key lock
Mains adapter socket
Phone line socket
Page key
Charging indicator
English
Installation
Connecting
. Connect the telephone line cord to a network wall socket
and to the K socket on the base unit.
2. Connect the mains adapter to the wall socket and to the
y socket on the base unit.
Batteries
. Insert two AAA 1.2 V NiMH batteries into the telephone in
accordance with the markings.
2. Place the handset in the base unit with the keypad facing
forwards. Charge the telephone for 16 hours the first time.
After that, it takes approximately 5 hours to fully charge
the battery.
Note!
Full battery capacity will not be reached until the
batteries have been charged 4–5 times. Batteries
degrade over time, which means that call time and
standby time will normally decrease with regular use.
English
Operation
Making a call
Normal dialling
. Press y or
and dial the number using the keypad.
Alternately, enter the number first, press C to delete the
last entered digit, then press y.
2. Press y again to end the call.
Speed dial
. Press and hold one of the speed dial keys
number is dialled.
A or B until the
Phone book call
. Press = twice to open the phone book.
2. Use v/V to select the desired entry, or quick search
by pressing the key corresponding to the first letter (see
Keypad characters, page 5).
3. Press y or
to dial the number.
English
Answering
On incoming calls, the LED indicators on the handset and
base unit will flash and RINGING is shown on the display.
. Press y to answer normally, or
to answer using
speakerphone.
If the Auto Talk function is enabled, just pick up the handset
from the base unit to answer. See Settings/Auto Talk.
Adjusting volume
During a normal or speakerphone call, press v/V to adjust
the sound volume of the handset or speaker. The volume level
is indicated on the display.
If phone is set to BOOST MODE/AUTO, you need to press and
hold v for each increasing step.
Note!
To switch between handset/speaker press
. Please
remember that in speakerphone mode, it is only possible
for one person at a time to talk.
English
Handset display
Base unit connected
Calling
Speakerphone
New call
Alarm
Ringer off
Key lock
Battery charge
English
Keypad characters
Press each numerical key repeatedly until the desired
character is displayed, then wait a few seconds before
entering the next character.
Key
Character
1
1
2
A
B
C
2
3
D
E
F
3
4
G
H
I
4
5
J
K
L
5
6
M
N
O
6
7
P
Q
R
S
8
T
U
V
8
9
W
X
Y
Z
9
0
0
*
-
,
.
?
&
=
*
#
:
“
$
£
€
¥
#
7
English
Additional functions
Paging
Press
on the base unit to page the handset. The handset
will ring and PAGING is displayed. To cancel, press
again,
or press any key on the handset.
Key lock
Press and hold # to lock/unlock the keypad. Incoming calls
can still be answered with y when key lock is active.
Mute
During a call, press and hold = to disable/enable the
microphone.
English
Speed dial
Frequently used numbers or emergency numbers can be
stored under the two speed dial keys A and B.
. In standby mode, enter the number to be stored.
2. Press and hold speed dial key A or B to store the number.
Note!
If you replace a number, store it under the same speed
dial key as before.
Flash key (Recall)
Press the R key followed by the extension number to transfer
a call when connected to a PBX system.
Additional network services may be accessible by using the
R, * and # keys. Please contact your network operator for
more information about the available network services.
English
Settings
In standby mode, press = to open the main menu, then use
v/V and = to select and open a submenu.
Press C anytime to cancel and return to the previous menu
level, or press y to return to standby mode.
Phonebook
The phone book can store up to 25 entries. When the phone
book memory is full, MEMORY FULL is displayed.
If Caller ID service is subscribed and the phone number of
an incoming call exists in the phone book, the corresponding
name will be shown on the display.
. Use v/V to scroll the list of phone book entries.
2. Press y to call the currently displayed entry or = for
the following submenu:
English
Add new entry
. Press =. NAME is displayed.
2. Enter a name for the new entry using the numerical
keypad (see Keypad characters, page 5), then press = to
continue.
3. Enter the number, then press = to save the entry.
Edit
. Press =. NAME is displayed.
2. Edit the name and/or press = to continue.
3. Edit the number and/or press = to save the entry.
Delete record
Press = twice to delete the currently displayed entry from the
phone book.
Delete all
Press = twice to delete all entries from the phone book.
English
Call log
If Caller ID service is subscribed, the phone number of
incoming calls is shown on the display. If the identity of the
caller is withheld, BLOCKED is displayed.
The last 20 incoming answered and unanswered calls are
stored along with the date and time of the call.
. Use v/V to scroll the list of incoming calls. Press * to
display the date and time of the call.
2. Press y to call the displayed number, C to return to the
main menu, or press = for the following submenu:
Save to phonebook
Press =, enter a name for the new entry, then press = twice
to save the number in the phone book.
Delete record
Press = twice to delete the currently displayed call from the
call log.
Delete all
Press = twice to delete all calls from the call log.
10
English
Redial
The 10 last called numbers are stored in the redial memory.
If the number is already in the phone book, the corresponding
name will also be displayed.
. Use v/V to scroll the list of called numbers.
2. Press y to call the displayed entry, C to return to the
main menu, or = for the following submenu:
Save to phonebook
Press =, enter a name for the new entry, then press = twice
to save the number in the phone book.
Delete record
Press = twice to delete the currently displayed call from the
redial memory.
Delete all
Press = twice to delete all calls from the redial memory.
11
English
Alarms
Two separate alarms can be programmed.
Select Alarm 1 or Alarm 2, then press = for the following
submenu:
Set
Enter the alarm time using the numerical keypad, then press
= to confirm and enable the alarm.
Clear
Press = to disable the alarm.
Note!
Press any key to acknowledge the alarm. Remember to
CLEAR any alarm that should not be repeated.
12
English
HS Settings
Settings for the handset.
Ringer melody
10 different melodies can be selected for external and
internal calls.
. Select External Call Melody or Internal Call
Melody and press =.
2. Select a melody for the call type, then press = to confirm.
HS Ringer volume
Select LEVEL 01-05 or RINGER OFF and press =.
With RINGER OFF, the call indicator LED and the display will
still indicate incoming calls. The base unit ring signal will be
heard unless it is also disabled (see BS SETTINGS).
13
English
Date/Time settings
Date/Time
. Select DATE or TIME and press =.
2. Press = and enter the date or time using the numerical
keypad, then press = twice to confirm.
Date/Time format
. Select DATE and press =.
2. Select either MM/DD (month/day) or DD/MM (day/month)
format, then press = to confirm.
3. Select TIME and press =.
. Select 12 HR or 24 HR time format, then press = to
confirm.
Key tone
Select ON or OFF and confirm with =.
Display contrast
Use v/V to adjust the contrast of the display (brightness
of the symbols/characters) and confirm with =.
14
English
Boost mode
The maximum volume of the handset can be extended by
enabling Boost Mode.
Warning!
The maximum handset volume can be very loud with
this setting. Boost Mode should only be used by persons
with impaired hearing.
Select Off, ON or Auto and confirm with =.
When ON is selected, select LOW, MEDIUM or HIGH as
maximum volume setting and confirm with =.
Press v/V to select required volume level during a call.
The selected volume level will remain for the next call.
In AUTO mode, press and hold v during a call to select
LOW boost. Repeat to select MEDIUM and HIGH. The handset
returns to the normal volume setting when the call is ended.
Handset name
Edit the name of the handset using the numerical keypad
(see Keypad characters, page 5) and confirm with =.
An ID number is automatically added to the name.
15
English
Backlight setting
Use v/V to adjust the timeout setting for the display
backlighting from 5 to 30 seconds, and confirm with =.
Auto talk
When Auto Talk is enabled, incoming calls are answered by
picking up the handset from the base unit.
Select ON or OFF and confirm with =.
Language
Select one of the 16 available display languages and confirm
with =. ENGLISH is default.
Set default
Press = twice to restore the handset to the factory default
settings.
16
English
BS Settings
A PIN (Personal Identification Number) is needed to access
the settings for the base unit. The default PIN is 0000.
See also Change PIN below.
Base ringer melody
Select one of the five different melodies and press = to confirm.
Base ringer volume
Select LEVEL 01-05 or RINGER OFF and press =.
With RINGER OFF, the call indicator LED will still indicate
incoming calls. The handset ring signal will be heard unless it
is also disabled (see BS SETTINGS).
Change PIN
Enter a new PIN code and press =, then enter the PIN again
and confirm with =.
Dial mode
Select Tone or Pulse dialling mode and confirm with =. If
unsure about which mode to use, select Tone.
17
English
Flash time
Select Short, Medium or Long and confirm with = to set
the flash key time to respectively 100, 300 or 600 ms.
100 is the standard setting for most countries, 300 for
France and Portugal, 600 for New Zealand.
VMWI
If voice messaging services are subscribed through the
network operator, a Visual Message Waiting Indication can be
displayed when a message is received.
Press = twice to disable the indication.
Set default
Press = twice to restore the base unit to the factory default
settings.
Registration
Not used on this model.
Note!
Do not use the Registration menu as it may cause the
telephone to stop working.
18
English
Care and maintenance
Your unit is a technically advanced product and should be treated with
the greatest care. Negligence may void the warranty.
• Protect the unit from moisture. Rain/snowfall, moisture and all types
of liquid can contain substances that corrode the electronic circuits. If
the unit gets wet, you should remove the battery and allow the unit to
dry completely before you replace it.
• Do not use or keep the unit in dusty, dirty environments. The unit’s
moving parts and electronic components can be damaged.
• Do not keep the unit in warm places. High temperatures can reduce
the lifespan for electronic equipment, damage batteries and distort or
melt certain plastics.
• Do not keep the unit in cold places. When the unit warms up to
normal temperature, condensation can form on the inside which can
damage the electronic circuits.
• Do not try to open the unit in any other way than that which is indicated here.
• Do not drop the unit. Do not knock or shake it either. If it is treated
roughly the circuits and precision mechanics can be broken.
• Do not use strong chemicals to clean the unit.
The advice above applies to the unit, battery, mains adapter and other
accessories. If the telephone is not working as it should, please contact
the place of purchase for service. Don’t forget the receipt or a copy of
the invoice.
19
English
Warranty and technical data
This product is guaranteed for a period of 12 months from the date of
purchase. If you experience any problems please contact the place of
purchase. Proof of purchase is required for any service or support needed
during the guarantee period. This guarantee will not apply to a fault caused
by an accident or a similar incident or damage, liquid ingress, negligence,
abnormal usage, non-maintenance or any other circumstances on the user’s
part. Furthermore, this guarantee will not apply to any fault caused by a
thunderstorm or any other voltage fluctuations. As a matter of precaution, we
recommend disconnecting the device during a thunderstorm. Batteries are
consumables and are not included in any guarantee. This guarantee does not
apply if other batteries than original batteries have been used.
This guarantee does not in any way affect your statutory rights.
Specifications
Weight:145 g (including batteries)
Battery:
2 x 1.2 V AAA NiMH batteries
Declaration of Conformity
Doro hereby declares that Doro PhoneEasy 336w conforms to the essential requirements and other relevant regulations contained in the Directives 1999/5/EC (R&TTE) and 2002/95/EC (RoHS).
A copy of the Declaration of Conformity is available at
www.doro.com/dofc
Specific Absorption Rate (SAR)
This device meets approved international safety requirements for
exposure to radio waves.
This telephone measures 0.01 W/kg (measured over 10g tissue).
The maximum limit according to WHO is 2W/kg (measured over 10g tissue).
20
English
UK
Technical support is available by email on [email protected]
Premium rate telephone number: 0905 895 0854, calls cost
50 pence per minute (price correct at the time of publication).
You can also contact us in writing (regarding any Spares or Technical query):
Customer Services
Doro UK Ltd
1 High Street
Chalfont St Peter
Buckinghamshire
SL9 9QE
Further contact details are available on our website:
www.doro-uk.com.
21
English
Version 1.2