1
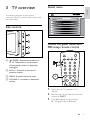
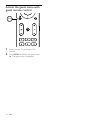
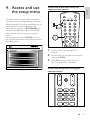
Register your product and get support at
www.philips.com/welcome
EN User manual
Contents
Clone data 25
Download software 25
4
2 Important 6
3 TV overview 9
Side controls 9
Guest menu 9
Access the guest menu with PBS setup
remote control 9
Access the guest menu with guest remote
control 10
4 Access and use the setup menu 11
Navigate the setup menu
Select a language
Select the country
Set the type of communication
Set the number of channels
Auto install, program install, and
configuration
Cloning/upgrade and healthcare
Set the clock
12
12
12
12
13
13
13
13
5 Configuration of advanced settings 15
Configure the switch-on settings
15
Configure the picture settings
18
Configure the sound settings
18
Configure the security settings
18
Configure the control options
20
Select the energy saving option 21
9 Healthcare 27
10 Connect devices 28
Back connectors 28
Side connectors 29
Use a Conditional Access Module 30
Use a Kensington lock 30
11 Product information 31
Supported display resolutions 31
Multimedia 31
Tuner/Reception/Transmission 31
Power 31
Power 31
12 Troubleshooting 32
TV power on/ off issues 32
No access to PBS setup menu 32
Picture issues 32
Sound issues 32
Communication issues 33
Guest RC does not work 33
Other issues 33
Contact us 33
13 Index 34
6 Automatically install the channels 22
7 Manually install the channels 23
Step 1: Select a program 23
Step 2: Select the type of input 23
Step 3: Select the system 23
Step 4: Select the frequency 23
Step 5: Customize the TV channels 23
Step 6: Select a ring of channels 24
EN
Eng lis h
1 Notice
8 Clone data and upgrade software 25
1 Notice
2009 © Koninklijke Philips Electronics N.V. All
rights reserved.
Specifications are subject to change without
notice. Trademarks are the property of
Koninklijke Philips Electronics N.V or their
respective owners. Philips reserves the right
to change products at any time without being
obliged to adjust earlier supplies accordingly.
The material in this manual is believed
adequate for the intended use of the system.
If the product, or its individual modules or
procedures, are used for purposes other than
those specified herein, confirmation of their
validity and suitability must be obtained. Philips
warrants that the material itself does not
infringe any United States patents. No further
warranty is expressed or implied.
Warranty
• Risk of injury, damage to TV or void of
warranty! Never attempt to repair the TV
yourself.
• Use the TV and accessories only as
intended by the manufacturer.
• The caution sign printed on the back of
the TV indicates risk of electric shock.
Never remove the TV cover. Always
contact Philips Customer Support for
service or repairs.
•
Any operation expressly prohibited in
this manual, or any adjustments and
assembly procedures not recommended
or authorised in this manual shall void the
warranty.
Pixel characteristics
This LCD product has a high number
of color pixels. Although it has effective
pixels of 99.999% or more, black dots or
EN
bright points of light (red, green or blue)
may appear constantly on the screen.
This is a structural property of the display
(within common industry standards) and
is not a malfunction.
Open source software
This television contains open source
software. Philips BU Hospitality hereby
offers to deliver or make available,
upon request, for a charge no more
than the cost of physically performing
source distribution, a complete machinereadable copy of the corresponding
source code on a medium customarily
used for software interchange.
To obtain the source code, write to:
Philips Singapore Pte Ltd.
Philips BU Hospitality
Software Development Manager
620A Lorong 1, Toa Payoh
Singapore 319762
This offer is valid for three years after the
date of purchase of this product.
Compliance with EMF
Koninklijke Philips Electronics N.V.
manufactures and sells many products
targeted at consumers, which, like
any electronic apparatus, in general
have the ability to emit and receive
electromagnetic signals.
One of Philips’ leading Business Principles
is to take all necessary health and safety
measures for our products, to comply
with all applicable legal requirements and
to stay well within the EMF standards
applicable at the time of producing the
products.
Philips is committed to develop, produce
and market products that cause no
adverse health effects. Philips confirms
that if its products are handled properly
for their intended use, they are safe
to use according to scientific evidence
available today.
Philips plays an active role in the
development of international EMF
and safety standards, enabling Philips
1
2
3
Remove fuse cover and fuse.
The replacement fuse must comply with
BS 1362 and have the ASTA approval
mark. If the fuse is lost, contact your
dealer in order to verify the correct type.
Refit the fuse cover.
In order to maintain conformity to the EMC
directive, the mains plug on this product must
not be detached from the mains cord.
Copyright
Philips Consumer Lifestyle Philips Ltd.
Assembly Centre Hungary Székesfehérvár,
Holland Fasor 6,
Hungary
This text appears in the ES_ES (Spanish
European) language only.
Insert at the end of the notice section.
--Objeto de esta declaración, cumple con la
normativa siguiente:
• Reglamento Técnico del Servicio de
Difusión de Televisión y del Servicio
Portador soporte del mismo (Real
Decreto 1160/1989) Articulo 9.2
• Reglamento sobre Perturbaciones
Radioeléctricas (Real Decreto 138/1989)
Anexo V.
Eng lis h
to anticipate further developments in
standardisation for early integration in its
products.
Mains fuse (UK only)
This TV is fitted with an approved
moulded plug. Should it become
necessary to replace the mains fuse, this
must be replaced with a fuse of the same
value as indicated on the plug (example
10A).
VESA, FDMI and the VESA Mounting Compliant
logo are trademarks of the Video Electronics
Standards Association.
® Kensington and Micro Saver are registered
US trademarks of ACCO World corporation
with issued registrations and pending
applications in other countries throughout the
world.
All other registered and unregistered
trademarks are the property of their respective
owners.
This text appears in the IT_IT (Language)
language only.
Insert at the end of the notice section.
---Dichiarazione di conformità
Si dichiara che l’apparecchio televisori a colori
(vedere indicazioni sull’etichetta nel retro della
televisione) risponde alle prescrizioni dell’art. 2
comma 1 del D.M. 28 gosto 1995 n. 548.
Fatto in Székesfehérvár, il 02 Febbraio 2009
EN
2 Important
•
Read and understand all instructions before you
use your TV. If damage is caused by failure to
follow instructions, the warranty does not apply.
Safety
•
Risk of electric shock or fire!
• Never expose the TV to rain or
water. Never place liquid containers,
such as vases, near the TV. If
liquids are spilt on or into the TV,
disconnect the TV from the power
outlet immediately. Contact Philips
Consumer Care to have the TV
checked before use.
• Never place the TV, remote control
or batteries near naked flames or
other heat sources, including direct
sunlight.
To prevent the spread of fire, keep
candles or other flames away from
the TV, remote control and batteries
at all times.
•
•
Never insert objects into the
ventilation slots or other openings on
the TV.
• When the TV is swiveled ensure that
no strain is exerted on the power
cord. Strain on the power cord can
loosen connections and cause arcing.
Risk of short circuit or fire!
• Never expose the remote control or
batteries to rain, water or excessive
heat.
• Avoid force coming onto power
plugs. Loose power plugs can cause
arcing or fire.
•
EN
•
•
Risk of injury or damage to the TV!
• Two people are required to lift and
carry a TV that weighs more than
55 lbs.
• When stand mounting the TV, use
only the supplied stand. Secure the
stand to the TV tightly. Place the
TV on a flat, level surface that can
support the combined weight of the
TV and the stand.
• When wall mounting the TV, use
only a wall mount that can support
the weight of the TV. Secure the wall
mount to a wall that can support the
combined weight of the TV and wall
mount. Koninklijke Philips Electronics
N.V. bears no responsibility for
improper wall mounting that results
in accident, injury or damage.
Risk of injury to children!Follow these
precautions to prevent the TV from
toppling over and causing injury to
children:
• Never place the TV on a surface
covered by a cloth or other material
that can be pulled away.
• Ensure that no part of the TV hangs
over the edge of the surface.
• Never place the TV on tall furniture
(such as a bookcase) without
anchoring both the furniture and TV
to the wall or a suitable support.
• Educate children about the dangers
of climbing on furniture to reach the
TV.
Risk of overheating! Never install the TV
in a confined space. Always leave a space
of at least 4 inches or 10 cm around the
TV for ventilation. Ensure curtains or
other objects never cover the ventilation
slots on the TV.
Risk of damage to the TV! Before you
connect the TV to the power outlet,
ensure that the power voltage matches
the value printed on the back of the TV.
Never connect the TV to the power
outlet if the voltage is different.
Risk of injury, fire or power cord damage!
Never place the TV or any objects on the
power cord.
• To easily disconnect the TV power cord
from the power outlet, ensure that you
have full access to the power cord at all
times.
• When you disconnect the power cord,
always pull the plug, never the cable.
• Disconnect the TV from the power
outlet and antenna before lightning
storms. During lightning storms, never
touch any part of the TV, power cord or
antenna cable.
• Risk of hearing damage! Avoid using
earphones or headphones at high
volumes or for prolonged periods of time.
• If the TV is transported in temperatures
below 5°C, unpack the TV and wait
until the TV temperature matches room
temperature before connecting the TV to
the power outlet.
This text appears in the NO_NO
(Norwegian) language only.
Insert at the end of the safety section.
---Apparater som er koplet til beskyttelsesjord
via nettplugg og/eller via annet jordtilkoplet
utstyr – og er tilkoplet et koaksialbasert kabelTV nett, kan forårsake brannfare. For å unngå
dette skal det ved tilkopling av apparater til
kabel-TV nett installeres en galvanisk isolator
mellom apparatet og kabel-TV nettet.
This text appears in the SV_SE (Swedish)
language only.
Insert at the end of the safety section.
---• Apparater som är kopplade till skyddsjord
via jordat vägguttag och/eller via
annanutrustning och samtidigt är kopplad
till kabel-TV nät kan i vissa fall medfőra
risk főr brand. Főr att undvika detta skall
vid anslutning av apparaten till kabelTV nät galvanisk isolator fi nnas mellan
apparaten och kabel-TV nätet.
Screen care
•
•
•
•
•
Avoid stationary images as much as
possible. Stationary images are images
that remain on-screen for extended
periods of time. Examples include:
on-screen menus, black bars and time
displays. If you must use stationary
images, reduce screen contrast and
brightness to avoid screen damage.
Unplug the TV before cleaning.
Clean the TV and frame with a soft,
damp cloth. Never use substances such as
alcohol, chemicals or household cleaners
on the TV.
Risk of damage to the TV screen! Never
touch, push, rub or strike the screen with
any object.
To avoid deformations and color fading,
wipe off water drops as soon as possible.
Disposal of your old product and
batteries
Your product is designed and manufactured
with high quality materials and components,
which can be recycled and reused.
When this crossed-out wheeled bin symbol
is attached to a product it means that the
product is covered by the European Directive
2002/96/EC. Please inform yourself about the
local separate collection system for electrical
and electronic products.
Please act according to your local rules and
do not dispose of your old products with your
normal household waste.
Correct disposal of your old product helps to
prevent potential negative consequences for
the environment and human health.
EN
Eng lis h
•
Your product contains batteries covered by
the European Directive 2006/66/EC, which
cannot be disposed with normal household
waste.
Please inform yourself about the local rules
on separate collection of batteries because
correct disposal helps to prevent negative
consequences for the environmental and
human health.
EN
Guest menu
Eng lis h
3 TV overview
This section gives you an overview of
commonly used TV controls and functions and
the Guest Menu.
GUEST MENU
FULLSCREEN
ON
ENGLISH
ENGLISH
OFF
PICTURE FORMAT
SUBTITLE
SUBTITLE LANGUAGE
AUDIO LANGUAGE
SLEEPTIMER
Side controls
4
3
MENU
2
Access the guest menu with
PBS setup remote control
1
POWER
RECALL
TEXT
a
SMART
SLEEP
CC
POWER : Switches the product on
or off. The product is not powered
off completely unless it is physically
unplugged.
GUEST
DCM
GUEST
b P/CH +/-: Switches to the next or
previous channel.
SETUP
1
2
3
4
5
6
7
8
0
RESET
c MENU: Accesses the home menu.
M
+
1
2
3
CH
M
A/CH
_
d VOLUME +/-: Increases or decreases
volume.
9
GUIDE
+
+
Switch on the TV and select a TV
channel.
Set the switch at the side of the remote
control to GUEST.
Press M to display the guest menu.
» The guest menu is displayed.
EN
Access the guest menu with
guest remote control
MENU
1
2
10
Switch on the TV and select a TV
channel.
Press MENU to display the guest menu.
» The guest menu is displayed.
EN
Access the setup menu with PBS
setup remote control
POWER
RECALL
TEXT
On-screen menus help you setup and install
channels on the TV, change settings, and access
different features. This section describes how to
access the menus and configure the TVs.
When the security level is [STANDARD], you
can access the PBS setup menu with the PBS
setup remote control or the guest remote
control.
When the security level is [HIGH], you must
use the PBS setup remote control to access the
PBS setup menu.
SETUP
ENGLISH
UK
>
>
>
>
>
>
>
>
SMART
SLEEP
CC
GUEST
DCM
SETUP
SETUP
1
2
3
4
5
6
7
8
M
2
3
CH
M
A/CH
_
1
9
GUIDE
0
RESET
+
LANGUAGE
COUNTRY
COMMUNICATION
NO. OF PROGRAMS
AUTO INSTALL
PROGRAM INSTALL
CONFIGURATION
CLOCK SETUP
CLONING/UPGRADE
HEALTHCARE
Eng lis h
4 Access and use
the setup menu
+
+
Switch on the TV and select a TV
channel.
Set the switch at the side of the remote
control to SETUP.
Press M to display the setup menu.
» The setup menu is displayed.
Access the setup menu with guest
remote control
EN
11
1
2
Switch on the TV and select a TV
channel.
Press ‘319753’ followed by (Mute)
within 10 seconds.
» The setup menu is displayed.
Navigate the setup menu
Set the type of
communication
You must set the correct communication
protocol to work with an external system.
1
2
To navigate the setup menu,
• Press
on the remote control to select
a menu.
• Press to configure or modify the
settings of the selected function.
• Press M on the PBS setup remote control
or MENU on the guest remote control to
return to the previous menu.
You can choose a language for the on-screen
display on your TV.
•
Enter the setup menu.
Press to select a language.
» The setup menu is displayed in the
selected language.
Note
• You can choose [ENGLISH], [FRANCAIS],
•
•
Select the country
•
Select the country where you are installing the
TV.
1
2
12
Enter the setup menu.
Press
EN
to select the country.
to select [COMMUNICATION].
COMMUNICATION
3
[DEUTSCH], or [ITALIANO] as your
preferred language.
Press
COMMUNICATION
STORE
ENABLE CARD SLOT
DCM TYPE
CP
Select a language
1
2
Enter the setup menu.
•
SP-SPI
>
YES
GENERIC
YES
Press
to select the type of
communication:
[COMMUNICATION]: Select one of the
following:
• [SP-SPI], [SP-I2C], [HM-LINK]
or [SERIAL XPRESS]: Sets the
communication protocol between
the TV and an external device
connected to the TV, such as a settop box.
• [SMART RC]: Accesses PayTV
channels using remote control.
• [OFF]: Allows no communication.
[STORE]: Stores the settings. Select this
option after making all the selections.
[ENABLE CARD SLOT]: Select [YES] to
enable the smart card slot.
[DCM TYPE]: Select [GENERIC] if you
use [SP-SPI] or [SP-I2C] protocol. Select
[NO SOURCE SWITCH] if the set-top
box requires no switching.
[CP]: Select [YES] to control the panel in
system mode.
Set the number of channels for different kinds
of programs. The total number of channels for
all programs is 250.
1
2
Enter the setup menu.
Press
Cloning/upgrade and
healthcare
Eng lis h
Set the number of channels
For detailed information on cloning/upgrade
and healthcare, read the later sections of the
user manual.
to select [NO. OF PROGRAMS].
Set the clock
NO. OF PROGRAMS
TV
PAYTV
INFO
RADIO
STORE
235
4
3
15
>
This section describes how to set the time and
display the clock .
1
2
Enter the setup menu.
Press
to select [CLOCK SETUP].
CLOCK SETUP
3
4
Press
to select one of the
following programs, then press 0-9
(Numeric buttons) to set the number of
channels for the program:
• [TV]: Sets the number of TV
channels.
• [PAYTV]: Sets the number of Pay TV
channels.
• [INFO]: Sets the number of
information channels.
• [RADIO]: Sets the number of radio
channels.
Press
to select [STORE].
Auto install, program install,
and configuration
For detailed information on automatic install,
program install and configuration, read the later
sections of the user manual.
DISPLAY STANDBY
DISPLAY ON
TIME SETTING
TIME DOWNLOAD
DOWNLOAD PROGRAM
TIME OFFSET
BUZZER VOLUME
3
1
5
23:45
YES
TV 1
0
LOW
Press to configure one of the following:
• [DISPLAY STANDBY]: Sets the
brightness of the clock display, when
the TV is in standby mode. Select
[OFF] to turn off the display.
• [DISPLAY ON]: Sets the brightness
of the clock display, when the TV is
switched on. Select [OFF] to turn off
the display.
• [TIME SETTING]: Press 0-9
(Numeric buttons) to set the clock.
• [TIME DOWNLOAD]: Select [YES]
to download the time from TV
program or select [NO] to manually
set the clock.
• [DOWNLOAD PROGRAM]:
Selects the channel to download
the time from. Appears only when
you select [TIME DOWNLOAD] >
EN
13
•
•
14
EN
[YES]. Set the download program as
the startup program to achieve a fast
startup time.
[TIME OFFSET]: Sets the time
offset.
[BUZZER VOLUME]: Sets the
volume of the alarm buzzer. Select
[OFF] to switch off the buzzer.
This section describes how to configure the
advanced settings for the TV, such as the switchon settings, picture and sound settings, energy
saving, and control settings.
1
2
Enter the setup menu.
Press
to select [CONFIGURATION].
•
•
Configure the switch-on
settings
1
2
CONFIGURATION
SWITCH ON / OSD
PICTURE
SOUND
SECURITY
CONTROL
ENERGY SAVING
3
Enter the setup menu.
Press
to select [CONFIGURATION]
> [SWITCH ON / OSD].
SWITCH ON / OSD
>
>
>
>
>
>
Press
to configure the settings:
• [SWITCH ON / OSD]: Sets the
default value for settings such as
volume, channel, picture format, and
power mode. These values are used
when the TV is switched on (see
‘Configure the switch-on settings’ on
page 15).
• [PICTURE]: Configures picture
settings such as brightness, color, and
sharpness (see ‘Configure the picture
settings’ on page 18).
• [SOUND]: Configures sound
settings such as bass, balance, and
AVL (see ‘Configure the sound
settings’ on page 18).
• [SECURITY]: Sets the level of
security (see ‘Configure the security
settings’ on page 18).
[CONTROL]: Configures some
settings (see ‘Configure the control
options’ on page 20).
[ENERGY SAVING]: Sets the energy
saving mode (see ‘Select the energy
saving option’ on page 21).
WELCOME MESSAGE
SWITCH ON PROGRAM
SWITCH ON VOLUME
SWITCH ON PIC FMT
POWER ON
VOLUME INDICATOR
CHANNEL DISPLAY
CHANNEL BANNER
AUDIO / SUBTITLE
THEME TV
3
>
TV 1
30
WIDESCREEN
LAST STATUS
YES
ALL
NO
>
OFF
Press to select one of the available
options:
• [WELCOME MESSAGE]: Sets or
clears a welcome message (see ‘Set
the welcome message’ on page 16).
• [SWITCH ON PROGRAM]: Sets a
channel that is displayed when the
TV is turned on (see ‘Preset the
switch-on channel’ on page 16).
• [SWITCH ON VOLUME]: Specifies
the volume at which the TV is
turned on (see ‘Preset the switch-on
volume’ on page 16).
• [SWITCH ON PIC FMT]: Sets the
picture format that is used to display
when the TV is turned on (see
‘Preset the picture format’ on page
16).
EN
15
Eng lis h
5 Configuration
of advanced
settings
•
•
•
•
•
•
[POWER ON]: Sets the power
mode that is used when the TV is
turned on after a prolong period of
no activity (see ‘Preset the switch-on
power mode’ on page 16).
[VOLUME INDICATOR]: Sets
the display of volume indicator
(see ‘Enable or disable the volume
indicator’ on page 17).
[CHANNEL DISPLAY]: Sets the
display of channel number and the
label on the screen (see ‘Set the
channel display’ on page 17).
[CHANNEL BANNER]: Displays
the channel banner on the top of
the screen (see ‘Display the channel
banner’ on page 17).
[AUDIO / SUBTITLE]: Sets the
preferred language for audio and
subtitle (see ‘Select the preferred
audio and subtitle language’ on page
17).
[THEME TV]: Displays the ring icons
(also known as the theme) (see ‘Set
ThemeTV’ on page 17).
Set the welcome message
1
2
3
16
Enter the setup menu.
Press
to select [CONFIGURATION]
> [SWITCH ON / OSD] > [WELCOME
MESSAGE].
Press
to select one of the
following options:
• [DISPLAY]: Select [YES] to display
the welcome message. Select
[NO] to prevent the display of the
welcome message.
• [LINE 1]: The first line of welcome
message. Press
to select a
character slot and
to select an
alphanumeric character.
• [LINE 2]: The second line of
welcome message. Press
to
select a character slot and
to
select an alphanumeric character.
EN
•
[CLEAR]: Clears the welcome
message.
Note
• You can have a maximum of 20 alphanumeric
characters in each line of your welcome
message.
Preset the switch-on channel
1
2
3
Enter the setup menu.
Press
to select [CONFIGURATION]
> [SWITCH ON / OSD] > [SWITCH
ON PROGRAM].
Press to select the type and press 0-9
(Numeric buttons) to select the channel
that is displayed when the TV is turned
on.
Preset the switch-on volume
1
2
3
Enter the setup menu.
Press
to select [CONFIGURATION]
> [SWITCH ON / OSD] > [SWITCH
ON VOLUME].
Press to pre-define the volume at
which the TV is turned on.
Preset the picture format
1
2
3
Enter the setup menu.
Press
to select [CONFIGURATION]
> [SWITCH ON / OSD] > [SWITCH
ON PIC FMT].
Press to select one of the available
picture formats:
» The selected picture format is used to
display pictures when the TV is turned
on.
Preset the switch-on power mode
1
Enter the setup menu.
3
Press
to select [CONFIGURATION]
> [SWITCH ON / OSD] > [POWER
ON].
Press to select the power mode that is
used when the TV is turned on from the
AC mains power outlet:
• [LAST STATUS]: Turns on the TV in
the last used power mode.
• [ON]: Turns on the TV. The
button on the TV and the guest
remote control are enabled.
• [STANDBY]: Turns on the TV in
standby mode.
• [FORCED ON]: Turns on the TV.
The button on the TV and the
guest remote control are disabled.
Enable or disable the volume
indicator
1
2
3
Enter the setup menu.
3
1
2
3
Press to select one of the following:
• [YES]: Displays the volume indicator.
• [NO]: Prevents the display of the
volume indicator.
1
2
3
Press to set the format of channel
display:
• [NUMBER]: Displays the channel
number on the screen.
• [LABEL]: Displays the channel name
on the screen.
• [ALL]: Displays both channel number
and the name on the screen.
• [NONE]: Prevents the display of
channel information.
Press
to select [CONFIGURATION]
> [SWITCH ON / OSD] > [CHANNEL
BANNER].
Press to select one of the following:
• [YES]: Displays the channel banner
on the screen.
• [NO]: Prevents the display of the
channel banner on the screen.
Enter the setup menu.
Press
to select
[CONFIGURATION] > [SWITCH ON /
OSD] > [AUDIO / SUBTITLE].
Press
to set the audio and subtitle
language:
• [AUDIO LANGUAGE]: Sets the
audio language.
• [SUBTITLE LANGUAGE]: Sets the
subtitle language.
Note
• The default language will be selected each time
the TV is tuned to a new channel.
• The preferred language selected in Guest
Menu will override the language selected in
Setup menu until the TV restarts.
Enter the setup menu.
Press
to select [CONFIGURATION]
> [SWITCH ON / OSD] > [CHANNEL
DISPLAY].
Enter the setup menu.
Select the preferred audio and
subtitle language
Press
to select [CONFIGURATION]
> [SWITCH ON / OSD] > [VOLUME
INDICATOR].
Set the channel display
1
2
Display the channel banner
Set ThemeTV
1
2
3
Enter the setup menu.
Press
to select
[CONFIGURATION] > [SWITCH ON /
OSD] > [THEME TV].
Press
to select one of the following:
• [ON]: Displays ThemeTV when you
press OK.
• [OFF]: Prevents the display of
ThemeTV.
EN
17
Eng lis h
2
•
[DISPLAY ON STARTUP]: Displays
ThemeTV on startup and when you
press OK.
•
Configure the picture settings
1
2
3
•
Enter the setup menu.
Press
to select [CONFIGURATION]
> [PICTURE].
Press
to select one of the
following options:
• [BRIGHTNESS]: Adjusts the light
intensity or darkness.
• [COLOUR]: Adjusts the color.
• [CONTRAST]: Adjusts the contrast.
• [SHARPNESS]: Adjusts the image
sharpness.
• [TINT]: Adjusts the color balance in
an image.
• [ACTIVE CONTROL]: Select
[YES]to fine-tune the received
signals according to the lighting
conditions of the room. Select
[NO]to retain other setting.
Configure the security
settings
1
2
3
18
Enter the setup menu.
Press
to select [CONFIGURATION]
> [SOUND].
Press
to select one of the
following options:
• [EQUALIZER]: Adjusts
individual sound
frequencies.[BALANCE]:
Adjusts the balance of the
speakers.
• [MIN VOLUME]: Sets the minimum
volume.
• [MAX VOLUME]: Sets the
maximum volume.
• [AVL]: Select [ON]to reduce the
fluctuations in volume when the
EN
Enter the setup menu.
Press
to select [CONFIGURATION]
> [SECURITY].
SECURITY
SECURITY
KEYBOARD LOCK
REMOTE CONTROL LOCK
AUDIO/VIDEO OUT
USB BREAK-IN
EPG
TXT/MHEG
VTRACK
SCRAMBLING
Configure the sound settings
1
2
commercials are aired or when you
switch channels.
[SMART SETTING RC]: Select
[SMART SETTING] to select a
smart sound setting or select [SPLIT
AUDIO] to select the sound from a
different audio source.
[AUDIO SOURCE]: Selects the
audio source from a particular
connection.
3
STANDARD
ALL
YES
TUNER
YES
YES
ALL
ON
>
Press
to select one of the
following:
• [SECURITY]: Specifies the security
level (see ‘Select the security level’
on page 19).
• [KEYBOARD LOCK]: Enables
or disables local TV controls (see
‘Enable or disable the TV controls’
on page 19).
• [REMOTE CONTROL LOCK]:
Enables or disables the remote
control keys (see ‘Enable or disable
the remote control’ on page 19).
• [AUDIO/VIDEO OUT]: Disables
audio and video out signal (see
•
•
•
•
PBS setup remote control’ on page
11).
Enable or disable the TV controls
1
2
3
3
Enter the setup menu.
Press
to select [CONFIGURATION]
> [SECURITY] > [SECURITY].
Press to select one of the following
settings:
• [STANDARD]: Accesses the setup
menu using the PBS setup remote
control or the guest remote control
(see ‘Access the setup menu with
guest remote control’ on page 11).
• [HIGH]: Accesses the setup menu
using the PBS remote control only
(see ‘Access the setup menu with
Enter the setup menu.
Press
to select [CONFIGURATION]
> [SECURITY] > [KEYBOARD LOCK].
Press to select one of the following
settings:
• [ALL]: Locks all control keys on the
TV including the key.
• [YES]: Locks all control keys on the
TV excluding the key.
• [NO]: Unlocks all control keys on
the TV.
Enable or disable the remote control
1
2
3
Select the security level
1
2
Eng lis h
•
‘Enable or disable video and audio
output to a recording device’ on
page 19).
[USB BREAK-IN]: Enables or
disables the auto detection of
USB devices. Select to [YES]
automatically switch to the USB root
menu when a USB device is plugged
in. Select [NO] to disable automatic
switchover.
[EPG]: Select [YES] to enable the
EPG function and [NO] to disable
EPG.
[TXT/MHEG]: Select [TXT] to
enable teletext only. Select [ALL] to
select both teletext and MHEG or
select [NO] to disable teletext and
MHEG.
[VTRACK]: Select [YES] to enable
watermark in the PayTV channels.
Select [NO] to disable watermark in
the PayTV channels.
[SCRAMBLING]: Loads the key
required to descramble Vsecure
channels. Select [LOAD KEY TO
USB] to load the Public key to USB
and [LOAD KEY TO TV] to load
the descramble key to the television
via USB.
Enter the setup menu.
Press
to select [CONFIGURATION]
> [SECURITY] > [REMOTE CONTROL
LOCK].
Press to select one of the following
settings:
• [YES]: Disables all standard remote
control functions.
• [NO]: Enables all standard remote
control functions.
Note
• The PBS setup remote control cannot be
locked.
• You can access the PBS Setup Menu even if
you lock the remote control.
Enable or disable video and audio
output to a recording device
1
2
Enter the setup menu.
Press
to select
[CONFIGURATION] > [SECURITY]
> [AUDIO/VIDEO OUT]. Select one of
the following options:
EN
19
•
•
•
[TUNER]: Sends the audio/ video
output from the tuner to another TV
that is connected to your TV.
[MONITOR]: Sends the audio/ video
output from a monitor to another
TV that is connected to your TV.
This is not available when input signal
is protected with Vsecure, HDCP
and Macrovision.
[MUTE]: Disables the audio/ video
output from all the sources.
•
•
Configure the control
options
1
2
•
Enter the setup menu.
•
Press
to select [CONFIGURATION]
> [CONTROL].
•
•
CONTROL
AUDIO / VIDEO MUTE
SCRAMBLED CHANNEL
STEP TUNING
DIGIT TIMEOUT
3-DIGIT TUNING
AUTO SCART
ALWAYS RGB
RING MAX
CEC
3
20
YES
YES
YES
0.0
YES
YES
AUTO
15
>
Press
to select one of the
following options:
• [AUDIO / VIDEO MUTE]: Select
[YES] to mute the source audio and
video.
• [SCRAMBLED CHANNEL]: Select
[YES] to install the scrambled
channels during automatic
installation or [NO] to skip the
scrambled channels during automatic
installation.
• [STEP TUNING]: Select [YES] to
enable tuning of single digit channels
EN
or select [NO] to enable the tuning
of double digit channels.
[DIGIT TIMEOUT]: Set a time
between 1 - 9.9 seconds for a
channel to switch to another channel.
Do not select [DIGIT TIMEOUT] to
be too short if you want to enable
the tuning of two digit or three digit
channel numbers.
[3-DIGIT TUNING]: Select [YES]
to enable the tuning of three digit
channels. Select [NO] to enable the
tuning of only two-digit channels.
[AUTO SCART]: Enables or disables
the automatic detection of SCART
signal (see ‘Automatic detection of
SCART signal’ on page 20).
[ALWAYS RGB]: Enables or disables
RGB insertion (see ‘Insert RGB’ on
page 21).
[RING MAX]: Sets the maximum
number of rings.
[CEC]: Enables or disables HDMI
CEC features such as one touch play,
system standby and RC passthrough.
Automatic detection of SCART signal
1
2
3
Enter the setup menu.
Press
to select [CONFIGURATION]
> [CONTROL] > [AUTO SCART].
Press
to select one of the
following options:
• [AV1]: Switches to AV1 automatically
when a SCART cable is connected to
the AV1 (EXT 1) connector.
• [AV2]: Switches to AV2 automatically
when a SCART cable is connected to
the AV2 (EXT 2) connector.
• [ALL]: Switches to the correct
source when a SCART signal is
detected on any connector.
• [POWER SCART]: Wakes up the
TV automatically from standby when
a SCART signal is detected. Switches
3
•
Insert RGB
1
2
3
Enter the setup menu.
Press
to select [CONFIGURATION]
> [CONTROL] > [ALWAYS RGB].
Press
to select one of the
following options:
• [AV1]: Allows RGB insertion in AV1
(EXT 1) and other sources.
• [AUTO]: Allows RGB
insertion in any source when
[COMMUNICATION] in the setup
menu is selected as [SP-SPI] or
[SP-I2C]. Otherwise, allows RGB
insertion in AV1 (EXT 1) only.
• [NO RGB]: Prevents RGB insertion
in any source.
• [NO]: Allows RGB insertion in AV1
(EXT 1) only.
•
•
Press
to set the energy saving
options:
[LOW POWER STANDBY]: Defines the
power consumption for the TV when it is
in standby mode:
• [GREEN]: Achieves minimum power
consumption. [COMMUNICATION]
is disabled in this mode.
• [FAST]: Achieves fast power up.
• [CLOCK]: Achieves low power
consumption when the clock is
displayed and [COMMUNICATION]
is enabled.
[ESP]: Set a time from 1 - 99 hours to
enable ESP. If the TV does not receive any
command for this time period, it enters
the standby mode to save energy. Select
[OFF] to disable ESP.
[SMART POWER]: Selects a power
saving mode. Select [HIGH] for
maximum power savings. Select
[MEDIUM] and [LOW] for less power
savings. Select [OFF] to disable the
power saving mode.
Select the energy saving
option
1
2
Enter the setup menu.
Press
to select [CONFIGURATION]
> [ENERGY SAVING].
ENERGY SAVING
LOW POWER STANDBY
ESP
SMART POWER
CLOCK
2
LOW
EN
21
Eng lis h
•
automatically to standby when the
SCART signal is removed.
[NO]: Disables automatic detection
of SCART signal.
6 Automatically
install the
channels
This section describes how to install the TV
channels automatically.
1
2
Enter the setup menu.
Press
to select [AUTO INSTALL].
AUTO INSTALL
DVB-C
DVB-T
ANALOG
START
3
>
>
>
>
Press
to select one of the
following:
• [DVB-C]: Installs DVB-C channels.
The [FULL SCAN] searches all
frequency spectrum and takes
approximately 2 hours. Filling
in [MODULATION] type and
[SYMBOL RATE] will speed up auto
installation.[QUICK SCAN] takes a
few minutes but it needs additional
parameters such as [NID] and
[NETWORK FREQUENCY].
• [DVB-T]: Installs DVB-T channels.
• [ANALOG]: Installs analog channels.
• [START]: Starts the automatic
installation of channels.
Note
• The complete installation takes a few minutes
and up to 2 hours if DVB-C Full Scan is
enabled. When complete, the first tuned
channel appears on the TV.
22
EN
3
This section describes how to install the TV
channels manually.
1
2
1
2
3
Enter the setup menu.
Press
to select [PROGRAM INSTALL].
Press
to manually install the channels.
PROGRAM INSTALL
PROGRAM NO.
INPUT
SYSTEM
FREQUENCY
STORE
CHANNEL OPTIONS
RINGS
4
Press
TV 1
TUNER
UK
123.4567>
>
>
>
1
2
3
4
Enter the setup menu.
Press
to select [PROGRAM
INSTALL] > [PROGRAM NO.].
Press to select the type of channel
that you want to install: [TV],
[PAYTV],[INFO], or [RADIO].
Press 0-9 (Numeric buttons) to select a
channel.
Step 2: Select the type of
input
1
2
Step 3: Select the system
3
Enter the setup menu.
Press
to select [PROGRAM
INSTALL] > [INPUT].
Enter the setup menu.
Press
to select [PROGRAM
INSTALL] > [SYSTEM].
Press
to select the system.
Step 4: Select the frequency
1
2
3
to select a setting.
Step 1: Select a program
Press to select the input source of
selected program.
Eng lis h
7 Manually install
the channels
Enter the setup menu.
Press
to select [PROGRAM
INSTALL] > [FREQUENCY].
Press 0-9 (Numeric buttons) to enter a
frequency or press to start the search
of a channel.
» If the specified channel is not found,
the system searches for the next
available channel.
Step 5: Customize the TV
channels
1
2
Enter the setup menu.
Press
to select [PROGRAM
INSTALL] > [CHANNEL OPTIONS],
then select one of the following:
• [LABEL]: Labels a channel (see ‘Label
a channel’ on page 24).
• [FINE TUNE]: Fine tunes the
channel.
• [TELETEXT LANGUAGE]: Selects a
teletext language.
• [MUTE]: Mutes the audio or video in
the channel (see ‘Mute a channel’ on
page 24).
• [PROTECTION]: Select [YES] to
lock the channel or [NO] to unlock a
locked channel.
EN
23
3
to select [STORE].
Press
Note
• [CHANNEL OPTIONS] is available only when
you select [PROGRAM INSTALL] > [INPUT]
> [TUNER].
2
3
Label a channel
1
2
Enter the setup menu.
Press
to select [PROGRAM
INSTALL] > [CHANNEL OPTIONS] >
[LABEL].
CHANNEL OPTIONS
LABEL
FINE TUNE
TELETEXT LANGUAGE
MUTE
PROTECTION
(CNN_ _ _ _ _ ) >
0
UK
NONE
NO
4
1
2
4
4
5
6
Press
to select a slot to enter a
character.
» A flashing red mark underlines the
selected slot.
Press
to select a character.
Repeat steps 3 and 4 until you finish
naming the channel.
Press
to select [STORE].
Note
• The channel name can have a maximum of
nine characters.
Press
to select one of the following:
• [AUDIO]: Mutes the audio in the
channel.
• [VIDEO]: Mutes the the video in the
channel.
• [NONE]: Does not mute the sound
from the audio or video source in
the channel.
Press
5
6
7
Enter the setup menu.
Select the channel that you want to
include in a ring.
Press
to select [PROGRAM
INSTALL] > [RINGS].
Press
to select the preferred ring
of channels.
» A flashing red dash appears next to
the selected list.
Press OK on the guest remote control to
select or deselect a list.
» The selected list is marked by an “X”.
Press M on the setup RC or MENU on
the guest RC to return to the previous
menu.
Press
to select [PROGRAM
INSTALL] > [STORE].
Note
• Rings R13 - R15 are reserved for certain
channels.
Mute a channel
1
Enter the setup menu.
24
EN
to select [STORE].
Step 6: Select a ring of
channels
3
3
Press
to select [PROGRAM
INSTALL] > [CHANNEL OPTIONS] >
[MUTE].
1
This section describes how to clone the TV
configuration data and download software.
•
1
2
2
3
4
Enter the setup menu.
Press
to select [CLONING/
UPGRADE].
CLONING/UPGRADE
CLONING
SW DOWNLOAD
RESET
>
>
>
•
•
Insert the USB storage device into the
USB connector of your TV.
Eng lis h
8 Clone data
and upgrade
software
Enter the setup menu.
Press
to select [CLONING/
UPGRADE] > [CLONING].
Press to select one of the following
options:
[OPTIONS]: Selects the data to clone.
• [ALL]: Clones all data. This option
requires the longest time.
• [SETTINGS]: Clones TV settings and
channels list only. Select this option
if you do not need to clone icons. It
requires a shorter time.
• [THEMETV IMAGE]: Clones Theme
TV icons.
• [MOVIE BAR IMAGE]: Clones
Movie Bar icons.
[USB TO TV]: Clones the data from a
USB storage device to a TV.
[TV TO USB]: Clones the data from a TV
to a USB storage device.
Note
3
Press to select one of the following
options:
• [CLONING]: Clones data from a
USB storage device to a TV or a TV
to a USB storage device.
• [SW DOWNLOAD]: Downloads
software from a USB storage device
or an RF channel.
• [RESET]: Resets to setup menu
default settings (including channels
list).
Clone data
You can copy the configuration data from a
TV to a USB storage device or vice versa. This
enables the installer to bypass the PBS setup
menu and configure multiple TVs by simply
using the USB storage device.
• Do not remove the USB storage device during
cloning.
• All standard remote control functions and TV
controls are disabled during cloning.
Tip
• Switch off the TV after cloning and restart it
for the changes to take effect.
Download software
You can download software upgrades or TV
settings from a USB storage device or an RF
channel.
1
2
Enter the setup menu.
Press
to select [CLONING/
UPGRADE] > [SW DOWNLOAD].
EN
25
3
•
•
•
•
•
Press to set the source and type of the
software download:
[SOURCE]: Select [USB] or [RF] as the
source of download.
[SW TYPE]: Select one of the following
types of software for download:
• [SSB NVM]: Downloads SSB NVM
software.
• [SSB FIRMWARE]: Downloads
digital software such as MPEG 2 and
MPEG 4.
• [8051 FIRMWARE]: Downloads the
TV startup data.
• [IBOARD NVM]: Downloads the TV
settings.
• [IBOARD FIRMWARE]: Downloads
iboard software.
• [ALL]: Downloads all the software
upgrades.
[PROGRAM NO.]: Selects the RF
channel to download the software from.
This is available only when you select
RF as the source of download. Press 0-9
(Numeric buttons) to select the channel.
[RF TO TV]: Downloads the software
from an RF channel to the TV. This is
available only when you select RF as the
source of download.
[USB TO TV]: Downloads the software
from a USB storage device to the TV.
This is available only when you select USB
as the source of download. Executes also
via the F button on the setup remote
control.
Note
• Do not remove the USB storage device during
cloning.
• All standard remote control functions and TV
controls are disabled during cloning.
26
EN
This section describes how to select some of
the features that are used in the healthcare
industry.
1
2
•
to a remote control of one of those
colors.
[REMOTE COLOUR]: Configures
the TV to respond to the remote
control of a particular color.
Enter the setup menu.
Press
to select [HEALTHCARE].
HEALTHCARE
LOUD SPEAKER MUTE
MULTI RC
REMOTE COLOUR
3
EASYLINK
ON
YELLOW
Press to select one of the following
options:
• [LOUD SPEAKER MUTE]: Select
[YES] to mute the TV speakers
or select [NO] to enable the TV
speakers. Select [EASYLINK] to
enable the speakers of the easylink
compliant device connected to the
TV.
• [MULTI RC]: Enables or disables
Multi RC. Select [ON] to enable
Multi RC or select [OFF] to disable
multi RC. Multi RC enables you
to watch upto four TVs in a room
without any interference from each
other’s remote controls. When Multi
RC is enabled, each TV responds
to a remote control that is set
to the same color that the TV is
programmed to. Each of the remote
controls must be programmed to
one of the four colors - blue, yellow,
green or red. Each TV must be
separately programmed to respond
EN
27
Eng lis h
9 Healthcare
10Connect devices
Back connectors
VGA IN
This section describes how to connect
various devices with different connectors and
supplements examples provided in the Quick
Start.
DATA 1
2
DATA 2
4
Note
• Different types of connectors may be used to
connect a device to your TV, depending on
availability and your needs. A comprehensive
interactive guide to help you connect your
product is available at www.connectivityguide.
philips.com.
1
3
5
12
11
SERV.U
10
9
SPDIF
OUT
EXT 3
EXT 2
(CVBS)
EXT 1
(RGB/CVBS)
AUDIO OUT
AUDIO IN
6
7
HDMI 2 HDMI1
AUDIO IN :
LEFT/ RIGHT
HDMI1/ DVI
HDMI2/ DVI
8
VGA IN
Video input from a computer.
a DATA 1 and DATA 2
Pay-Per-View terminal connection.
b
1/8 inch mini-jack connection to a
bathroom speaker or a healthcare
pendant control (also known as pillow
speaker).
c Software Update
28
EN
e HDMI 1/ HDMI 2
Digital audio and video input from highdefinition digital devices such as Blu-ray
players.
AUDIO OUT L/R
Analog audio output to home theaters
and other audio systems.
SERV. U
For Serial Express communication and
use by service personnel.
SPDIF OUT
Digital audio output to home theaters
and other digital audio systems.
f EXT 3 (Y Pb Pr and AUDIO IN L/R )
Analog audio and component video input from
analog or digital devices such as DVD players or
game consoles.
Note
• Do not use VGA IN and EXT 3 at the same
time.
Side connectors
Eng lis h
d EXT 1 (RGB/CVBS) and EXT 2 (CVBS)
Analog audio and video input from analog
or digital devices such as DVD players or
game consoles.
TV ANTENNA
Signal input from an antenna, cable or
satellite.
AUDIO IN
Audio input from devices that require
a separate audio connection, such as a
computer.
1
2
3
4
5
6
7
a
((Headphone)
Stereo audio output to headphones or
earphones.
b AUDIO L/R
Audio input from analog devices
connected to VIDEO.
c VIDEO
Composite video input from analog
devices such as VCRs.
d S-VIDEO
S-Video (side) to be used with Audio L/R
connectors for camcorder, game console,
etc. When you use the S-Video (side) for
video signals, do not use the Composite
video (side) input for video signals.
e USB
Data input from USB storage devices.
f HDMI
Digital audio and video input from highdefinition digital devices such as Blu-ray
players.
g COMMON INTERFACE
Slot for a Conditional Access Module (CAM).
EN
29
Use a Conditional Access
Module
Access CAM services
A Conditional Access Module (CAM) is
provided by digital TV service operators to
decode digital TV channels.
2
Note
• If required, refer to documentation from your
operator on how to insert a smart card into
the Conditional Access Module.
1
After inserting and activating the CAM,
enter the setup menu.
Press
to select
[CONFIGURATION] > [SECURITY] >
[CI CARD] > [YES].
» Applications provided by the digital TV
service operator appear on the screen.
Note
• This menu option is available only if the CAM
is inserted and activated correctly.
Insert and activate a CAM
Caution
• Be sure to follow the instructions described
below. Wrong insertion of a CAM may
damage both the CAM and your TV.
1
2
3
4
5
30
Switch off the TV and disconnect it from
the power outlet.
Following the directions printed on the
CAM, gently insert the CAM into the
COMMON INTERFACE at the side of
the TV.
Push the CAM in as far as it will go.
Reconnect the TV to the power outlet.
Turn on the TV and wait for the CAM
to be activated. This may take several
minutes. Do not remove the CAM from
the slot when in use — removing the
CAM will deactivate digital services.
EN
Use a Kensington lock
There is a Kensington security slot at the back
of the TV. Prevent theft by looping a Kensington
lock between the slot and a permanent object,
such as a heavy table.
Product information is subject to change
without notice. For detailed product
information, go to www.philips.com/support.
Tuner/Reception/
Transmission
•
•
•
•
Supported display resolutions
Computer formats
• Resolution - refresh rate:
• 640 x 480 - 60Hz
• 800 x 600 - 60Hz
• 1024 x 768 - 60Hz
• 1280 x 1024 - 60Hz (HDMI only)
• 1360 x 768 - 60Hz
• 1920 x 1080 - 60Hz (HDMI only)
Video formats
• Resolution - refresh rate:
• 720 x 480p @60Hz
• 720(1440) x 480i @60Hz
• 720 x 576p @50Hz
• 720(1440) x 576i @50Hz
• 1280 x 720p @ 60Hz
• 1280 x 720p @50Hz
• 1920 x 1080i@50Hz, 60Hz
• 1920x 1080p@24Hz, 25Hz , 30Hz,
50Hz, 60Hz
Power
•
•
•
•
•
•
•
Mains power: 90-270V, 50Hz
Standby power: < 1W with LCD clock
display.
Ambient temperature: 5 to 40 degrees
Celsius
Power
•
•
•
•
Multimedia
Antenna input: 75ohm coaxial (IEC75)
TV system: DVB-T; PAL I/BG/DK; SECAM
BG/DK/I/ L/L’
Video playback: NTSC M/4.43; SECAM;
PAL BG/M/N/60
Tuner Bands: Hyperband, S-channel, UHF,
VHF
Speaker diversity: 10W/ 6 Ohms
Internal speaker RMS power:
• Impedance: 6 Ohm
• Power: 2 x 10W
• Audio response: -3dB, >12.5 KHz
Headphone:
• Impedance: 16 Ohm
• Power: 2 x 50mW
Bathroom amplifier:
• Impedance: 8 Ohm
• Power: 1W
Supported storage device: USB1.1 and
USD 2.0 memory class device
Supported audio format: MP3
Supported image format: JPEG (.jpg)
Supported slideshow format: Philips
Album Format (.alb)
EN
31
Eng lis h
11Product
information
12Troubleshooting
This section describes commonly encountered
issues and accompanying solutions.
TV power on/ off issues
The TV does not power on:
•
Ensure that the TV is connected to the
AC mains power outlet. If it does not
power on, pull the plug out of the power
outlet, wait for 60 seconds, plug it back
and turn the TV on again.
The TV does not respond:
•
Check that the TV controls are not
locked. Use PBS setup remote control to
access the PBS setup menu and unlock all
TV control keys (see ‘Enable or disable
the TV controls’ on page 19).
•
If you are using the guest remote control,
check that the remote control is not
locked. Use PBS setup remote control to
access the PBS setup menu and enable
the guest remote control (see ‘Enable or
disable the remote control’ on page 19).
The TV turns off by itself:
•
Check the ESP setting and increase the
time if you want the TV to stay on for
longer duration (see ‘Select the energy
saving option’ on page 21).
The TV cannot be turned off:
•
Check if the power mode has been set to
[FORCED ON]. If it is set to [FORCED
ON], select a different setting (see
‘Preset the picture format’ on page 16).
No access to PBS setup menu
The PBS setup mode cannot be accessed using
the guest remote control:
Check that the high-security mode has
•
been turned off. Use the PBS setup
32
EN
remote control to access the PBS setup
menu to allow the use of guest remote
control (see ‘Select the security level’ on
page 19).
The PBS setup mode cannot be accessed using
the PBS setup remote control:
•
Check that the switch at the side of the
PBS setup remote control is set to the
SETUPposition (see ‘Access the setup
menu with PBS setup remote control’ on
page 11).
Picture issues
The TV is on, but there is no picture:
•
Check that the antenna or the cable is
connected properly to the TV.
•
Check that source device and
communication protocols are selected
correctly.
The TV is on, but picture quality is not good:
Check the antenna, cable or set-top box
•
connections to the TV and ensure that
they are properly connected.
•
Check that the picture settings are
correct for your TV and the source
device.
•
Do not connect the VGA input and the
EXT3 input to the TV at the same time.
Sound issues
The is picture but no sound:
•
Check that all the cables are properly
connected.
•
Check if the audio is muted. If it is muted,
enable audio on the channel (see ‘Mute a
channel’ on page 24).
•
Check that the audio source is selected
correctly (see ‘Configure the sound
settings’ on page 18).
•
If the TV is connected to a DVD player
using HDMI connection, make sure that
If the problem remains unresolved, contact
Philips Consumer Care in your country as
listed in the Addendum.
Eng lis h
•
the digital ouput of the DVD player is set
to PCM mode.
Check that the [MIN VOLUME] is not
set to zero (see ‘Configure the sound
settings’ on page 18).
Warning
• Do not attempt to repair the product yourself.
Communication issues
The TV does not communicate with the
external device:
•
Select the correct communication source.
•
Check that the card slot is enabled, if you
want to use the system/smart card.
Guest RC does not work
The guest remote control does not work:
•
Change the batteries if they are weak or
old.
•
Check the orientation of the batteries
and make sure that they are inserted in
accordance with the +/- orientation.
•
If the remote control is locked, unlock the
remote control (see ‘Enable or disable
the remote control’ on page 19).
This may cause severe injury, irreparable
damage to your product or void your
warranty.
Note
• Make a note of your TV model and serial
number before you contact Philips. These
numbers are printed on the back of the TV
and on the packaging.
This text appears in the PL_PL (Polish)
language only.
Insert at the end of the troubleshooting
section.
--Uwaga
• W odbiorniku wysokie napięcie! Przed
zdjęciem obudowy wyjqć wtyczkę z gniazda
sieciowego!
Other issues
The character ‘F’ appears on screen:
•
This means that the TV is in factory
mode. Press MENU at the side of the
TV for a few seconds to reset the TV to
normal mode.
Contact us
If you cannot resolve your problem, refer to
the FAQs for this product at www.philips.
com/support.
EN
33
13Index
E
A
Audio/video out
Auto SCART
19
20
Energy saving
ESP
H
C
CAM
Card slot
Channel
Channel banner
Channel display
Lock a channel
Mute a channel
Name a channel
Rings of channels
Scrambled channel
Set the number of channels
Switch-on channel
Clock settings
Buzzer volume
Display clock
Download time
Set time
Cloning
Clone data from TV to USB
Clone data from USB to TV
Communication
Conditional Access Module
Configure settings
Clock settings
Control settings
Energy saving
Healthcare settings
Picture settings
Security settings
Sound settings
Switch-on settings
Control settings
Controls
D
Display resolutions
34
Download software
Download time
EN
30
12
17
17
23
24
24
24
20
13
16
13
13
13
13
25
25
12
30
13
20
21
27
18
18
18
15
20
9
31
Healthcare settings
25
13
21
21
27
I
Install channels
Automatic installation
Manual installation
K
Kensington lock
Keyboard lock
22
23
30
19
L
Language
Menu language
Teletext language
Loud speaker mute
Low power standby
12
23
27
21
M
Menus
Navigate the menu
Multi RC
P
Picture settings
Power
ESP
Low power standby
Power mode
Power specifications
Smart power
R
Remote control
12
27
18
21
21
16
31
21
S
Screen care
Security settings
High security
Keyboard lock
RC lock
Standard security
Smart power
Sound settings
Switch-on settings
Audio language
Channel banner
Channel display
Power mode
Subtitle language
Switch-on channel
Switch-on picture format
Switch-on power
Switch-on volume
TV theme
Volume indicator
Welcome message
T
Troubleshooting
11
27
11
19
27
21
24
Eng lis h
Guest RC
Multi RC
PBS setup RC
RC lock
Remote control color
RGB insertion
Rings of channels
7
19
19
19
19
21
18
17
17
17
16
17
16
16
16
16
17
17
16
32
EN
35
38
© 2008 Koninklijke Philips Electronics N.V.
All rights reserved.
Document order number: 000000000000